
I’ve done a fair bit of AR builds and mods over the years culminating with a flurry of them this summer. I’ve used an old plastic clam shell upper receiver block, and for the most part it’s been fine. I’ve occasionally run into an upper profile that doesn’t fit the block though, and more recently had a couple barrels that must have been torqued on by gorillas. I could see the aluminum upper flexing in the vise and backed off before I damaged something.
I started looking around at other options and came across various reaction rods. These are basically heavy steel rods that slide through the rear of the receiver and lock into the locking lugs of the barrels receiver extension. That way you’re putting the stress on the steel barrel extension rather than the aluminum upper.
There are a number of different companies making these, but when I got an e-mail from Otis Technology for their Pro+ AR-15 Lock Block I decided to jump on it and give theirs a try. I’ve worked with a lot of Otis gear over the years and always been happy with thought that went into their designs and the value of the products so I reached out to Otis and got one headed my way.
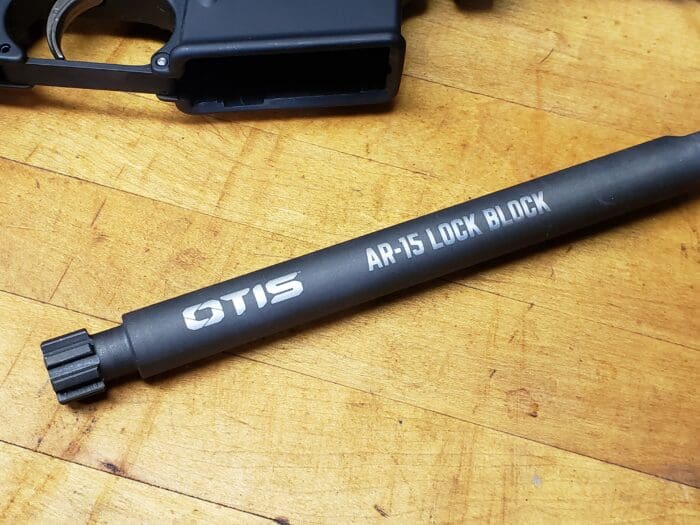
The Pro+ AR-15 Lock Block
Let’s take a look at what Otis has to say about the Lock Block, then I’ll go into some personal observations from my experiences.
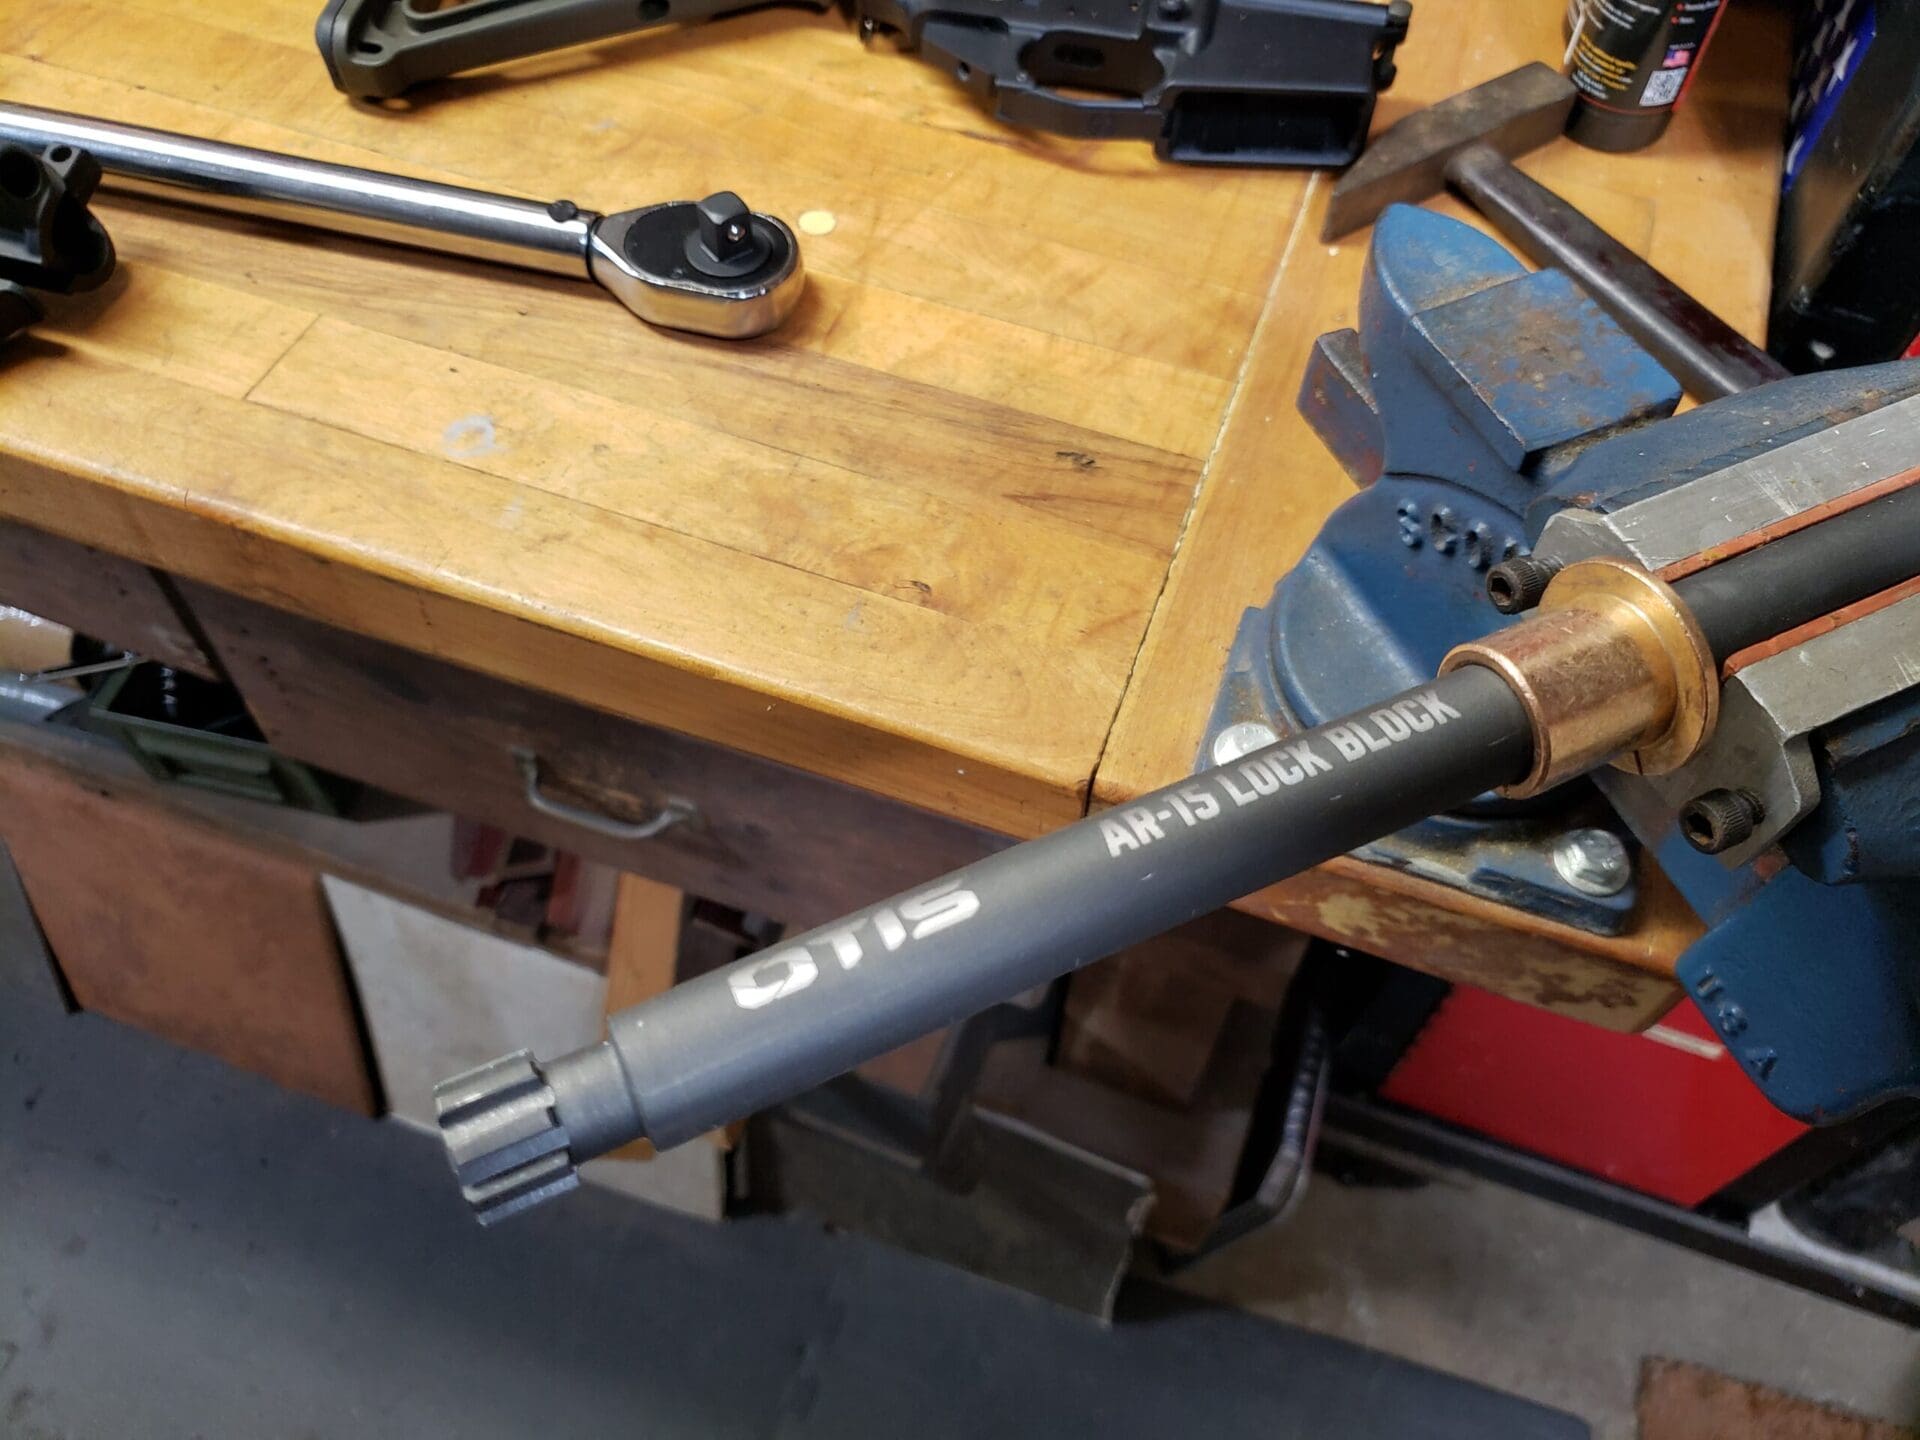
The Otis Technology Pro+ AR-15 Lock Block is designed to make the removal and installation of barrels and even hand guards quicker, while also allowing you to tackle stuck barrel nuts with ease. Held in a standard bench vise, the AR-15 Lock Block locks into the barrel extension, securing it from twisting and minimizing the chance of marring. Give it all the elbow grease your project needs, the AR Lock Block has you covered.
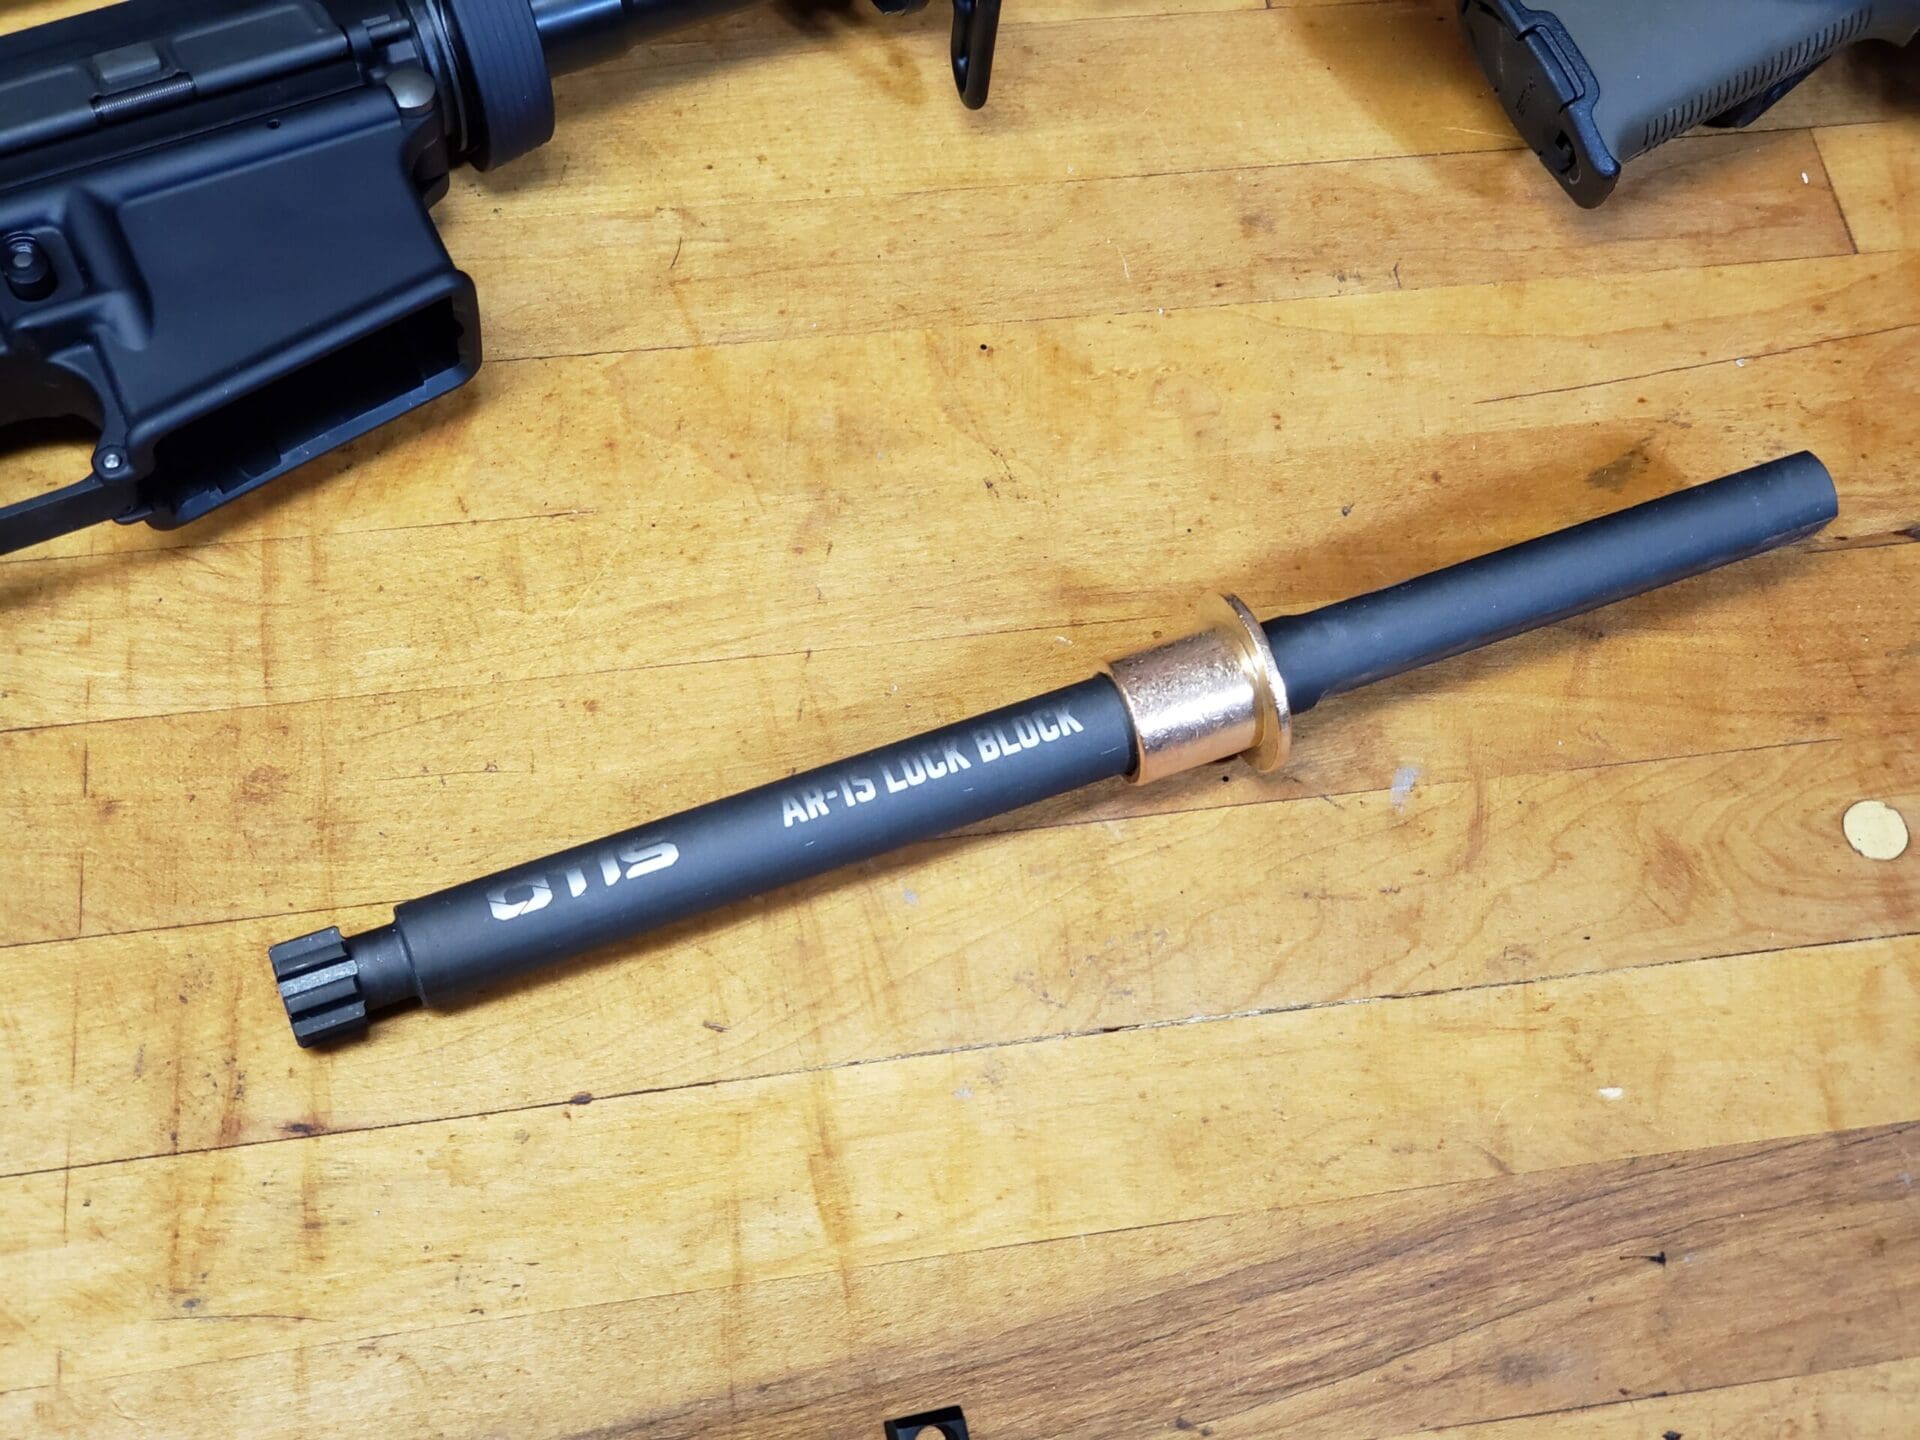
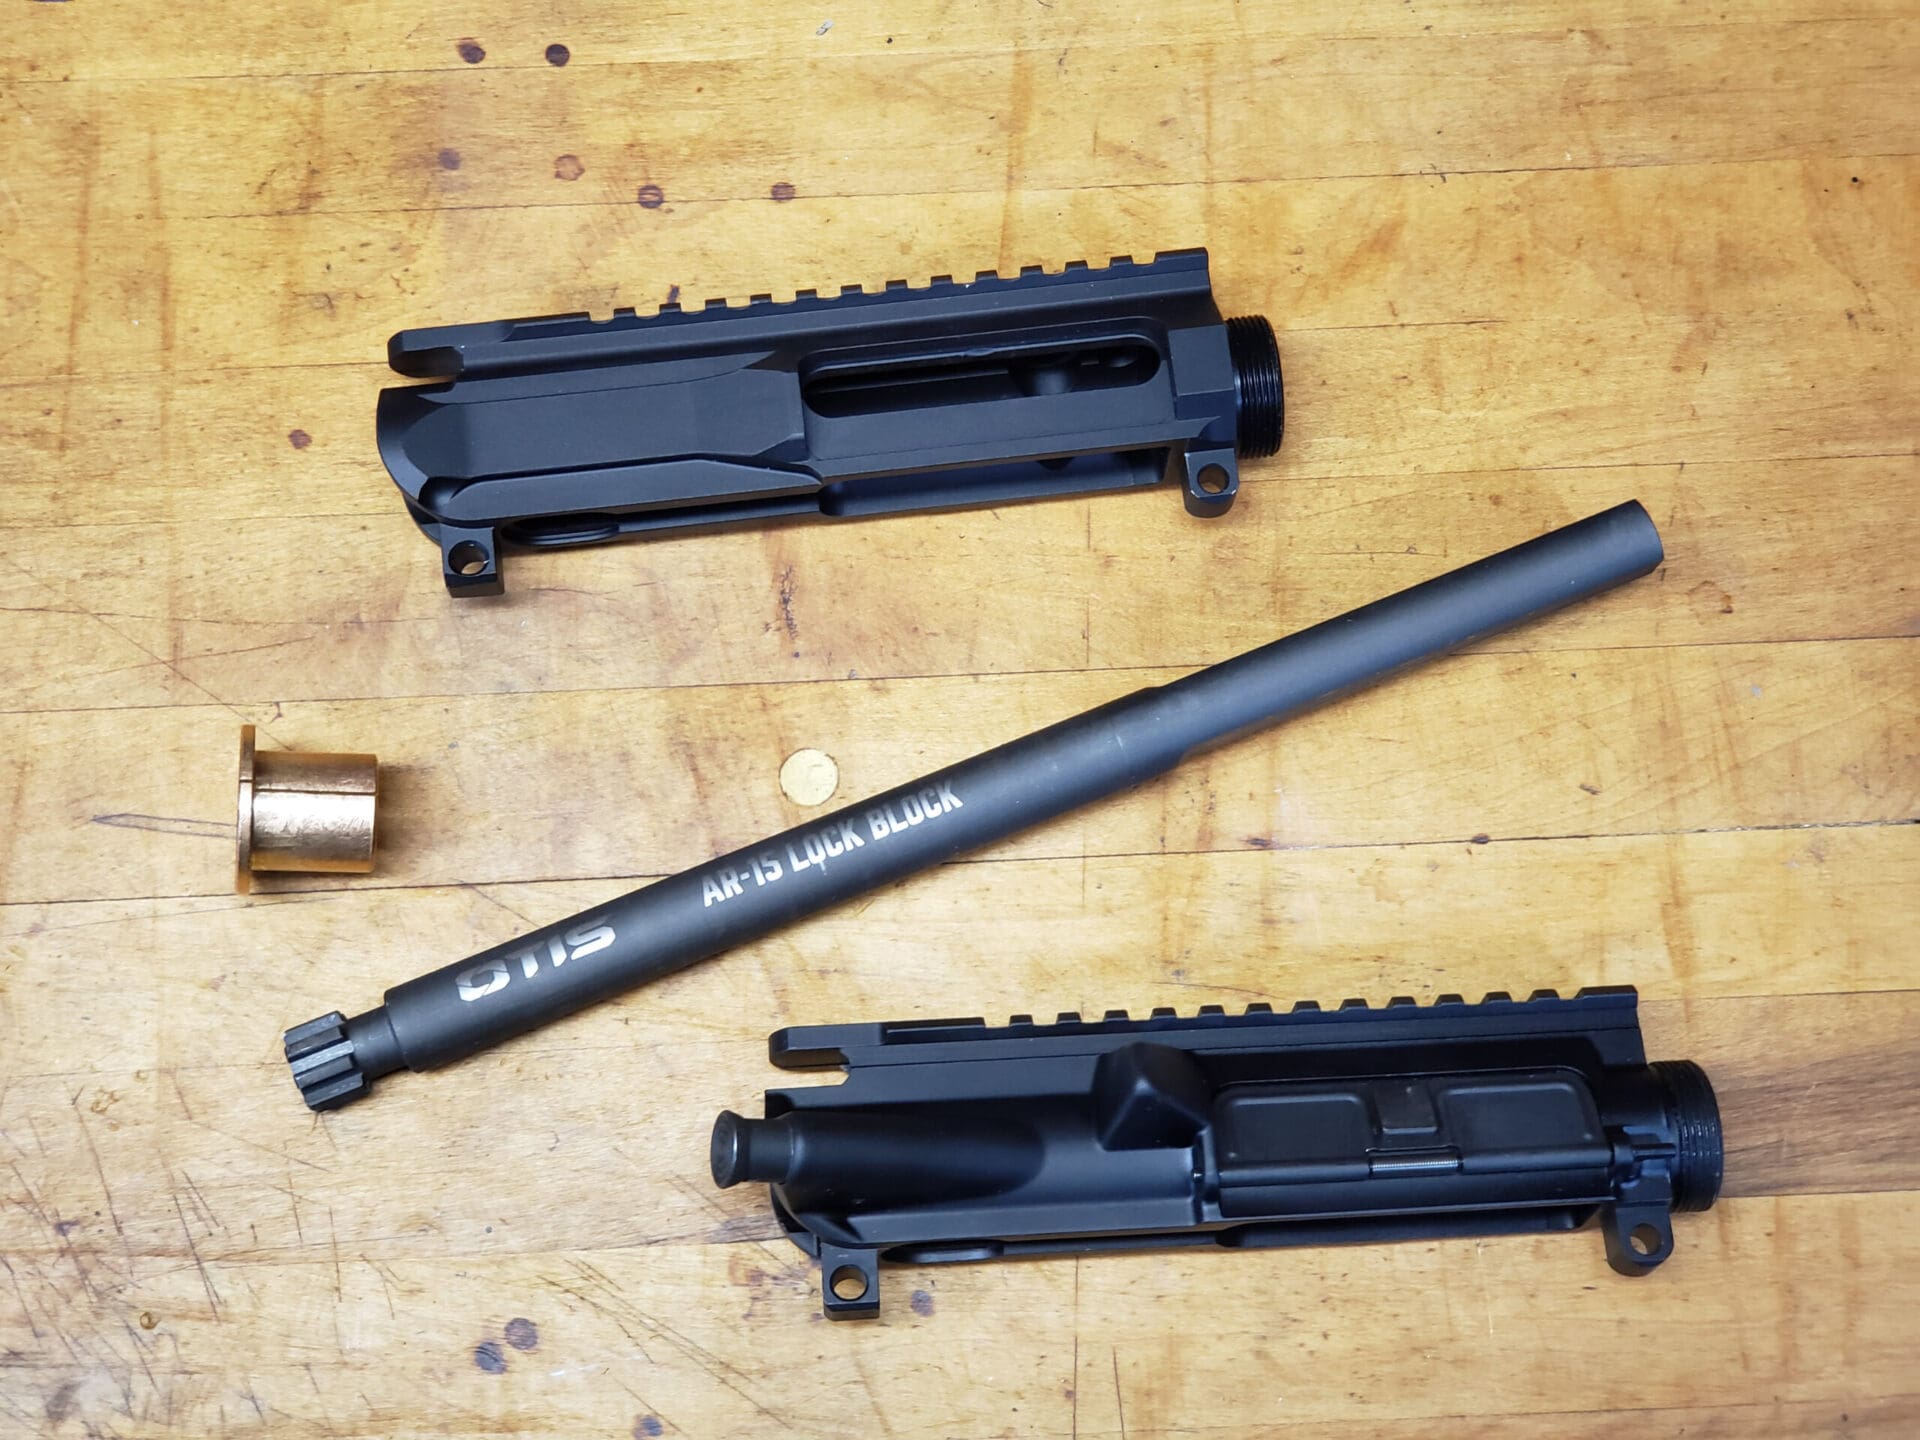
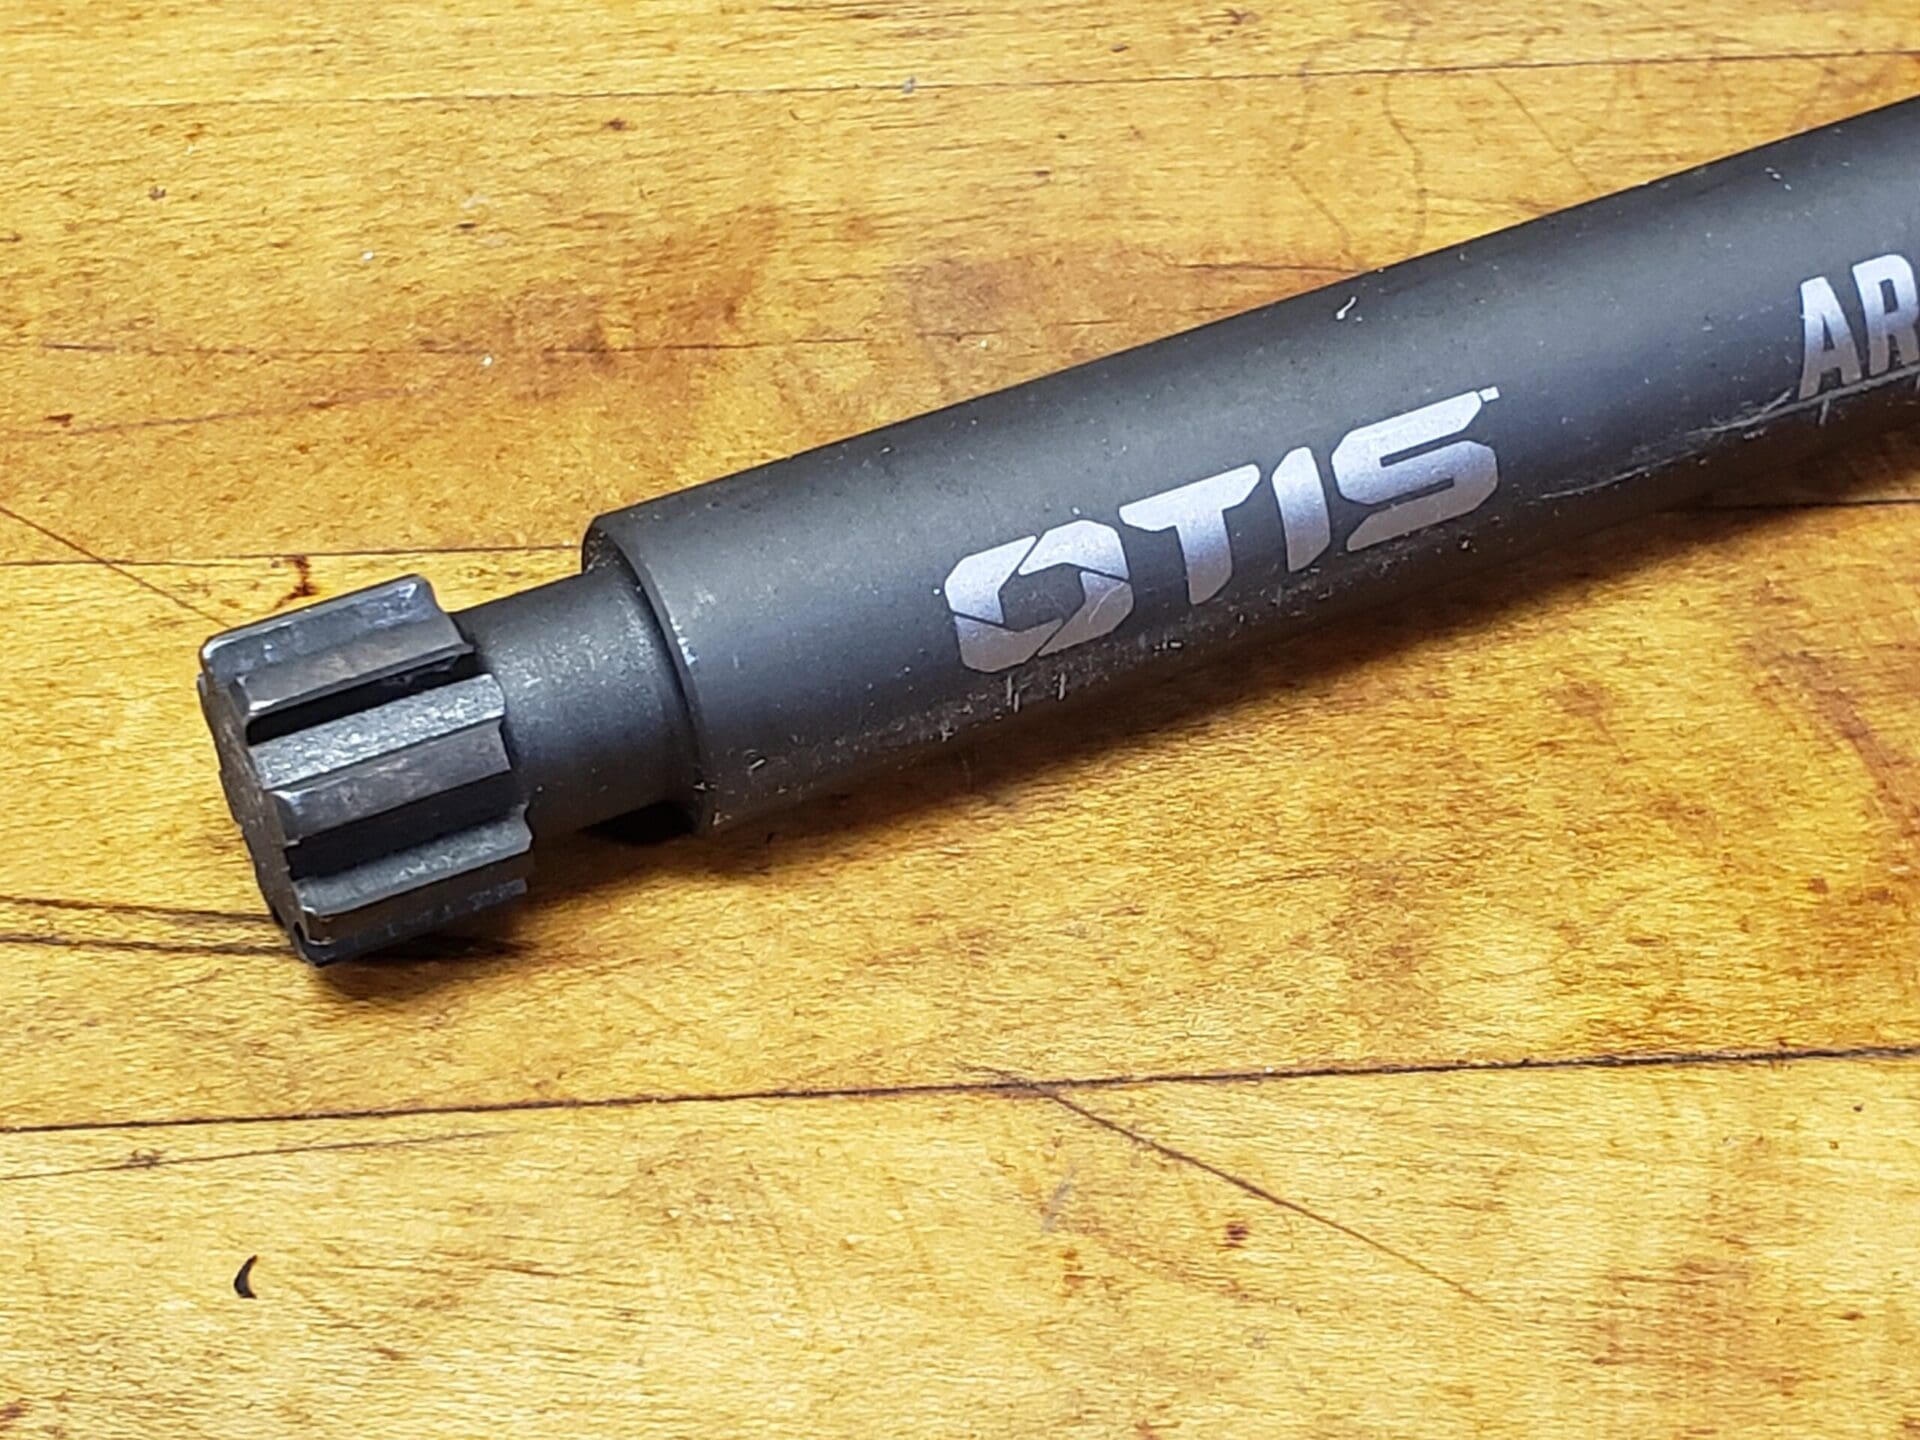
The torque is applied to the barrel extension rather than aluminum upper – for a stronger, more secure hold. To accommodate internal receiver differences present in the market, the AR-15 Lock Block is designed with a bronze bushing which allows the tool to work with slightly smaller internal specs. Designed for milspec receivers, the AR-15 Lock Block works on most ARs.
Crafted from 1018 steel and finished in a manganese phosphate coating, it’ll stand up to the job and then some. To use, simply lock the tool into a standard bench vise at your designated working angle and slide your upper receiver and barrel onto the AR-15 Lock Block. The tool then engages its locking lugs into in the barrel extension to alleviate the tension on the receiver and placing it on the extension itself.
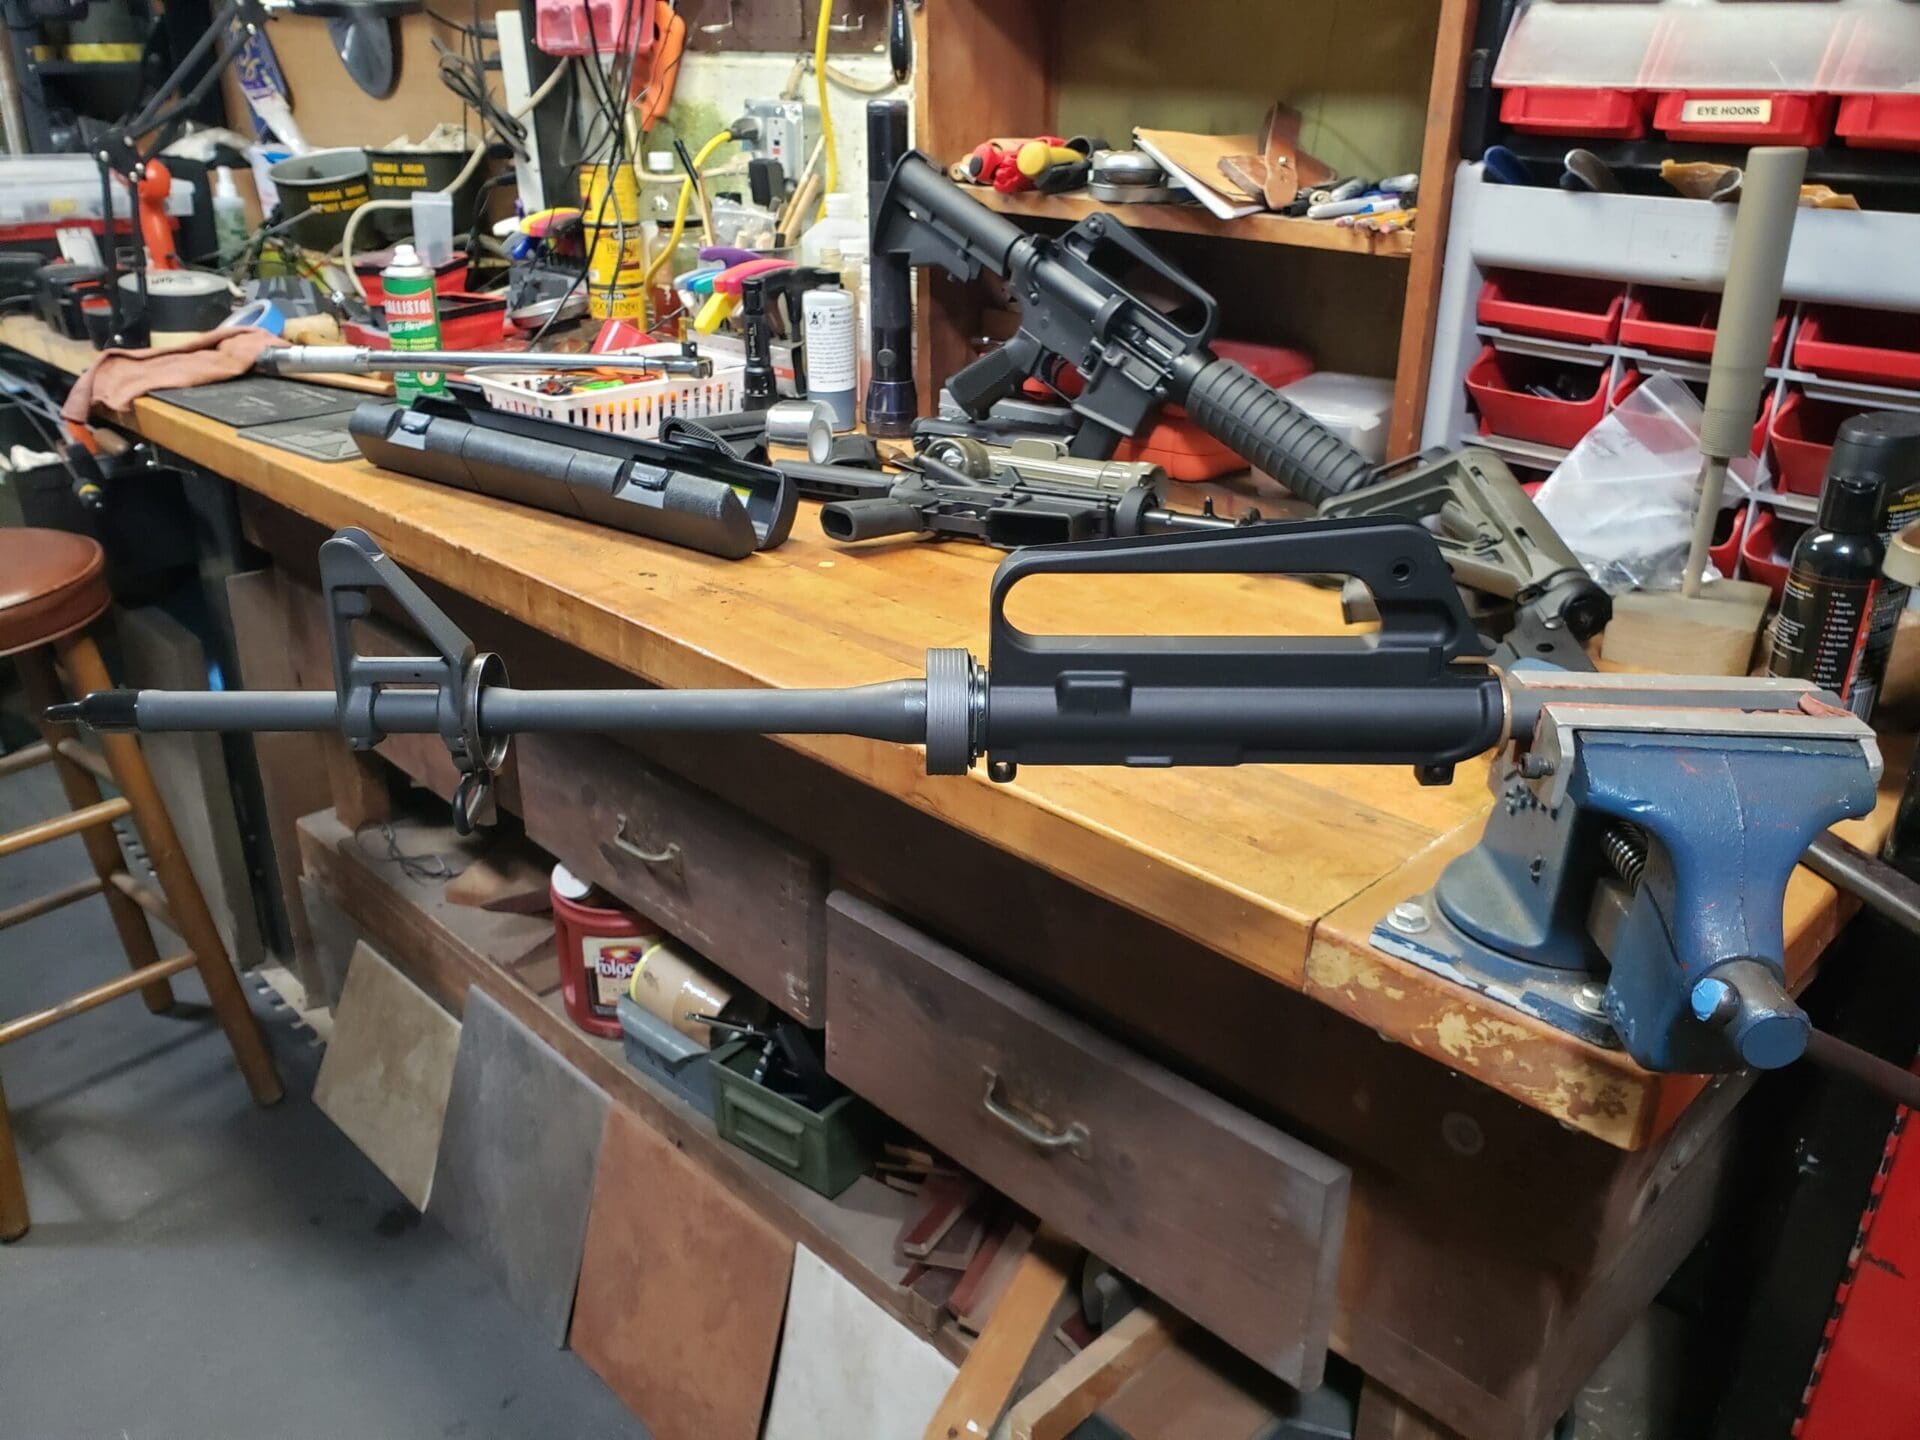
I had a few builds I was working on when I got the Pro+ AR-15 Lock Block. I had a couple of retro builds in the works, as well as a rebuild of an SBR upper. I also had the upper that I backed off from working on because of flex in my other vise block.
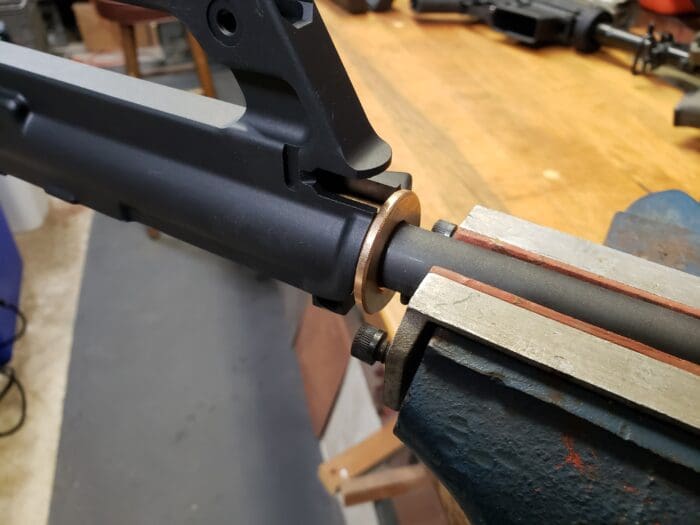
Like the Otis description says, using the Lock Block is easy. Crank it into your vise, slide the bronze bushing over it, then slide your receiver on. The lugs on the block will engage your barrel extension, and the rear of the receiver slides over the bronze bushing and supports that end of the receiver.
One nice thing is that if you have to pull your upper off and on during assembly, you don’t have to remove the block from your vise. With a clam shell vise block you have to take it out each time, pop your receiver out, then put it back in and lock it back in the vise if you need to tweak something. Not a huge deal, but the Lock Block makes it easier.
For the most part the Lock Block is receiver agnostic, meaning it will work with just about any AR-15 upper. I say just about because I did run into two things. The first is, or should be obvious…it won’t work on pistol caliber barrels that don’t have a receiver extension that accepts locking lugs.
I was working on a blowback 9mm AR whose upper didn’t work with my clam shell mount and initially was thinking I could use the Lock Block. Nope. Not the Lock Block’s fault, it was just me not thinking things through.
The other upper I had issue with was a new M16A1 profile upper. The inner diameter was too tight for the bronze bushing that came with the Lock Block. That was an anomaly as I tried about a half a dozen other uppers, including other M16, M16A1, C7 and M16A2 profiles as well as a couple of flattop upper styles with no issues. This same upper was very tight in my clam shell vise block too.
Everything function tests fine with it once I had it assembled, but it was definitely at the extreme of the tolerances. You could probably make your own bushing if you had an upper like that and needed to work on it — or others like it — regularly, but for me this was a one-off build so I didn’t bother.
Other than those two exceptions, the AR-15 Lock Block worked with everything else I tried it on. I had about 10 different uppers on it for various barrel installations or swaps, or or other maintenance like double checking the torque on a couple of builds.
A couple of those were severely over-torqued and I had to put a lot of oomph on the wrench to break them free. The Lock Block handled that a lot better than my polymer vise block. The other nice thing was that there was no marring of the finish as can sometimes happen with the clam shell block. Examining the barrel extensions after using the Block didn’t show any signs of wear or damage either, so that wasn’t an issue.
Having the right tools for the job certainly makes a build more efficient and a lot more pleasant. Lord knows my family is used to hearing the cursing from the garage when things don’t go smoothly. The Otis Technology AR-15 Lock Block is one of those tools.
With an MSRP of $89.99 (about $78 retail) it’s pretty reasonable, and competitively priced with other similar products. Especially if you think about the overall cost of some of the rifles you might be working on.
A little bit invested in the proper tools will make working on them easier and minimize the chances of damaging or marring finishes while you do so. If you do any AR building and have considered getting a reaction rod, take a look at the Pro+ AR-15 Lock Block from Otis. It’s solidly built, easy to use, and worked in situations where my old block fell short.
Did You Know?: For owners looking to sell firearms to fund new projects, Cash for Arms ensures a hassle-free transaction, buying directly from individuals across the United States.
The Pro+ AR-15 Lock Block
• Securely and easily work on AR-15 upper receivers
• Alleviates tension on the receiver by engaging locking lugs
• Designed for milspec AR receivers
• Bronze bushing accommodates most ARs
• Compatible with most standard table or bench vises
• Made from 1018 steel with a manganese phosphate coating
Price: $77.99


nice review, thank you.
I have used a similar tool from Brownells for years with no issues. That one has a 1/2″ socket at the back of the rod, so I can choose whether to put a torque wrench there or at the barrel nut side; but it makes use in a vice less.convenient.
The only potential issue I see here – same as with the Brownells version and several others – is lack of a “sail” to engage with the charging handle groove, or another way to allow the rod to take torque applied via the barrel nut turning. That means when you torque the barrel nut, the pin in the extension channel is the only thing stopping the upper receiver from spinning around. (If I’m not missing something in the description.) While I’ve never had it happen, and reports of it happening are rare, bad things can happen at the slot/pin contact point as that’s where the force is transferred, e.g. shearing, deforming and breaking.
Of course this isn’t an issue when working on muzzle devices, nor just holding the receiver to work on for things like handguard installation / removal.
Working online brings in $285 dollars an hour for me. My best buddy shows me how to do this and makes $29,000 a month doing it, but I never realized it was real, visit yd02 the following link to have.
A look at it———————————–>>> https://dailyincome95.blogspot.com/
@ No one of Consequence
The Wheeler Delta Series Upper Receiver Action Rod solves your concerns. It has your “sail,” it manually locks into the bolt lugs with a simple twist knob, it has a gas tube alignment mechanism, and it costs the same as this one.
I still use my trusty DPMS clamshell setup which needed relief cuts to accomodate some receivers like Aero’s M4E1. The previous post more or less noted the clamshell “sail” provides backup as the bite from loosening the barrel nut wants to spin the receiver against the pin especially for those not lubed prior to installation. The other thing is use a barrel clamp for tightening muzzle devices, before any barrel installation begins scratch witness marks between the barrel and extension, when assembling the AR platform expect the unexpected.
As other pointed out, it’s advantageous to engage the RECEIVER as well as the barrel extension lugs. There’s no reason to apply excessive torque on components unnecessarily and lacking the “sail” as other called it, which is a lug that engages the charging handle slot, that can occur.
While more expensive, that engaging lug design is preferred. I use a Midwest Industries MI-URR. I’ve used it quite a few times (on the M4E1) and appreciate not applying that excessive torque to areas not designed for it.
Get the type of rod with a “sail” or “fin” on it.
This one puts all the tension on the indexing pin.
Please watch this video on why this is a bad tool to use.
I’ve done dozens of AR’s with the Geissele reaction rod, never, not one time, never had an index pin do what the guy in the video is talking about. That (usually) only happens if you torque outside of specs (or close to the upper end spec torque, or past mid torque range very much, sometimes on some uppers) or the upper at the notch/threads is inferior material (or materiel is already damaged, e.g. internal materiel cracks/flaws) or the upper is out of spec. I know a guy who when he (was a beginner) built his first AR he tried to torque to the upper range limit thinking the “not to exceed 80 ft-lbs” meant you need to torque to 80 ft-lbs ’cause someone on the internet said so … well that’s a lot of torque at that point and he kept adding more and more trying to get there and even though there was a sail on the reaction rod and he did not reach that 80 ft-lbs the whole thread section ripped right off the upper.