
[ED: This is the second in a three-part series. Read the first article HERE.]
If you read my first post on how I spent my summer vacation, you know I built a few rifles. But that was just part of my summer production. I still had time and parts on hand so . . .
After I got my H&R lower and swapped it out, I had my old gray Nodak Spud lower free, so I figured I may as well make use of that as well. Even though my Air Force time only had me qualify on the M9, the old M16’s, and the M16A2, I always liked the various Air Force carbines. I worked in an Aerial Port Squadron and we worked around heavy equipment like forklifts, 25k and 40k Loaders, and on a variety of cargo aircraft like the old C-141, C-130’s, C-5’s and C-17’s, as well as contracted commercial cargo aircraft.
I always thought a compact carbine made more sense than a full-sized rifle for deployed units, and in fairness I think a lot of units that did deploy ended up with them. I always worked with rifles though, and I wanted a carbine so I decided to build an Air Force one.
The Air Force always did small arms their own way. They stuck to the M16 when the Army went to the M16A1, as witnessed by those slick-side M16’s that my unit still had in the early 90’s. They did the same with carbines.
When the Army went to the XM177 with a forward assist the Air Force had a slick-side version that they called the GAU-5. Over the years they used a variety of GAU-5 variations, some factory built and many built by Air Force armorers using whatever parts they had on hand.
It’s not uncommon to see Air Force carbines from the 70’s through the 90’s with a variety of lower receiver styles, slick side as well as A1 uppers, and a mix of barrel lengths from 10.5 to 14.5 inch, with either the old Vietnam style moderator or a basic A1 or A2 flash hider. If you’re going to build an Air Force carbine “clone” you have a wide range of options and parts to pick from and still be “clone correct.”
While the Army and Marine Corps use M as a model designator for their weapons systems, the Air Force uses GAU, which stands for Gun Aircraft Unit. That makes sense for an airplane weapon systems, but not for small arms. Who am I to say though?
I decided to do a later-style build, which would be considered a GAU-5/P or GUU-5/P. According to the USAF Carbine Guide on Retro Black Rifle there is some debate on the GAU-5/P designation but there’s solid info on the GUU-5/P stamped guns. Why is this one a GUU and not a GAU? You got me. I haven’t figured that one out yet. Supposedly GUU is applied more to personal weapons as opposed to aircraft weapons, yet all of the earlier carbines are GAU variations.
Either way, a GUU-5/P was basically a rebuild using a 14.5 inch barrel, first with a pencil profile, and then later M4 profile barrels, and whatever uppers and lowers the armory had on hand. I went with 14.5 over one of the shorter carbine variants because I could pin and weld a flash hider on and not have to worry about filing for a Form 1 and registering my build as a short barrel rifle. Stocks on the various GAU/GUU builds were typically the older A1 grip, CAR buttstock and thinner CAR handguards.

I used my Nodak Spud lower, and swapped out the last of the black lower parts with gray ones from H&R. I also grabbed a gray charging handle, chromed bolt carrier group with no forward assist notches and a 14.7 inch pencil profile barrel from H&R.
I decided to do the 14.7 over a 14.5 inch barrel so that I could pin and weld a regular A1 flash hider to meet the government’s ridiculously arbitrary 16-inch barrel requirement for a rifle. I had the pin and weld done through CDS Arms, my local NFA guy. I got a CAR stock set from TNTE Sales and a gray two position CAR buffer tube and A1 rear sight kit and ejection port cover from KAK Industry. I had a carbine buffer and spring laying around in my parts bin. I ended up ordering front sight parts from M&A Parts. All I needed then was a slick-side upper.
I wanted a slick-side upper just because that was unique to the Air Force, and I liked that they continued to use those old uppers even on fairly late rebuilds. It turned out that was going to be the missing link of my build.
I looked for a gray anodized upper for months with no luck. H&R is going to do them at some point, but that point hasn’t come yet. Same for a couple of other vendors and manufacturers. There are a lot of guys doing clone builds who are looking, but the availability of carry handle uppers in general has been tight, whether it’s slick-side, A1, C7 or A2. And when they do pop up, they’re black anodized. Old gray Colt SP1 uppers pop up on Gunbroker, but I didn’t love the prices, or the fact that many were the old large-pin variants that only Colt used.
LUTH AR finally got some black slick-side uppers in stock so I grabbed one. I debated doing the build with a black upper and having a mismatched gun. Military rebuilds didn’t always match up well, but the idea triggered my OCD.
I could get the upper Cerakoted to match, but for what that would cost I might as well break down and pay for one of the original Colt uppers. I did a bunch of research on the various retro rifle forums and guys in my same position suggested painting it with either Brownells Aluma Hyde 2 or Norrell’s Moly Resin. I ended up buying both.
Aluma Hyde is just a spray can, like any other rattlecan paint. Except that it isn’t. It’s really thick since it’s not just paint. It’s a durable finish that cures on your parts once applied. You really have to shake it and keep it shaken as you paint or it goes on clumpy. I read a lot of mixed reviews on it. The consensus was that the finish was very good, but application could range from tricky, to an outright pain in the ass.
Moly Resin got overall good reviews, especially in color matching the old Colt gray finish. It’s also apparently used in military depots for finish touch-up on guns being refurb’ed. It requires more prep and process than Aluma Hyde, though. In theory at least. You have to clean and prep your piece and preheat it in an oven, it has to be applied with an airbrush, and it also needs to be shaken really well, and shaken frequently when you refill your airbrush as you go. If you haven’t used an airbrush before, and I hadn’t, there’s a little bit of technique involved in doing so. Finally, once the piece is painted you have to bake it for an hour in an oven at 300 degrees.
Despite it sounding complicated I got some encouragement from guys on the forums who said it wasn’t that bad, and I saw their results and they looked good. I decided to hold off on the Aluma Hyde and jumped in.
Norrell’s Moly Resin isn’t cheap. It’s about $40 for an 8-ounce bottle, as opposed to about $13 for a can of Aluma Hyde. Then you need to get an air brush if you don’t already have one. I got one from Amazon that had been suggested to me for around $40 and has its own compressor.
Now, in fairness that little 8-ounce bottle provides a lot of coverage. Norrell’s has a great application guide and FAQ section and they say it only takes about 2.5 ounces to cover an entire AR-15 sized rifle. After that you need safety glasses, gloves, a mask or respirator and a well-ventilated space to paint. You’re also going to need an oven to preheat and then cure your parts.
I grabbed a bottle of FDE and a bottle of Colt Grayish Black, which is supposed to be the best match for the older gray receivers. Being that I had zero airbrush experience, and my spray painting skills are marginal, I practiced before I tried painting my slick side upper.
I used a basic PSA lower and another random upper from the parts bin and decided to use the FDE on those to hone my skills.
Good thing I did. My first attempts were rough. Not enough pre-heat, paint not shaken and mixed well enough, sprayed too close or too far away. I pretty much made all of the mistakes, but I learned from doing it.
After a few stops and starts I got an acceptable coating on the upper and baked it. I have a toaster oven in the garage which I could use for the preheat, but for the final bake you need to hang the painted part and I needed more space, so I used the kitchen oven. Norell’s instructions suggest you do this when your wife is away. I took that advice.

Painting the lower went much quicker after my initial trials and tribulations on the upper. Neither was perfect, but the lower was much better than the upper so I decided to give the slick side upper a go.
Between what I learned on my practice runs and the fact that I think the gray seemed to cover better than the FDE, the upper paint job went pretty smoothly. I did the oven bake, let it sit for a day or so, then hit with a coat of oil. I compared it to my original Colt upper and the color is very close. It matched up well with the Nodak Spud lower so I started putting everything together.

With an appropriate upper in hand, the assembly process went quickly. After months of tracking down parts and learning some new skills, I finally had a pretty good example of a GUU-5/P.
The upper and lower match pretty well, as do the small parts. The KAK buffer has a bit of a bronze tinge to it, but some Air Force vets on the retro groups said that some of their issue guns had that on some parts as well, so I’m calling it good.
It was a longer build process than I expected and took me down some unexpected paths with learning to apply the Moly finish, but I’m very happy with the end result. It’s a pretty good clone of an interesting issue weapon, and it’s a handy rifle in its own right.
The finished rifle only weighs 5.69 pounds empty, with a sling. With the pinned 14.7 pencil barrel, slick side upper, and svelte CAR stocks, it’s light, compact and handles really well. I do like my modern red dot-equipped ARs, but I gotta say, I wouldn’t feel bad if this was my only AR either. Luckily I don’t have to limit myself to just one though….

The Misfits
Although my clone builds are close, there are some minor details that would keep them from being “clone correct” to a purist. I did a few other builds that are retro, but even less clone correct or outright fantasy pieces, so I figured I’d cover those separately.

The first is an “almost M16.” I ended up with a second slick-side upper from ACME Machine, a set of OD green A1 furniture from Brownells, and an old three-prong flash hider that may or may not be original. I know it’s at least 40 years old since my dad had it when he was doing AR builds when I was in my teens.
Obviously I needed to build an M16. Not an M16A1, but a first gen, slick-slide, no forward assist M16. I knew this wasn’t going to be a true clone, but rather a retro-themed rifle.
I had a pile of PSA “Stealth” lowers that I bought at the beginning of summer on sale for $29 each. I figured that would work fine for this and since it matched the black upper, I was just rolling it with it. No more painting.
I got a 1 in 7 twist A1 profile barrel from Brownells, cranked the old flash hider on, added a milspec lower parts kit, charging handle, and BCG and called it good.
Too many details are off to call it a clone, but it looks like an M16, and I like the early style OD green stocks. I added a vintage OD sling from my parts bin and found another M7 bayonet to pair it up with, along with some old 20-round GI mags. It was a fast, fun build without worrying about all the little details on my other projects.
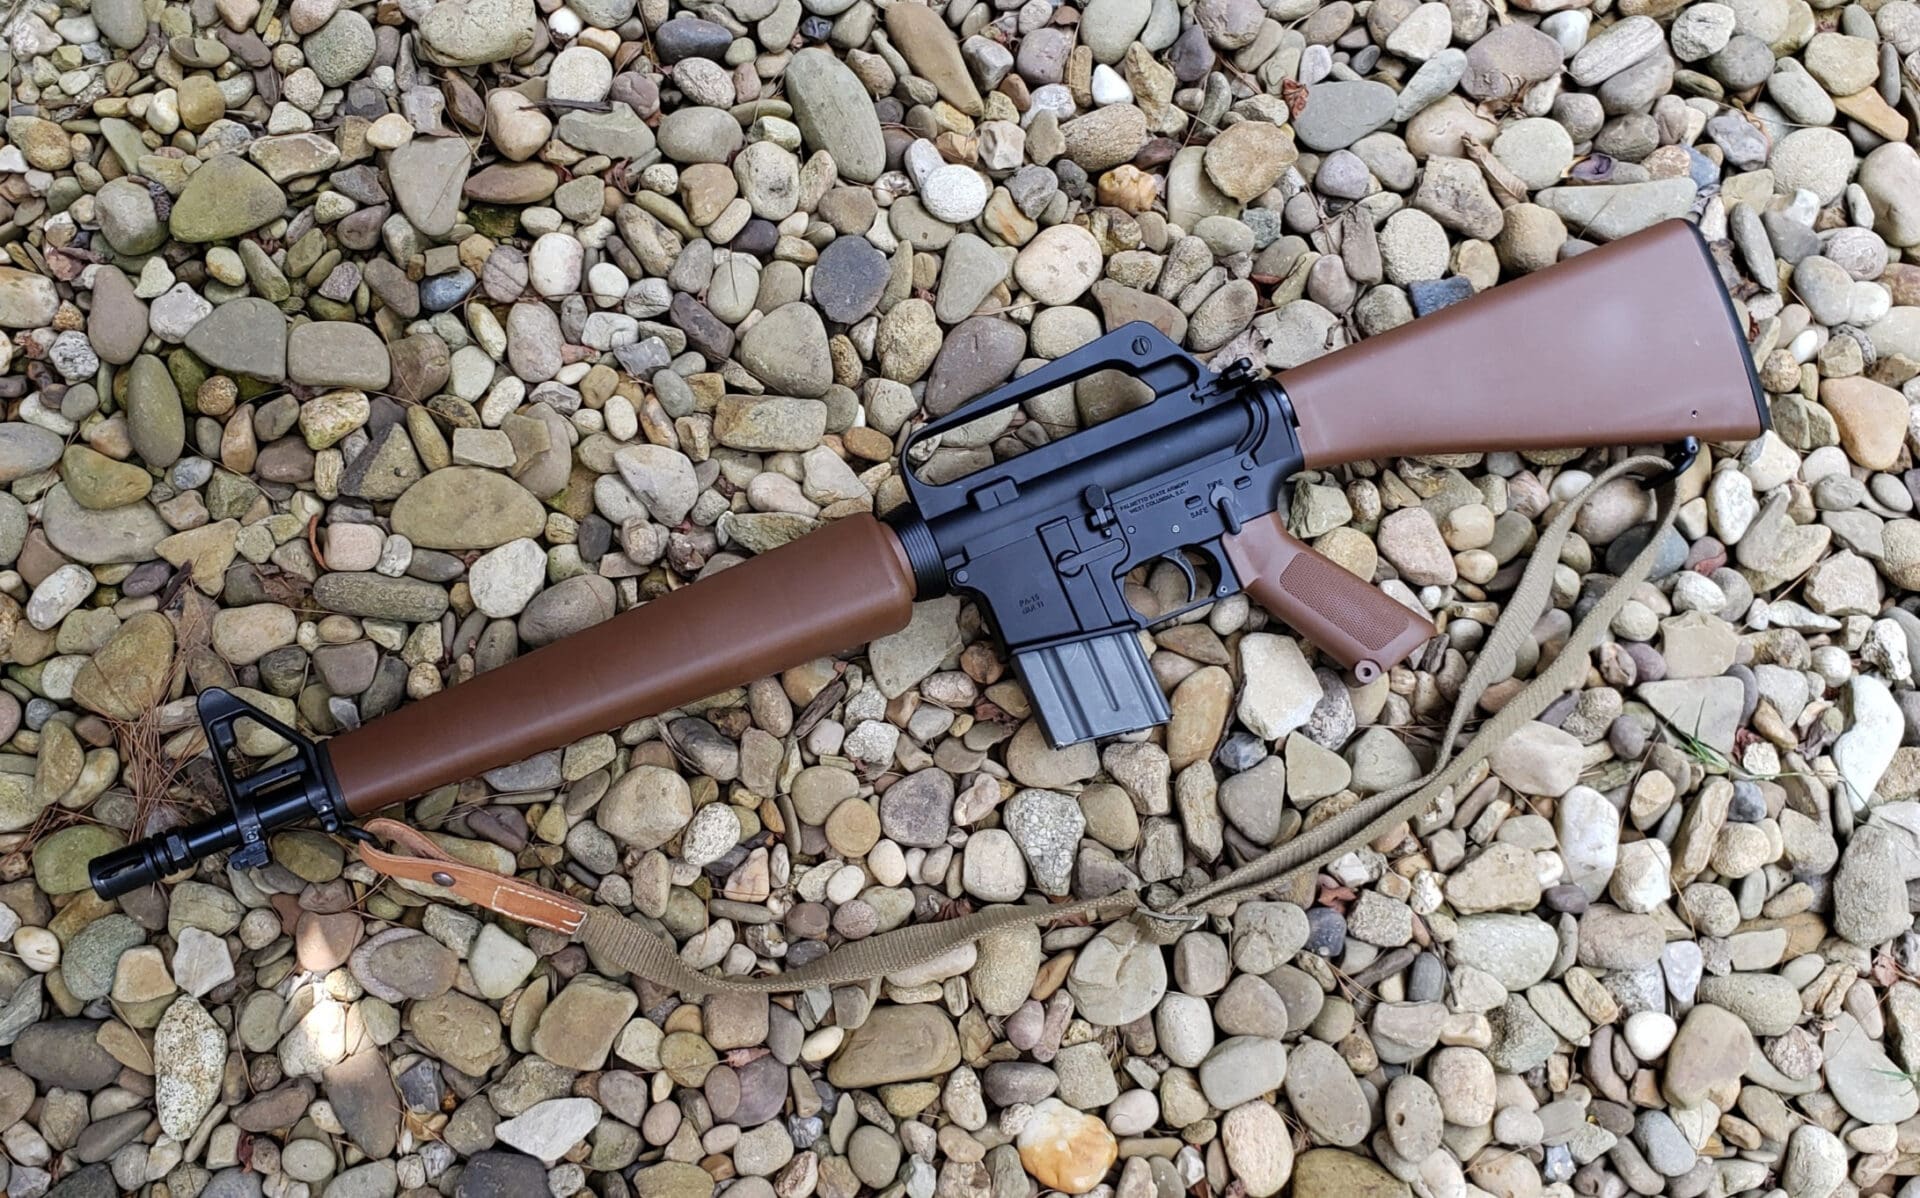
Next up was my tribute to the Fallout New Vegas (FNV) service rifle, from the Fallout video games. I always liked the retro, yet post-apocalyptic, style of the Fallout games and when I saw some other FNV builds I decided I wanted one. The in-game gun in question differs in some details, but it’s closest to an M16A1 with a C7 upper (A1 sights and brass deflector block), a 16-inch Dissapator barrel, and wood stocks.
I snagged a C7 upper off of the Gun Accessories for Sale board on Reddit, mated it up with another PSA Stealth lower, basic milspec upper and lower parts, and this time used brown Brownells retro stocks. Wood would be nice, but the brown A1 stocks were available and affordable, and still look pretty good.
To get a barrel, I actually bought a complete barreled upper from PSA. It was on sale and easier to just grab it and swap out the flat top upper it came with, rather than track down a barrel separately at the time. This ended up being another fast, fun build. Since it’s a post-apocalyptic-inspired gun that’s not a direct clone of anything, I found an old military sling and tossed it on. I think it was a Yugoslavian subgun sling if I recall. It had the right look though.

The last build of this trio was an A2 carbine. While there are plenty of legit A2 carbines I could have built, I just wanted to do my own.
I got an A2 upper from M&A Parts, used yet another Stealth lower, and sourced a 14.5-inch barrel with a mid-length gas system and a long A2 flash already pinned and welded from B. King Firearms. I used a set of Brownells mid-length Portuguese AR10 handguards this time, just for a little different look.
These needed a round end cap on the barrel, which I was able to get from B. King already installed. To get them to fit I needed to cut two notches where the handguard tucks under the end cap to accommodate the AR-15 style end cap. A couple minutes with a Dremel made that an easy job.
Since these handguards don’t have an aluminum heat shield, I lined them with an adhesive self-stick heat shield tape instead. Probably not as good as a dedicated heat shield, bit I figured it wouldn’t hurt. I started with a carbine buffer tube, but ended up swapping it for for a fixed rifle buffer and I’m using the old Cavalry Manufacturing A1-length stock that started out on my A4 clone.
While this one has a retro look with the fixed A2 upper, Portuguese AR-10 handguards, and fixed stock, it isn’t a clone of anything that I’m aware of. Although I’m sure someone has built something similar along the way. It’s a handy rifle and should make a great truck gun.
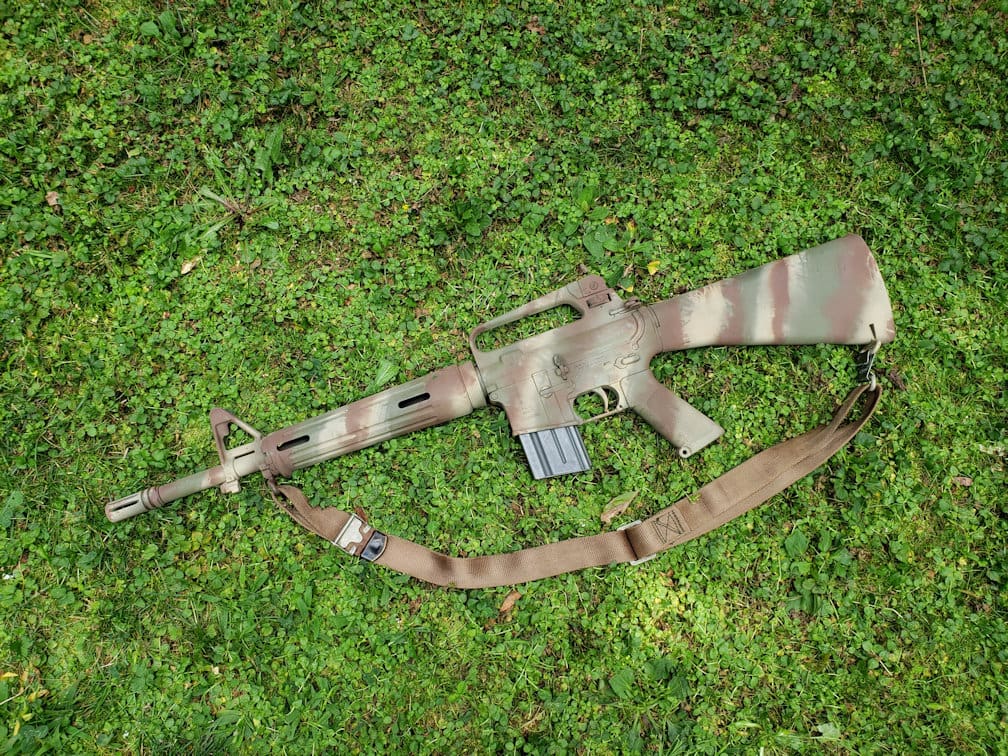
Since this rifle wasn’t a clone of anything, I decided to give it a basic rattlecan finish. Not the Moly Resin, or even Aluma Hyde…just plain old rattlecan spray paint. It isn’t fancy or as durable as the other finishes, but it’s quick and easy to apply, and simple to change or touch up as needed.
I did a base coat of Hunters Specialties OD green and then layered some torn burlap strips in a diagonal pattern. I did a coat of Rust-Oleum khaki, let it dry, then moved the strips around and did a coat of Hunters Specialties Mud Brown.
The burlap had a bit of an open weave and some loose threads on the edges so it broke up the lines nicely, as opposed to a crisp line like painters tape would give you. The end result was a sort of ersatz Portuguese camo, which is kinda cool since I used the Brownells Portuguese handguards on this build. I finished the build off with a crusty, but solid Vietnam-era GI seat belt sling.
Summer still wasn’t quite over yet, and I did a couple of more modern builds as well, but that’s a tale for another day.
[ED: This is the second part of a three-part series. Read the first article HERE.]


I spent most of my summer walking South to Antarctica to get more ice for my
UniverseEndingPerpetualFussionNeutrinoBlomb.
“I need a bigger truck” said the polish apple salesman.
By the time I got back my glacier had turned into an ice cube.
A rab mistakes happen.
mosquito coast.
no.
well, maybe.
No building from me🙄
Nor I, yet…
geoff…gfy pervert. As for the builds the A2 with the forward assist makes the most sense. Welded barrels and slab side receivers are things I would never do. No forward assist is along the lines of no handle on a bolt action. Complying with what is 1.5″ ignorance leads to complying with more ignorance. I mean Gun Control began with Racism and advanced to Slavery and onto Genocide. Give them 1.5″ and they’ll go a mile.
why respond to three who have not done a build about yours?
jr…I responded to a pervert and some rifle builds and now to your bigoted self. Is that the three you are referring to?
why would you respond to a perve and a bigot?
“geoff…gfy pervert.”
“Every night, hon. It’s very soothing…”
R.A. Heinlein, ‘Friday’
😉
My great grandpa(moms side) built a flintlock, they said he used nails to make the barrel.
” they said he used nails to make the barrel.”
‘Cut’ nails were high-quality steel back then that could be used for tool steel…
https://tremontnail.com/
Please note that the proper spelling is “Marine Corps,” nor “Corp.”
Where’d you get them nice boots?
” Marine corpse.”
Nice, makes me want to go shooting tonight.
“Norell’s instructions suggest you do this when your wife is away. I took that advice.”
Good advice. I would add, make sure the oven is clean first, and if not, don’t ask your wife to do it for you. Good way to end up with a dented skillet, and it’ll be a few days before you can see well enough to spray it.
First couple of build stories were kinda cool, then my eyes sort of glazed over. Assembly of ARs is pretty easy – and building a ton of them seems like a sort of useless exercise to me, unless you’re into a collection of not-quite-authentic, and far-from-collectable firearms. But hey, whatever makes you happy!
Not sure about parts availability anymore, but if you’re really into the gun building thing, try more of a challenge: fold an AK receiver, build your own riveting jig, and assemble an AK kit or two! If FN-FAL parts kits are still available, put one or two of those together. They require some actual gunsmithing ability, though nothing you can’t figure out on your own, or with help from some of the build forums.
Seriously, not meaning to cramp the fun you had, but it just seems that twisting together multiple firearms with the same parts list in different permutations isn’t really worthy of a three-part series. Gotta say, I do like that wood-stocked model.
No, this is no way to build a proper AR of any type. To do that, you need custom fixtures, gauges that you make out of billet unobtanium, the inner workings of valve stems, and most of all – three phase power. Then you can produce a rifle that is impossible to jam, and will be so accurate that it has to have it’s groups measured in negative numbers. History will tell it’s the only way, any other methods only confirm your ignorance.
I would hope you could be more civil than that and not resort to that type of language to make a point. It reflects poorly on you and does nothing to promote whatever statement you were trying to make. Calling someone names and then talking about racism (which you spelled incorrectly) has nothing to do with the article. So what exacly is your point?
You are so right! AnY other form of ARfoolery is based in Black Rifle Racism. And you’re a perv.
Used to build AR’s from misc. parts. Most of the builders play at gunsmithing then bring their screw ups to an actual smith to fix. While usually not major problems, they nearly always bugger threads or pins/pinholes. Burs in places that need to be clean, misaligned parts, tried to make parts from different suppliers fit, rather than doing the minor fitment work.
If I’m going to build something, I’ll find a solid bolt action and build up something worth the effort. Something like a Mauser, or SAKO action, high quality barrel for a solid hunting caliber, good maple or walnut fitted to the action, carefully carved and checkered, screws indexed and clocked to match. glass smooth finish on the wood.
Haven’t set up the bluing tanks in a couple years. Will be carving a new stock to replace a damaged/split stock on a little Stevens single shot .22 this winter while things are slow on the homestead. Might strip and reblue the steel parts after I see what the underside of the barrel/action looks like. We’ll see. I do want to set up and refinish a couple of the lower value handguns I’ve had sitting in the safe for a few years. Nothing in too bad a shape, but finish is worn from spending years in holsters or poor storage before I picked them up at a couple pawn shops for cheap. May or may not sell them somewhere down the line.
The only part that the author has left out is that by modifying any rifle with a standard stock to less than 16 inches requires a special license from ATF. They are clearly short barrel rifles and probably illegal without the proper license.
The author didn’t leave it out. You must have missed the three places where he mentioned the “pinned and welded flash suppressor” that was on the end of the 14.5″ barrels, which brought it up to 16″ and more:
1) “I went with 14.5 over one of the shorter carbine variants because I could pin and weld a flash hider on and not have to worry about filing for a Form 1 and registering my build as a short barrel rifle.”
2) “I decided to do the 14.7 over a 14.5 inch barrel so that I could pin and weld a regular A1 flash hider to meet the government’s ridiculously arbitrary 16-inch barrel requirement for a rifle.”
3) “a 14.5-inch barrel with a mid-length gas system and a long A2 flash already pinned and welded…”
For the first two, I’d still be worried about the BATF Gestapo calling it illegal “constructive possession” to own a a rifle stock, an AR-15 lower, and a 14.5″ barrel before he got around to pinning and welding the flash suppressor on it. “Constructive possession” is anything the BATF says it is, and the BATF is entitled to change their mind six times a day and reinterpret laws however the F they want.
Comments are closed.