
[ED: This is the last in a three-part series. Read the first article HERE.]
Although most of my summer was spent doing retro or retro-inspired AR builds, I had enough time for a few more modern builds as well.
Something New
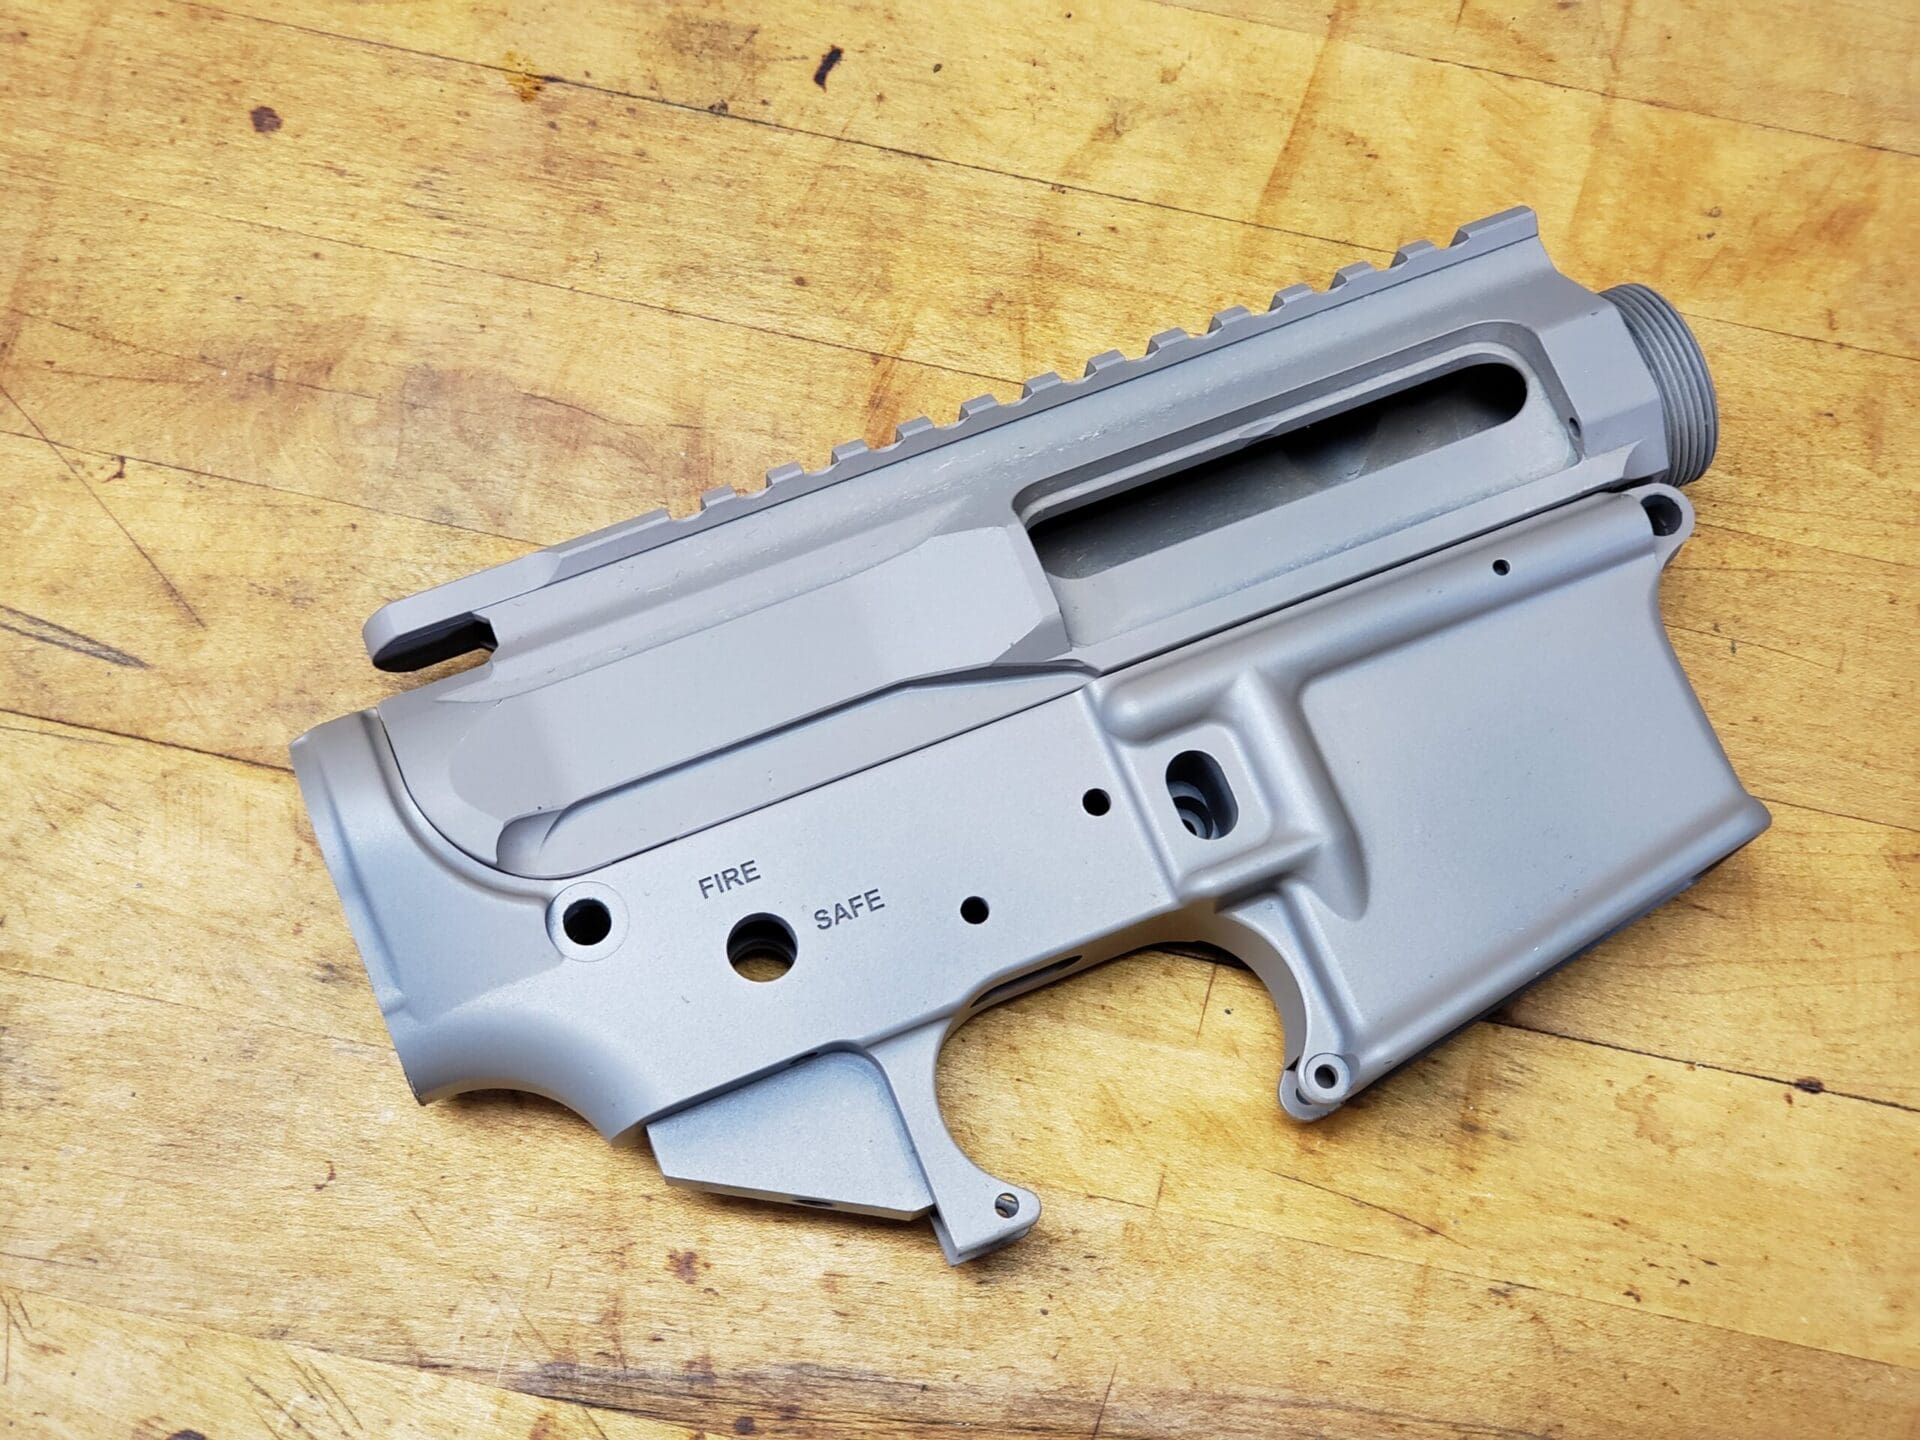
My first build started a little before the summer actually, and was the result of looking in my parts bin and figuring out what I could do with it. At the SHOT Show I had a chance to look at the FMK polymer AR lowers. They were honestly a lot nicer than I expected, and seemed a step up from the polymer lowers I had looked at years before.
When I saw that Palmetto State Armory had them on sale for a mere $29.95 I decided to give one a try. I got an FDE version and started rummaging around to see what I could build with it.
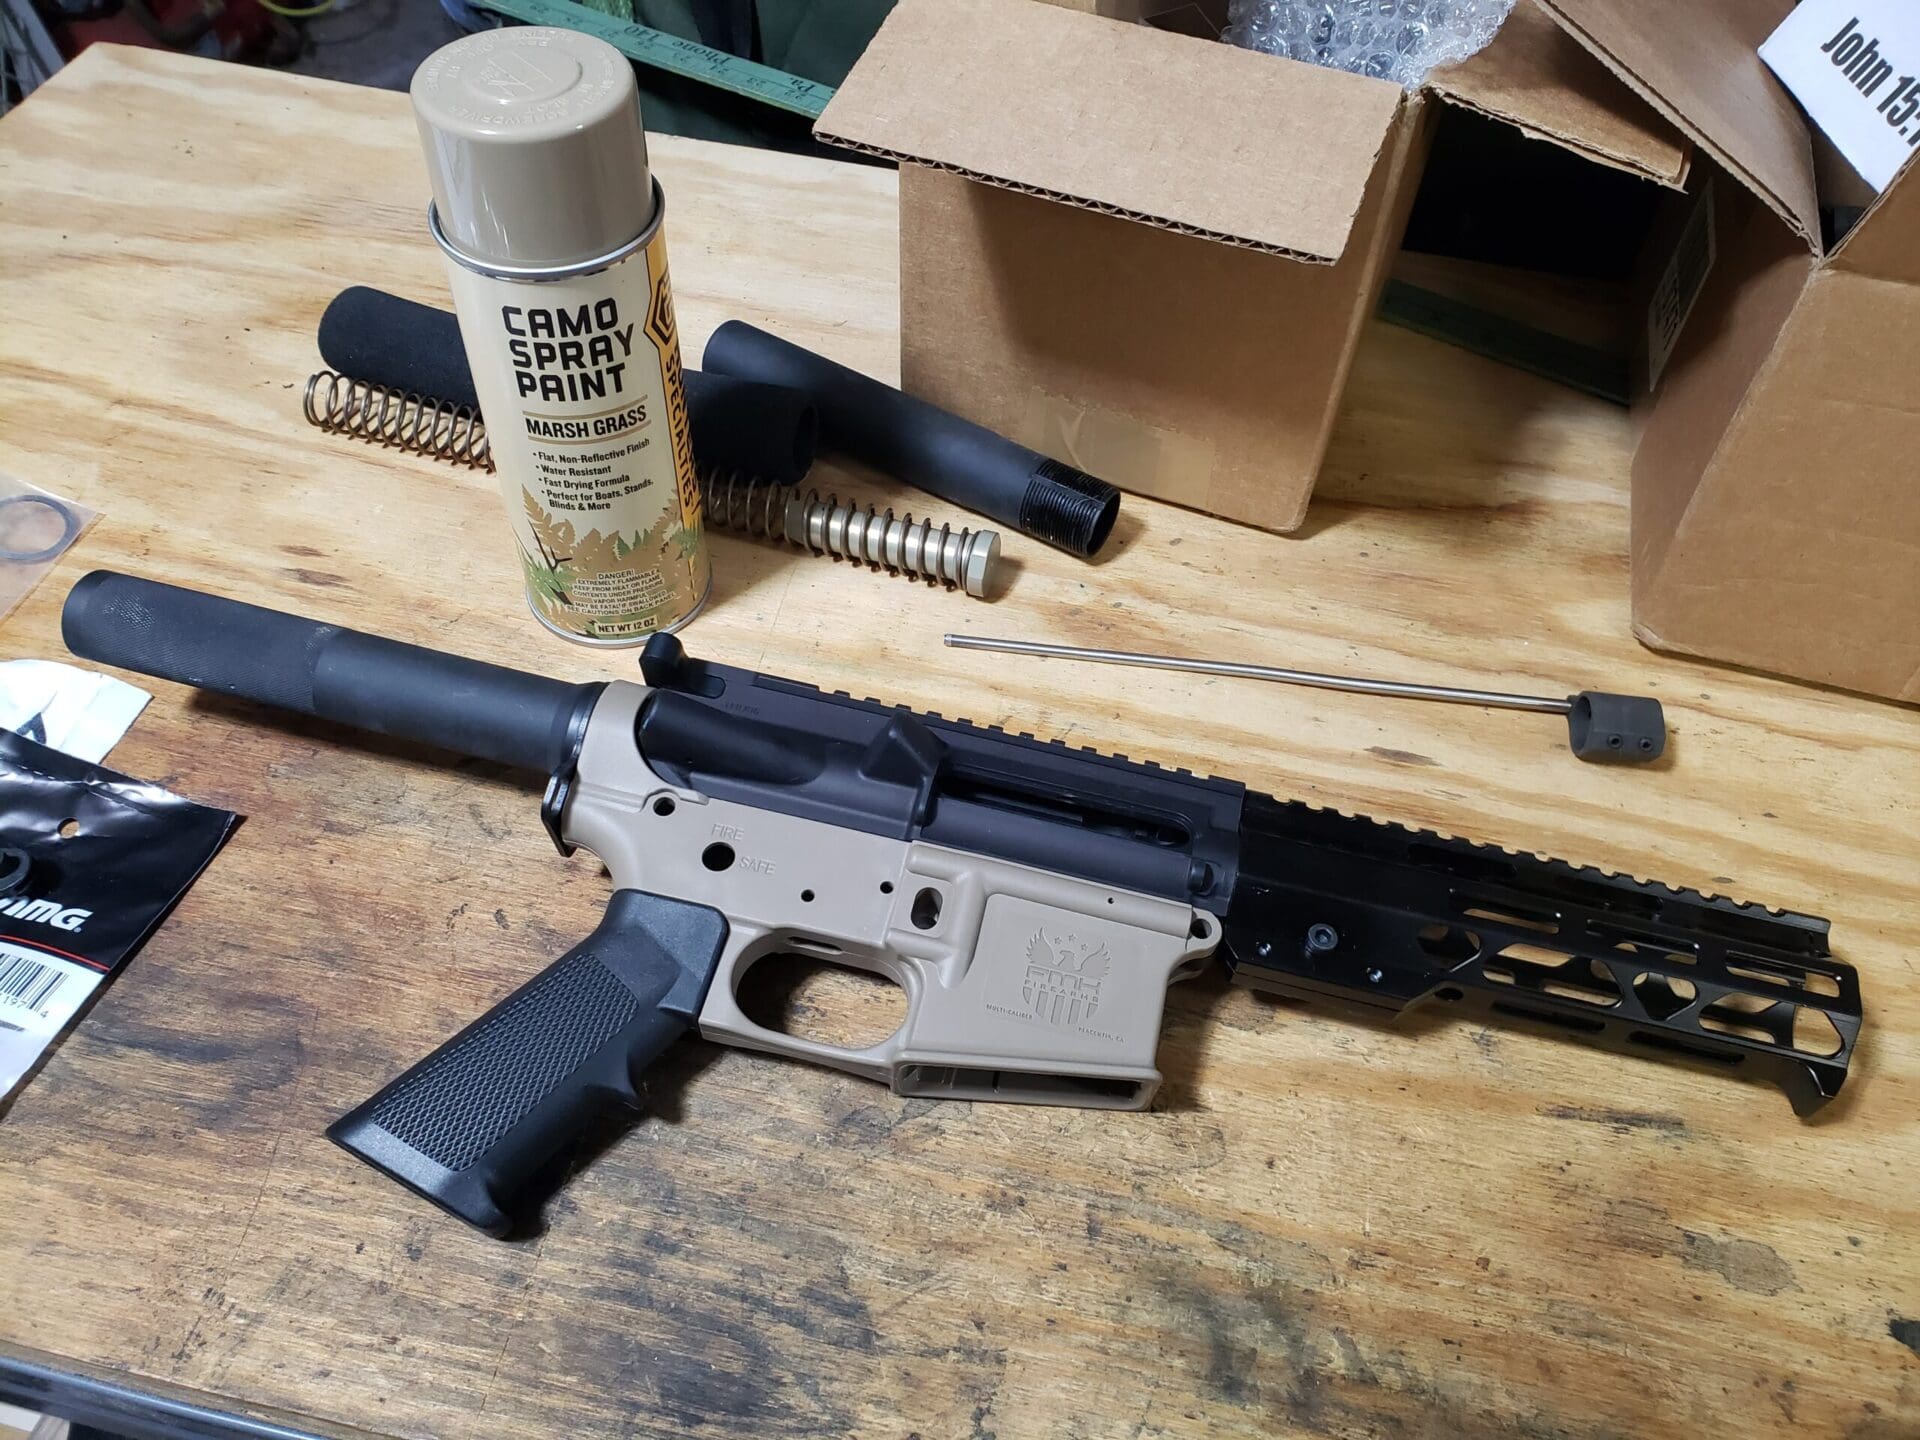
Even though polymer lowers have been around for a while now, I was still a little unsure of them so I decided on just a fun range build. I found a flattop upper (I have a pile from various builds and trades and honestly don’t even know where they all came from originally), a couple pistol buffer tubes, some A2 grips and leftover, mismatched lower parts from a number of previous builds.
I also had a short 8-inch rail that didn’t work out from another build last year. The inner diameter was wrong for the flash can I wanted to use, and I didn’t like its shiny black finish, so it just got dumped in the parts bin. I basically just needed a barrel, a bolt carrier group, and possibly a muzzle device.
I decided to try something I hadn’t done before on this one and went with a 7.62x39mm build. Since this was purely a fun gun, I didn’t want to spend a ton of cash on it and I found a good deal on a BCG and barrel from Bear Creek Arsenal.
I know…BCA has a mixed reputation among some of you. The poors (and I’m right there with you guys) love them. Guys into higher-end ARs generally disparage them. I’d worked with some BCA stuff before and didn’t have any issues, so I figured it was fine for this build.
I wasn’t going to take this thing into combat. I just wanted to blast some stuff at the range. I grabbed an ASC 10-round magazine from BCA at the same time. I topped the barrel off with a linear compensator from KM Tactical. I added a cheap FDE red dot from Amazon and a set of backup sights and was ready to go.
Assembly was uneventful other than the buffer retaining pin sticking in the lower channel. I reached out to FMK and they said I could either ream it out a little, or it was covered under warranty if I still had issues. I hand-turned a drill bit in the hole and that provided enough clearance for things to function as they should.
Even though I’ve been a member of the Firearms Policy Coalition for a while now and am covered by their pistol brace injunction, I decided to try a regular pistol buffer on this thing since I hadn’t used one in years.
I sat back and looked at my finished pistol build and, well, it was ugly. A mismatch of various shades of FDE, matte black, and shiny black parts. Being that this was a Rat Rod build with random parts I figured this was a great project for my first rattle can paint job.
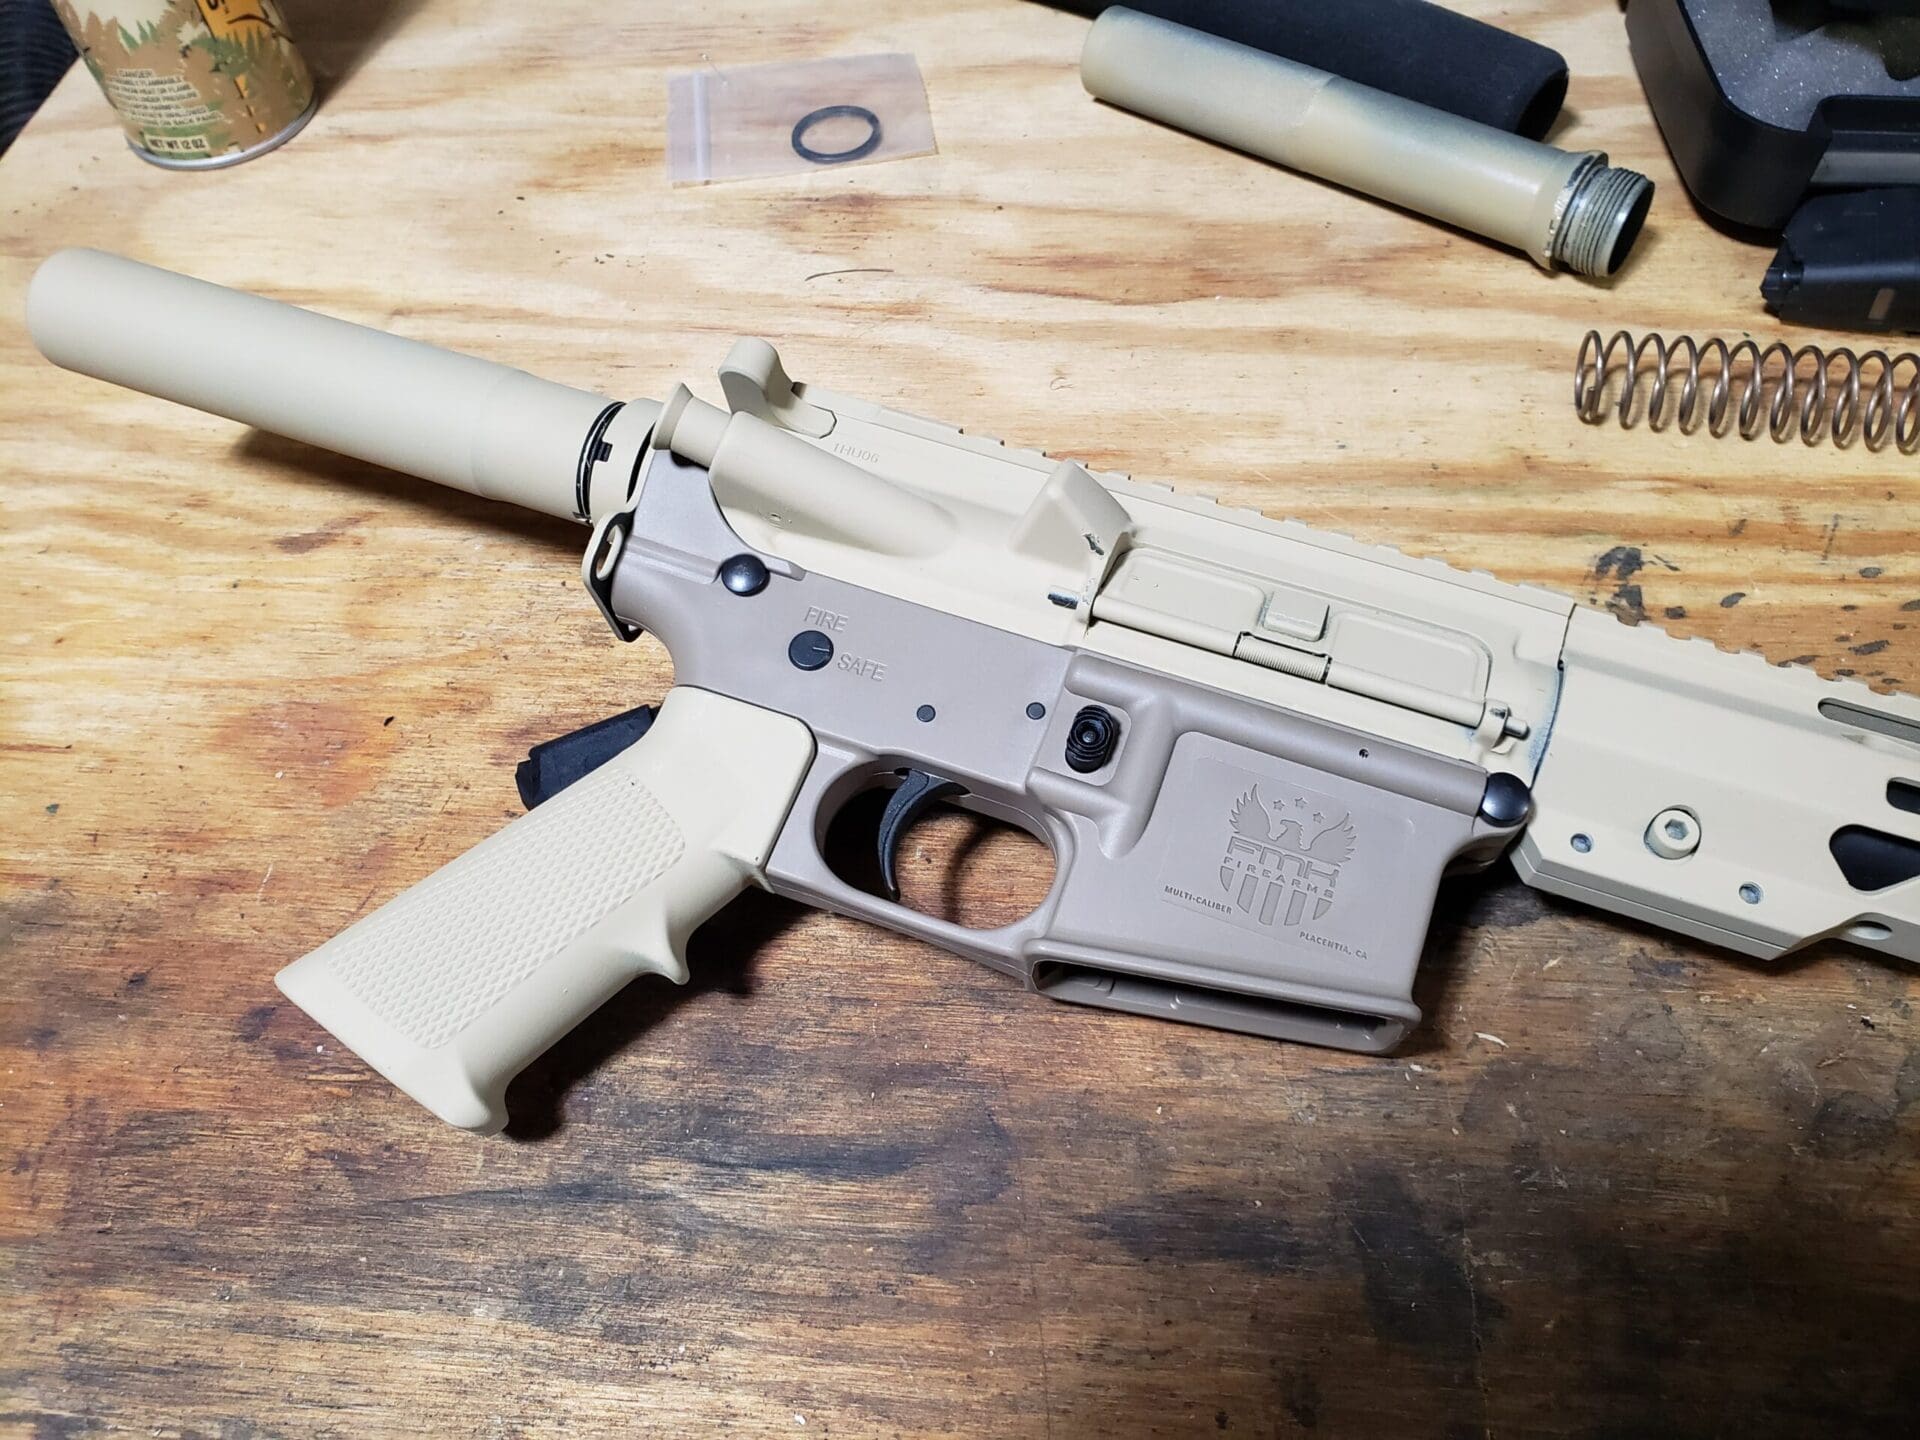
I built this thing before my later retro builds covered in the two previous articles. Trying to match up spray paint to FDE is a pain. If there are 50 shades of gray I swear there must be 150 shades of tan.
I used the Hunter’s Speciality tan and painted the upper, handguards, buffer tube and grip…and then realized it was much lighter than the FDE lower and optic. So then I painted everything with the tan.
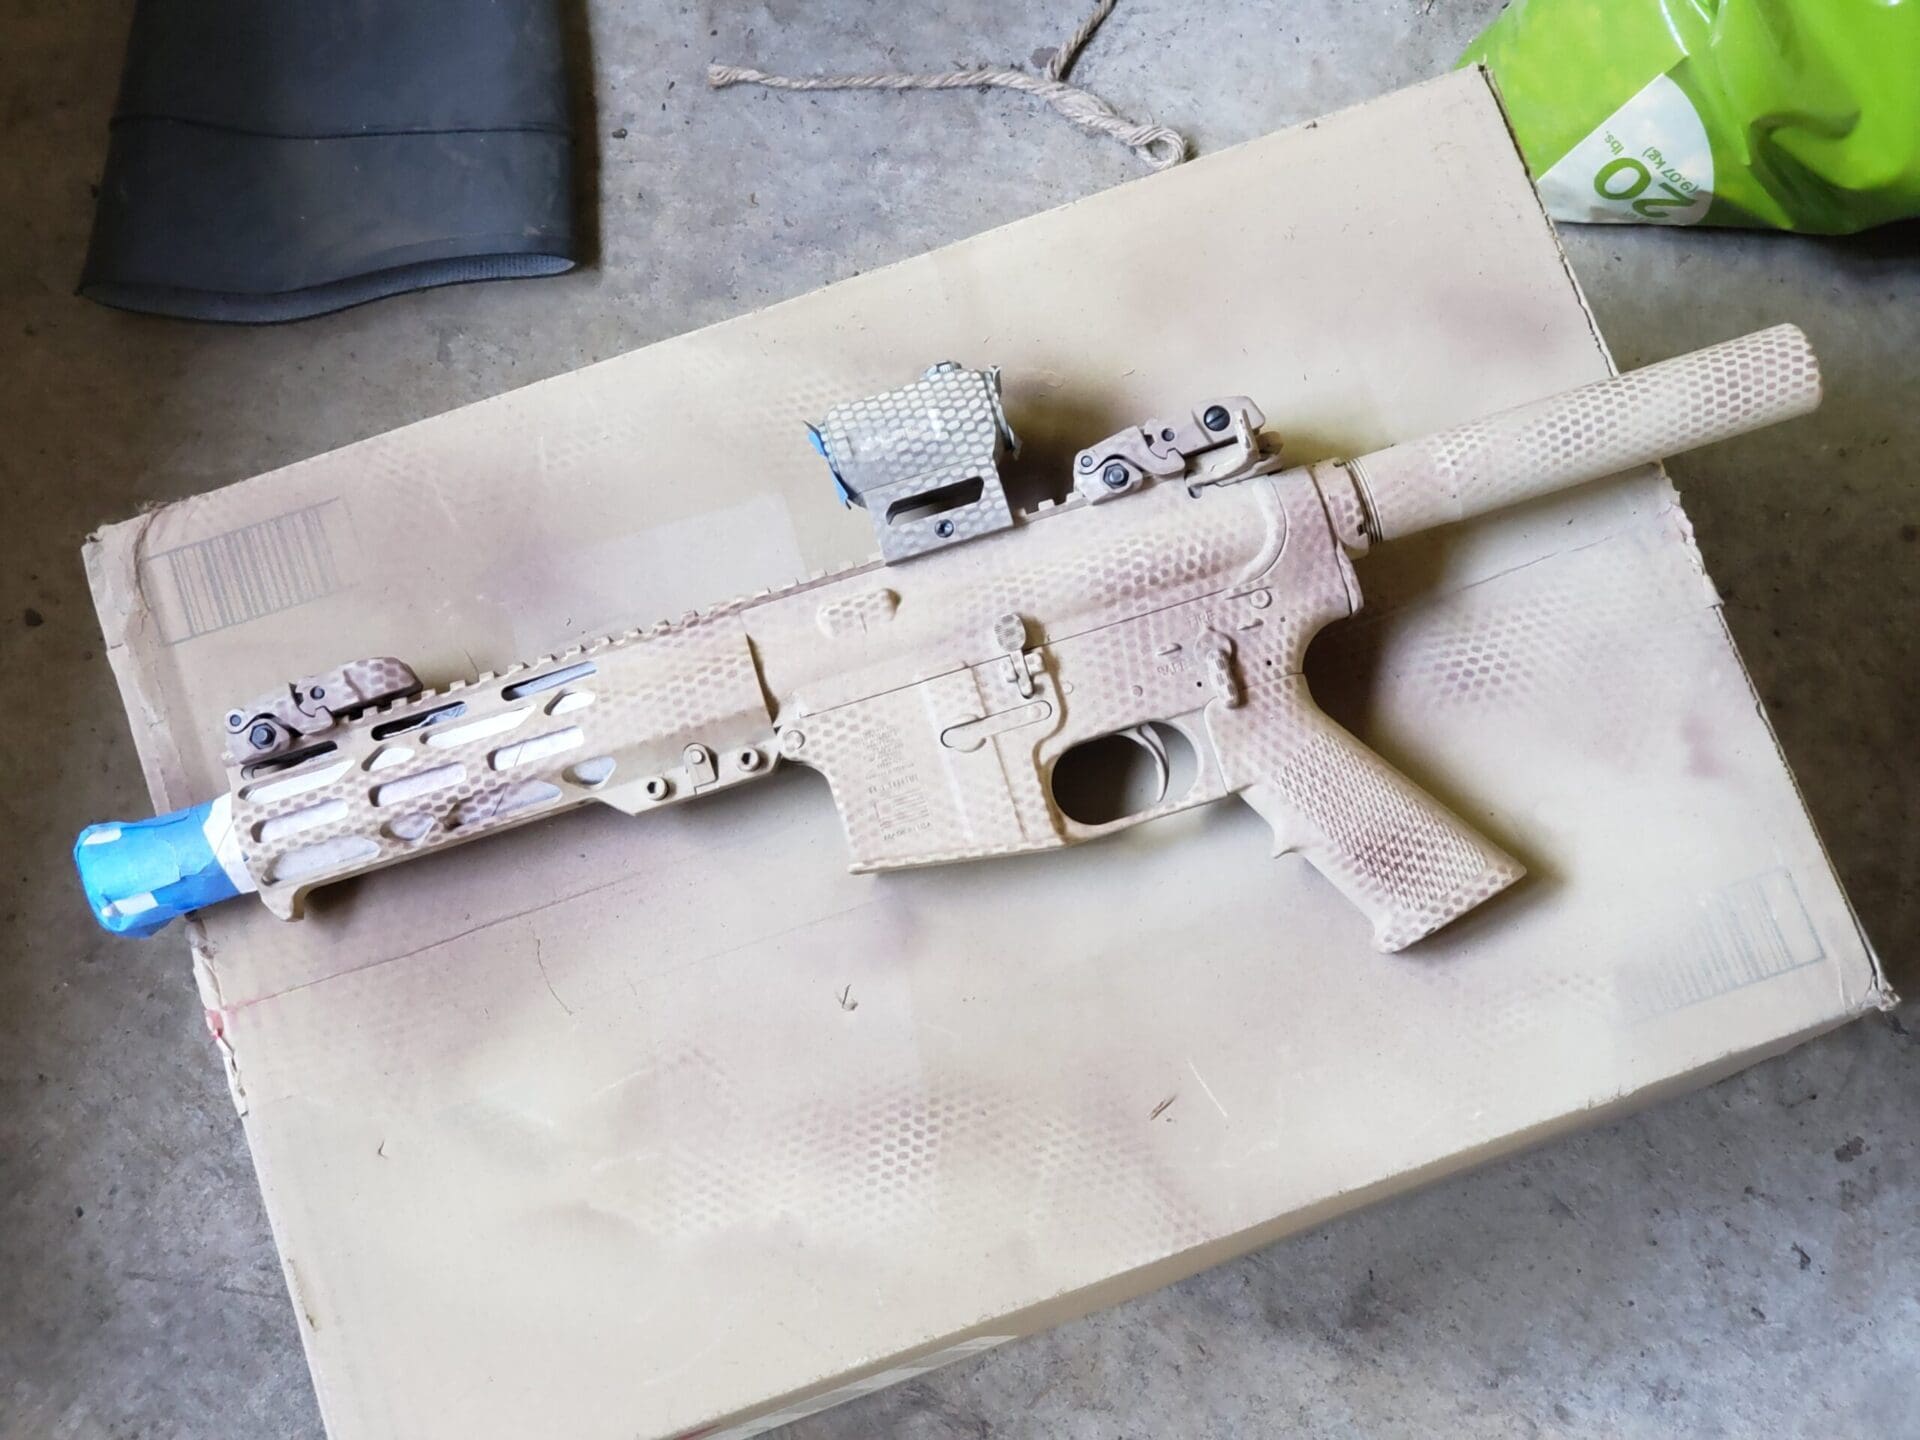
Now I had a bland tan canvas that needed some kind of a pop of color. I decided to camo it, but wasn’t sure what I wanted to do. A buddy who’s a SWAT sniper out west suggested using a laundry bag to create a pattern when I started adding color. He had done it on his work rifle and it turns out that’s a popular technique in the rattle can community. I added some marsh brown and olive drab and was actually pretty happy with how it turned out.
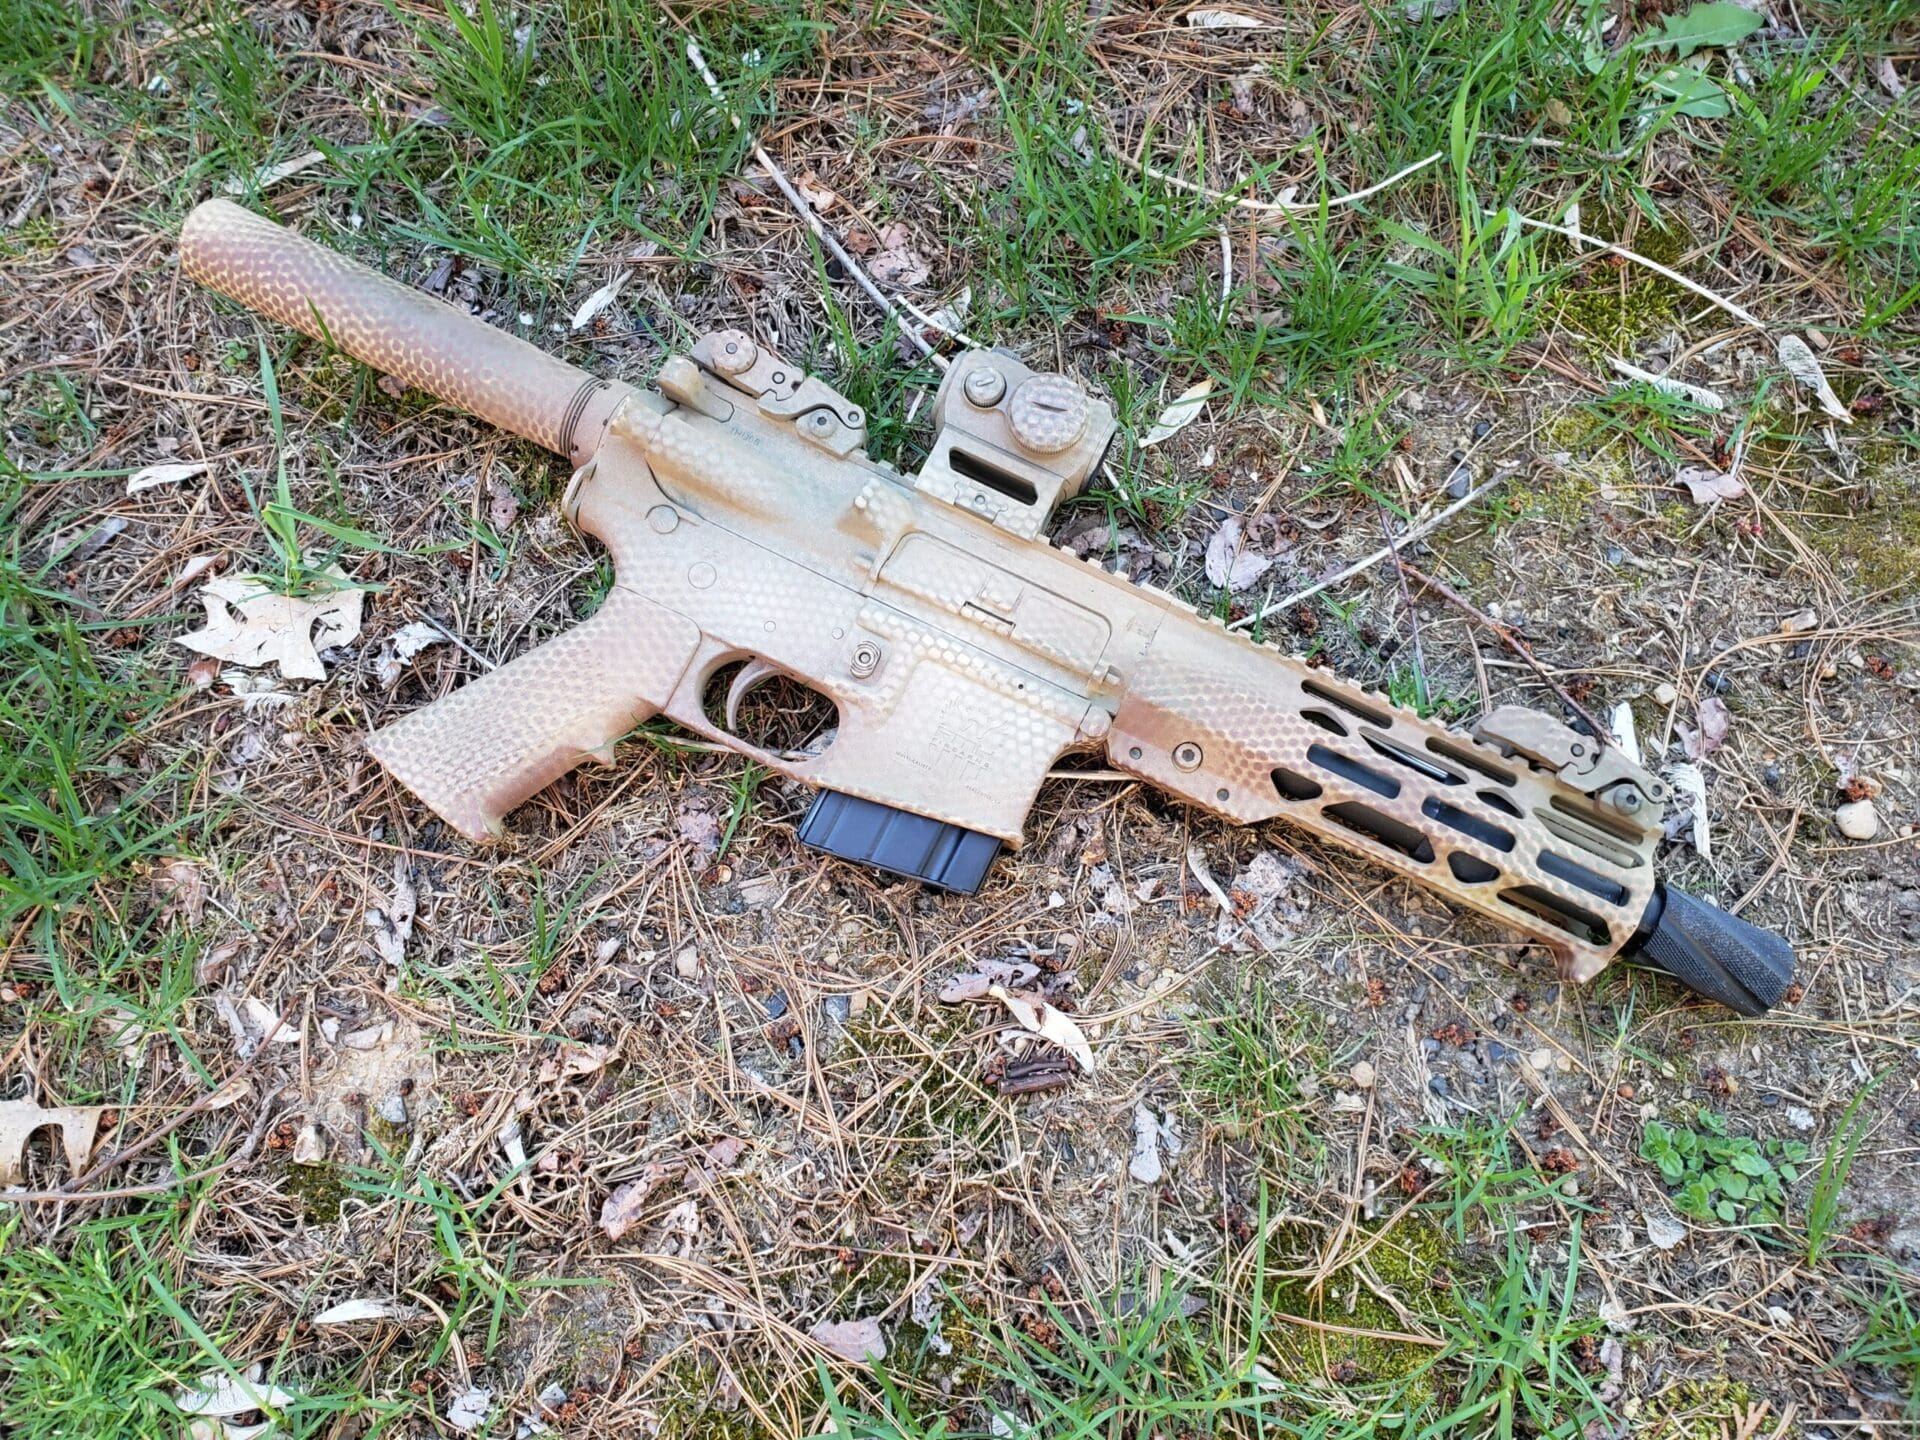
My first range session was surprisingly positive. I tried a mix of old 90’s era Chinese 7.62x39mm FMJ, Yugoslavian brass case FMJ, and Russian steel-cased hollowpoint. The gun ran like a champ. No issues, which I was pleasantly surprised by. I’ve read a lot of horror stories about reliability issues on 7.62x39mm builds, but so far I’m good to go.
Sight-in with my cheap Amazon sight was fast and easy. It was almost on right out of the box and only required minor adjustment. It was a fun build and actually looks okay with its rattle can finish over mismatched parts.
7.62×39 Rifle
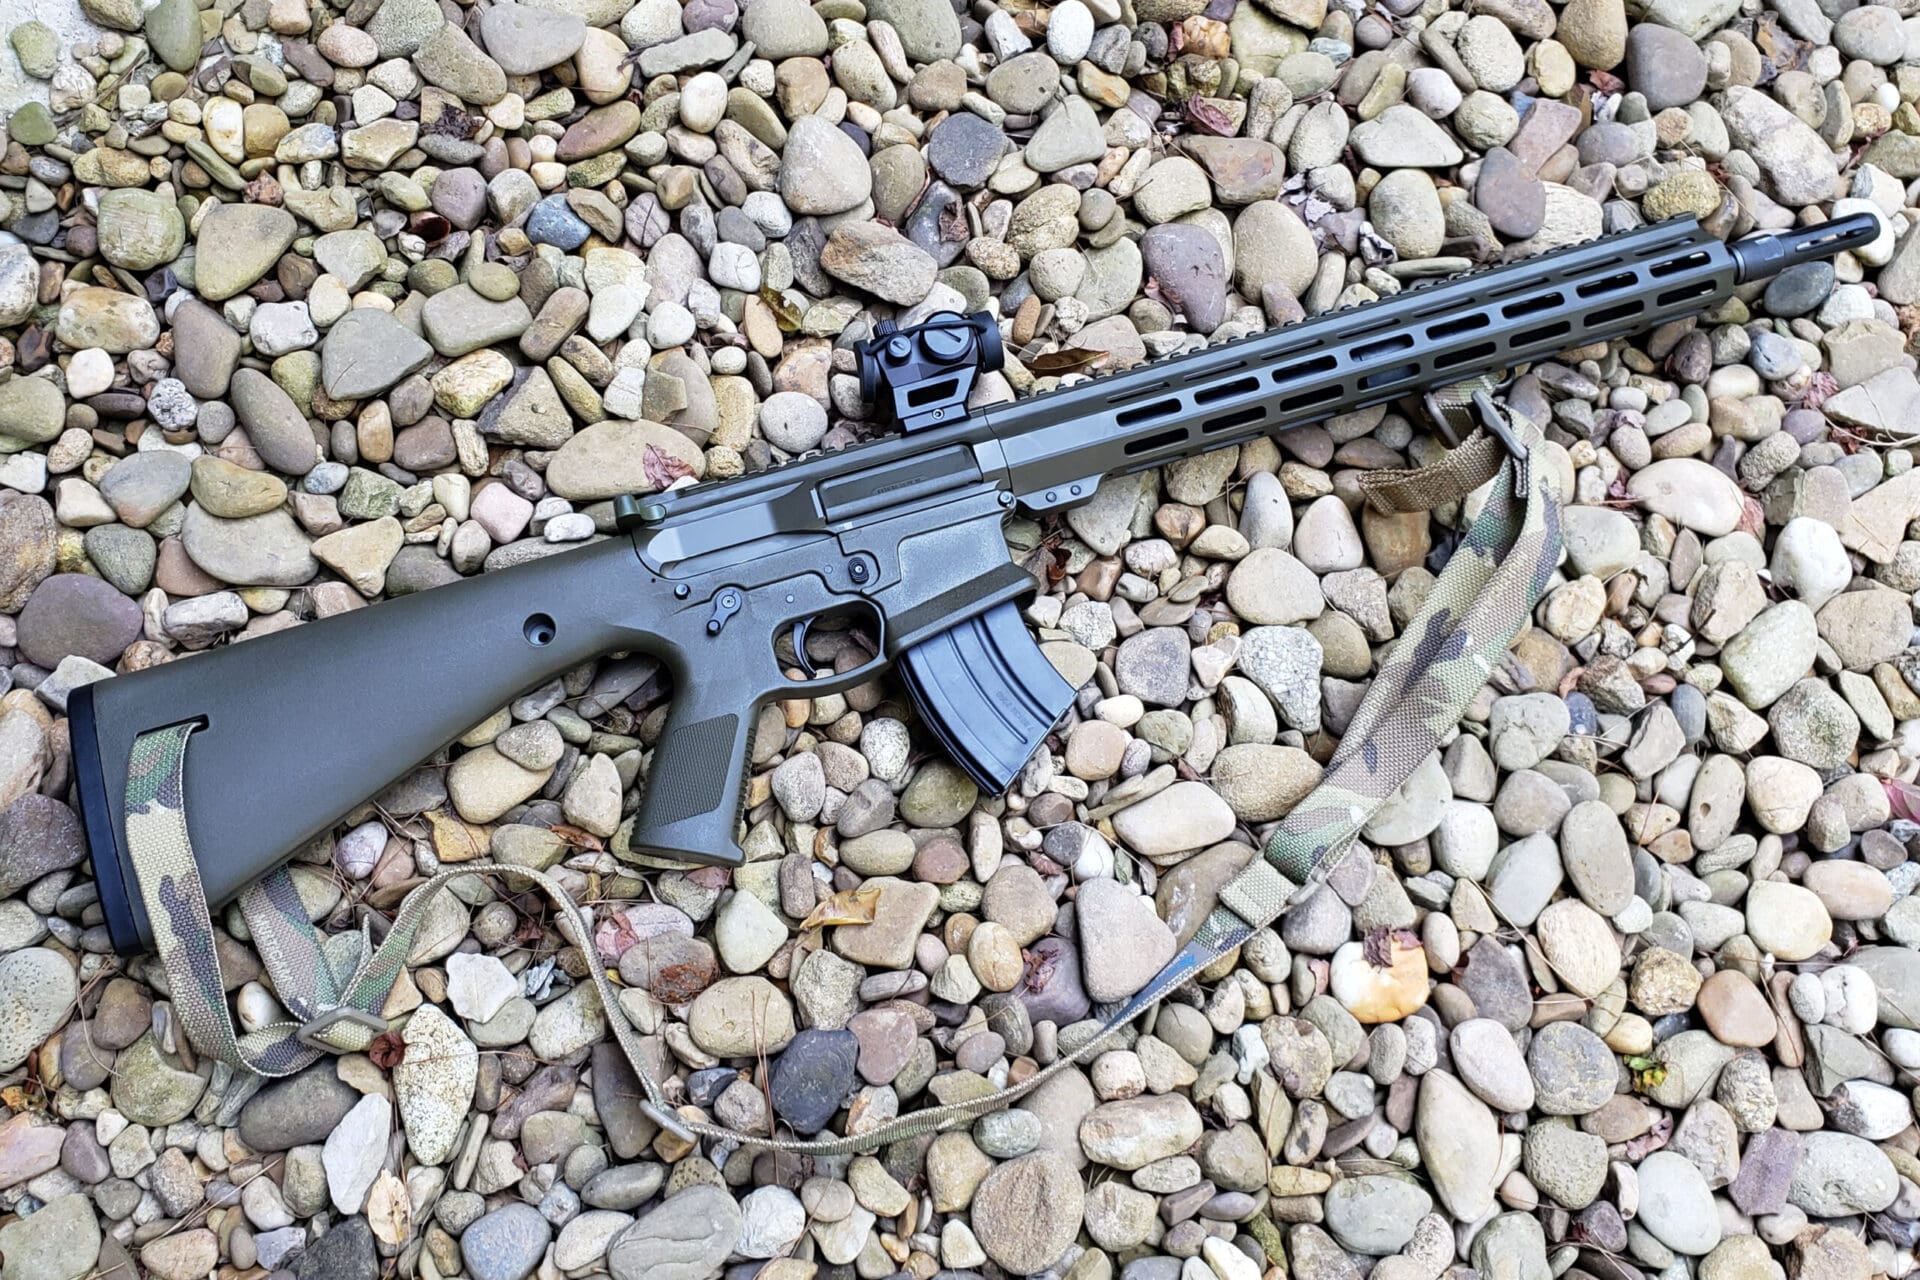
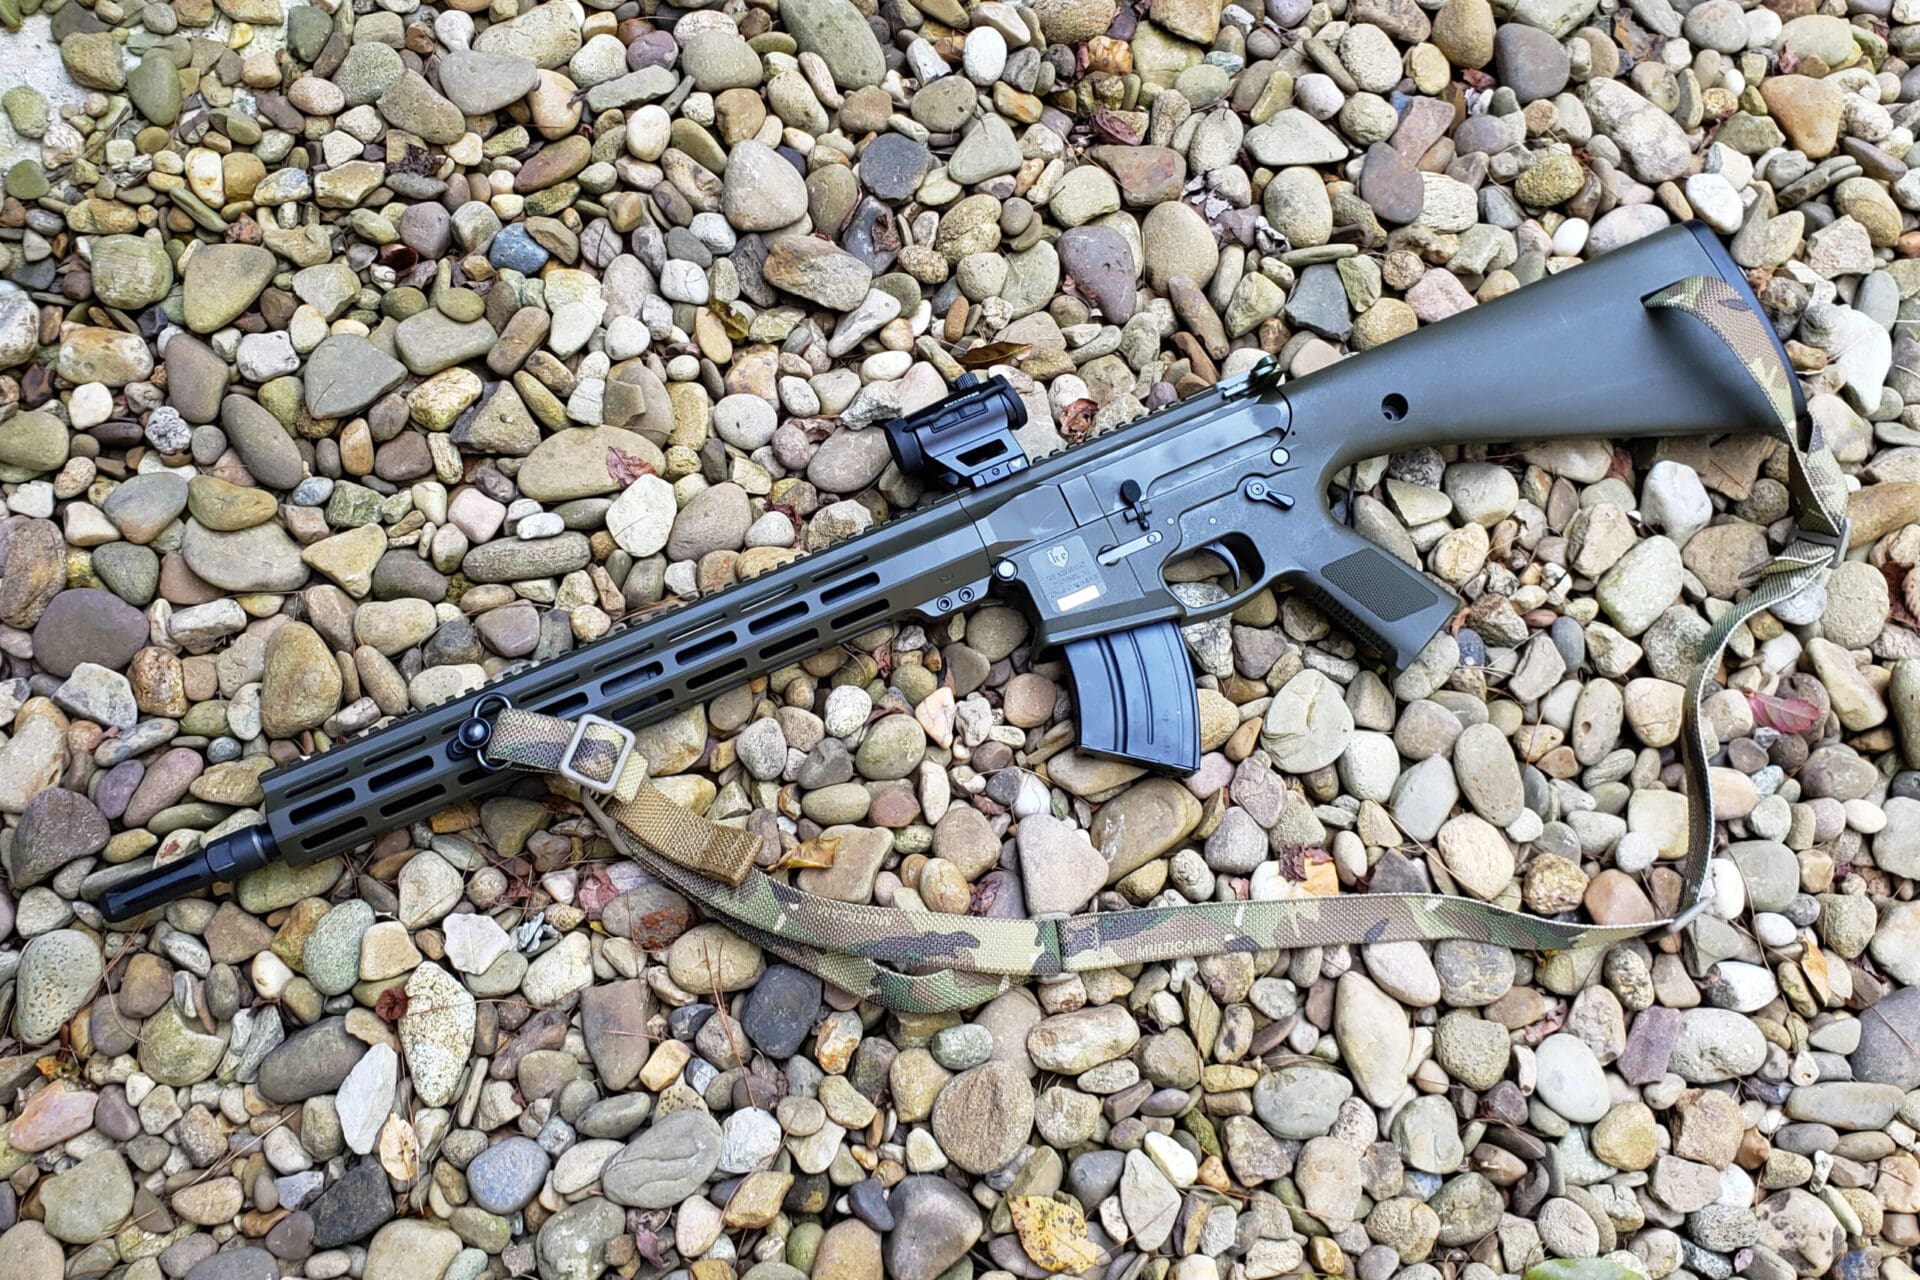
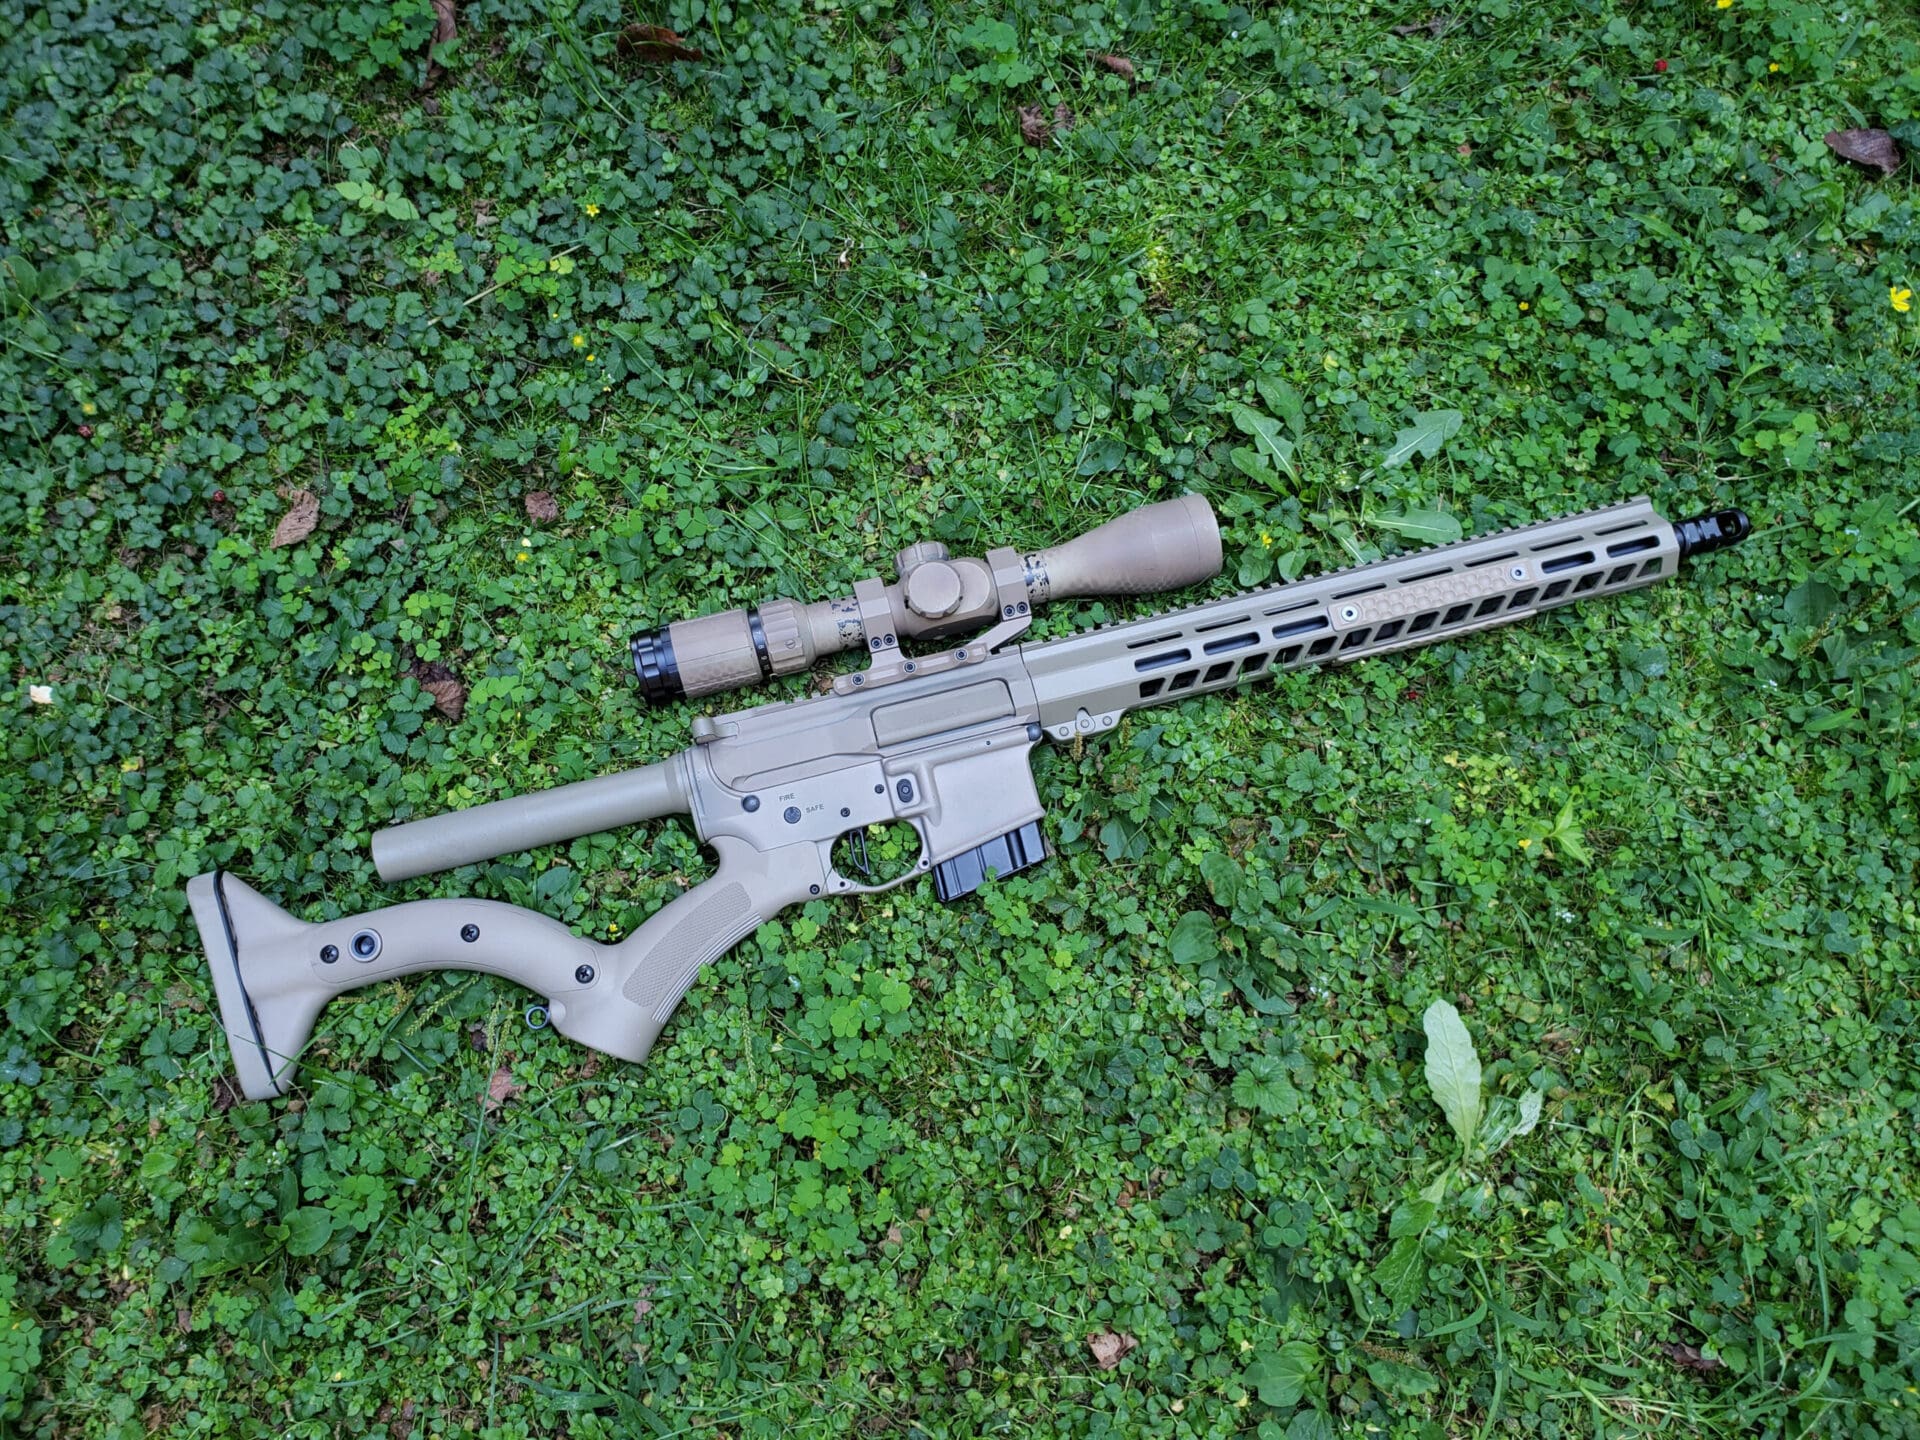
Since the pistol build went better than I expected, I decide I needed a 7.62x39mm rifle to go with it. I picked up a KE Arms lower in olive drab from Brownells. I had used one of these for a 5.56 build a couple years ago and I’m a fan.
I love the A1 length of pull, light weight, and simplicity of just buying the whole lower half pre-assembled. I got a blem model and saved a few bucks, and honestly, I can’t tell what the blem is supposed to be. Maybe more critical folks would pick it out, but it looked good to me.
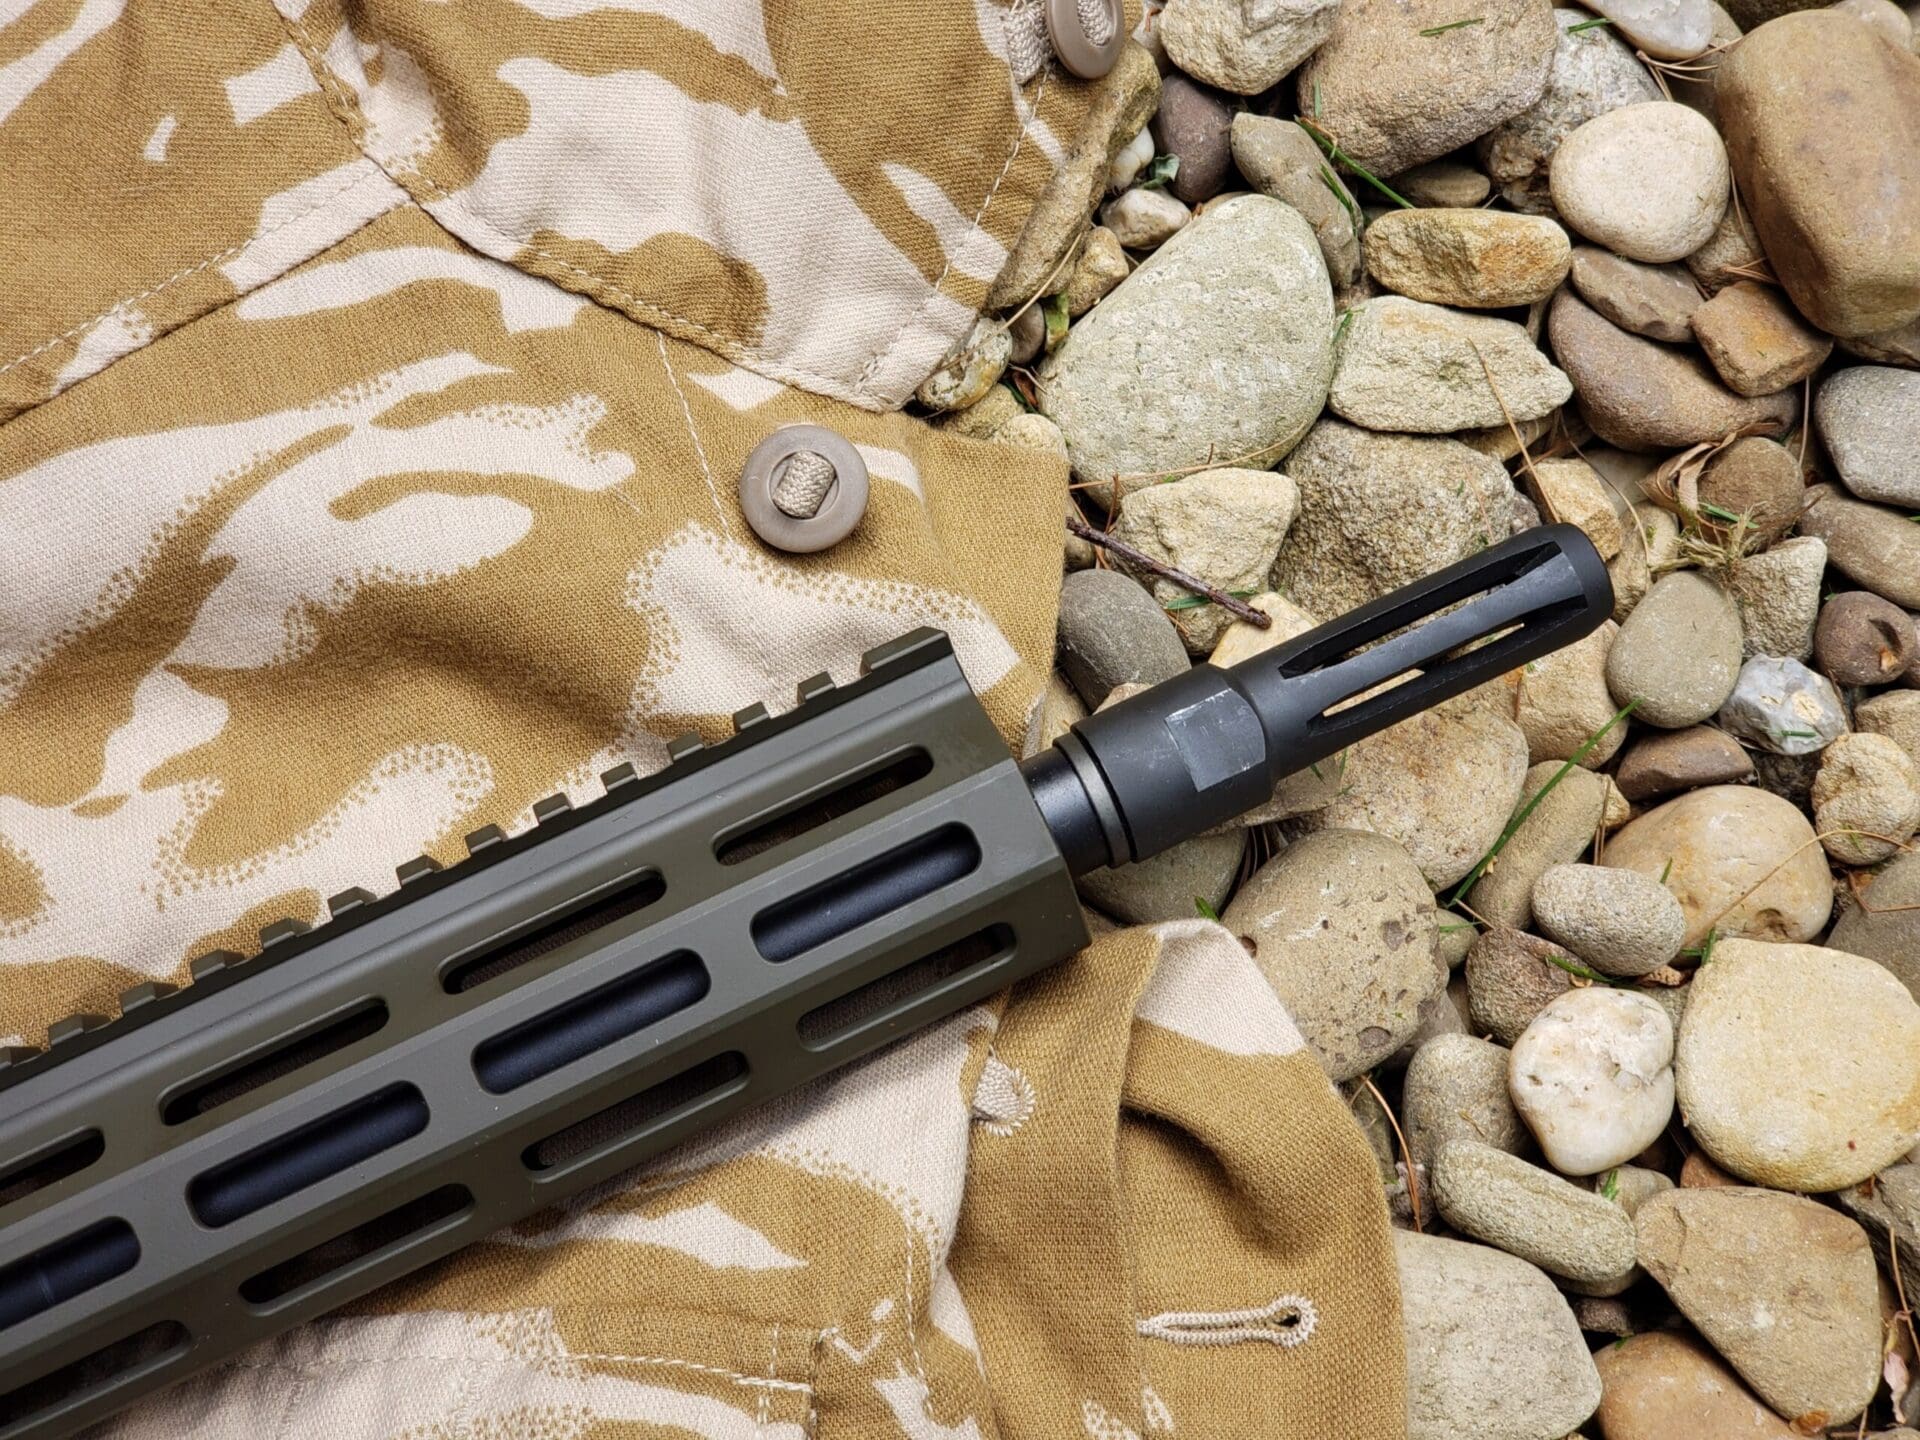
This time I got a barrel from KAK Industry and a bolt carrier group from AIM Surplus. I used a matching OD green upper and rail combo from KM Tactical. KAK had just introduced their M58 long flash hider and it proved to be a great choice for this build both in looks and function.
I can’t afford to put high-end optics on everything I build, but wanted to do something decent for this one and ended up with a Swampfox red dot and mount for this. It’s no Aimpoint, but I’ve used a number of Swamp Fox pistol and rifle red dots, and their LPVO scope with good results. If you’re a first responder, they have a great purchase program, but even their regular street prices are quite affordable, especially if you watch for sales. Again, not going into combat…it would do fine.
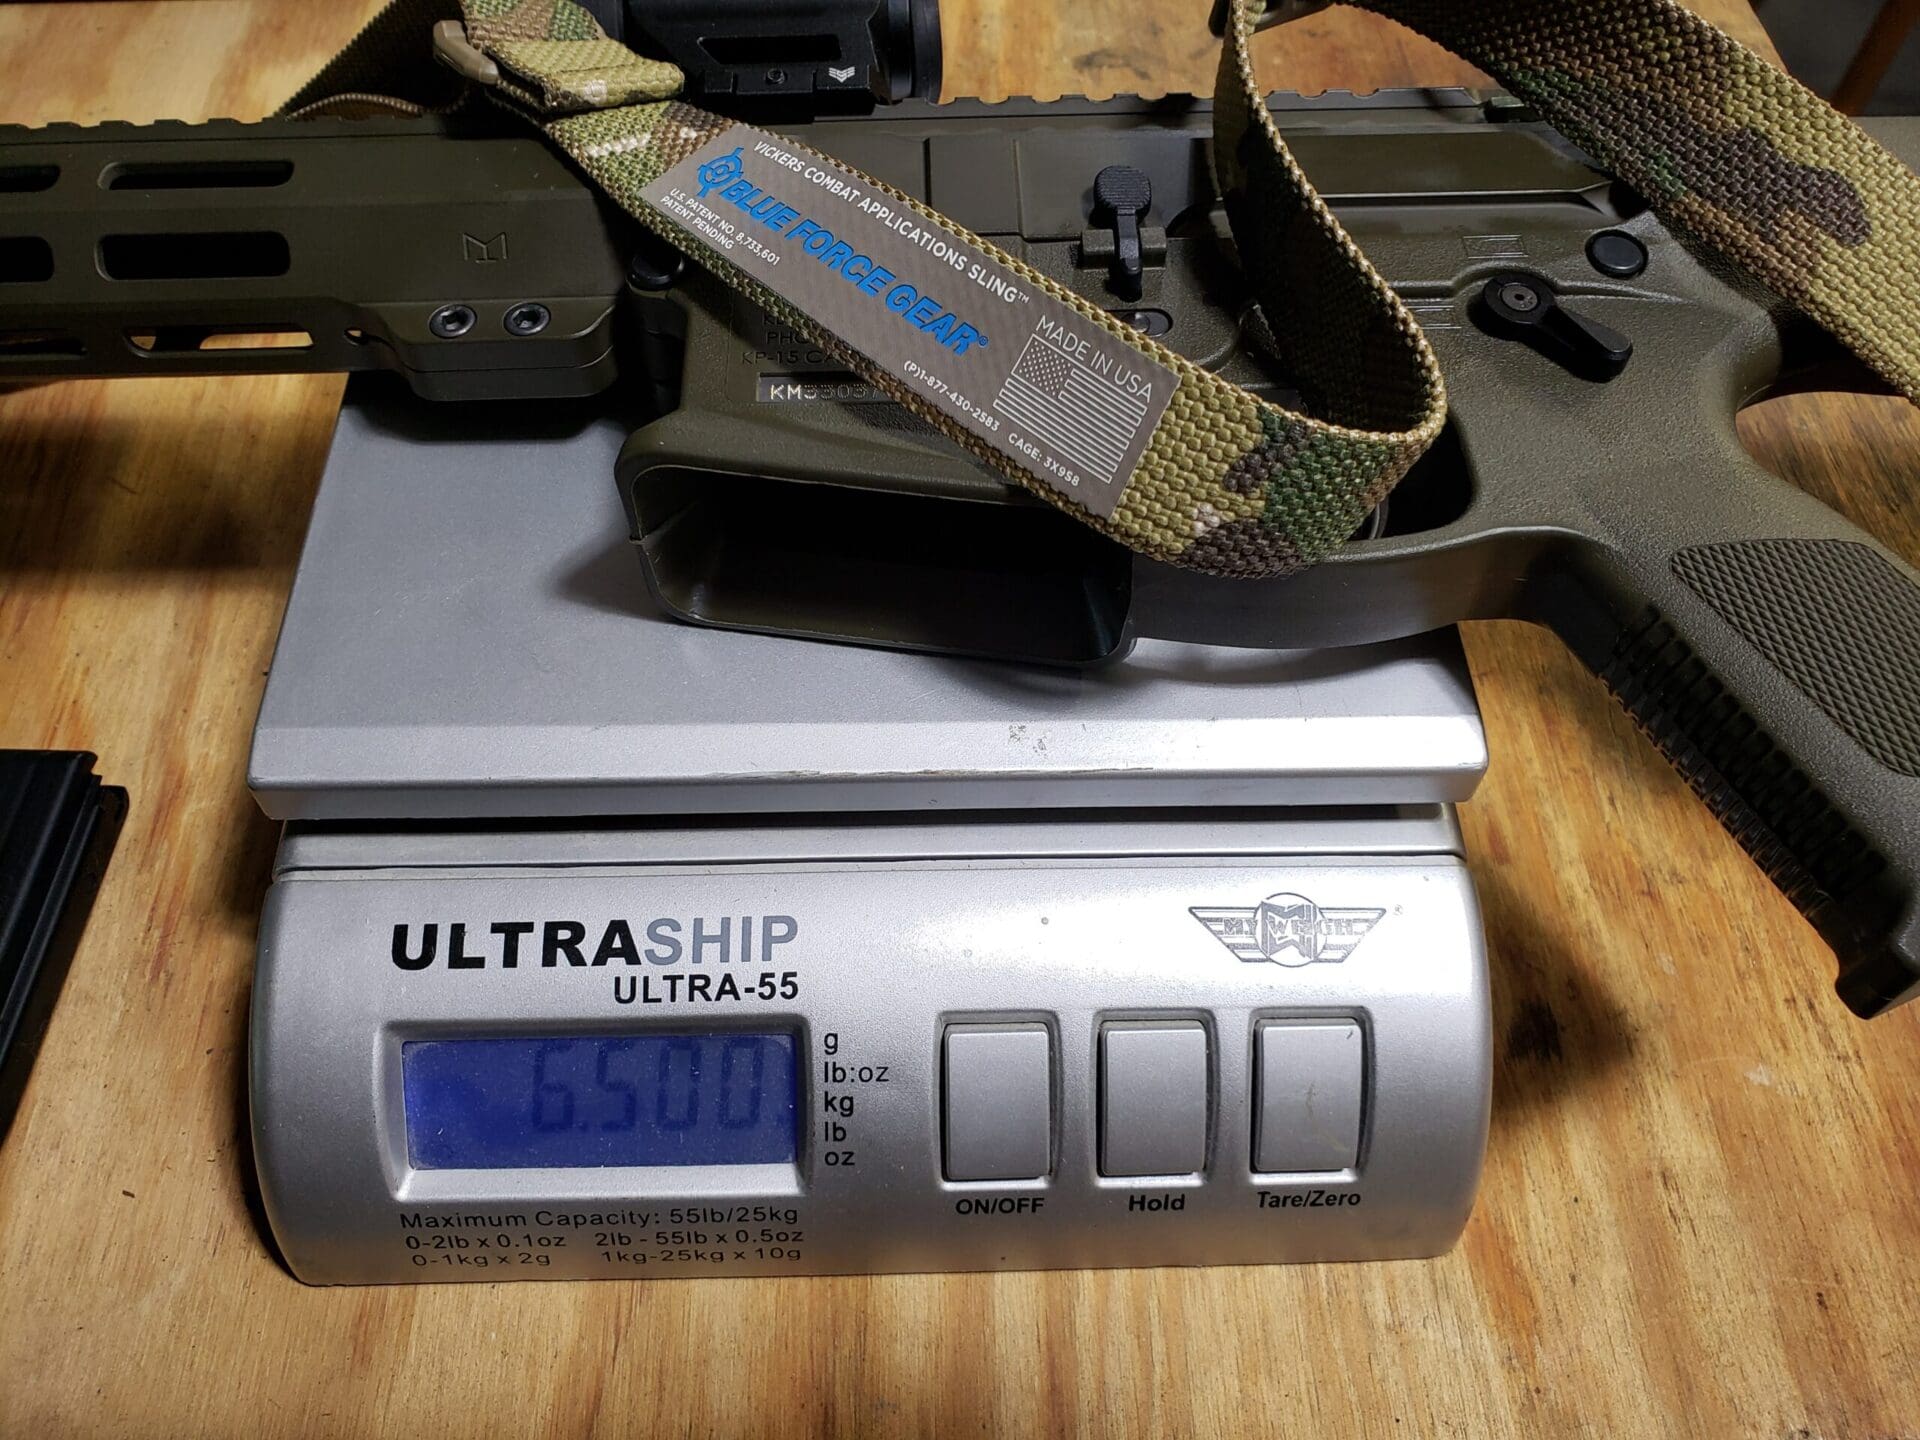
Since this was my second 7.62x39mm build I picked up a few more mags, 20-rounders this time. I also snagged a few 30s off of the Gun Accessories for Sale group from a guy on Reddit. I finished it off with a Vickers sling from Blue Force Gear that I had on hand. Weight with the sling attached, and no mag in the gun was only 6.5 pounds.
Range time with this one was largely uneventful. I don’t know if I’ve just been lucky with my 7.62×39 builds or what, but both have run without any problems. I shot the same mix of ammo through the KE Arms build as the pistol, and added in some Winchester brass-cased loads as well. The Swampfox optic was dead-on right out of the box, I didn’t even need to touch it.
The only problem I had was my charging handle popping loose under recoil. It was a Timber Creek Enforcer and appeared to be getting rounded off on the corners that engage the upper receiver. I’m not sure if this was an issue of the greater recoil impulse of the 7.62×39 over the 5.56 or not. They have a lifetime warranty, though so I contacted the company and they sent me a replacement charging handle, which I’ll give a run on a future 5.56 build. In the meantime, I dropped in a GI spec charging handle, which has worked fine. I painted it olive drab to match the rest of the gun.
This was a pretty fast build, particularly since I bought the completed lower half from Brownells. It’s a lot more pleasant to shoot than the 7.62 pistol and I like the OD finish, no rattle can required.
The Featureless Space Gat
Okay, if my first build was a little controversial due to my…shall we say…budget parts, this one’s going to raise eyebrows due to its configuration. Let me start by saying, I don’t live in a state with a so-called assault weapons ban. At least not yet anyway.
With that said, I’ve been curious about what my brothers who live behind enemy lines had to deal with for a while, and wanted to see what I could do within those limitations. Although each state’s bans differ somewhat, basically this meant a fixed stock, non protruding pistol grip, no bayonet lug, no flash hider and a ten-round magazine.
I started with another one of my $29.95 blem Palmetto State Armory Stealth lowers, and another upper from my bin. I think this one was from KM Tactical. I used an Aero Precision lower parts kit and another GI charging handle.
Since I couldn’t use a conventional grip and stock, I looked at what my featureless options were. I had looked at a couple of California compliant guns at the SHOT and handled the Thordsen stock, so I decided to go with that. I got a decent deal on one from a seller on Gunbroker.

Since I knew I was going to be limited to 10 rounds I decided to build this one in a heavier caliber than 5.56. I had just done the 7.62×39 builds, and already had a couple 300 Blackout builds, and wanted to try something else. After doing some research I settled on the 350 Legend as a good balance of power, along with price and availability. It also uses a standard 5.56 bolt face. I got a CMMG barrel from Brownells as well as a few C-Products 10-round magazines.
I still needed a bolt carrier group, a handguard, some sort of sites and a muzzle device. I also needed either a compensator or linear compensator since flash hiders and flash cans are a no-go in the ban zones. I ended up going with a Gamma VG6 9mm brake. Due to the .350’s bore diameter you have to step up from .30 cal muzzle devices. There aren’t a lot listed specifically for 350 Legend, but anything designed for the 9mm and its .355 bore diameter will work.
While I bought some parts for this build, it was also a “just because” build so I decided to see if I could trade into the rest of the parts I needed. I ended up making a couple swaps on the ARFCOM Equipment Exchange and Reddit Gun Accessories for Sale board and got a Midwest Industries handguard, a Springfield Armory Saint bolt carrier group, and a Primary Arms SLx 4-14x Scope and Aero Precision mount. I had already started painting this rifle FDE and the used PA scope was already rattle canned that color, so it was perfect.
This build was going on parallel to my GUU-5/P build and it was a test bed for my painting skills. I had done the 7.62 pistol by this point, but hadn’t worked with the Norrell’s Moly Resin or Brownells AlumaHyde 2 yet. Since this was also a partial parts gun and kind of a goofy build, I figured I’d use it as practice before I painted my GUU-5 upper that I actually cared about.
I had a bottle of FDE Moly Resin to practice with and, long story short, it took me three tries to get my spray technique and curing process down. Twice I either oversprayed, or hadn’t shaken the resin enough. I ended up stripping the finish with brake cleaner and started over. The third time I thought it looked okay and did the oven cure.
When it was done I saw thin spots that indicated that the resin still hadn’t been shaken enough. I started off okay, but realized that you had to make sure the resin didn’t sit in the air brush too long or it would settle out, and that you needed to re-shake the bottle every time you refilled the reservoir.
I also learned more about pre-heating my parts, and handling the painted part to avoid finger marks or other contaminants from it touching anything. Luckily you can apply multiple coats so I did one more layer with what I had learned, baked it, and called it good. It wasn’t perfect, but it would work. Spraying the lower after what I learned was much quicker and I did it in one try.
The handguard I got in trade was black, and I used a pistol buffer tube that was also black. I went with a pistol tube since I wasn’t attaching a buttstock to this build with the Thordsen stock anyway.
The stock came with a polymer cover that would slide over a carbine buffer tube, but I just went bare buffer. I’ve been thinking about putting a short buffer on it, but went with what I had in my parts bin for now at least. I decided to finally try my AlumaHyde 2 on those parts since this build was my paint test project.
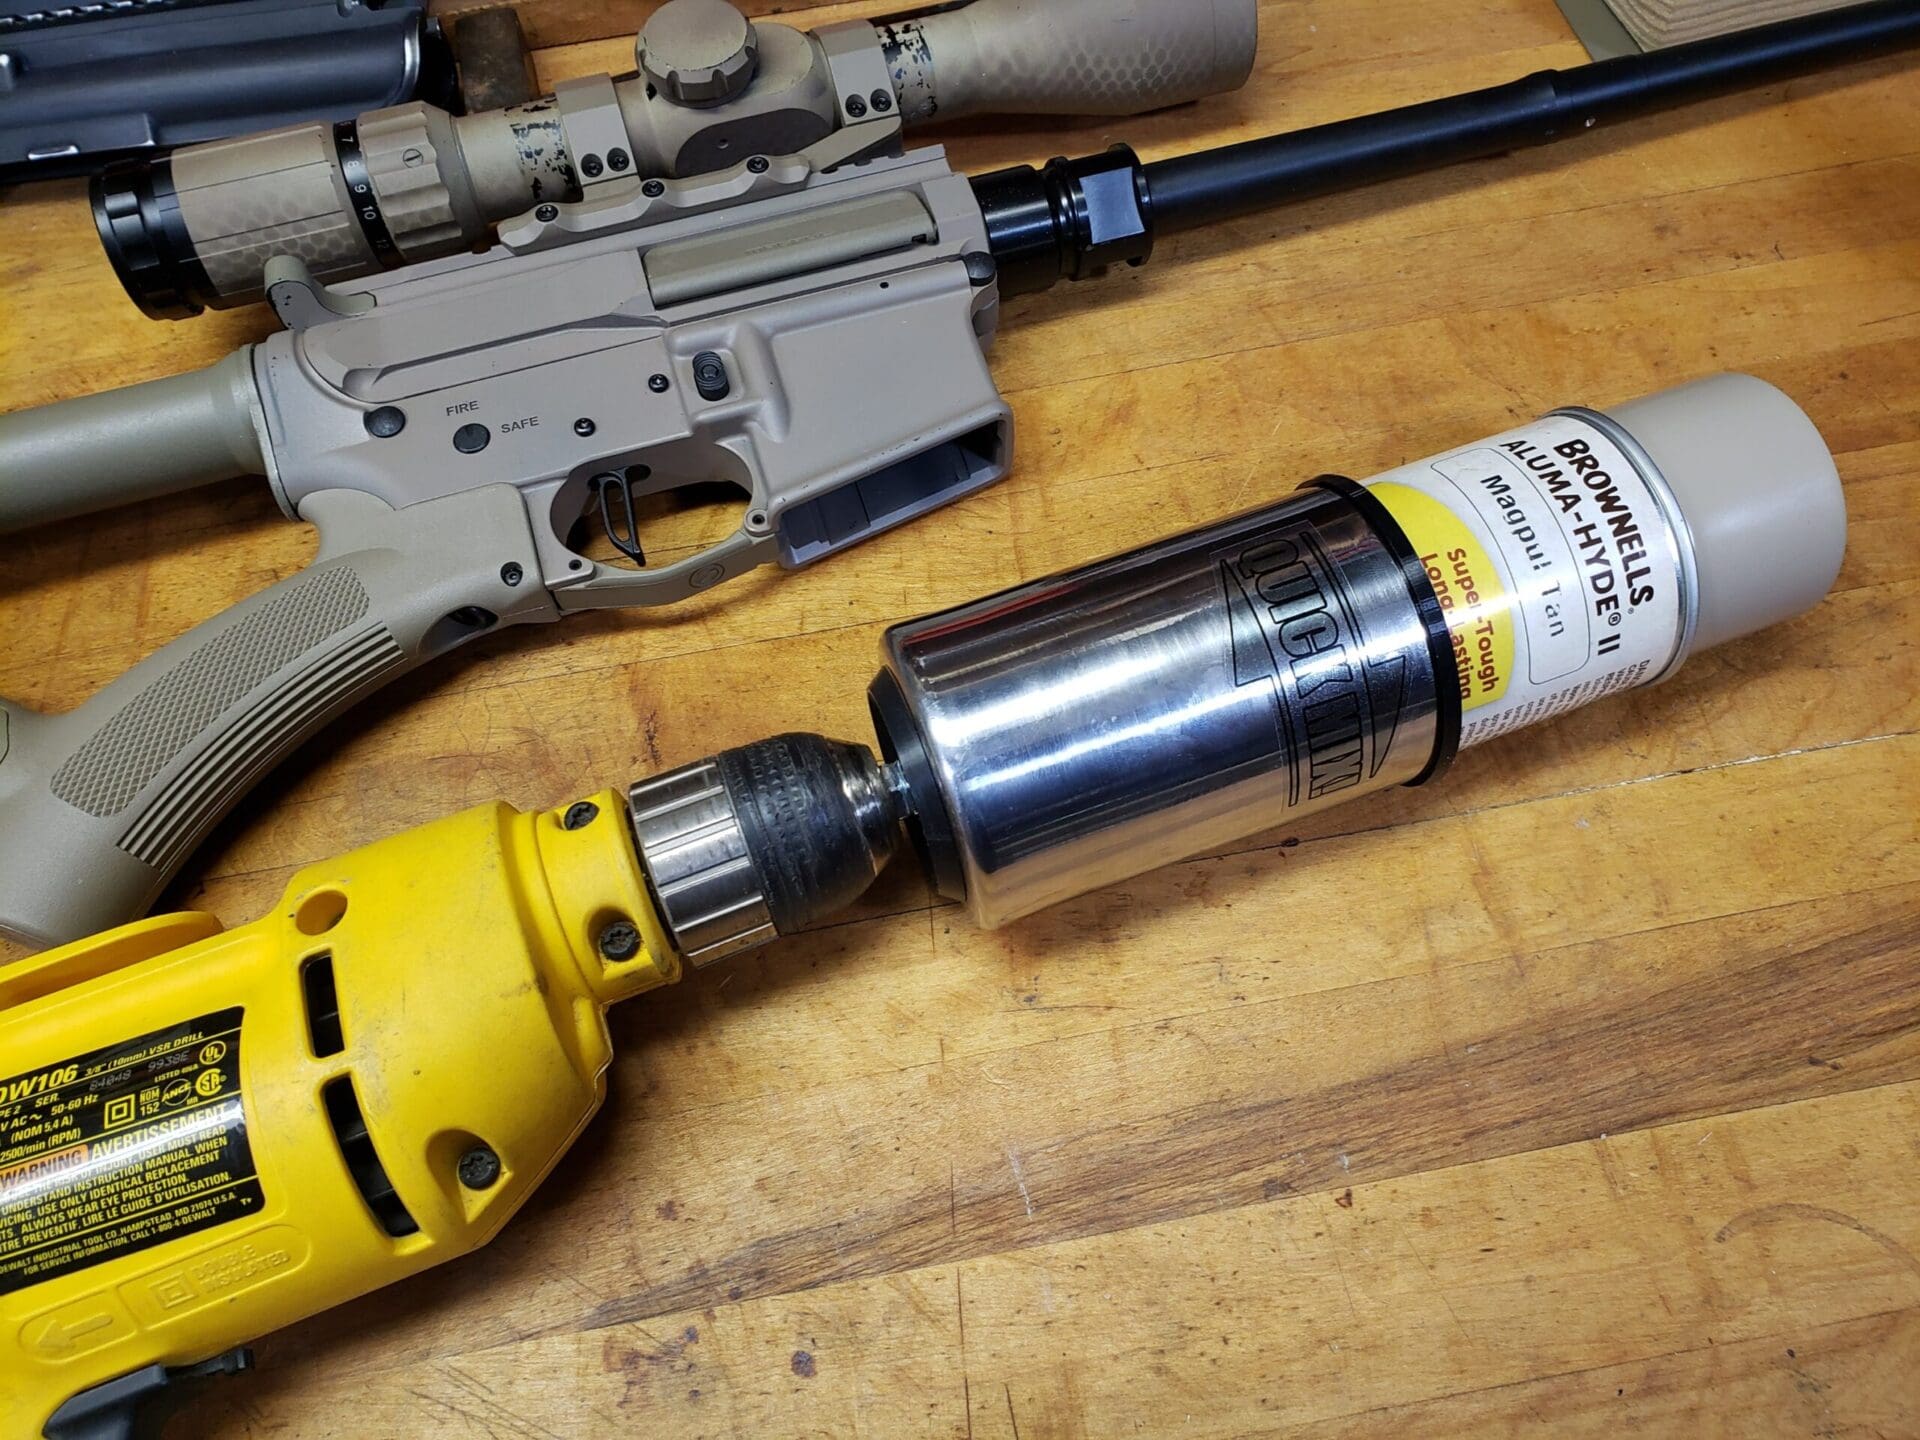
As I noted in my earlier posts, my first experiences with AlumaHyde were less than stellar. Even though I thought I had shaken the crap out of it, and then shook it some more, my finish came out clumpy and rough. I did the buffer tube and some small parts first and ended up having to scrape and sand the finish off and start over. AlumaHyde is tough, even when it’s not fully cured. After discovering the drill mounted paint can shaker, I tried again. Results after that were much better. I did the buffer tube and small parts again, then did the handguard.
With the parts finished I finally assembled the rifle. Even though I started this project before the Retro builds, it was actually the last build I finished over the summer by the time I got the last of the parts I needed. The actual build was pretty straight forward and everything went together without issue. No surprises during assembly is always a good thing.

The finished product looks weird. It has a funky “space gun” kind of vibe and is an affront to all things that an AR should be. With that said, it actually handles pretty well.
The Thordsen stock is surprisingly comfortable and it has a short A1 type length of pull that works well with a hunting jacket. The balance is decent and getting proper eye relief on my optic isn’t an issue. I think the scope is honestly overkill for the .350, but since I traded into it, it’s perfect.
The biggest thing I noticed is that with the conventional sporting grip style of the Thordsen stock, I have to break my grip to operate the safety. I dropped a set of cheap rail covers for some forward gripping surface on the handguard and called this one good, too.
If you like conventional ARs, you’ll probably hate it. I know guys in the online rattle can paint group did. They didn’t get why I’d build a ban-compliant gun if I didn’t have to. Well, the answer to that was, just because.
It was a different project for me and a challenge to find parts that worked within the artificial legislative constraints of the all-too-many ban states in the country. It also proved to me how ridiculous the bans really are.
At the end of the day, this is still a fully functional, detachable magazine AR, just like all of my others…even if it does look a little goofy. Hopefully the days of so called “assault weapons” bans are numbered with the recent pro-2A court victories we’ve been seeing and folks won’t have to do builds like this. It was fun to do, but I’m glad I’m not forced to use this configuration as my only option. It’s past time that citizens in the rest of the country should have to do it either.
Back to Work
So that pretty much finishes up my summer builds. It was a lot this year, but it kept me busy. Sometimes it was frustrating, sometimes satisfying, but I learned a lot along the way and got some fun guns out of it.
Am I done with builds now? My wife only wishes that was the case. Being back at work may slow me down, but I have most of the parts for a Colt 635 subgun clone build sitting on my workbench now. That might be a story for another day.
[ED: This is the last in a three-part series. Read the first article HERE.]


Interesting build with no brace on purpose. When I got my 1st gat over 12 years ago I saw a lot of braceless under 16″ rifles. I thought “if you’re strong no problems”. General fitness & strength is not emphasized enough in the gat community. I can relate as I regained a lot of what I had years ago at nearing 70…
You were almost there for NY compliant (threaded barrel and/or muzzle device are the felony) but yeah otherwise exactly what we deal with if we want a detachable magazine (or later iterations of the Thorstein). Neat builds but hopefully the third is a discontinued relic within the decade.
From the standpoint of Shall Not Be Infringed that space gun Stock signifies infringment, oppression, etc. It is an indication of what those behind the bastardization would really like to do to the rifle, the Second Amendment and Gun Owners. Using that stock is more than just using a stock. Using that stock is disrespectful to Stoner and worse it is blindly surrendering to the oppression inherent with slavery, colored water fountains, nooses, swastikas, etc.
Tell me you live in a state without crazy infringements without telling me you live in a state without cray infringements.
Now tell me how having the AR platform widely available to the citizens of NY in whatever form it may take while being easily convertible to normal is a surrender especially when we have legal challenges out.
I get you are going for being a purist but try not to alienate people doing the best they can in a shitty situation.
The Stoner action/design is a result of the Defense Acquisition Cycle aka, Your firearm was made by the candidate that met the most requirements as the lowest cost (source: Defense Acquisition University).
no.
“After doing some research I settled on the 350 Legend as a good balance of power, along with price and availability. It also uses a standard 5.56 bolt face.”
I really hope we can strike some of those “Straight-wall cartridge only” restrictions via the ‘Bruen’ decision.
Is the real issue with them a perceived hunting safety thing? .44 mag on up can deliver some serious downrange damage on flesh…
Is it just me or is 350 Legend just a .223 case before they taper and press the shoulder onto it? The case head is the same size as a 380 pistol cartridge, so it makes perfect sense to just stuff in a .355 projectile and have room for even more powder under it. So more power and bigger holes because they want to limit tapered/shouldered cases. Hmm, makes sense to me.
All 3 case heads have different diameters, going from .3739 (380 Auto) to .3759 (223 Rem) to .3900 (350 Legend). Regular jacketed 9mm (.355) pistol bullets are the correct diameter, but they aren’t stout enough to handle the higher velocities of the 350, especially for use on deer sized animals. The manufacturers have developed new bullets specifically for this cartridge, although many of us who reload this cartridge think it would have been more logical to spec it to use .358 rifle bullets. All that being said, hunters have had good results with this cartridge on deer and hogs out to around 200 yards, which is it’s intended purpose.
The official reason for the straight walled cartridge decisions made by a few states, is the perceived greater danger posed by errant projectiles from high velocity rifle cartridges compared to that of slower, larger diameter, less efficient projectiles such as shotgun slugs and large caliber handgun bullets. It’s more a matter of how relatively dangerous a projectile is farther downrange, than simple power. In the glaciated (i.e., relatively flat) agricultural regions of these states, a shotgun slug or 44 mag bullet will likely go to ground within a couple fields distant, or before it leaves the woods. A bullet from something like a 308 or 7mm, say, can reach the next town before going to ground. That’s the argument. The real world danger has been hotly debated for years, and the states in question are slowly coming around and beginning to allow more effective cartridges for deer hunting. I don’t think anybody will attempt to use Bruen to argue against this, but who knows?
Almost want to put something together to test ludicrous speed with copper solids.
Interesting idea, would likely crack 3,000 fps with the lighter fluted 9mm solids. That’s some serious RPMs to tear things up. The lighter ones may not load well in an AR, but in a bolt gun or break action…
I like the look of the KE arms lowers, but apparently they are communist sympathizing bastards. Not kidding. I don’t know all the details but they are partnered with that D-Bag from inrangetv. Do your research, sadly you have to be wary even of gun manufacturers anymore.
theres a reason i have 6 ar platform rifles with bca uppers
they just run like a top and are accurate
especially with factory match ammo
even my two 7.62×39 guns have shot 2 inch groups at 200 with tula
theyre the best deal out there
in the entire firearm industry
Just when I did not think the AR platform could be any uglier I get proven wrong.
Oh we have such sights to show you.
Was that a intended pun, re: sights? 😉
Hellraiser reference but I will take the bonus pun 🙂