I’ve never met anyone who likes the sproing! Sure, there are those who, “Don’t mind it,” possibly because they know not their options. But given a choice, I bet most would eliminate the unpleasant, springy creek and slap of a Mil-spec buffer system that can run down your spine like nails on a chalkboard…or like when you see that odd-sized school bus that’s neither a short bus nor a regular length bus (or maybe those only bother me).
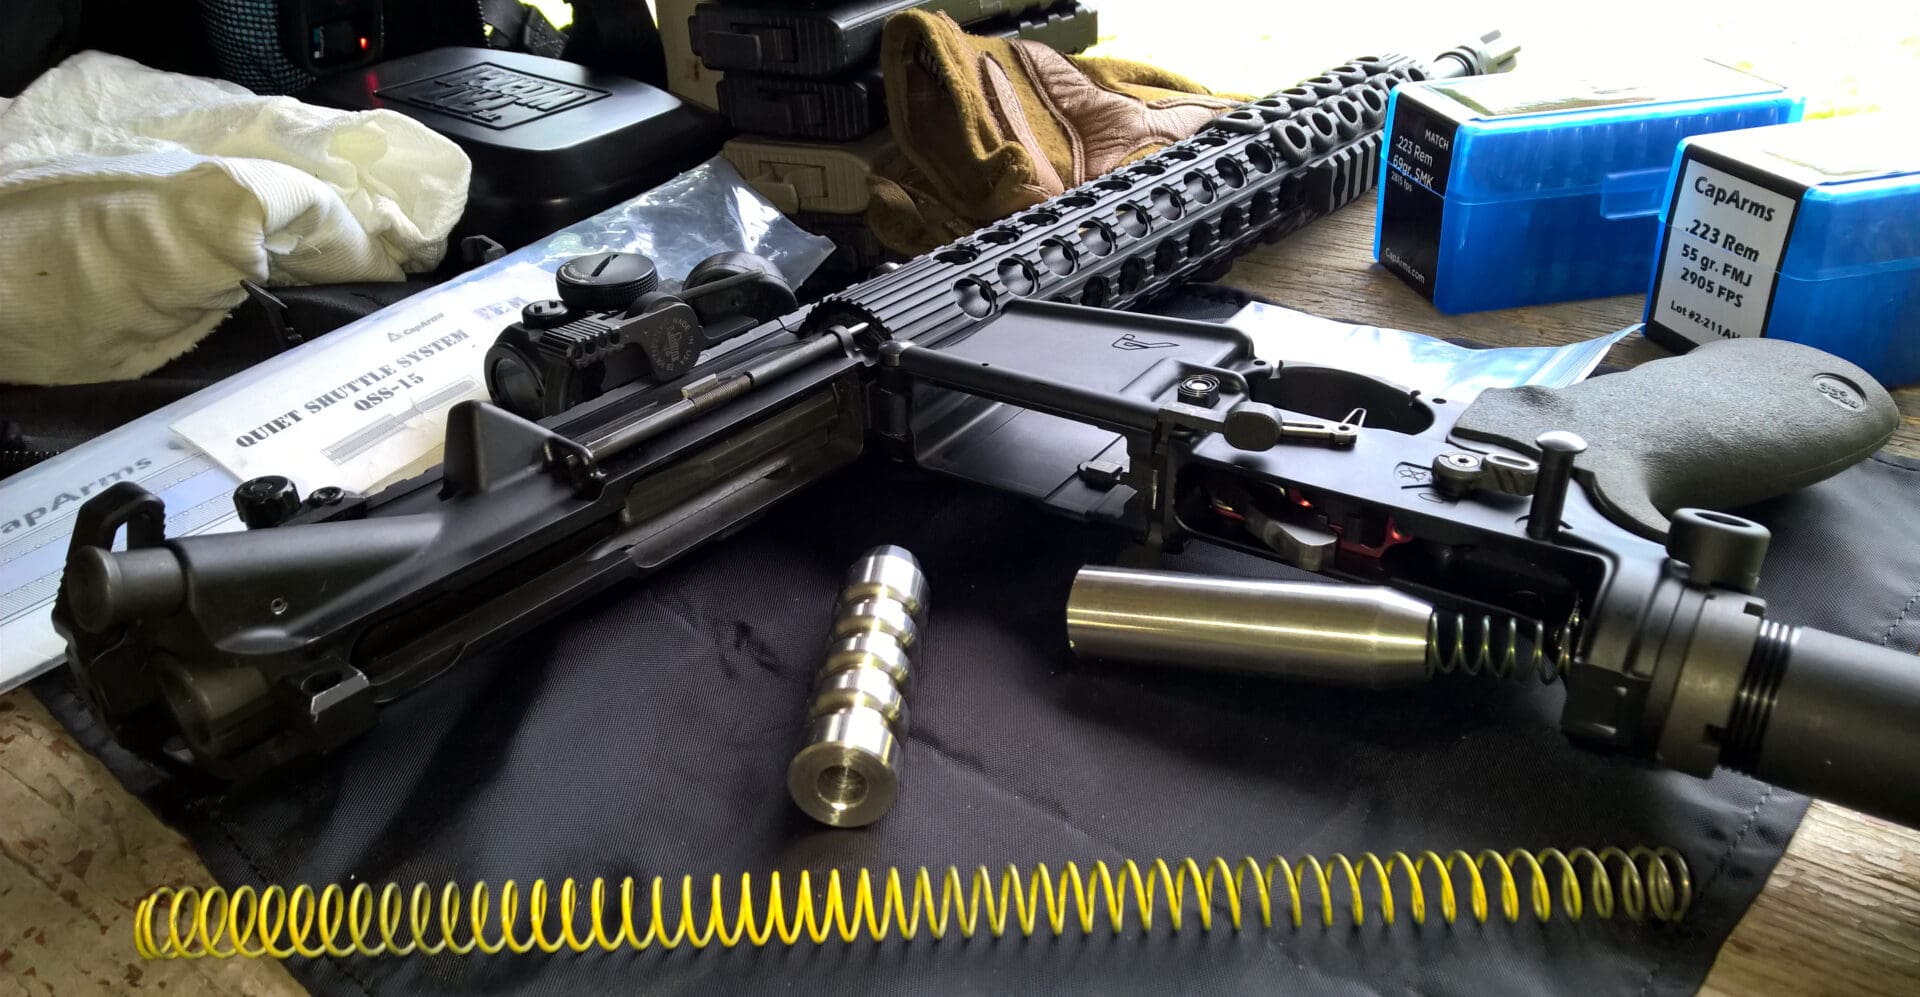
As someone who prefers no sproing, I immediately took notice when CapArms announced their Quiet Shuttle System (QSS). CapArms is TTAG’s official ammo sponsor and I’ve been very pleased with their dinner-plate-clean rifle and pistol ammo. So, naturally, I was intrigued to see them enter the firearms component market with a buffer system that not only claimed to be quiet and smooth, but also adjustable (no tools required).
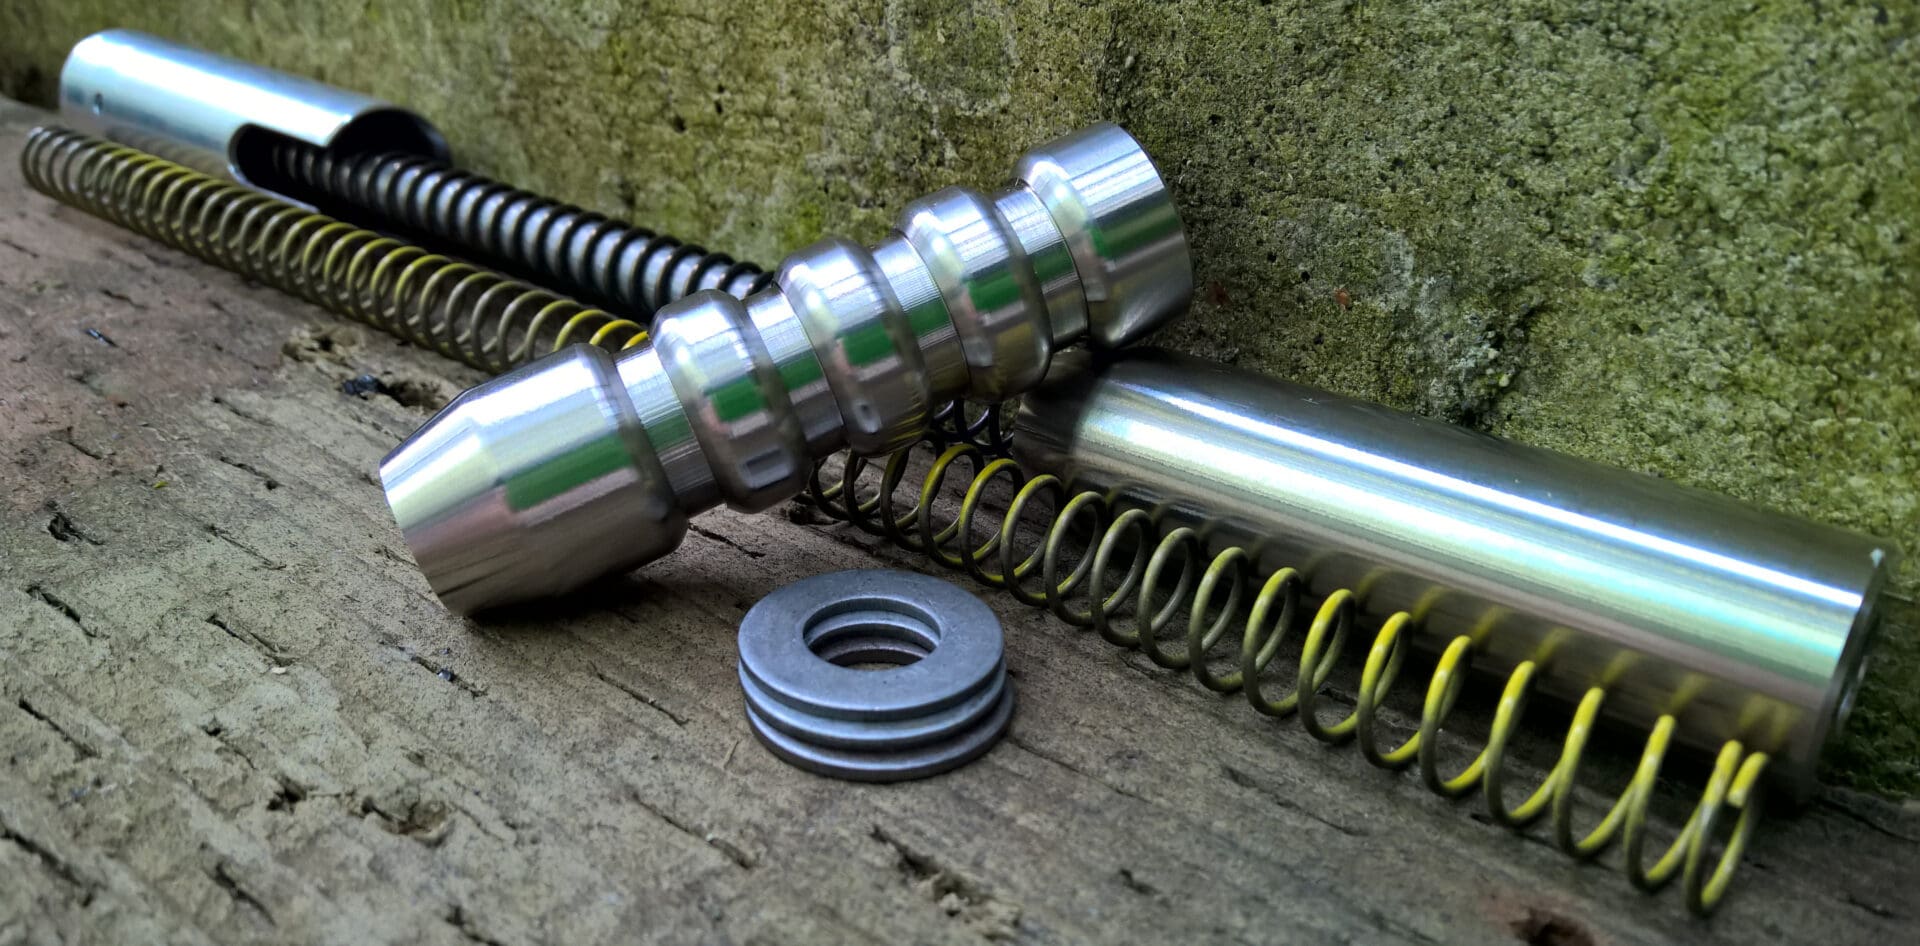
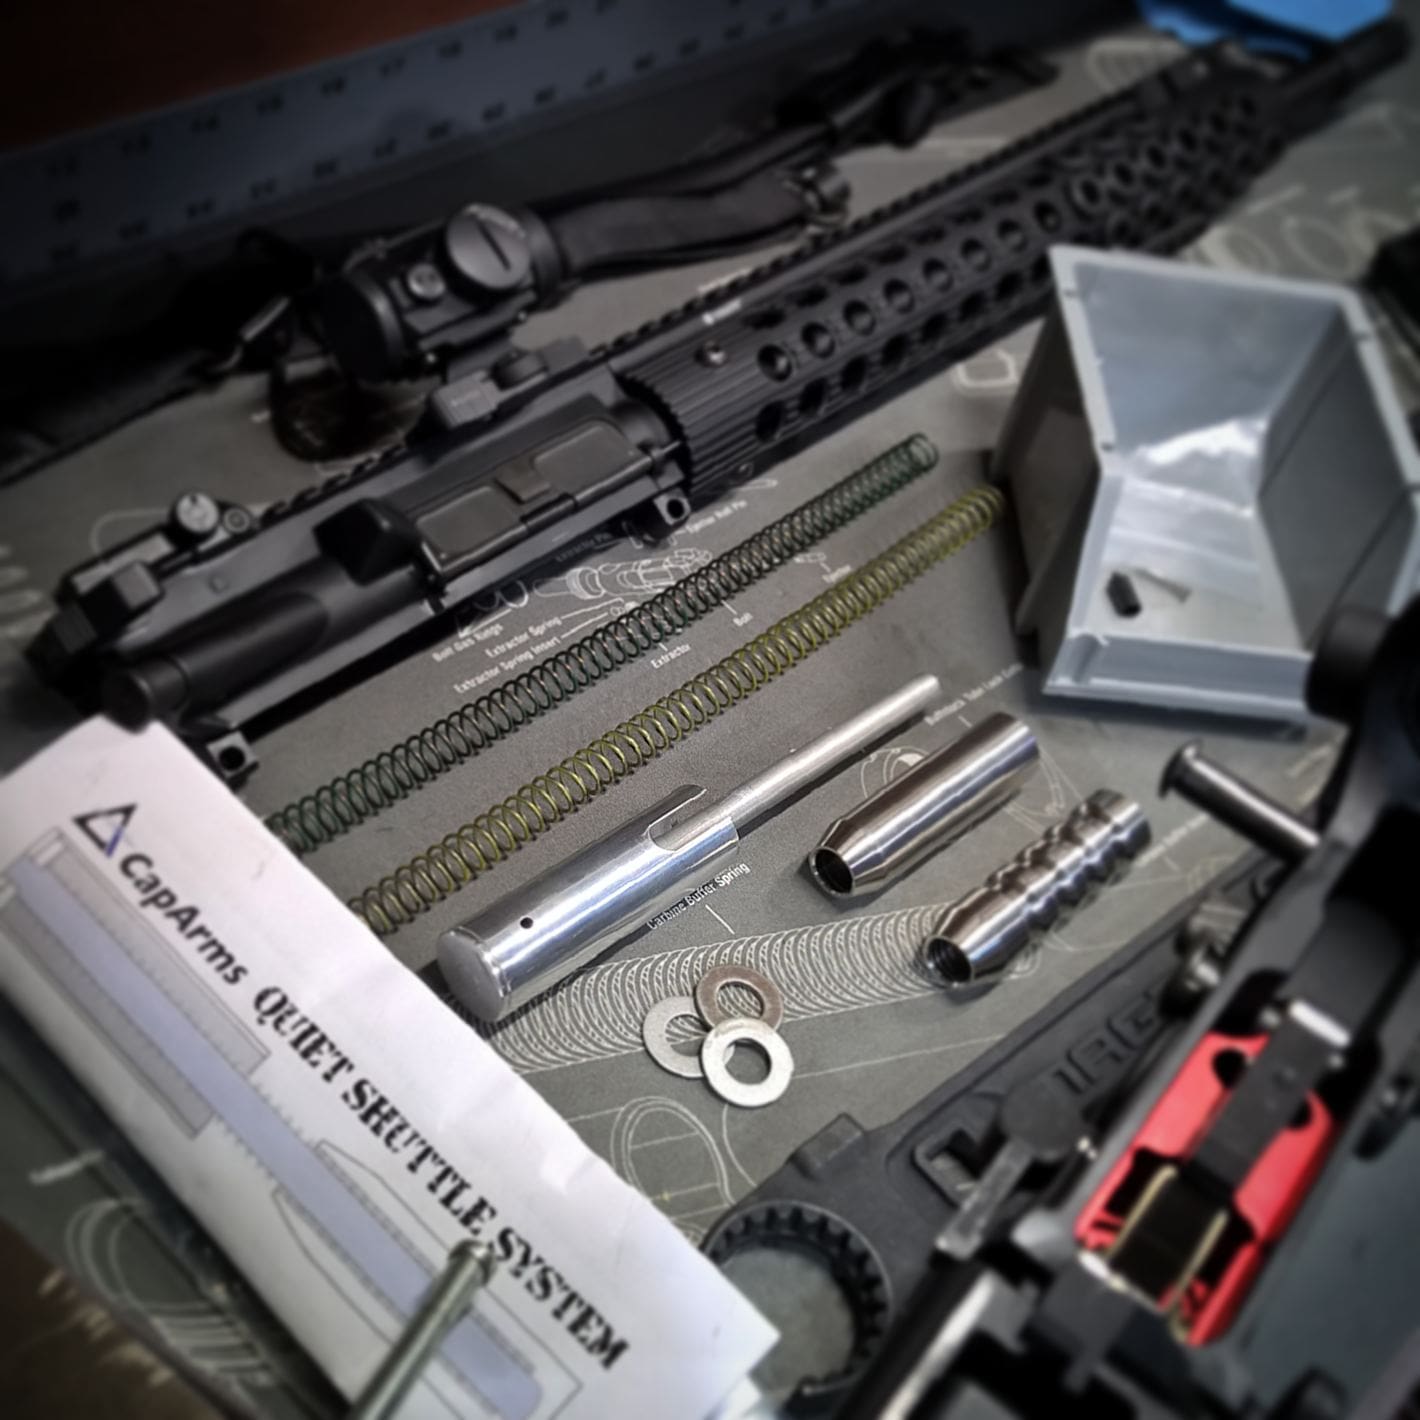
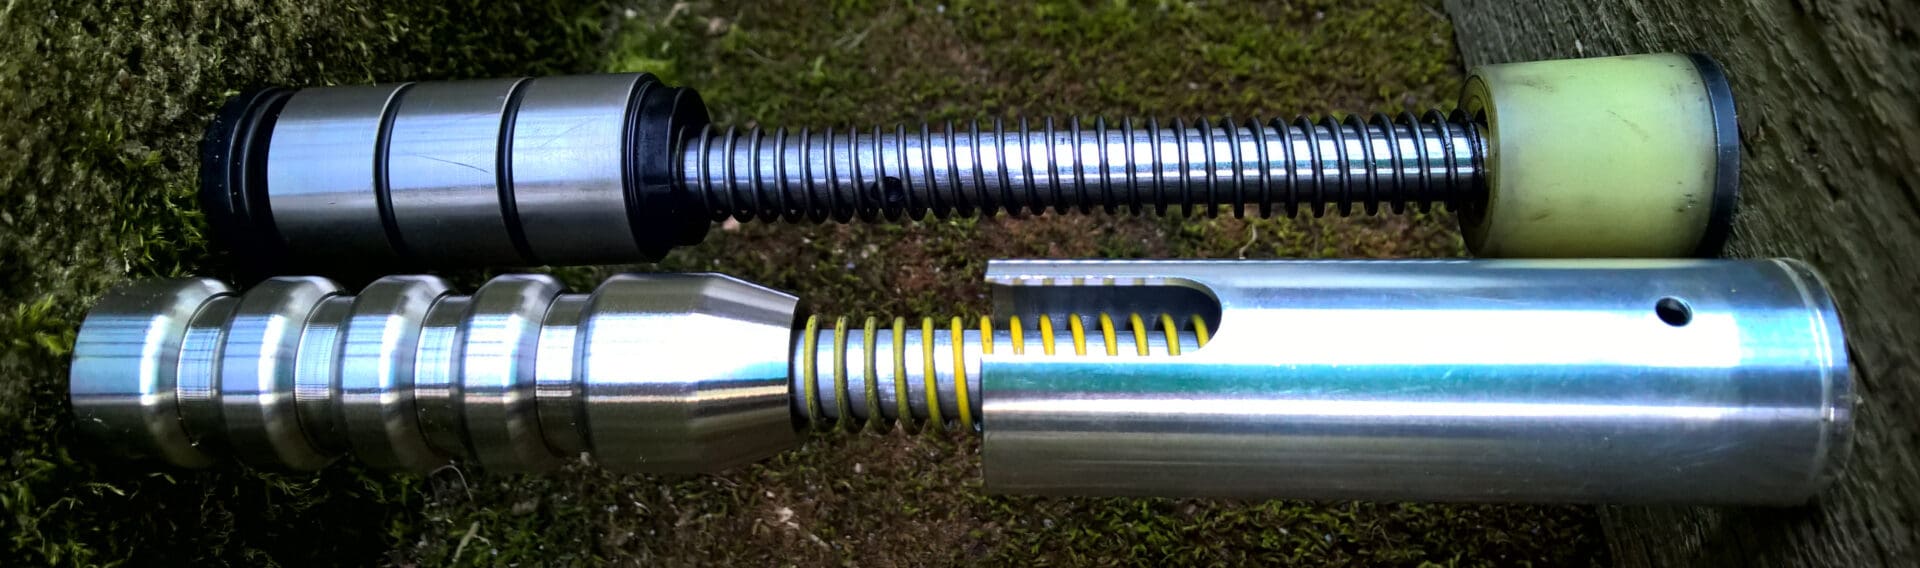
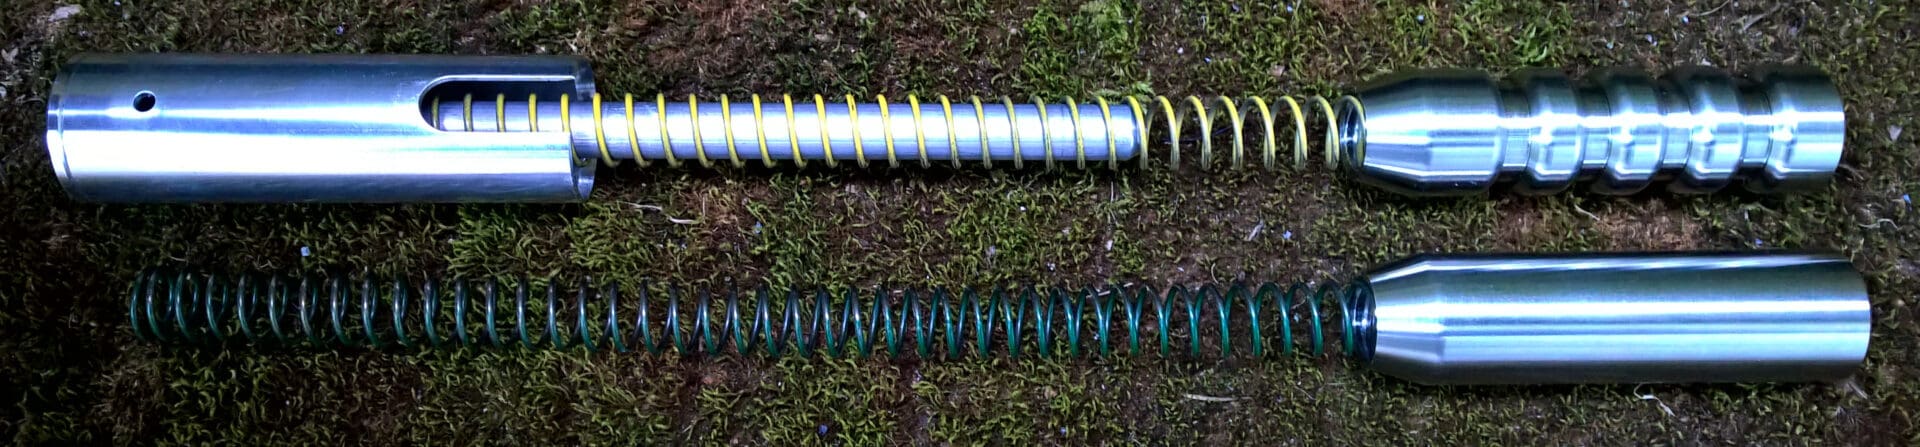
The QSS sets itself apart from other available no-sproing systems in that it allows for very rapid tuning using a set of springs and buffer weights that slide over a guide rod within the system’s carrier.
Because the system isn’t captured, it can be installed and tuned quickly, affording ease-of-use across AR/MSR/PDW weapons of different calibers and gas systems, suppressed and unsuppressed.
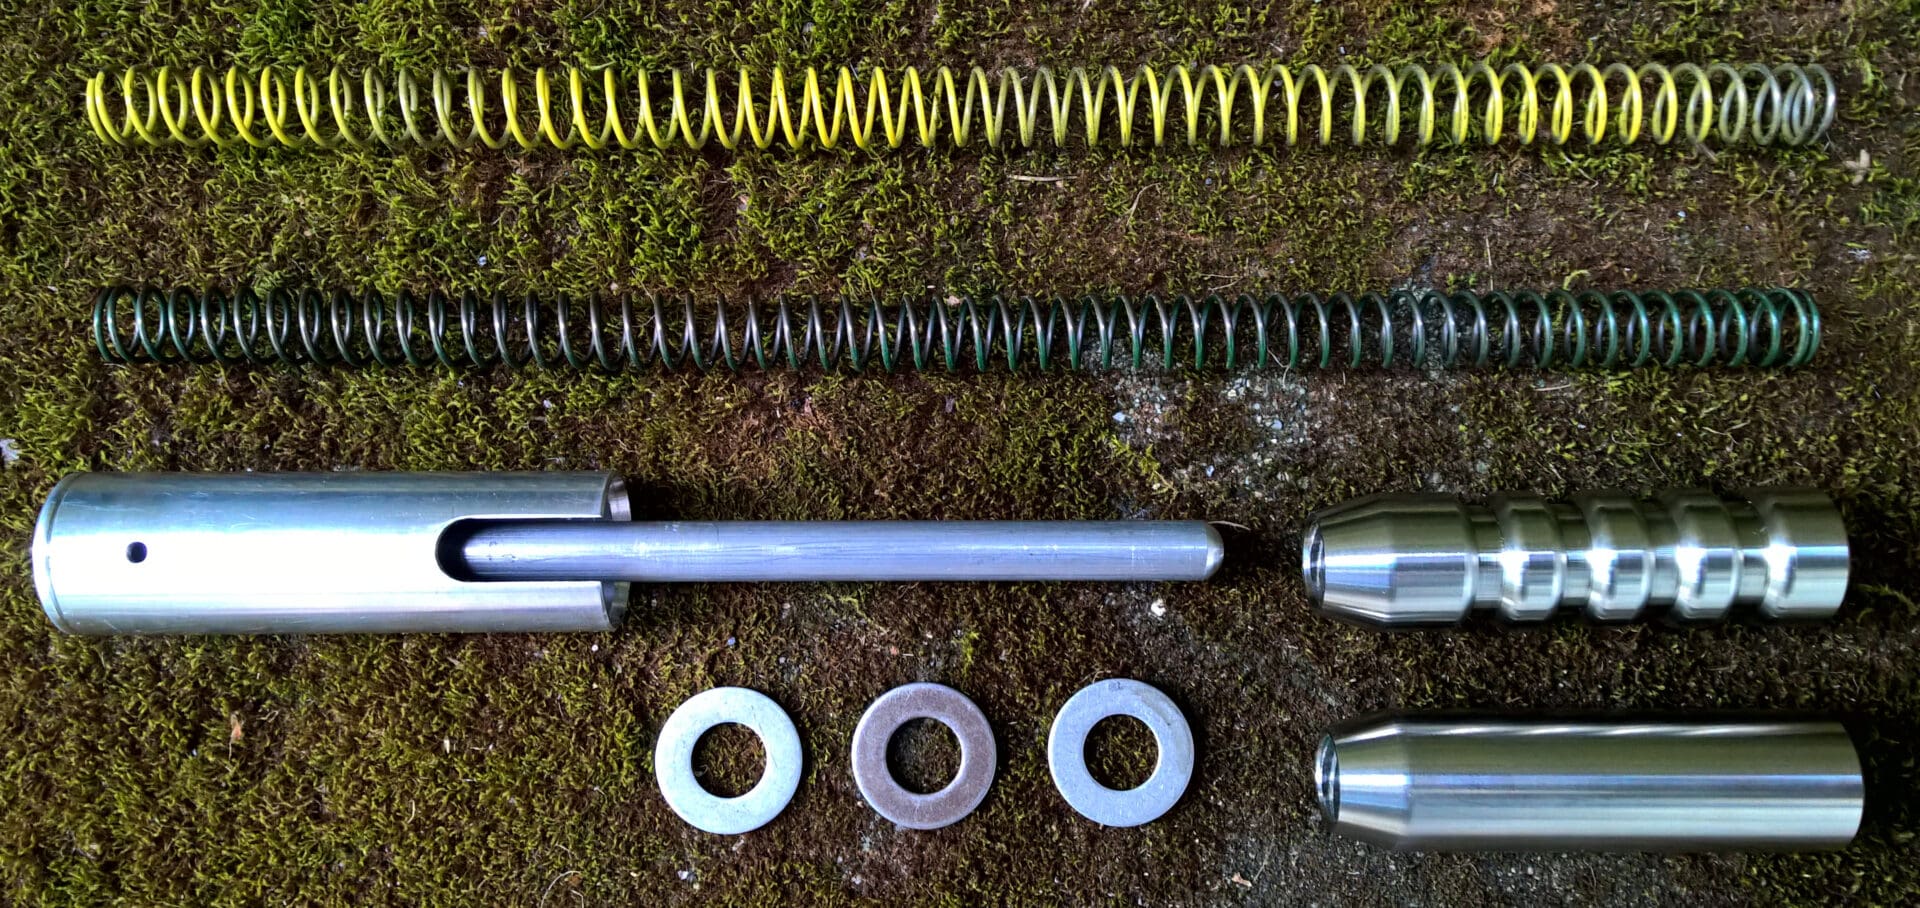
Component Weights:
• Carrier: 2.215 oz
• Heavy Buffer Weight (Slick-sided): 5.030 oz
• Light Buffer Weight (Grooved): 4.180 oz
• Heavy Spring (Yellow): 0.590 oz
• Light Spring (Green): 0.615 oz
• Washers: 0.125 oz each (three included)
Weight combinations (not including washers):
| Heavy Spring | Light Spring | |
| Heavy Buffer | 7.835 oz. | 7.86 oz. |
| Light Buffer | 6.985 oz. | 7.01 oz. |
The QSS Has some important restrictions:
• Semi-automatic weapons only
• No AR-10 or PCC (Pistol Caliber Carbine)
• Carbine & pistol buffer tube length only currently (spacer for rifle length buffer tubes coming soon)
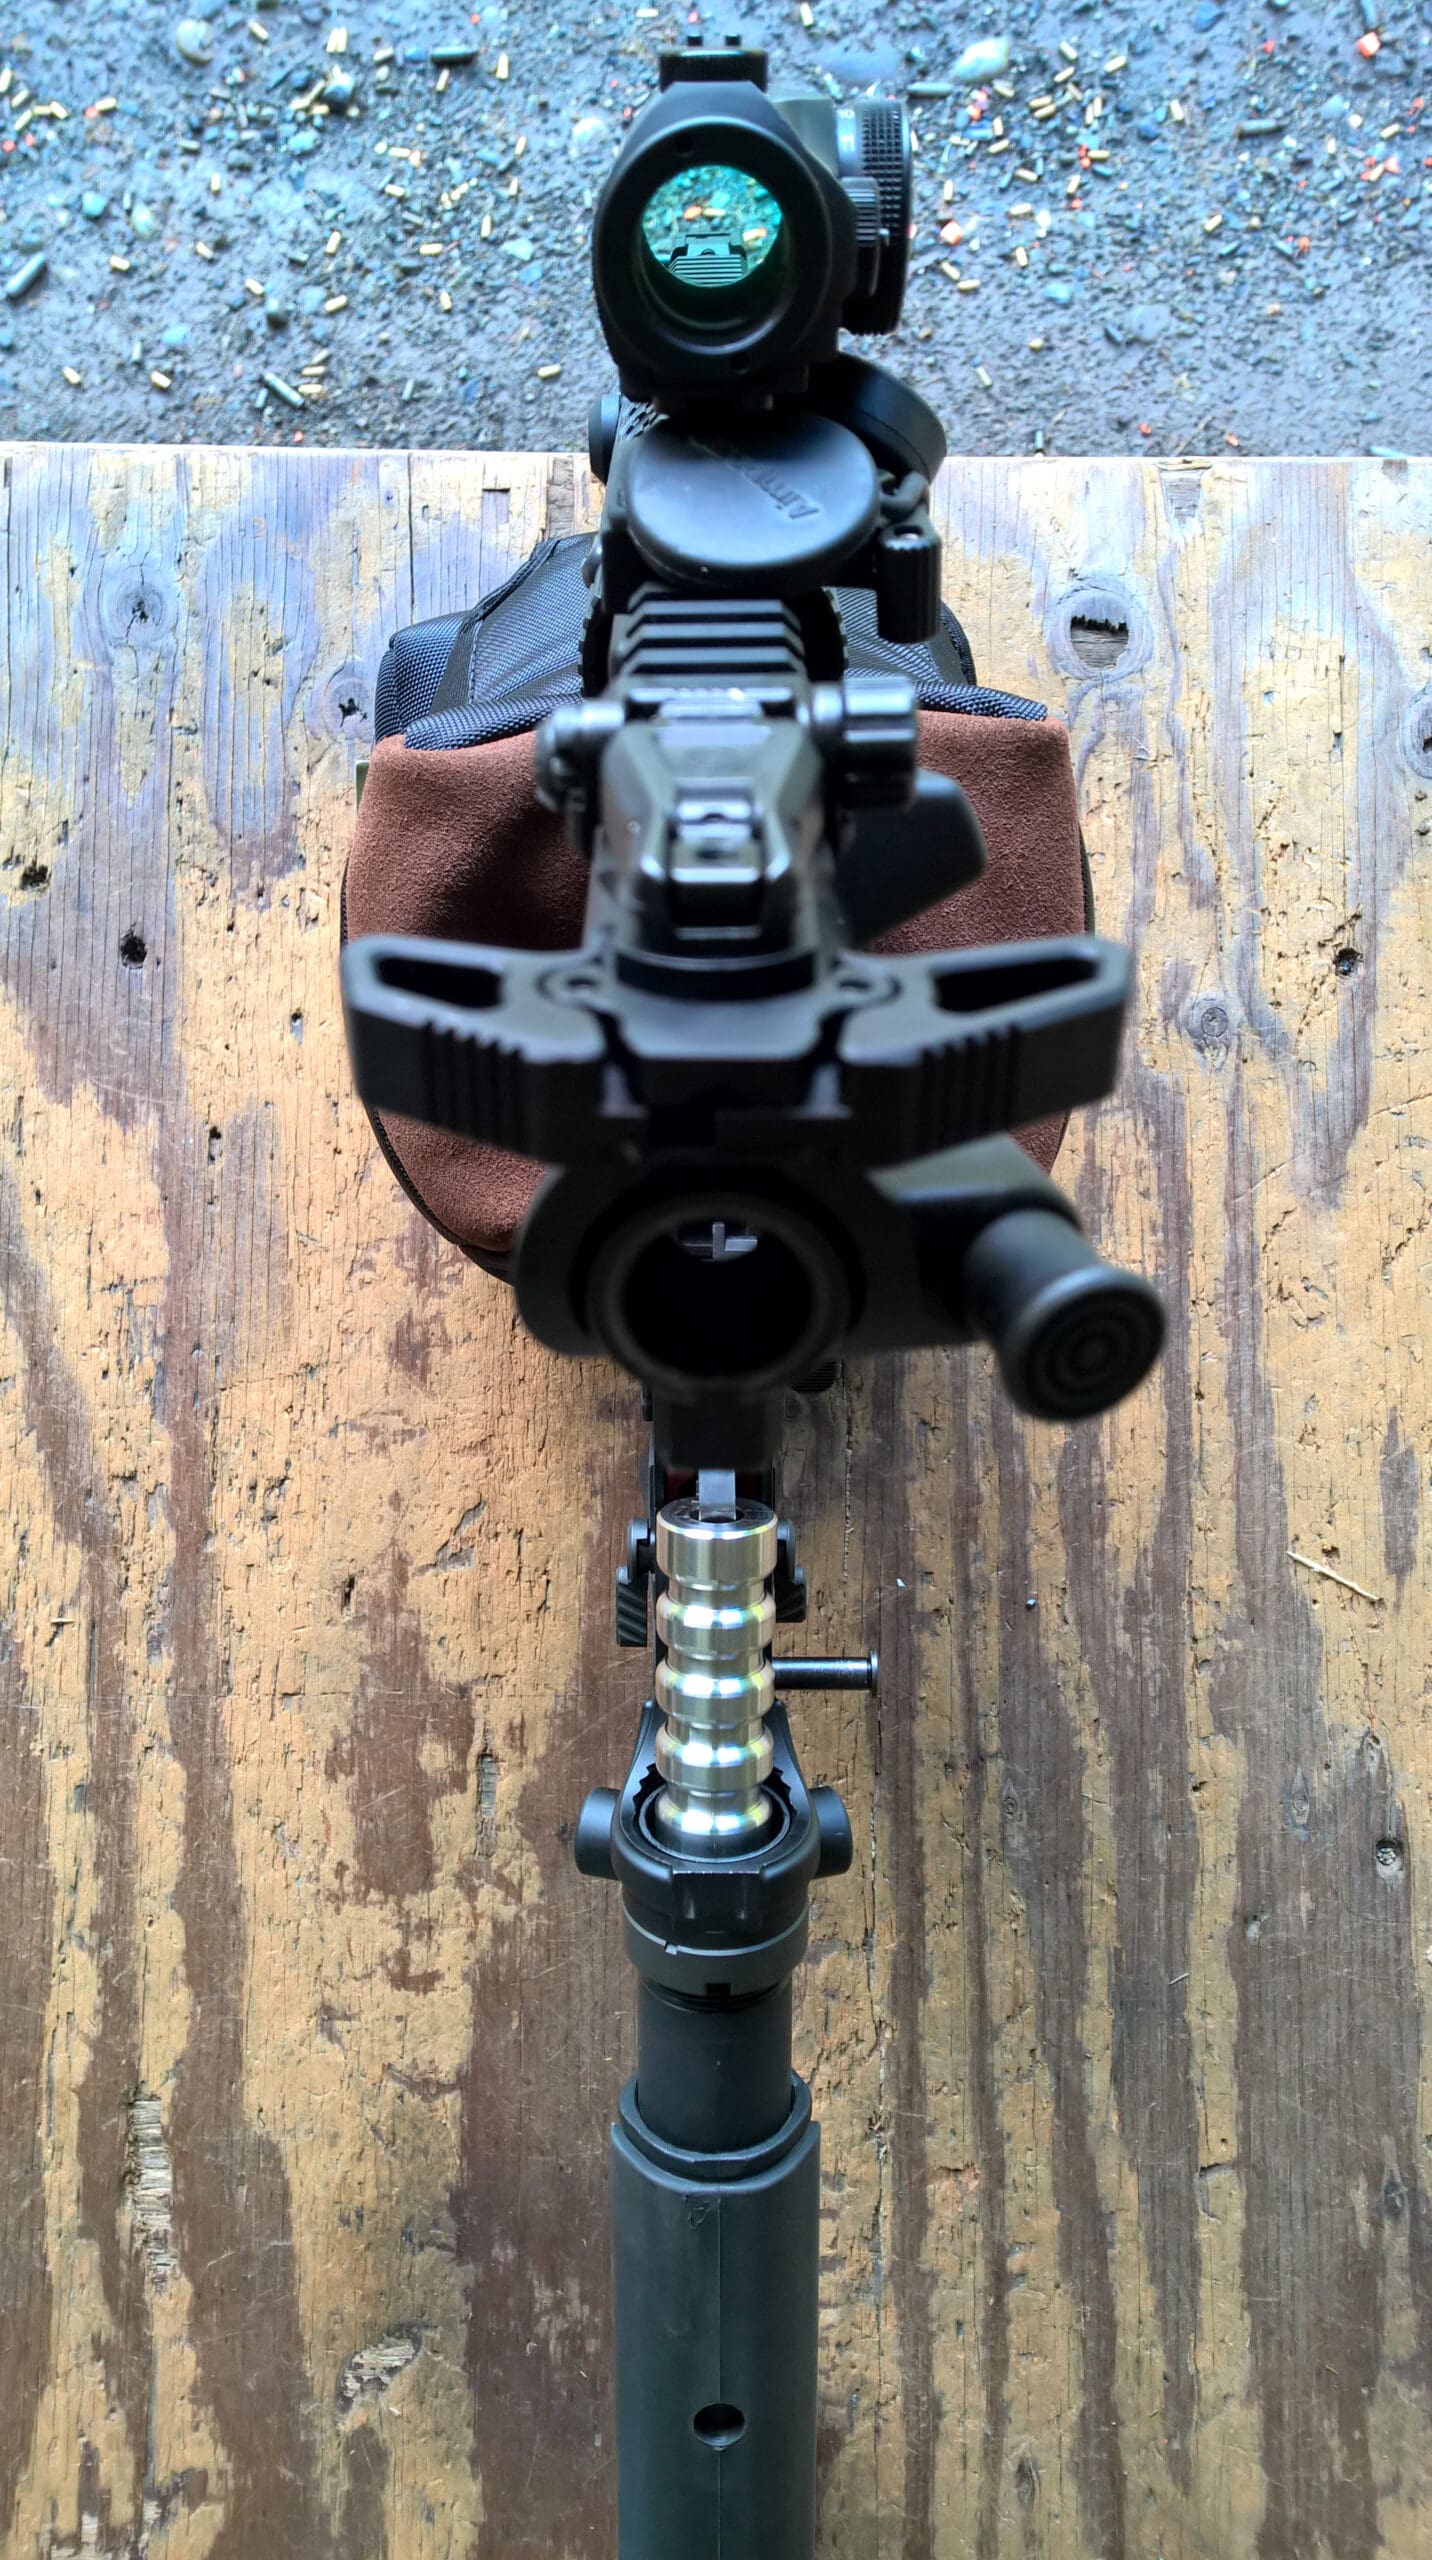
Installation
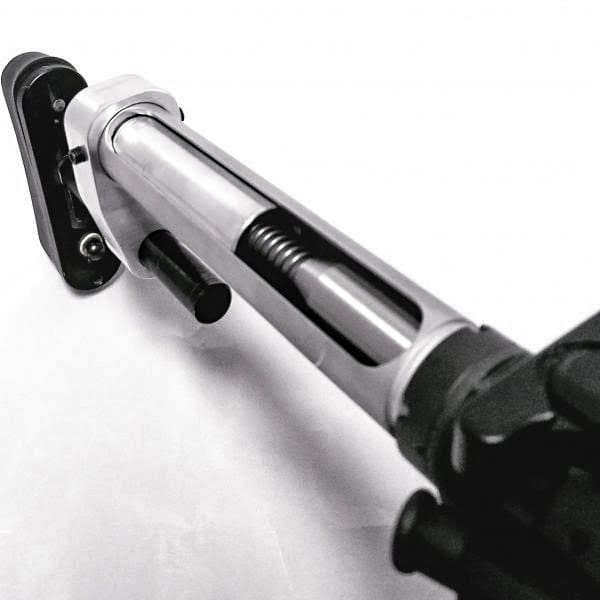
Installing the QSS is simple, but requires an approach that’s essentially a hybrid between Mil-spec and captured systems (like the JP Enterprises SCS) processes.
There are four things to take into account during installation:
First, like the JP SCS, the QSS is meant to run sans retaining pin. So if you have one installed, you’ll want to remove it prior to installation. There are several reasons for this and I wouldn’t recommend leaving the pin in just to find out what they are.
If you have a PWS Ratchet Lock castle nut and end plate, this is where you reap the benefits. If you have a staked castle nut, things may get uncomfortable.
If you don’t know how to remove a staked castle nut, don’t hesitate to take your build to a qualified gunsmith who can work past the stake while ensuring no damage to your lower receiver.

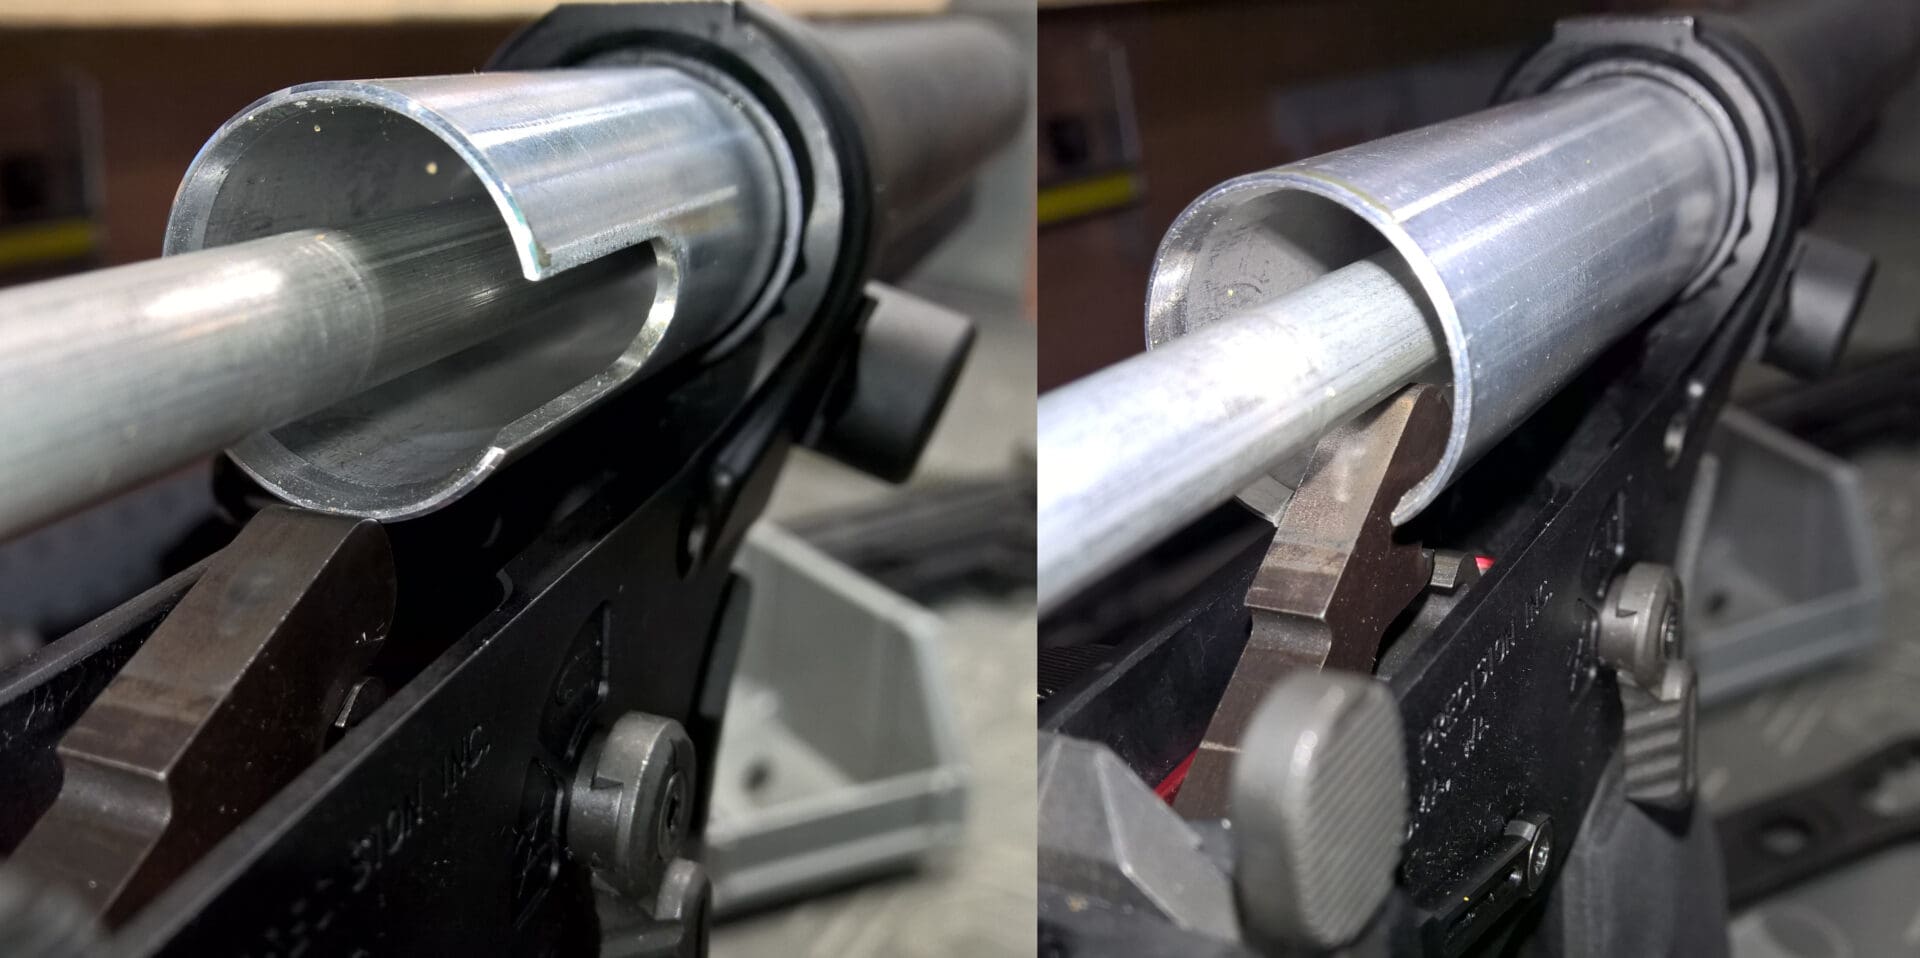
Second, like a Mil-spec system, the QSS isn’t a captured system. And now that the retaining pin is gone, there is nothing keeping the spring and buffer from ejecting off the guide rod and out of the buffer tube (the carrier will stay in the tube…something to do with physics).
While I did experience a slight learning curve, I quickly found the uncaptured feature to be very handy when tuning the system because swapping springs and weights only takes a few seconds (literally). And even with the heavy spring and heavy buffer installed, the force shouldn’t be enough to damage your hammer should it make contact.
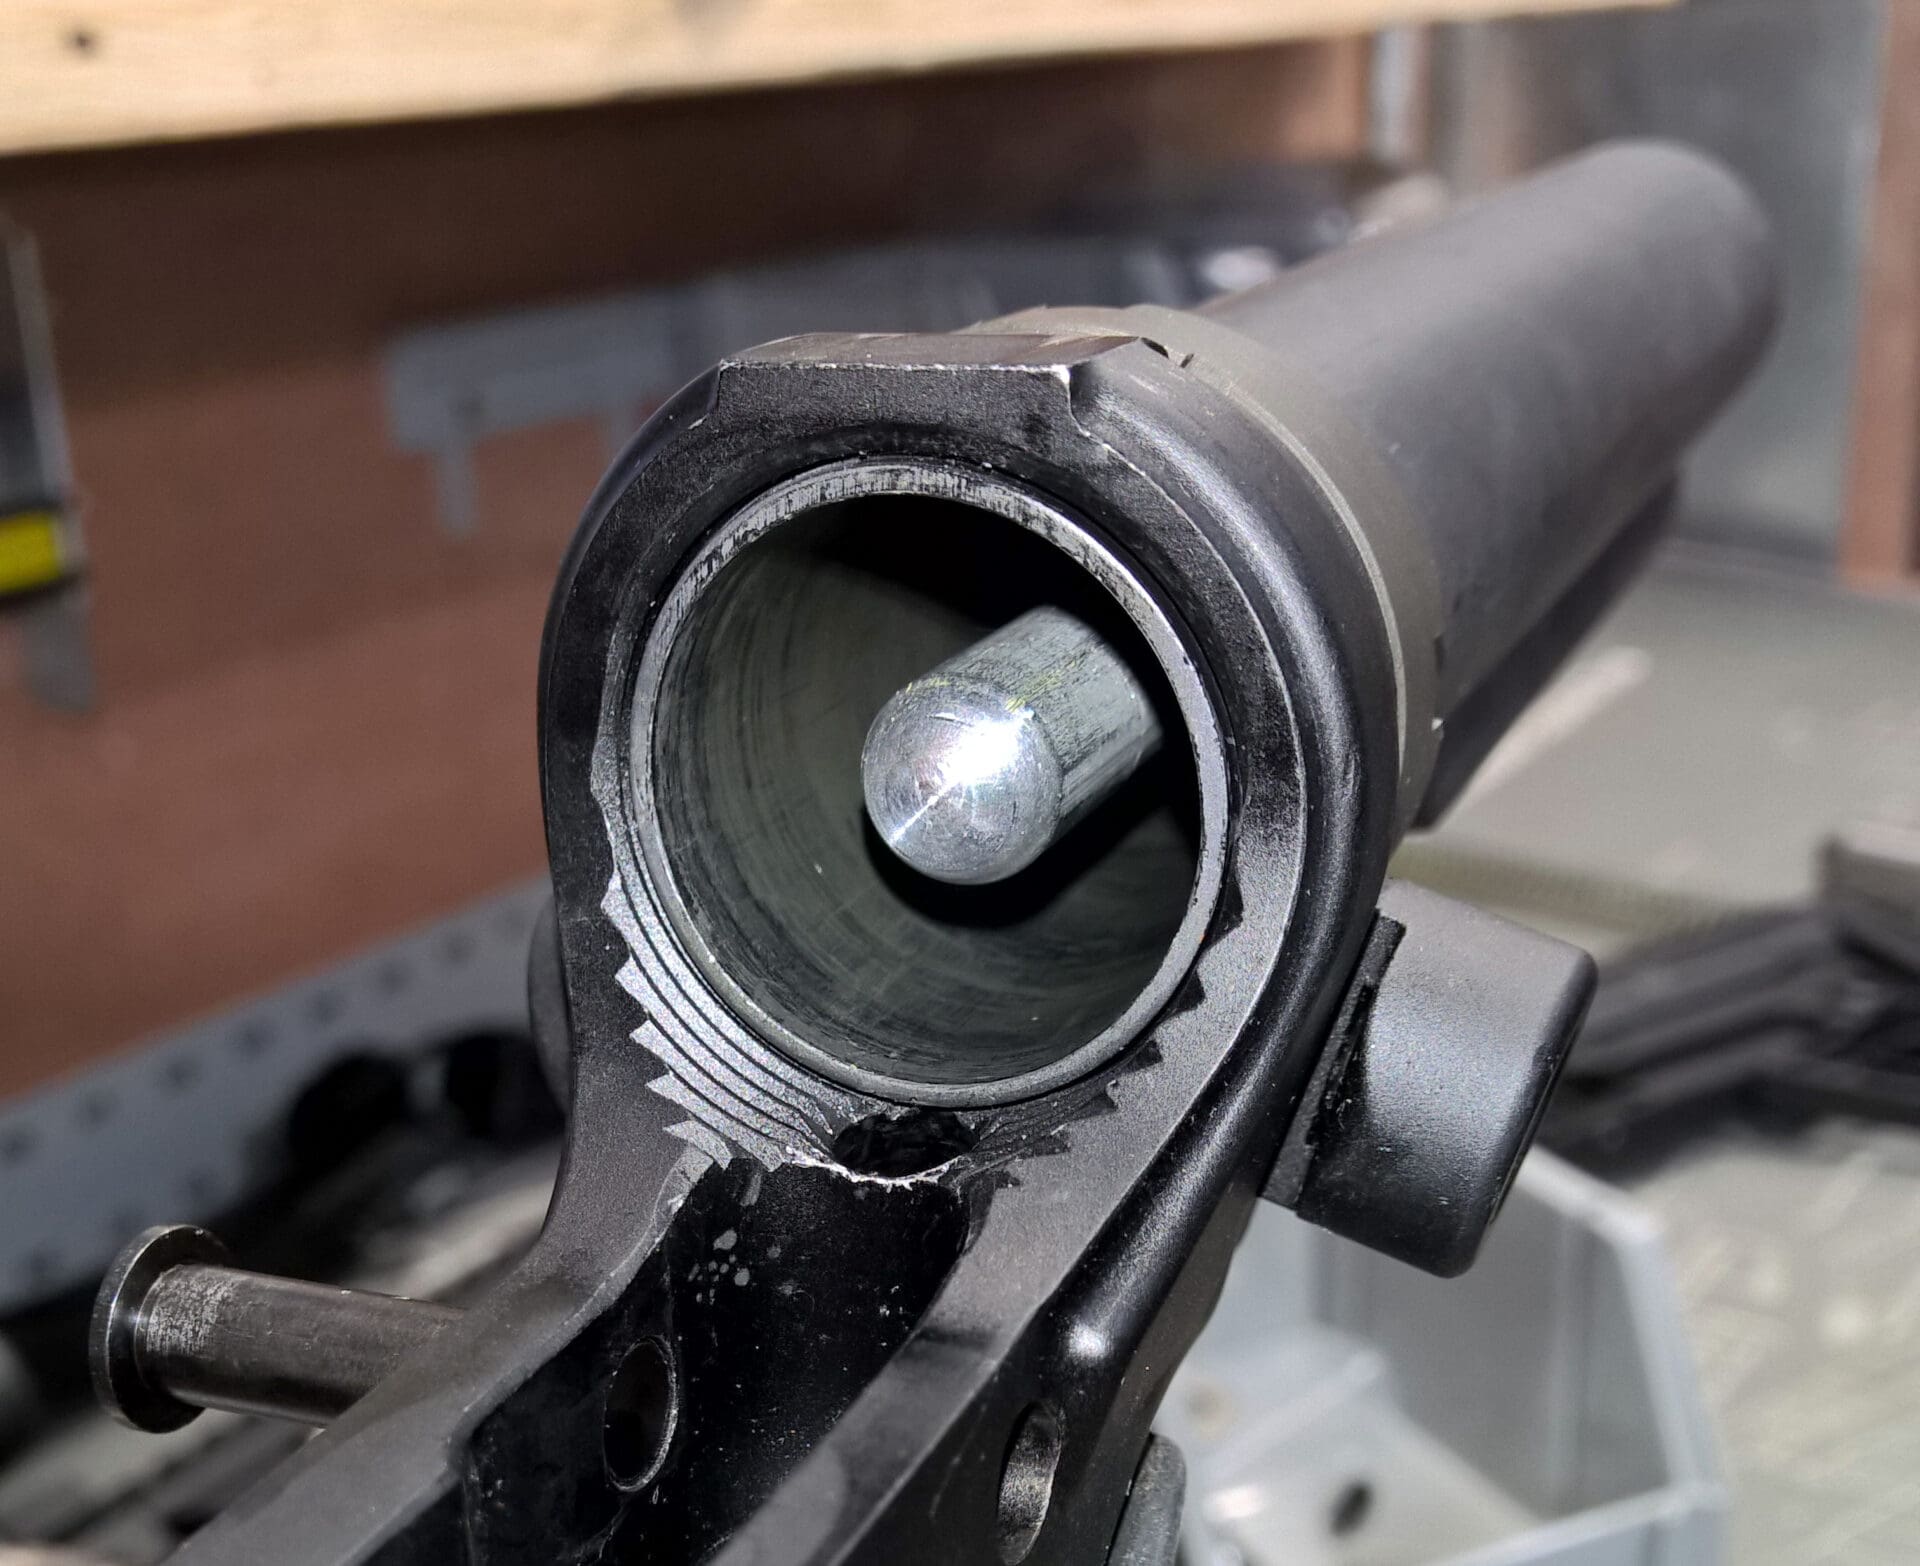
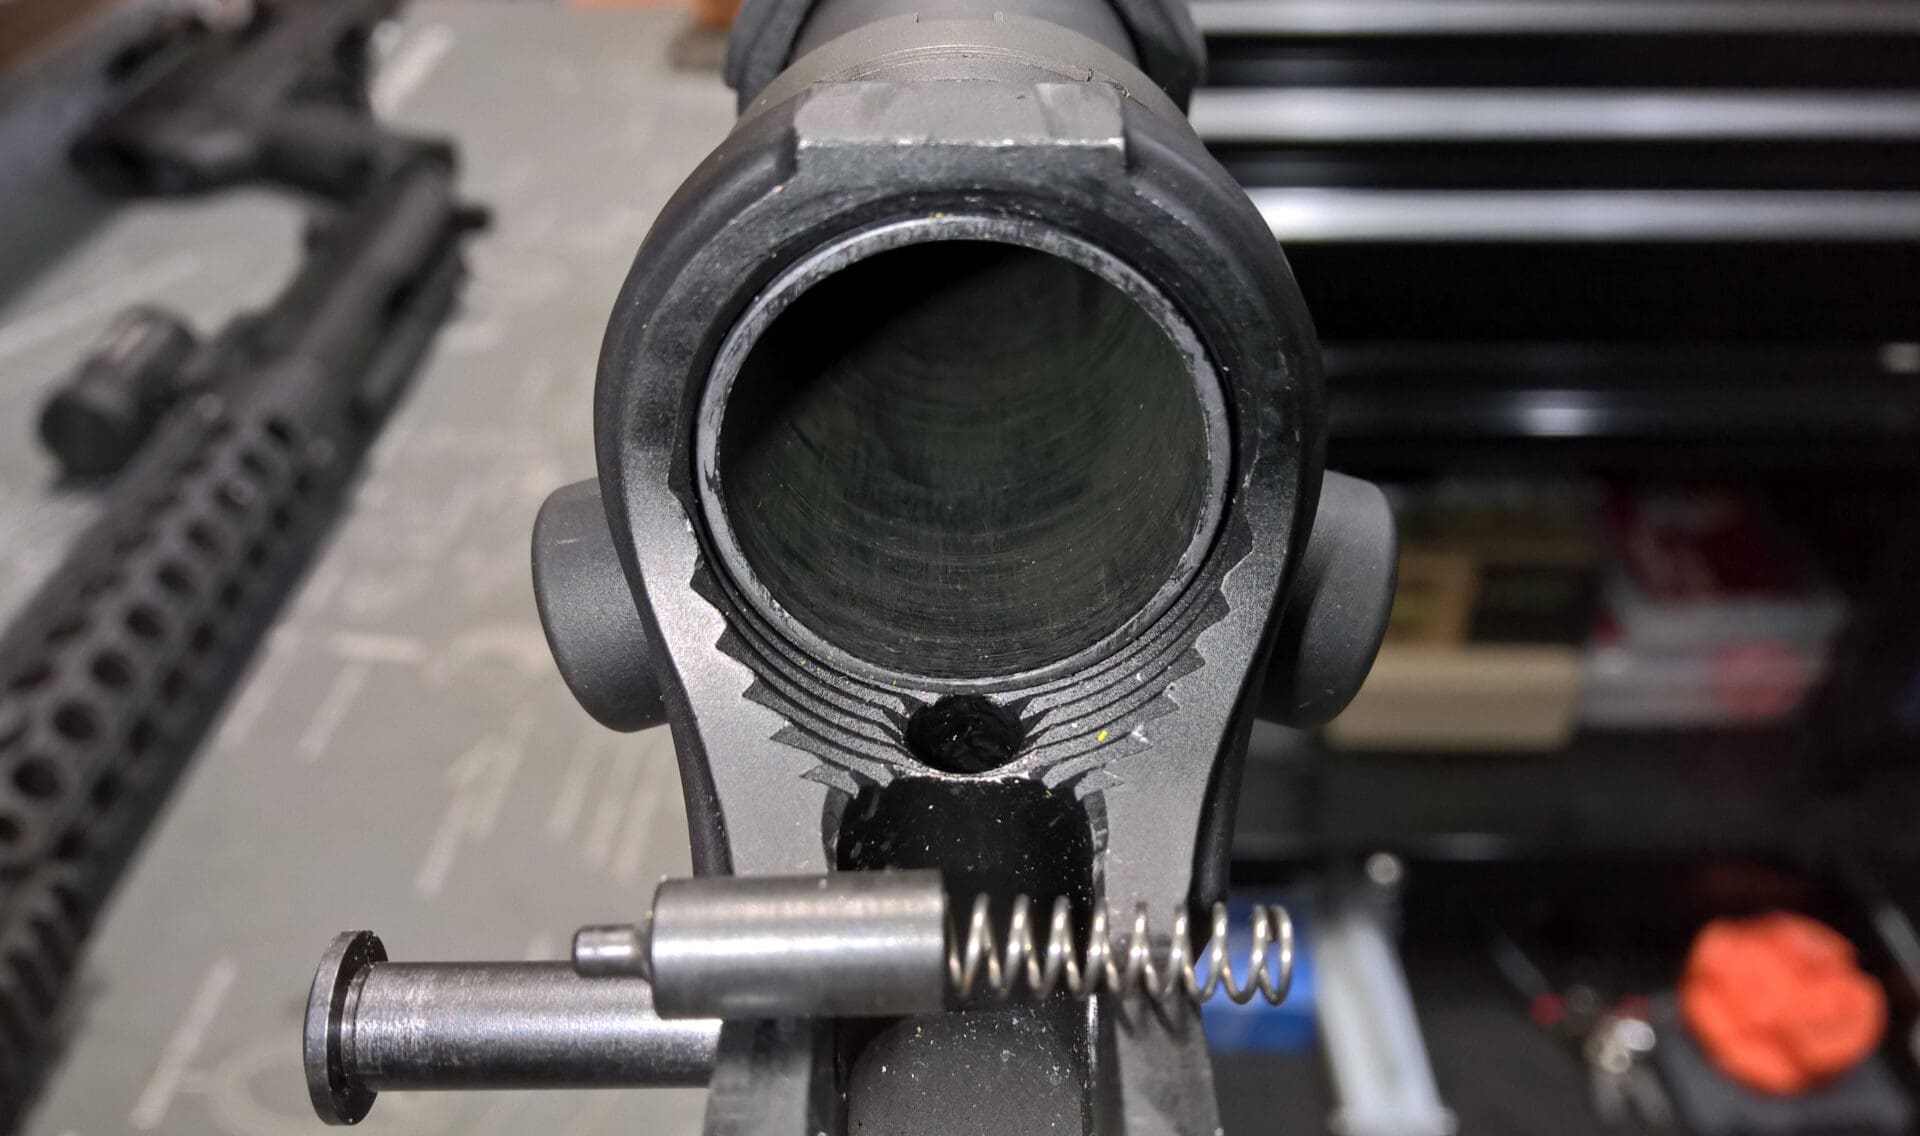
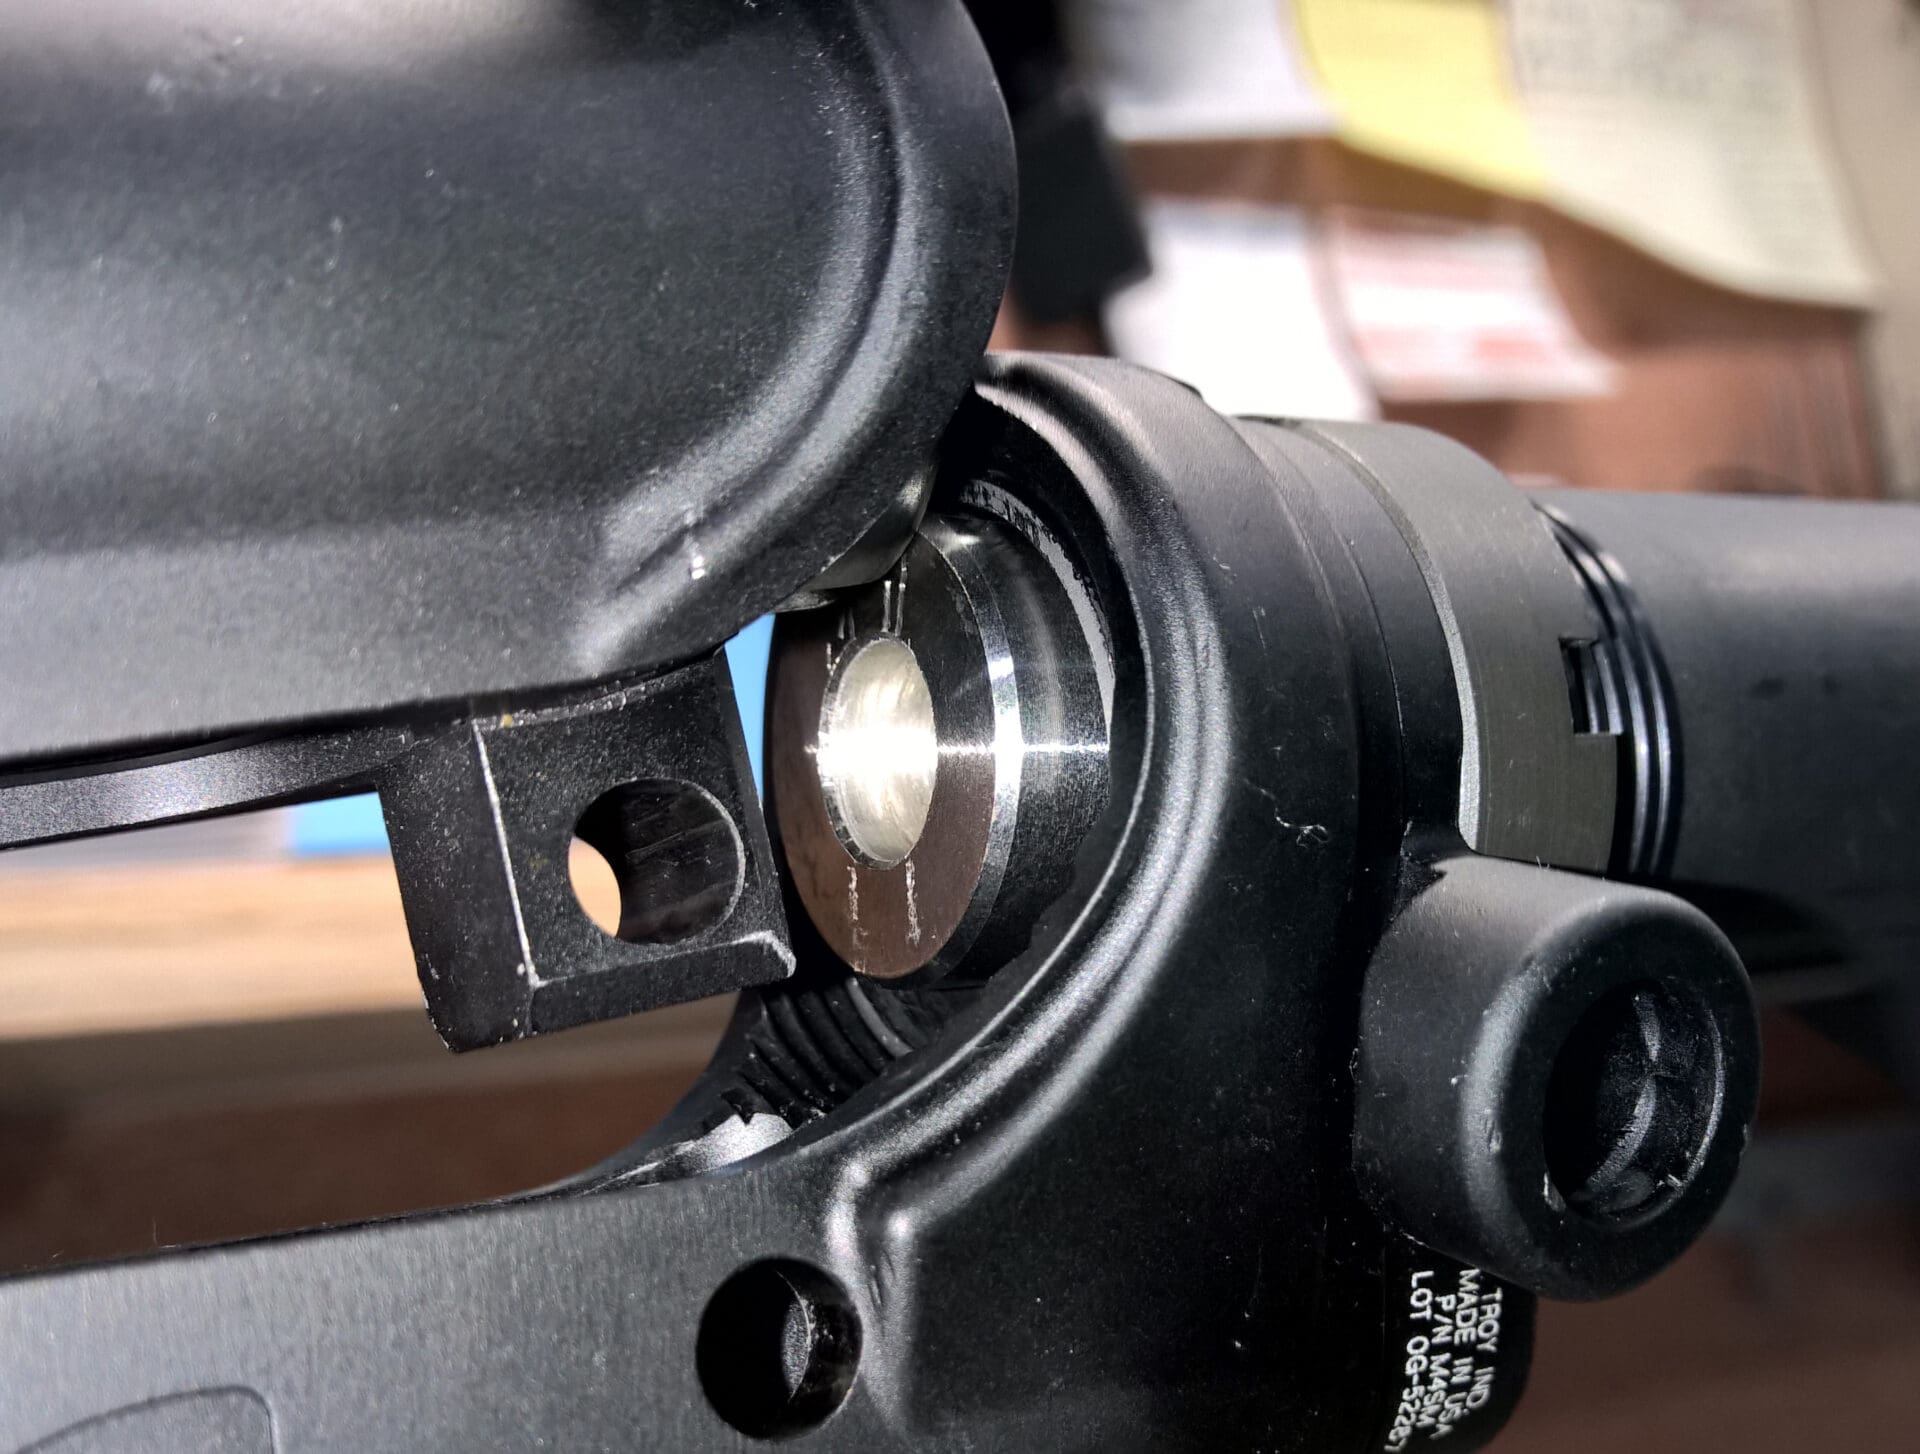
Third, the end of the guide rod needs to be flush with the end of the buffer tube. To assist with proper alignment, CapArms provides three washers to use as shims.
They’re clearly ordinary washers you can get at the hardware store, which could be an upside if you happen to misplace them. However, the washers and the way they’re used are the only part of this system that I feel needs tobe improved.
The washers do not attach to the carrier and are meant to be dropped into the buffer tube before installing the carrier. You’ll need to tilt the buffer upwards so that the washer lies flat against the back of the buffer tube, otherwise the washer will sit sideways and prevent the carrier from fully seating.
Since the washers are significantly smaller in diameter compared to the buffer tube, the washers could potentially move around inside the tube with each shot, creating unwanted wear and aluminum shavings.
Fourth, due to the length of the carrier, there is a hammer relief cut that allows it to slide over a cocked hammer and into the buffer tube. I found that I could depress my hammer further with the guide rod and easily slide the carrier in. Once the carrier is in place and correctly aligned, it can rotate freely.
Once the washer shims and carrier have been installed, simply slide one of the two springs onto the guide rod, and add a buffer weight over the end of the spring. Push the buffer and spring rearwards and once it clears the face of the buffer tube, close the upper receiver (with BCG and charging handle installed) to retain the QSS.
To swap a spring or buffer, follow the steps in reverse, taking care to catch the system with a finger or tool before the BCG clears the top of the buffer.
With the QSS properly installed with a combination of heavy spring and heavy buffer, I threw the charging handle back, letting go only to listen intently to the spring uncoil as the bolt slammed home.
I immediately took note of the drastic improvement over a Mil-spec buffer system – the QSS is smooth; more so than expected. I anticipated being able to feel or hear the parts contacting within the buffer tube – I was proved wrong. The sproing? Eliminated.
On The Range
At a piece of local lead-laden land, I ran the QSS through two direct impingement AR systems, a 16.5″ NATO Troy Industries / Aero Precision rifle (5.56 NATO, fixed gas system) and a 7.5″ Spinta Precision / James Madison Tactical / Trinity Force pistol (.223 Wylde, adjustable gas system). Both firearms were fed fresh CapArms .223 Rem 55-grain FMJ (2905 fps) as the main course and 69-grain SMK (2815 fps) for dessert.
Beginning with the rifle, I installed the heavy spring and heavy buffer with the carrier and one washer. Both CapArms 55-grain FMJ and 69-grain SMK casings ejected, but the bolt failed to lock back.
I stepped down to the lighter buffer weight but encountered the same issue. The third combination of light spring and heavy buffer produced the desired 2:30-3:00 ejection and bolt lock-back. I replicated this several more times, ran a few full mags, and was satisfied.
Although I had found the ideal spring/buffer combination for that particular rifle, I ran through the last combination which failed to lock back with 69-grain, but was successful with 55-grain.
Throughout the progression from heaviest combo to lightest combo, both felt recoil and angle of shell ejection increased, as they should. When properly tuned, the reduced felt recoil was smooth, consistent and, yes, quiet.
Up next, the 7.5″ .223 Wylde AR pistol’s gas block was already tuned for a captured spring system. I swapped-in the QSS heavy combo and found the gas to be heavy.
Since I started with the heaviest combo, my only choice was to constrict the gas at the block, which I gave a full turn. This helped attain the desired angle of ejection and bolt hold-open with both 55gr and 69gr.
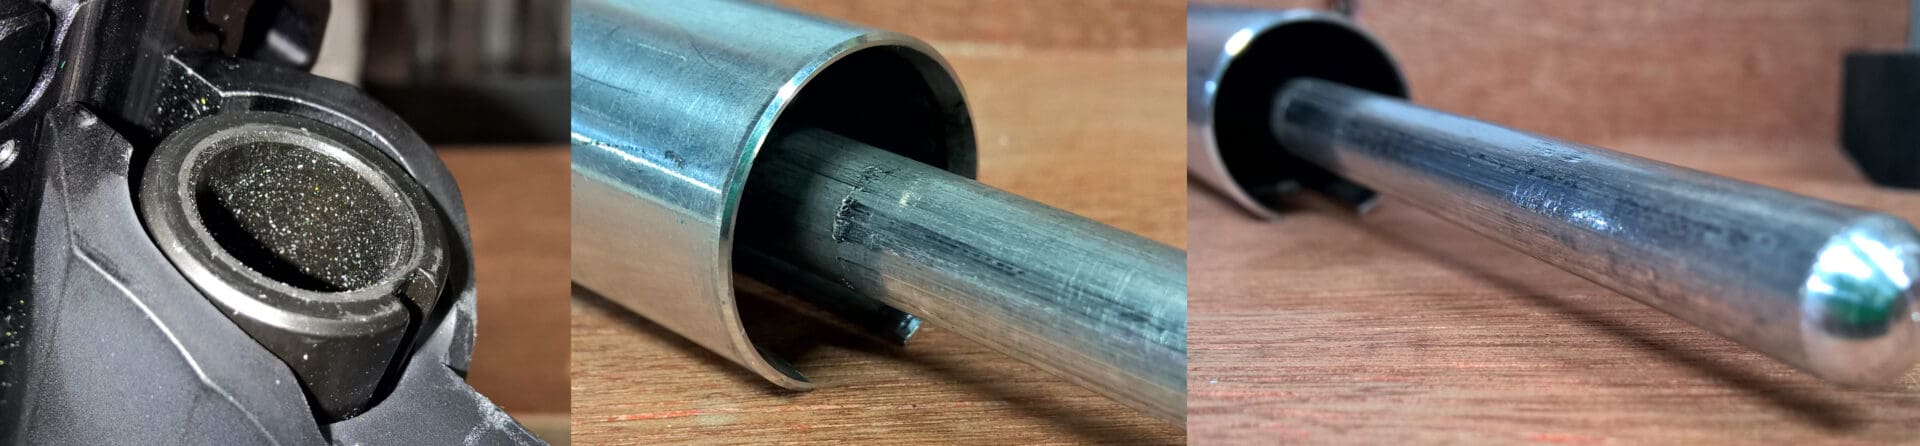
Back on the workbench, I noticed an unfortunate occurrence. After roughly six hundred rounds of .223 Rem, the aluminum guide rod had begun to wear down. In fact, I found noticeable, very small particles of shaved aluminum throughout the buffer system, buffer tube, and even inside the BCG.
While this didn’t impede the functionality of the system, it surely could, and CapArms will want to address this possibly, as some have suggested, by hard coat anodizing the carrier.

The QSS isn’t a precision instrument that you’ll feel like you need to baby to keep alive. It’s a versatile workhorse that comes in humble packaging and simply does what it claims to do.
The ability to tune the system to run with a wide variety of gas systems is a great feature. There are certainly a few areas where the product could be improved, such as the washer shims and guide rod shavings. But at the current price of $99.99, the CapArms Quiet Shuttle System is a good option for mitigating felt recoil and eliminating that annoying, toy-like AR sproing.
Specifications: CapArms Quiet Shuttle System
Price as reviewed: $139.99 MSRP (On sale now for $99.99)
Ratings (out of five stars):
Quality & Durability: * *
The two springs and two buffers are clearly marked and of good quality. The buffer weights are nicely finished. Everything is clean. The aluminum carrier is well-manufactured, but not finished well and sheds small flakes of aluminum. The included shims are basic washers and need to be redesigned to attach to the carrier. Except for the carrier, all components have held up well.
Installation: * * * *
Installation is straight-forward and simple. However, requiring removal of the buffer retaining pin and spring can present a barrier to those with a staked castle nut.
Tuning: * * * * *
The QSS is extremely easy to tune. Swap a spring or a buffer – it’s that simple. When used in conjunction with an adjustable gas block, tuning your weapon’s gas system becomes a breeze. Additionally, the system allows the user to quickly move it into another weapon (as long as the weapon does not have a buffer retaining pin).
Overall: * * * 1/2
The CapArms Quiet Shuttle System is quiet, smooth, and eliminates the sproing! But its real value is the ability to rapidly tune the system to almost any AR carbine or pistol gas system. Swapping between compatible firearms is extremely easy. The washer shims need to be revisited and the aluminum shavings coming off the guide rod needs to be addressed. When compared to other similar products of higher quality, MSRP seems a tad high. However, at the current price of $99.99, the QSS is a product worth consideration.


I’m too busy trying to hit what I’m aiming at to give the flightiest of fucks what noise the spring in my gun is making.
Agreed.
And I’ll add the only reason most folks can hear any “sproing” sounds at ALL, is because they are wearing hard-shell muff-type hearing protection, which is in direct contact with the stock. If you use earplugs, or pad the area where your ear protection touches the stock (with stick-on neoprene or rubber sheeting, for instance), you’ll hear much less spring noise, as it won’t be transmitted directly into the body of your ear protection.
But I’ll re-emphasize the point Vhyrus made, above — if you are hearing AR spring noise AT ALL while shooting, you’re not concentrating on your shooting fundamentals with the intensity needed to shoot well.
I only hear the noise on the last shot
Dip your finger in good bearing grease. Wipe on your buffer spring. Bam, there’s your $.04 solution to spring noise and you can’t tell the difference between a little grease and a JP SCS…I know because I have rifles with each and pulling the charge handle side by side, you can’t tell the difference.
Puuuuleeeeeze…… take a battle proven weapon and dip the recoil spring in grease, so sand and debris has a reason to hang around and grind away at every thing it touches?
Why is the “light spring” is heavier than the “heavy spring”?
Does it matter or is it just ironic? Is it Live or is it Memorex!?!
Good question, strych9! That threw me, too, and I triple-checked the physical weights before writing the review. I believe the reason for the “light” spring to weigh physically more than the “heavy” spring is because there are more coils per inch, thus more material.
Using the terms “heavy” and “light” to refer to both mass (buffer weight) and tension (buffer spring) doesn’t help any, I admit.
I understand the difference between the usage of the words in terms of mass and tension.
What I don’t get is why a spring with lighter tension would be heavier. Less tension, logically speaking, would mean less coils of the same wire and/or a thinner wire to make the spring. Both *should* result in an item with less mass.
The only thing I can come up with is that they used a thicker or denser wire to make the light (tension) spring because even with a lesser tension requirement “increasing” the thickness/density gave them an increase in longevity over a spring with less mass.
Conner W. is correct. If you use the exact same spring material and wire diameter, the more wire length, the lower the spring rate or spring constant.
Tension is the amount of force produced by the spring under a given amount of compression. The change or delta in tension, T, is given by the delta in compression, x, multiplied by the spring constant, k.
Delta(T) = k*Delta(x)
A coil spring is just a torsion spring wrapped into a helix. The longer the torsion rod, the lower the spring constant. The thinner the diameter of the rod, the lower the spring constant. The spring const. is a very strong function of rod diameter, so for modest changes in spring const. just change the rod or wire length.
So…
As counter intuitive as it might be, that lighter spring tension for a compression spring means more coils of the same gauge of wire which means more mass. And that if you want a spring that pushes back harder you have less coils of the same gauge material… and that for this application length of the overall spring doesn’t matter much, what matters is, for lack of a better term “density of coils” where less “coil density” means a stronger spring.
Am I getting that right?
Yes. Each coil gets compressed a smaller distance when the coils are closer together, so less force is needed to compress the entire spring.
I always basically envisioned the angle of the wire itself. When the coils are tighter, the angle is closer to perpendicular to the direction of compression and when the coils are farther apart (given the same total spring length) then they’re getting incrementally closer to being a straight wire that’s parallel with the direction of compression (which would be very hard to compress, indeed). As coils get farther apart and, therefore, the wire gets straighter, it makes sense to me that it resists compression more and more. May not be the actual physics of it, but it works in my mind 😉
I guess I just never paid enough attention to springs.
I went and pulled a few out after this conversation and, sure enough, those that had lighter tension but had fewer coils were made from a significantly thinner gauge of material. I just hadn’t paid enough attention to realize that. I also never really paid attention to the fact that so many “basically the same” springs really are not. The design varies immensely.
Jeremy: as for your last explanation, based on what I’ve now read about it your vision of how it works is fairly correct.
Learn something every day on this site.
I had designed passenger car springs back in the day. Fairly common to do progressive-rate springs for cars by going from closer-together to farther-apart coils within a single spring. So even though the material and diameter remain the same, you end up with a spring that gets progressively stiffer while it compresses. Or, you can do a couple inches of soft compression zone with closer coils then immediately jump to the rest of the travel at a farther-apart stiffer rate (dual rate spring), which could do something like give you a high performance spring that rides softly for normal driving but, once you get into a turn and compress that minimal amount of soft travel out, you hit a much higher spring rate. Then you gotta design in dead coils and other stuff, too.
You just reminded me that I need this…
No Sir. You need the JP silent capture spring.
This. Usually dvor.com has them on sale quite regularly. Something like $30 off JPs (and most other places prices)
Stuff like this is proof that guns are not for everyone.
I’ve been looking at the JP solutions. I was excited about an alternative until I failed the first 2 restrictions.
“Ribbed for his/her pleasure”
“I mean *substantial* caliber…”
Forget the buffer, for a hundred bucks I can ignore the sproing. But I do like that stock. anyone knows where that came from?
I got rid of the sproing using a 15 cent nylon washer in the back of the tube, a flat wire spring and a small dab of grease. While it’s not tunable it was inexpensive and effective. This system has to many components which seems to me increases the likely hood of failure down the road. The KISS method in a potential battle rifle is the way I would rather go.
I like the spring sound. There, I said it.
I just wrapped cellophane cling wrap a couple times around the buffer spring (kinda like the old “snake in a can” gag). No more sproing and no more spring rattle. When it gets worn I just replace it. Overall cost is about $.02.
There, that’s my 2 cents.
The ONE thing I remember from the first shot I fired when I had to BZO my M16A2 back in 1995 at Edson Range is that spring rattle vibrating through my jaw.
I like that rattle. Thanks, no thanks.
Comments are closed.