I’m a man on a mission. A special tools mission that is. I guess it started with my first action block. A polymer affair that clamshelled over a standard flat top upper. As soon as it arrived, I eagarly invited a friend over to assemble his box of AR parts so we could try out my new tool. He brought all the pieces including a Noveske barrel, the necessary gas block bits, and a non mil spec upper receiver. Which is where the problems started…
We quickly found out that the fancy polymer action block I purchased didn’t fit the non mil spec upper. We kind of squished it in place, but neither one of us felt great about it. But once we got the barrel nut torqued down and the hand guard timed correctly, we were starting to feel better. And then it came time to assemble the gas block. Without a “proper” set of punches or a solid vise, I watched as a $60 Noveske Gas Block was nearly ruined at my hands. Assembling the gas block took nearly 30 minutes, tons of cursing, and a strained friendship. The gas block looked like hell too. Luckily, it was seated under the hand guard so you couldn’t see my damage.
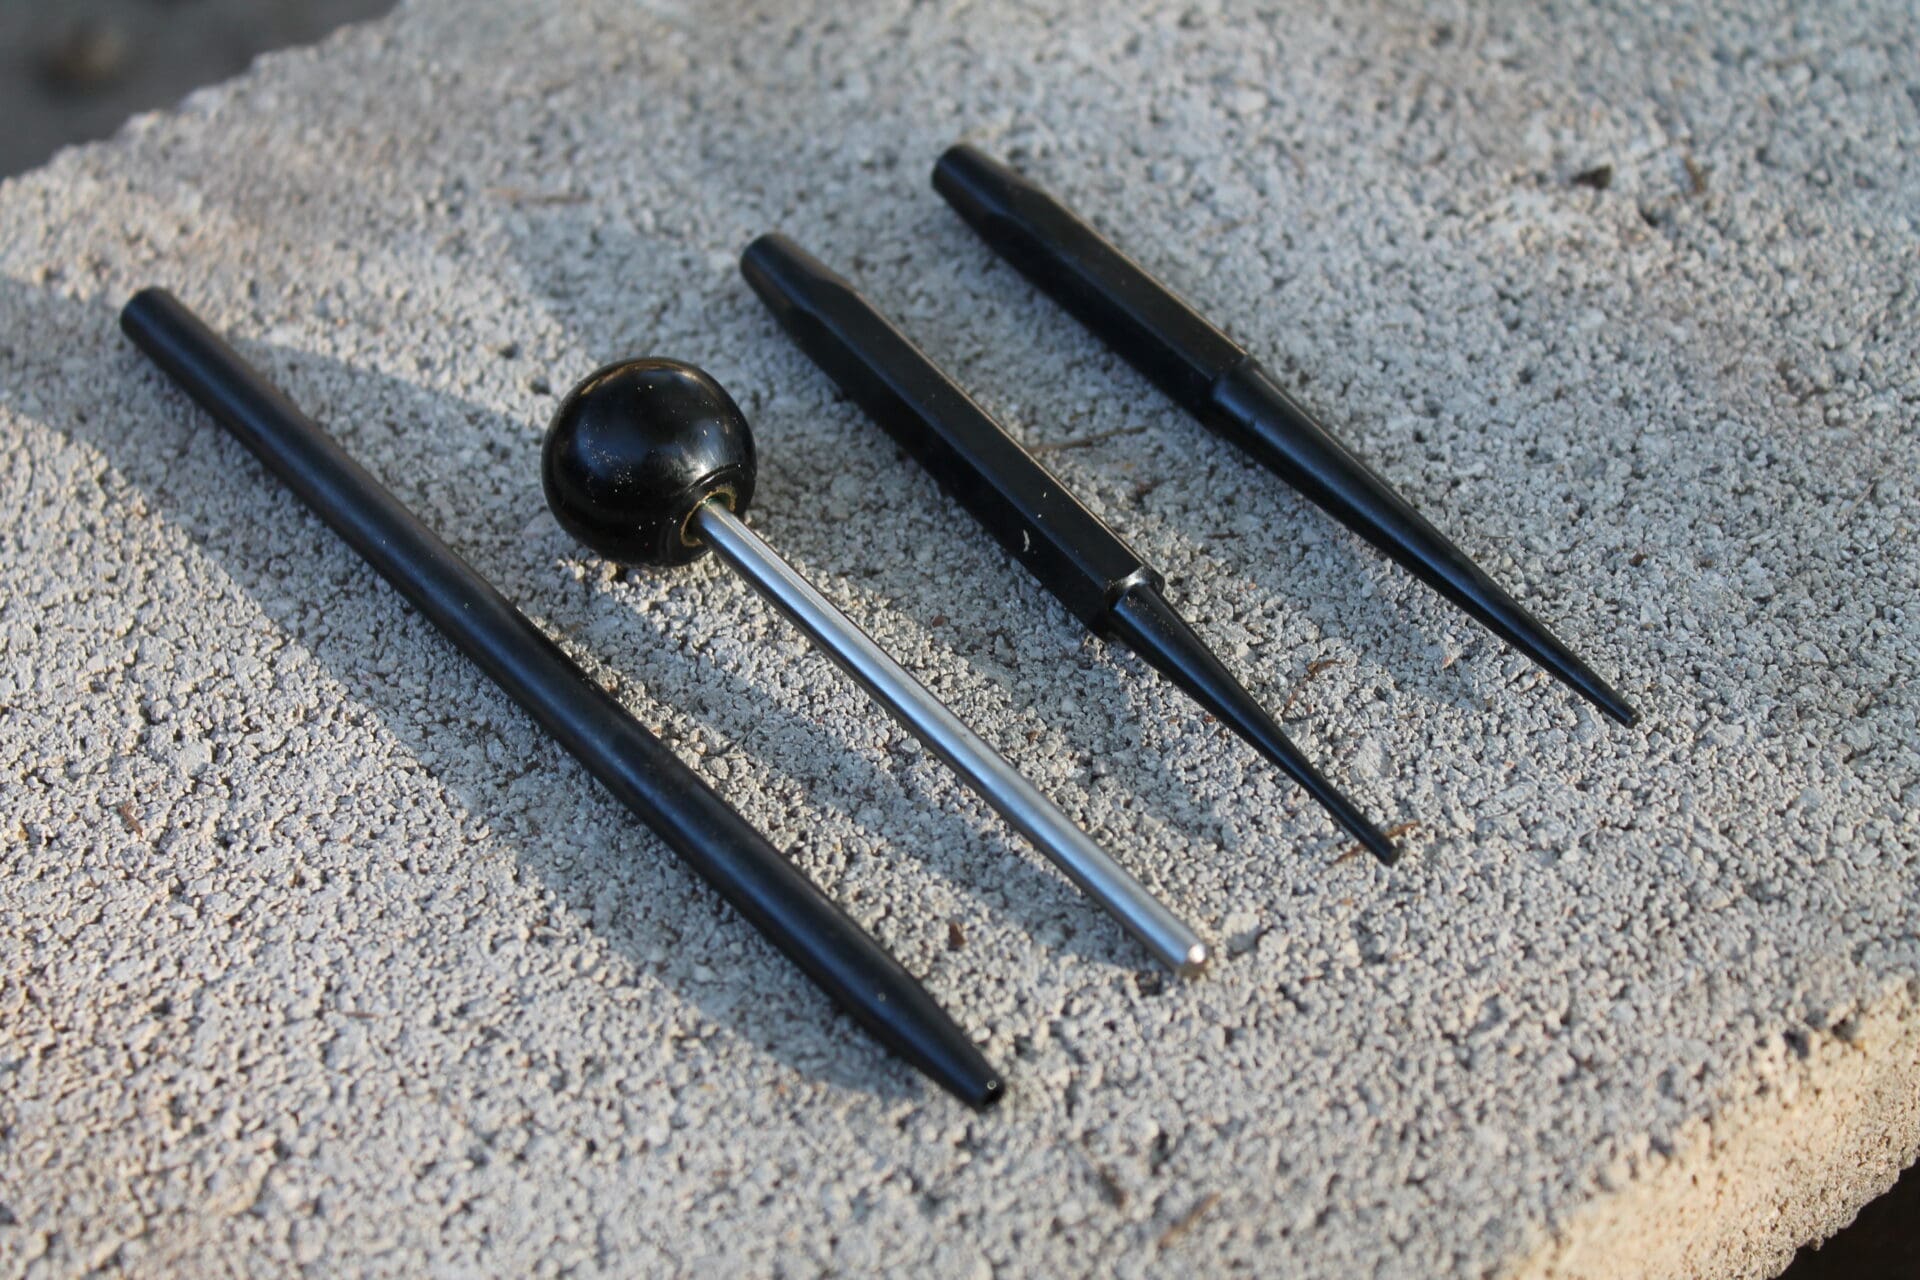
Last on the list for assembly was the lower. It went together slightly better than the upper but getting the trigger in place was no fun at all as the pin placing process required 3 hands it seemed. I knew something better existed. Enter Geissele and their AR 15/M4 Armorer’s Package. The Armorer’s Package is a five piece package that includes three punches used for assembling a gas block, a precision machined pin that matches the diameter of a trigger pin, and a large, heavy, purpose built metal rod.
The trigger fitting pin is precisely machined to fit the diameter of the small pin lower receiver that almost all lowers (except for certain Colt ones) use. Use it to get the trigger pieces in place and “stick it” with the fitting pin. Then push the trigger pin back through until it pushes the fitting pin out. There’s not much to say about a tool like this except that it makes life easier, fits the trigger pin holes perfectly, and you won’t need it until you do, and then you’ll be happy you have it.
The punch set makes installation of the gas tube on a gas block easy as pie. Simply grip your gas block in a sturdy vise, get the roll pin started in the starter punch, and slowly start it in the block. Hammer slowly until the punch nearly touches the gas block, and then switch to the tapered punch. Slowly hammer further until the pin is flush on both sides. If you need to remove the pin on an existing gas block, get it started with the tapered punch, and beat it out the rest of the way with the pin punch. This job can be done without a specialty made punch set, but boy howdy is it easier with the right tools. My previously mentioned 30 minute project that nearly destroyed a Noveske gas block took all of 2 minutes with the Geissele punch set.
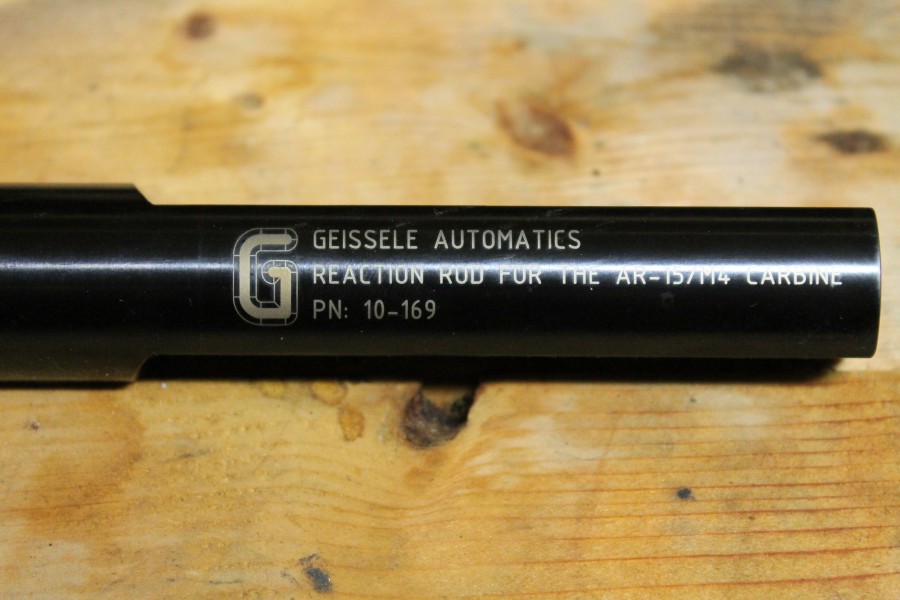
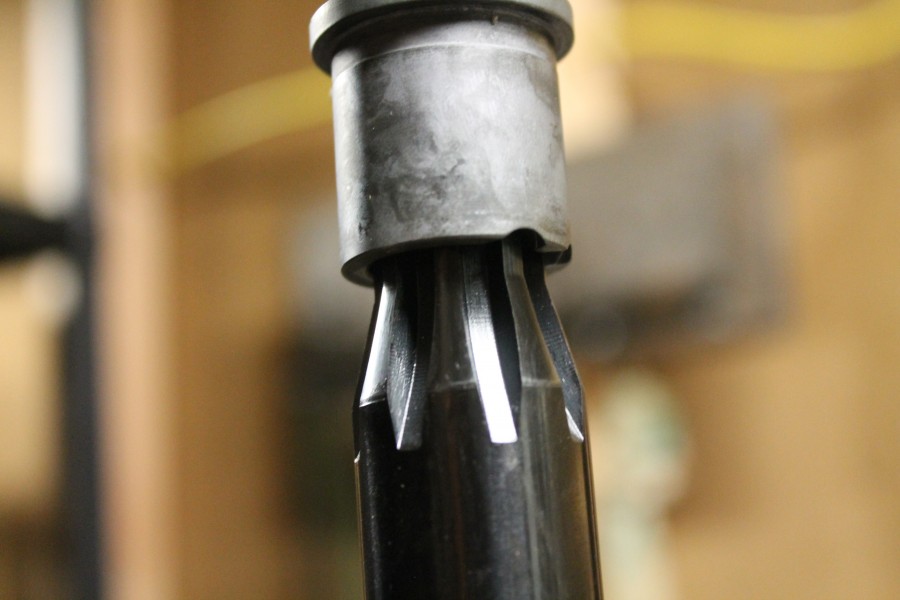
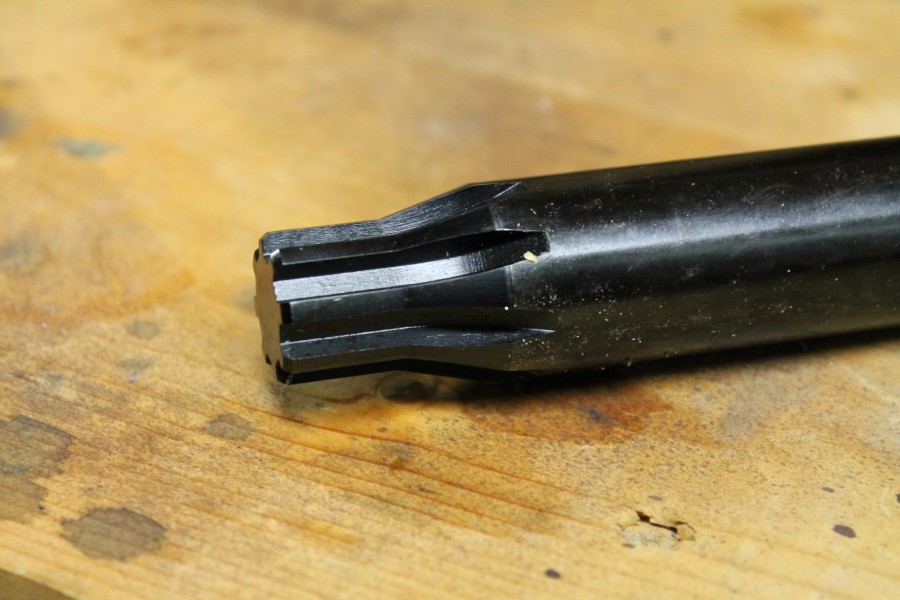
But the real gem of the kit is the reaction rod. And honestly, it was the tool I was most excited about in the Armorer’s Package. The reaction rod is precisely machined to fit the inside of the AR 15 receiver with flats machined on the other side so that your vise of choice can get a good grip. The business end of the reaction rod is shaped in such a way to fit perfectly inside the barrel extension of the barrel of your choice. See below for a picture of how that looks.
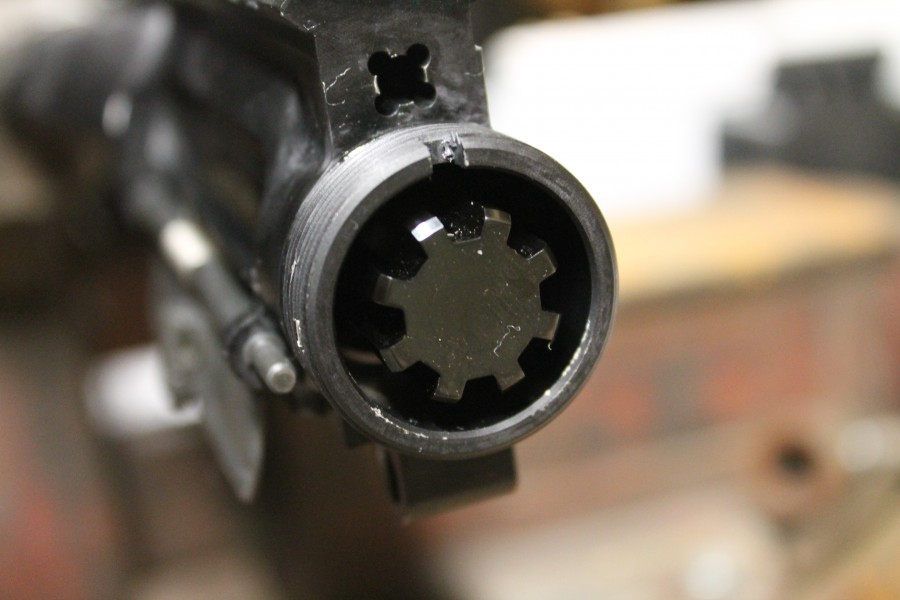
This arrangement has several benefits. First, and foremost in my mind, it allows you to work on a variety of uppers without issue. For example, if you owned three uppers, an A2 style, a M4 style, and a non mil spec like a CMT upper, you’d need a few different action blocks to assemble them. Or one reaction rod which frankly doesn’t care how your upper is shaped. Furthermore, if you wanted to do something like change out a flash hider, you know you need to properly isolate your upper from the (likely large) amount of torque needed to break the old one loose.
Your upper is made of delicate aluminum and you’ve likely read horror stories of people clamping some part of their gun in a vise, cranking on the flash hider, and breaking something. You can clamp the barrel in a purpose built vise like the ones available here, but for those with hand guards just a bit shorter than the barrel they cover, you might not have enough room to use that tool without first removing the handguard. Furthermore, you’d need to remove any optics or sights to put it in the vise. That would almost certainly mean re-zeroing your optic. That seems like a pain to swap out a flash hider.
The reaction rod beats out the action block and some other tools (in my mind) for a few reasons. First, it is a versatile tool. You can use it completely assemble an upper or swap out a couple parts from barrels to flash hiders. Second, during installation of a free floated hand guard, timing of the hand guard is often a trial and error project.
Using an action block, there will be frequent chucking and unchucking of the action from the action block. Using the reaction rod, you can set the rod in place, slide the receiver in place, torque the barrel nut down, and keep fine tuning the timing of the nut until the hand guard is perfect. I like that a lot because it saves a great deal of my time. Lastly, and this is very much my opinion, the reaction rod is easier on your upper receiver.
Even when it fits correctly, torquing a barrel nut using an action block always made me nervous. Aluminum is strong, but not so strong as steel. Transferring the torque from the barrel nut to the aluminum receiver via the indexing pin has always felt weird, especially when you get to really cranking on a barrel nut like Noveske recommends. The reaction rod allows you to transfer the torque from the barrel nut to the barrel which is a much stronger piece. I like that much better.
Specifications: Geissele AR 15/M4 Armorer’s Package
- AR15/ M4 Reaction Rod
- Material: 4140 Chrome Moly Steel
- Trigger Fitting Pin
- Gas Block Roll Pin Tool
- Gas Block Pin Punch Set
- Includes Tapered Starter Punch
- Includes Pin punch in 0.078″ diameter
- Price: $131.00
Fit, Function, Finish * * * * *
Bill Geissele isn’t really known for making sub par equipment so my expectations for his tools were high. Every single tool did their intended job with aplomb. The trigger fitting pin matched up with lower perfectly. I experienced a similar level of success using the punch set. The gas block roll pin fit in the starter punch perfectly, and the pin punch fit the gas block hole perfectly allowing me to drive out a very rusty and corroded gas block roll pin. But by far, my favorite was the reaction rod which fit the upper receiver perfectly, and slotted into the barrel extension with very little wiggle.
Overall Rating * * * * *
I understand that $131 is a decent chunk of change for a lot of people. And I definitely don’t think that this tool kit is necessary for everyone. But if you swap out upper parts once or twice a year, the reaction rod alone will prove its worth very quickly. If you’re assembling or disassembling uppers and lowers regularly or even if you just care about having the right tools for the job, the whole armorer’s kit can make your life a great deal easier. This is a high quality piece of kit, and the serious home armorer won’t regret spending the money to put it in their shop.


And the timing of this review couldn’t be better! You can head over to the Geissele website from Friday to Monday for reduced prices.
Except it is Out Of Stock. 🙁
The reaction rid should be used for barrel things like flash hiders. For torquing the barrel nut, you need to stabilize the receiver, not the barrel
Using the reaction rod to torque barrel nuts can lead to broken barrel receiver extensions.
I’d like to know more, got links?
Here is a discussion. The issue is when torquing the barrel it is possible for the receiver to put a lot of pressure on the barrel index pin.
http://www.m4carbine.net/archive/index.php/t-118152.html
It may be more theoretical than real.
Yep, the threads are on the receiver, not the barrel. The only stress on the barrel is from the barrel nut riding on the shoulder of the barrel. The torque applied is through the receiver, and using this tool would increase, not decrease, the stress on the index pin and mating slot. Proper maintenance would require both the reaction rod and receiver block.
$131 for good tools is not to much.
However, for those of us who have other firearms besides AR-15’s a more general approach to tools is required. Specialist tool sets are great for that specific fire arm. My Craftsman tools do the same thing on AR’s, M1’s (rifle and carbine), mausers, remingtons, rugers, and springfields.
After a struggle with a billet upper I bought the Brownell’s tool.
AR Barrel Extension Torque Tool. Out of stock right now, but about $ 30.00. It has a 1/2″ square hole in the end for a wrench or a torque wrench. I put the barrel nut tool in the vise and torqued the barrel nut up with a torque wrench in this tool.
http://www.brownells.com/gunsmith-tools-supplies/rifle-tools/barrel-tools/ar-15-m16-308-ar-barrel-extension-torque-tools-prod27452.aspx
John in Philly
Nice package!
Wait, that didn’t come out right . . . .
“I’m very sensitive to the needs of truckers”
Geissele products rocks. The reaction rod is the best tool for taking down or up barrels on a upper.
Good stuff Tyler. I also like wheeler engineering tools for mounting scopes nice and true.
Pretty neat, but way out of my price range. My $10 action block suits me just fine.
Seems like awesome stuff.
My understanding is that muzzle device work should be done by clamping the barrel near the muzzle. Several devices exist for this, and you can make your own easily with hardwood. Clamping near the barrel extension or through the upper creates a long lever that amplifies the torque applied at the muzzle.
http://www.ar15.com has a lot of interesting discussion about the reaction rod in its build it yourself forum. As far as I can tell, there is no foolproof way to clamp an upper. I think the key is to use shims to avoid high torque in the first place.
I disagree. Read
http://www.everydaynodaysoff.com/2014/08/06/the-story-of-brownells-ar-15-magazines/
Comments are closed.