
Most shooters have at least one build that will never be complete. Many times these are the firearms we shoot and train with the most. Just as often, it’s our “fun guns” or those builds our friends will hurl insults at and refuse to even squeeze the trigger on, even if they function flawlessly and accurately.
A few years back I assembled a few “monstrosities” on Ruger’s 10/22 and .22 Charger receivers, several of which have evolved with time, technology, and fashion. A new stock/brace, a different grip, the latest optic….
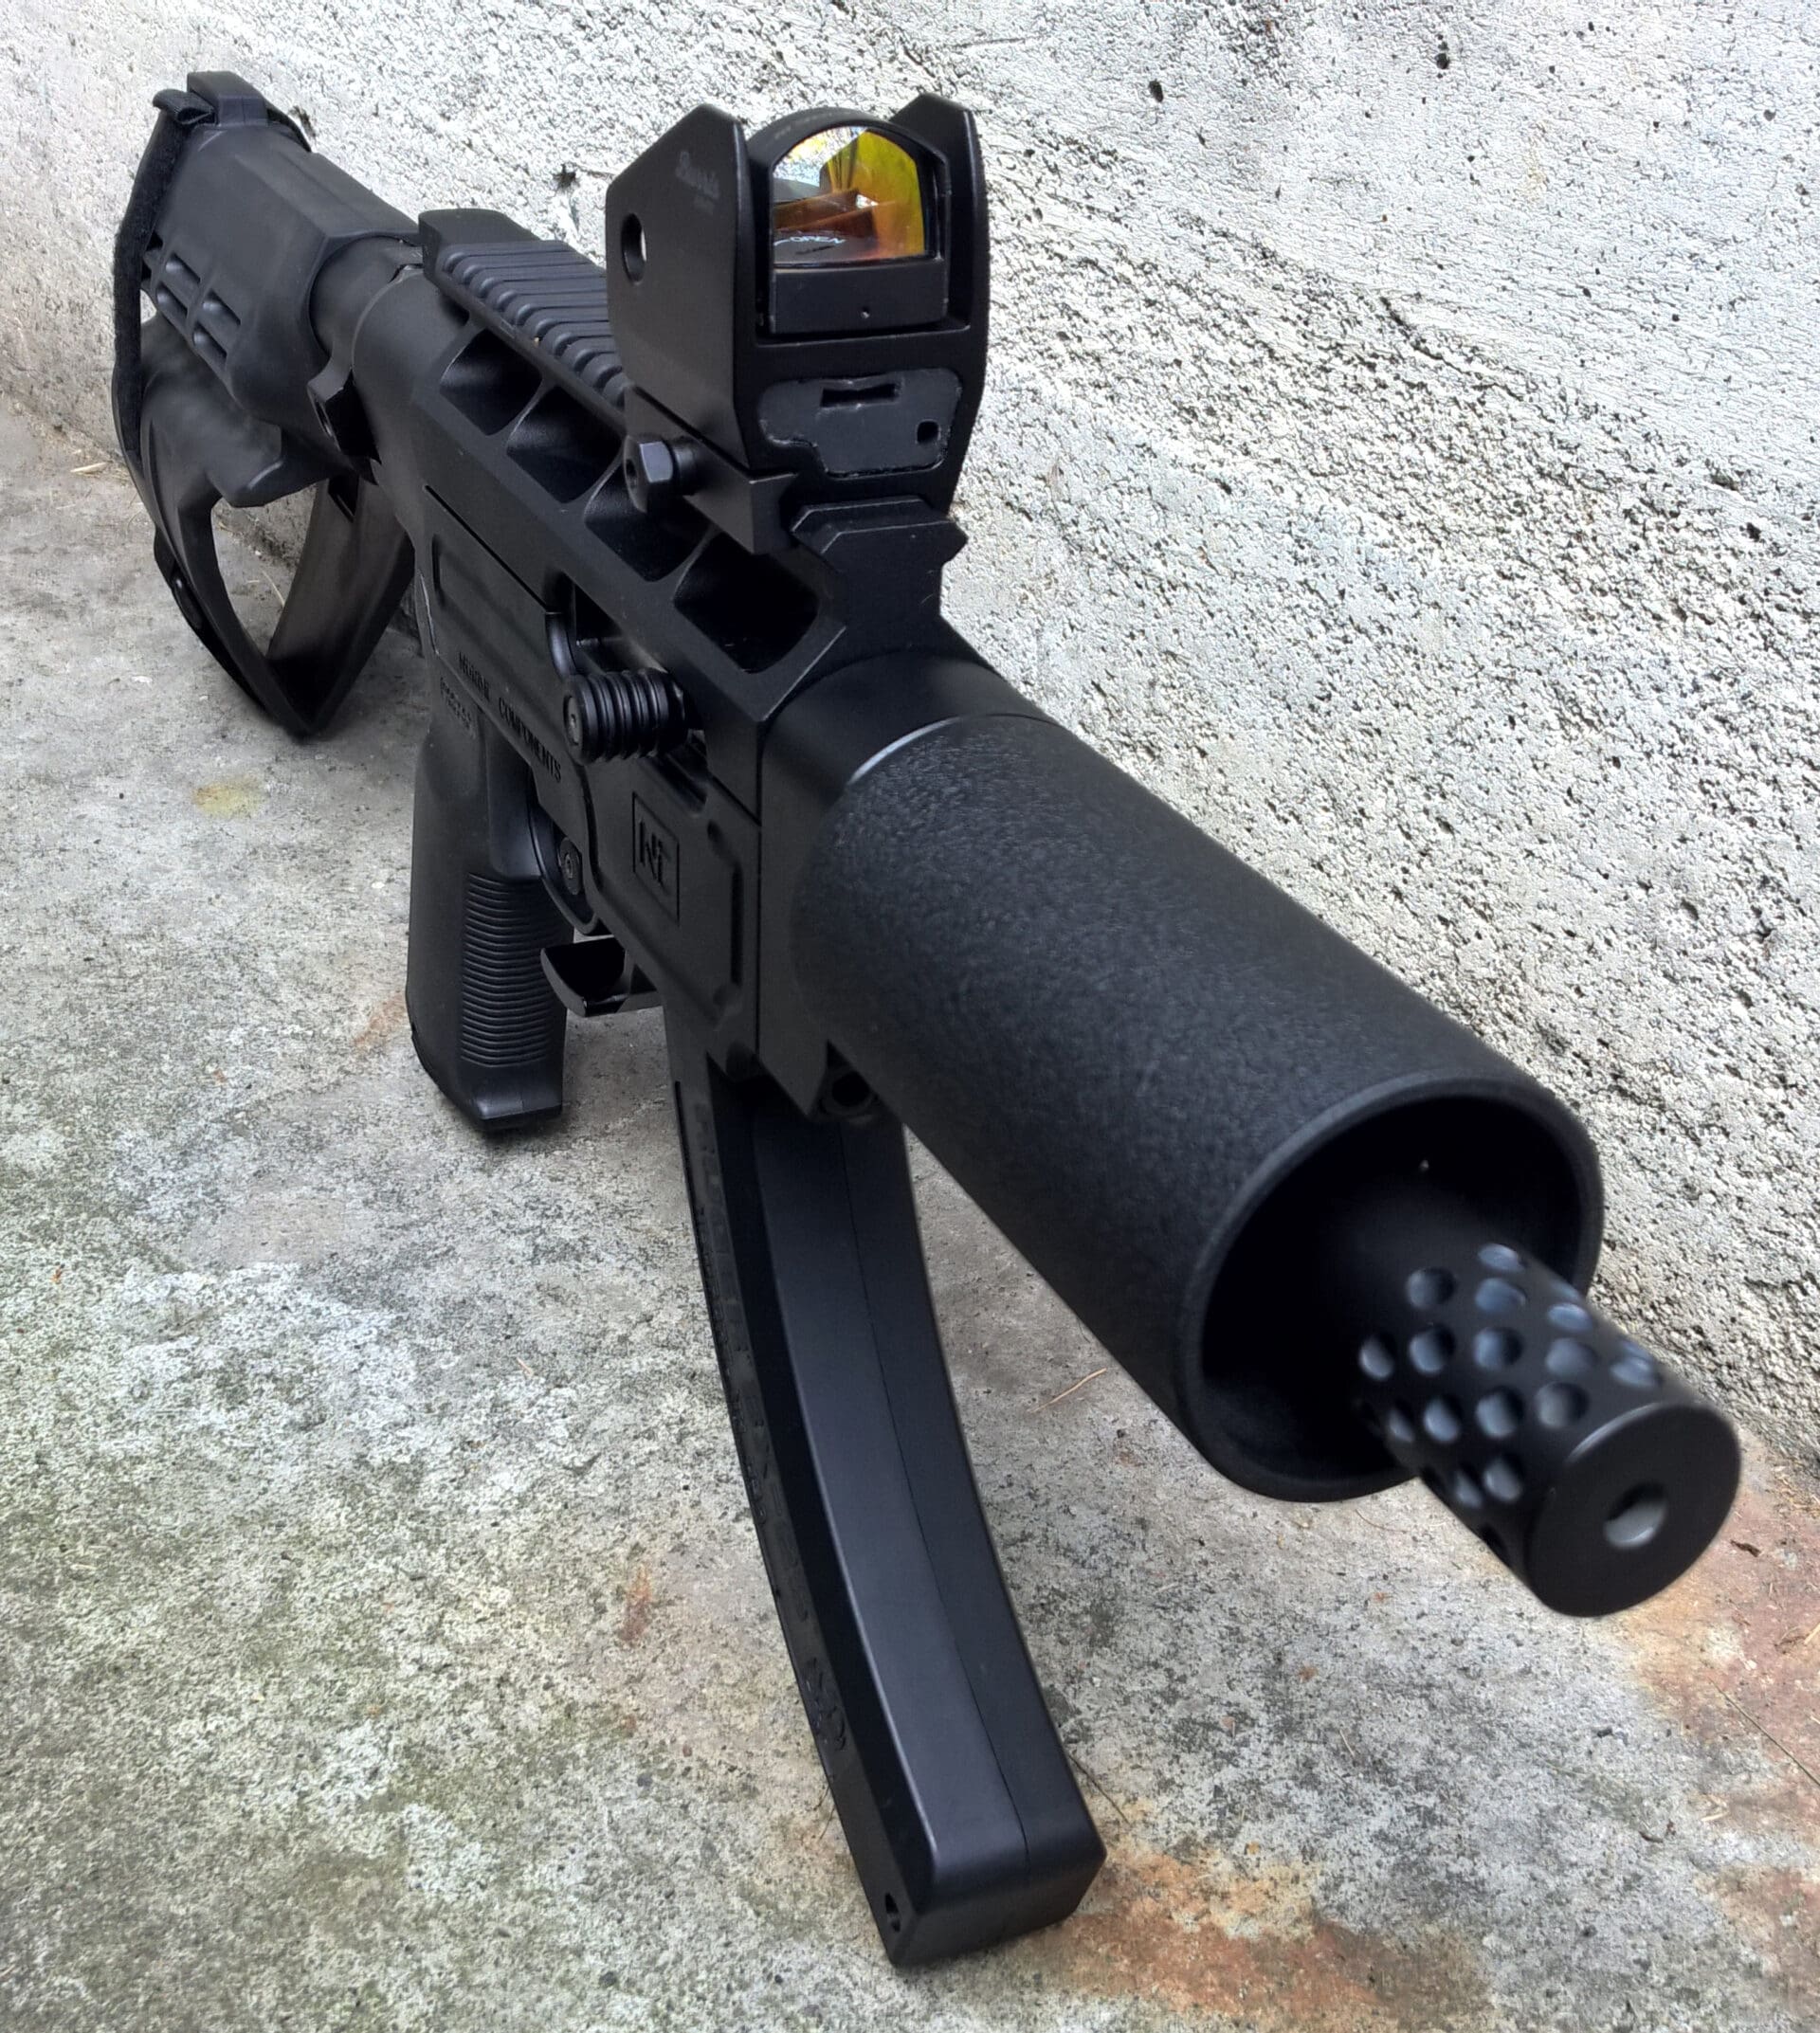
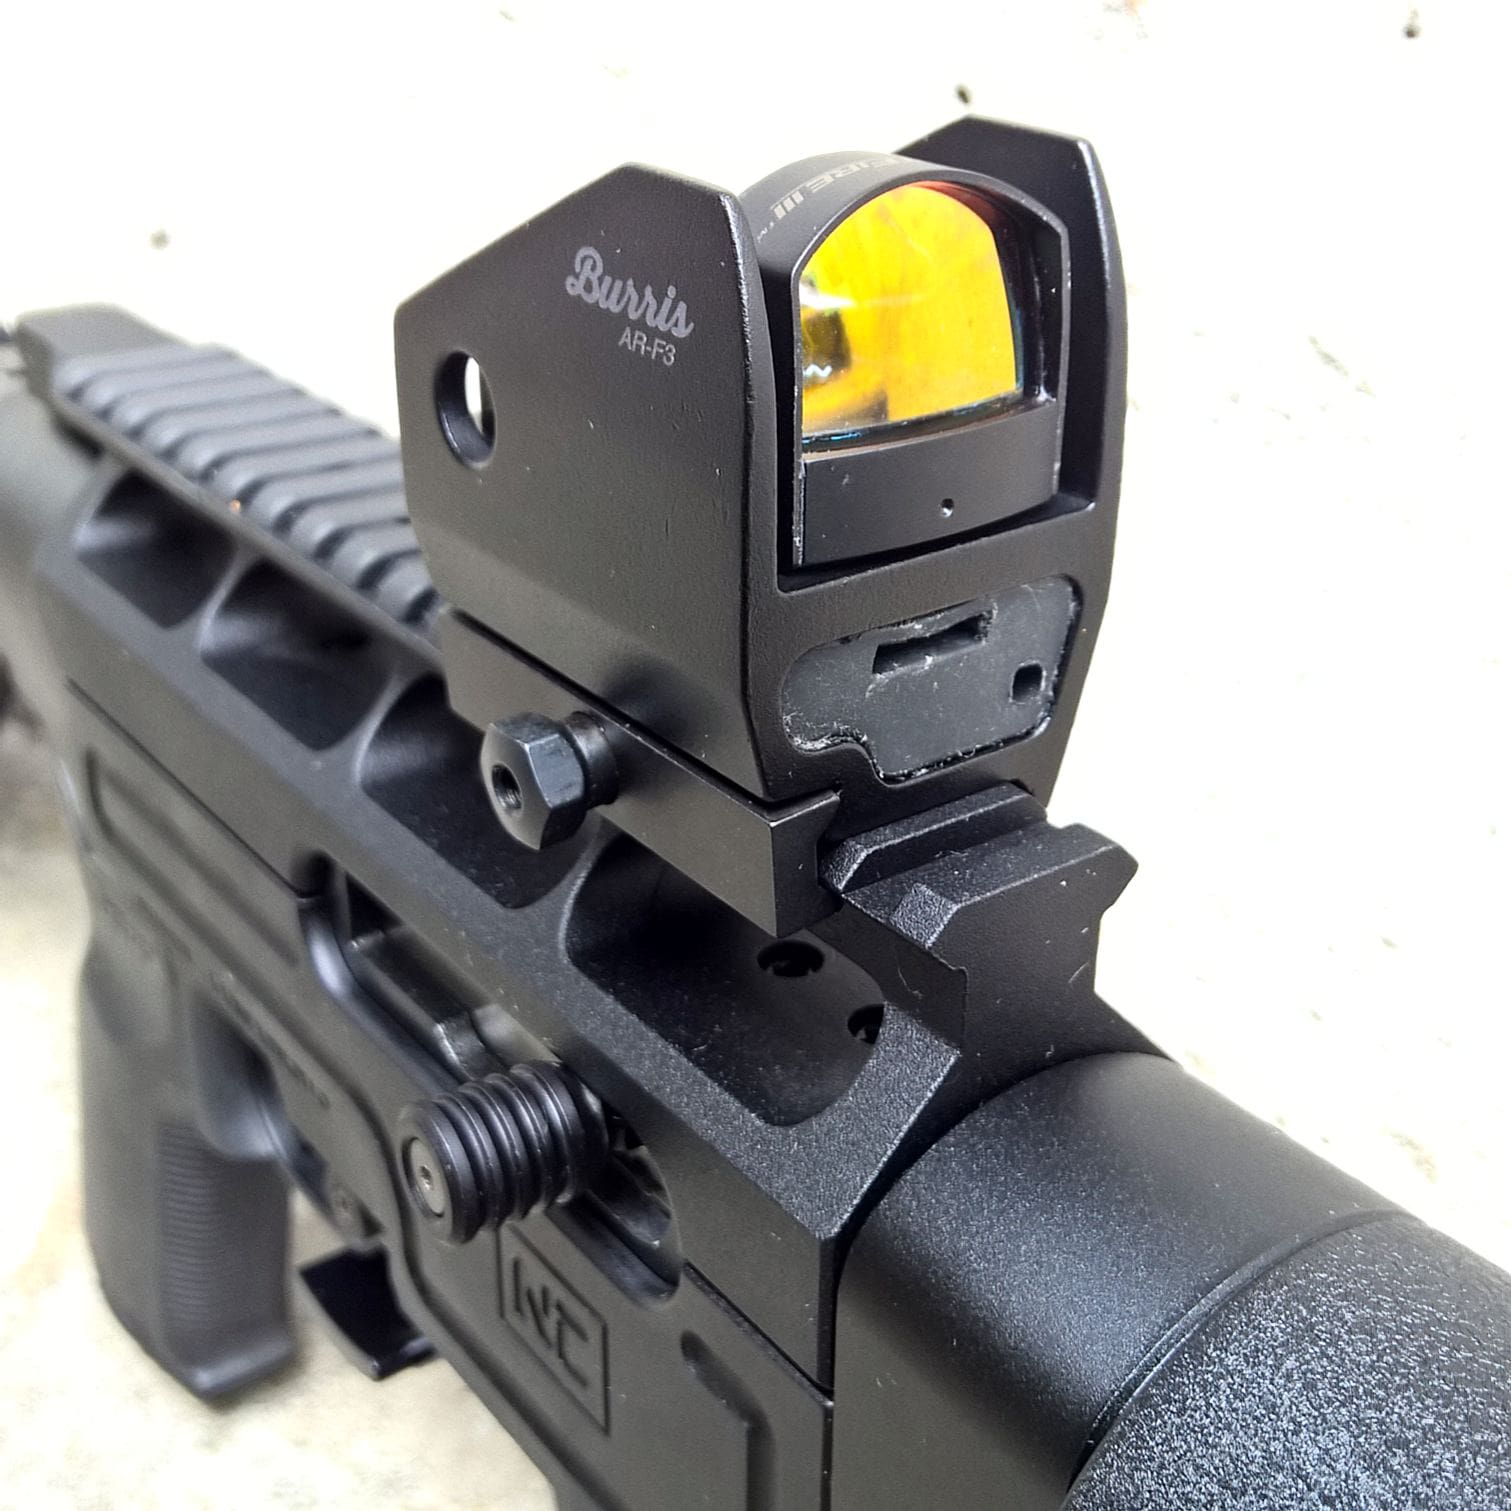
This last time around, I finally decided to elevate the Burris FastFire 3 red dot sight (RDS) on my braced .22 Charger pistol to the position it deserved. Now, I have zero qualms about the Fastfire III; I think it’s a good RMR-style red dot sight. My preference was simply to have it sit higher off the rail for quicker reticle acquisition.
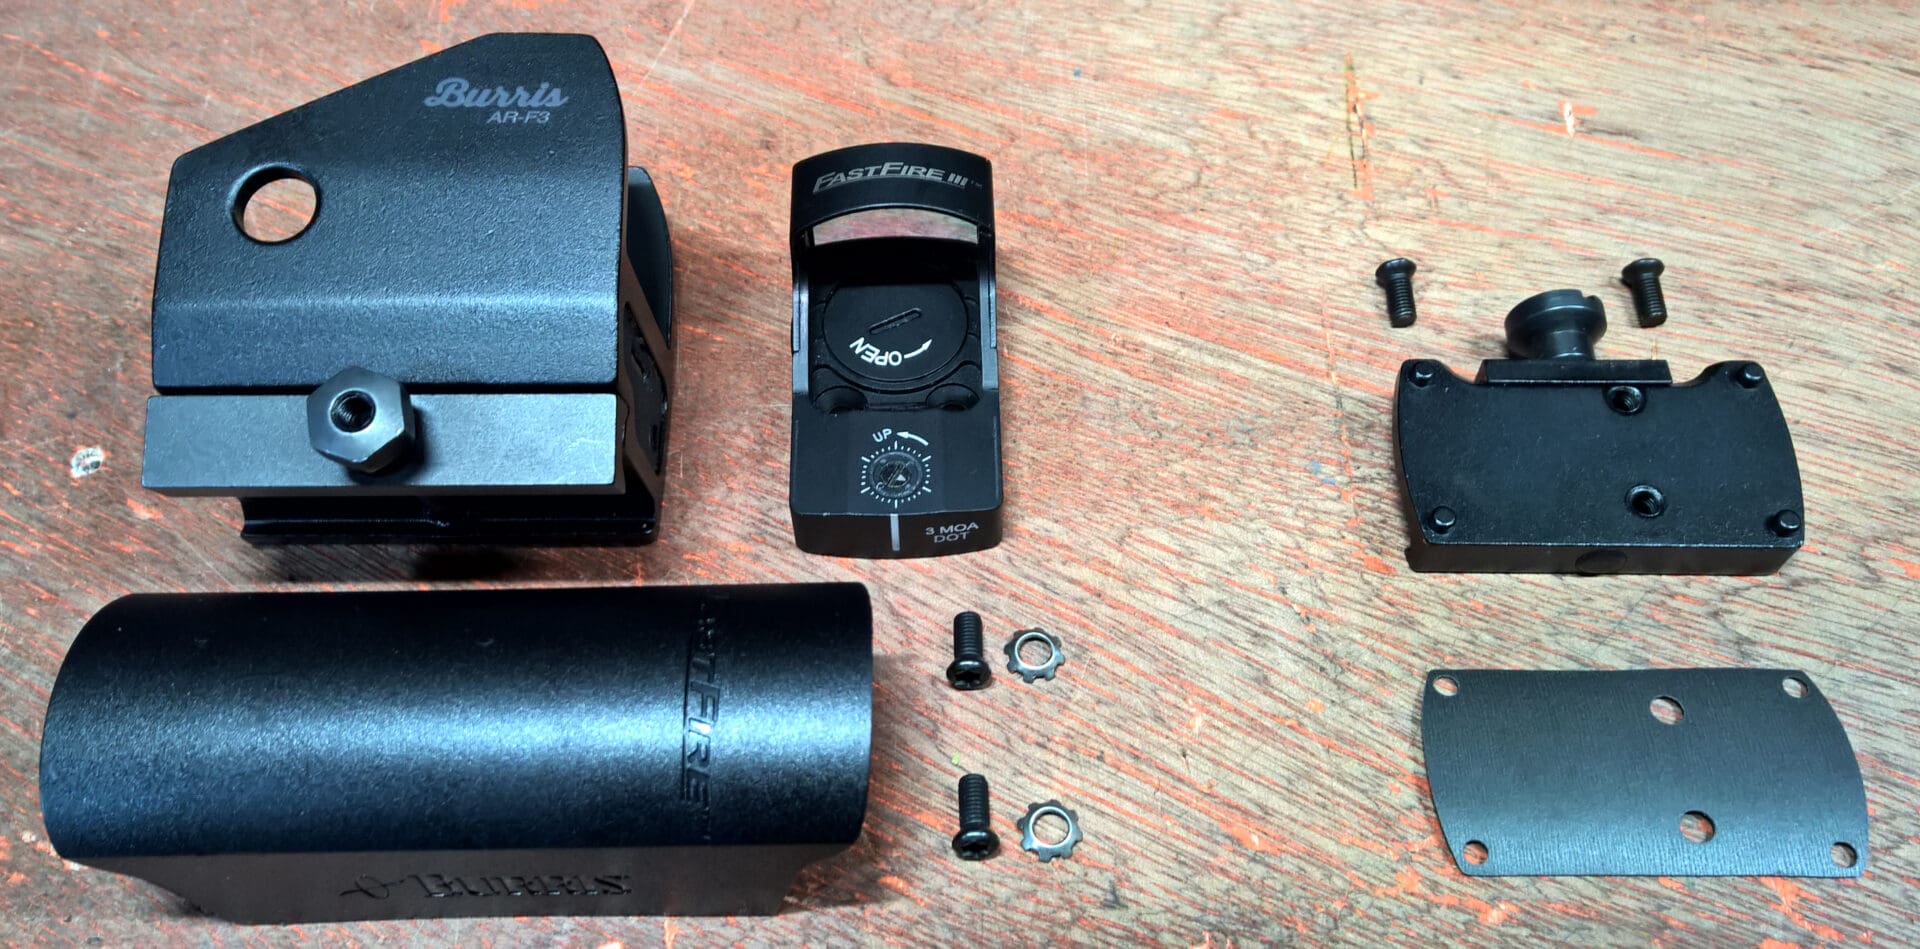
There are a number of very good products I could have used to boost the reflex sight. Lighter, smaller profile or less expensive options exist. But I chose Burris’s AR-F3 Mount (above and below) because it was designed to work with the optic I already had; I didn’t want to deal with any issues regarding fit or compatibility.

The AR-F3 mount comes with everything you need to mount your Burris FastFire II or III. Three sets of T-15 Torx head screws and concave locking washers (above, right) are provided, allowing you the opportunity to lose a screw and washer without much consequence – or have a set of back-ups.
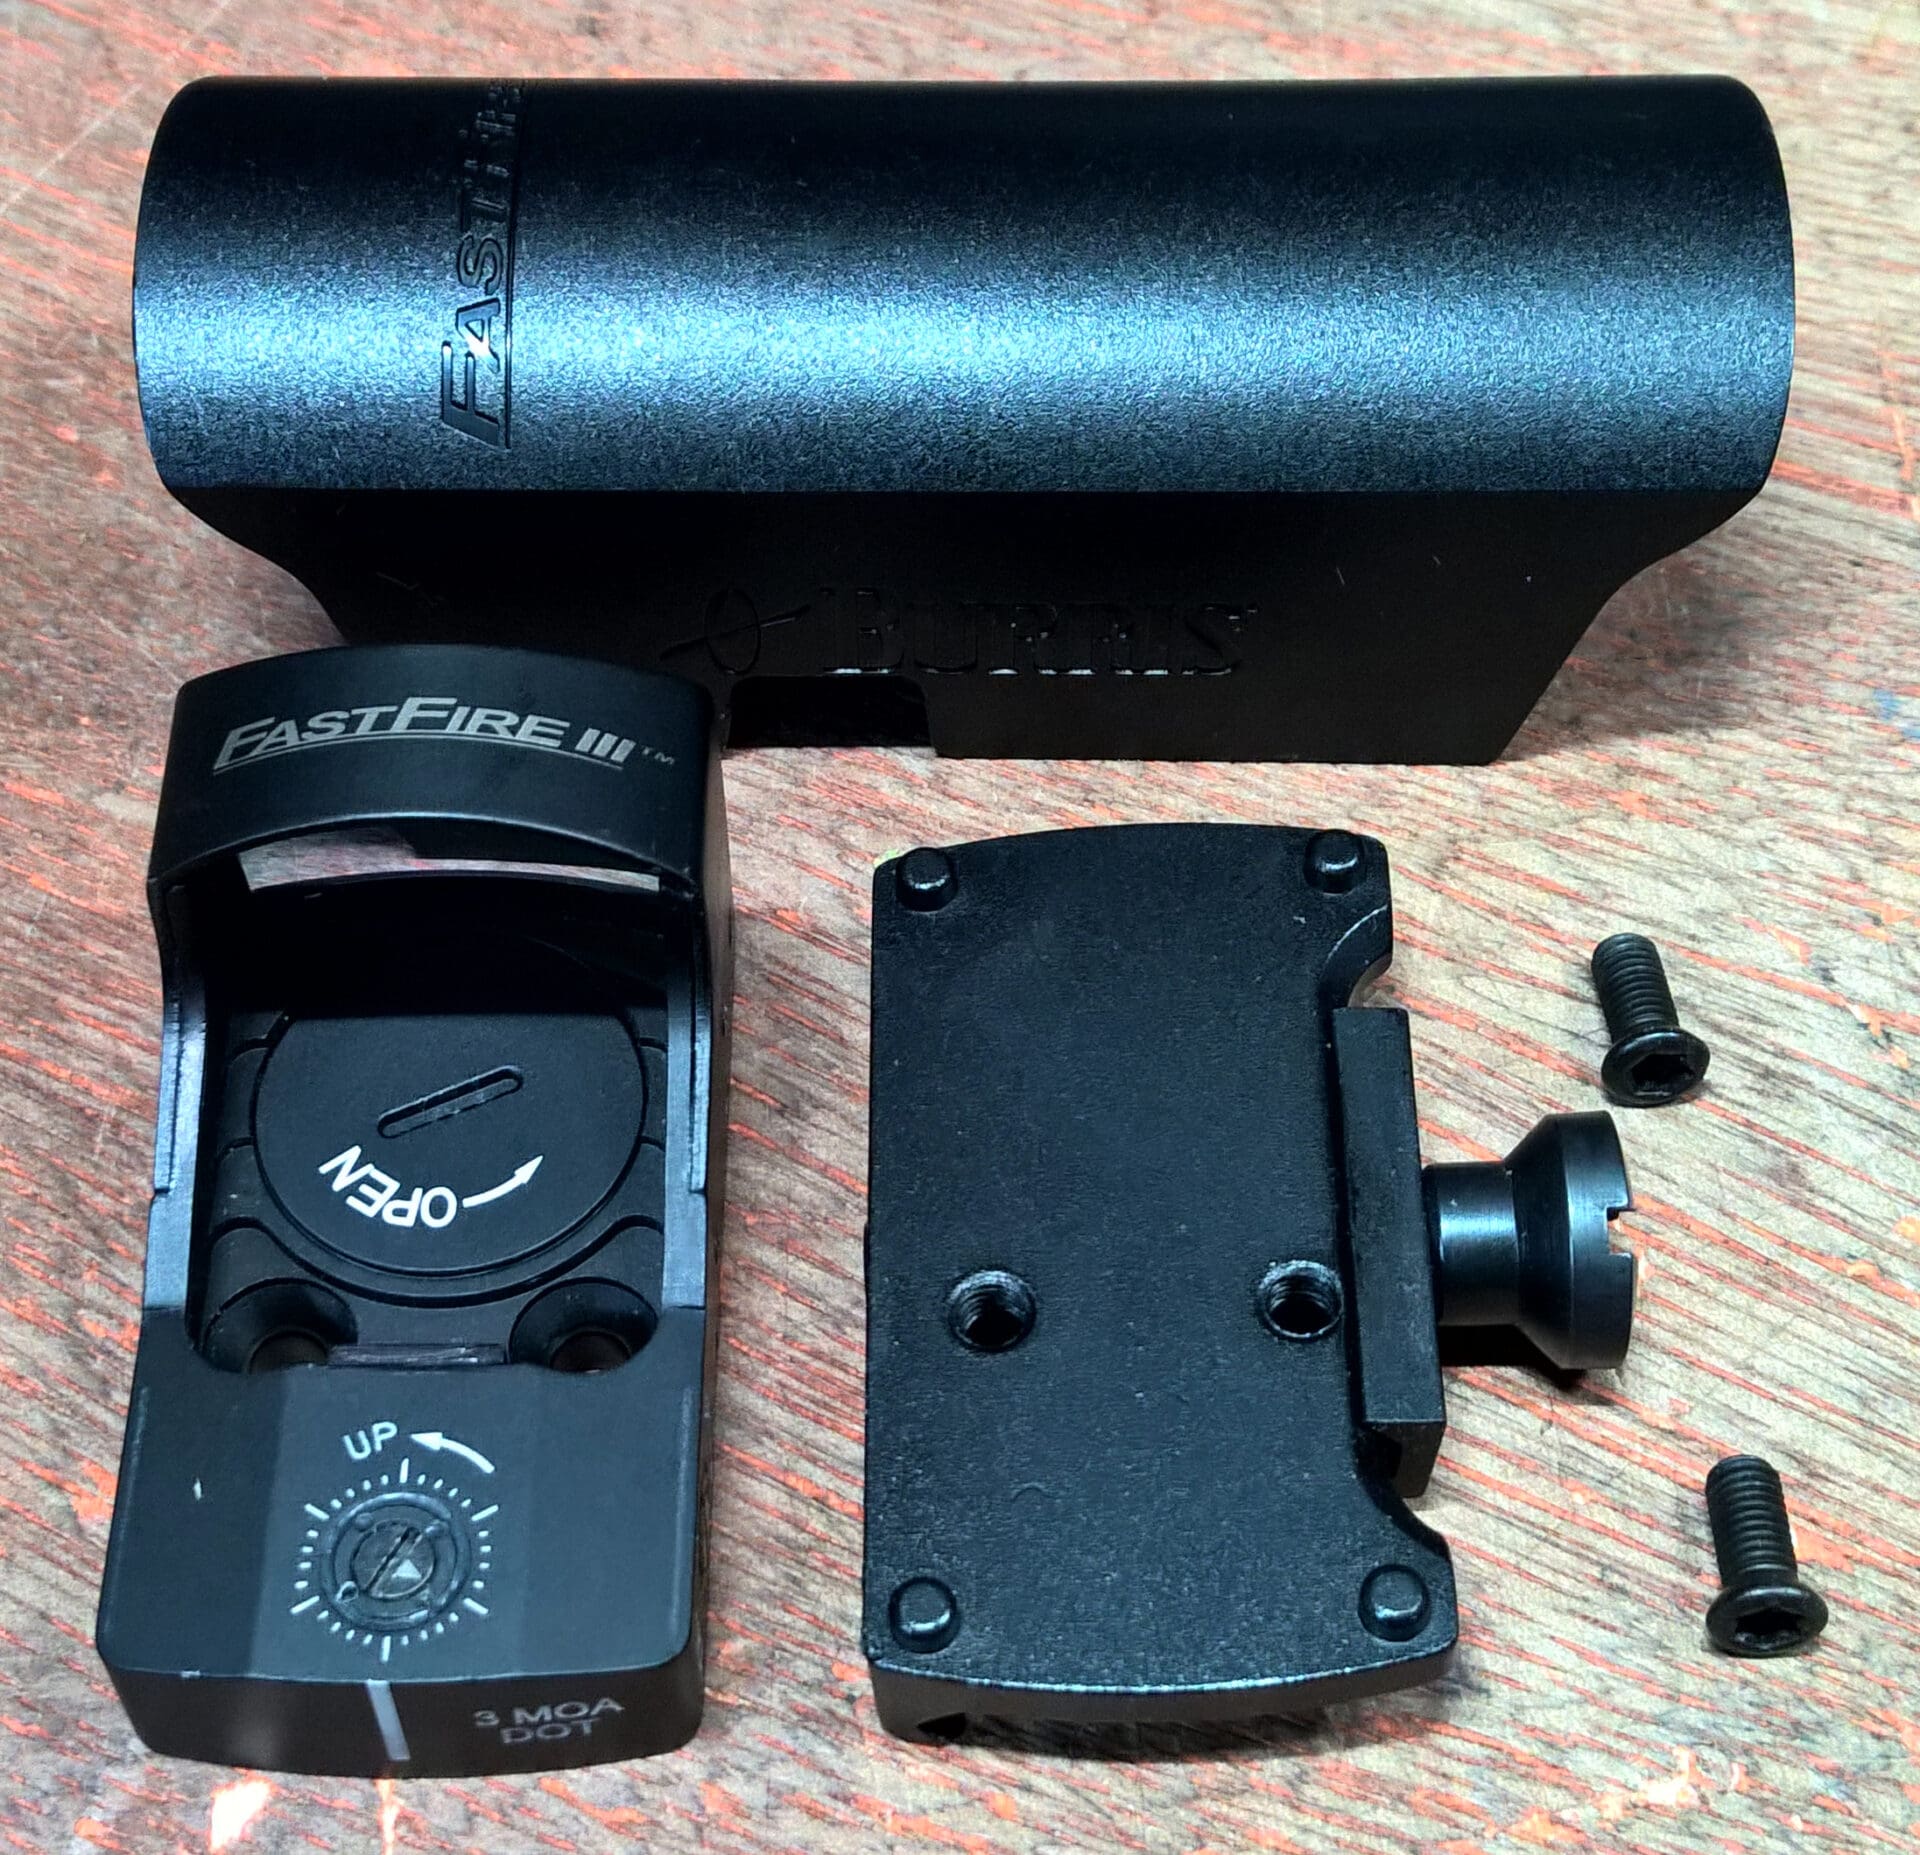
Folks with a FastFire II red dot sight will want to use the included rubber gasket (above, left) to help seal the bottom of the optic. If you have a FastFire III, the gasket is not necessary.
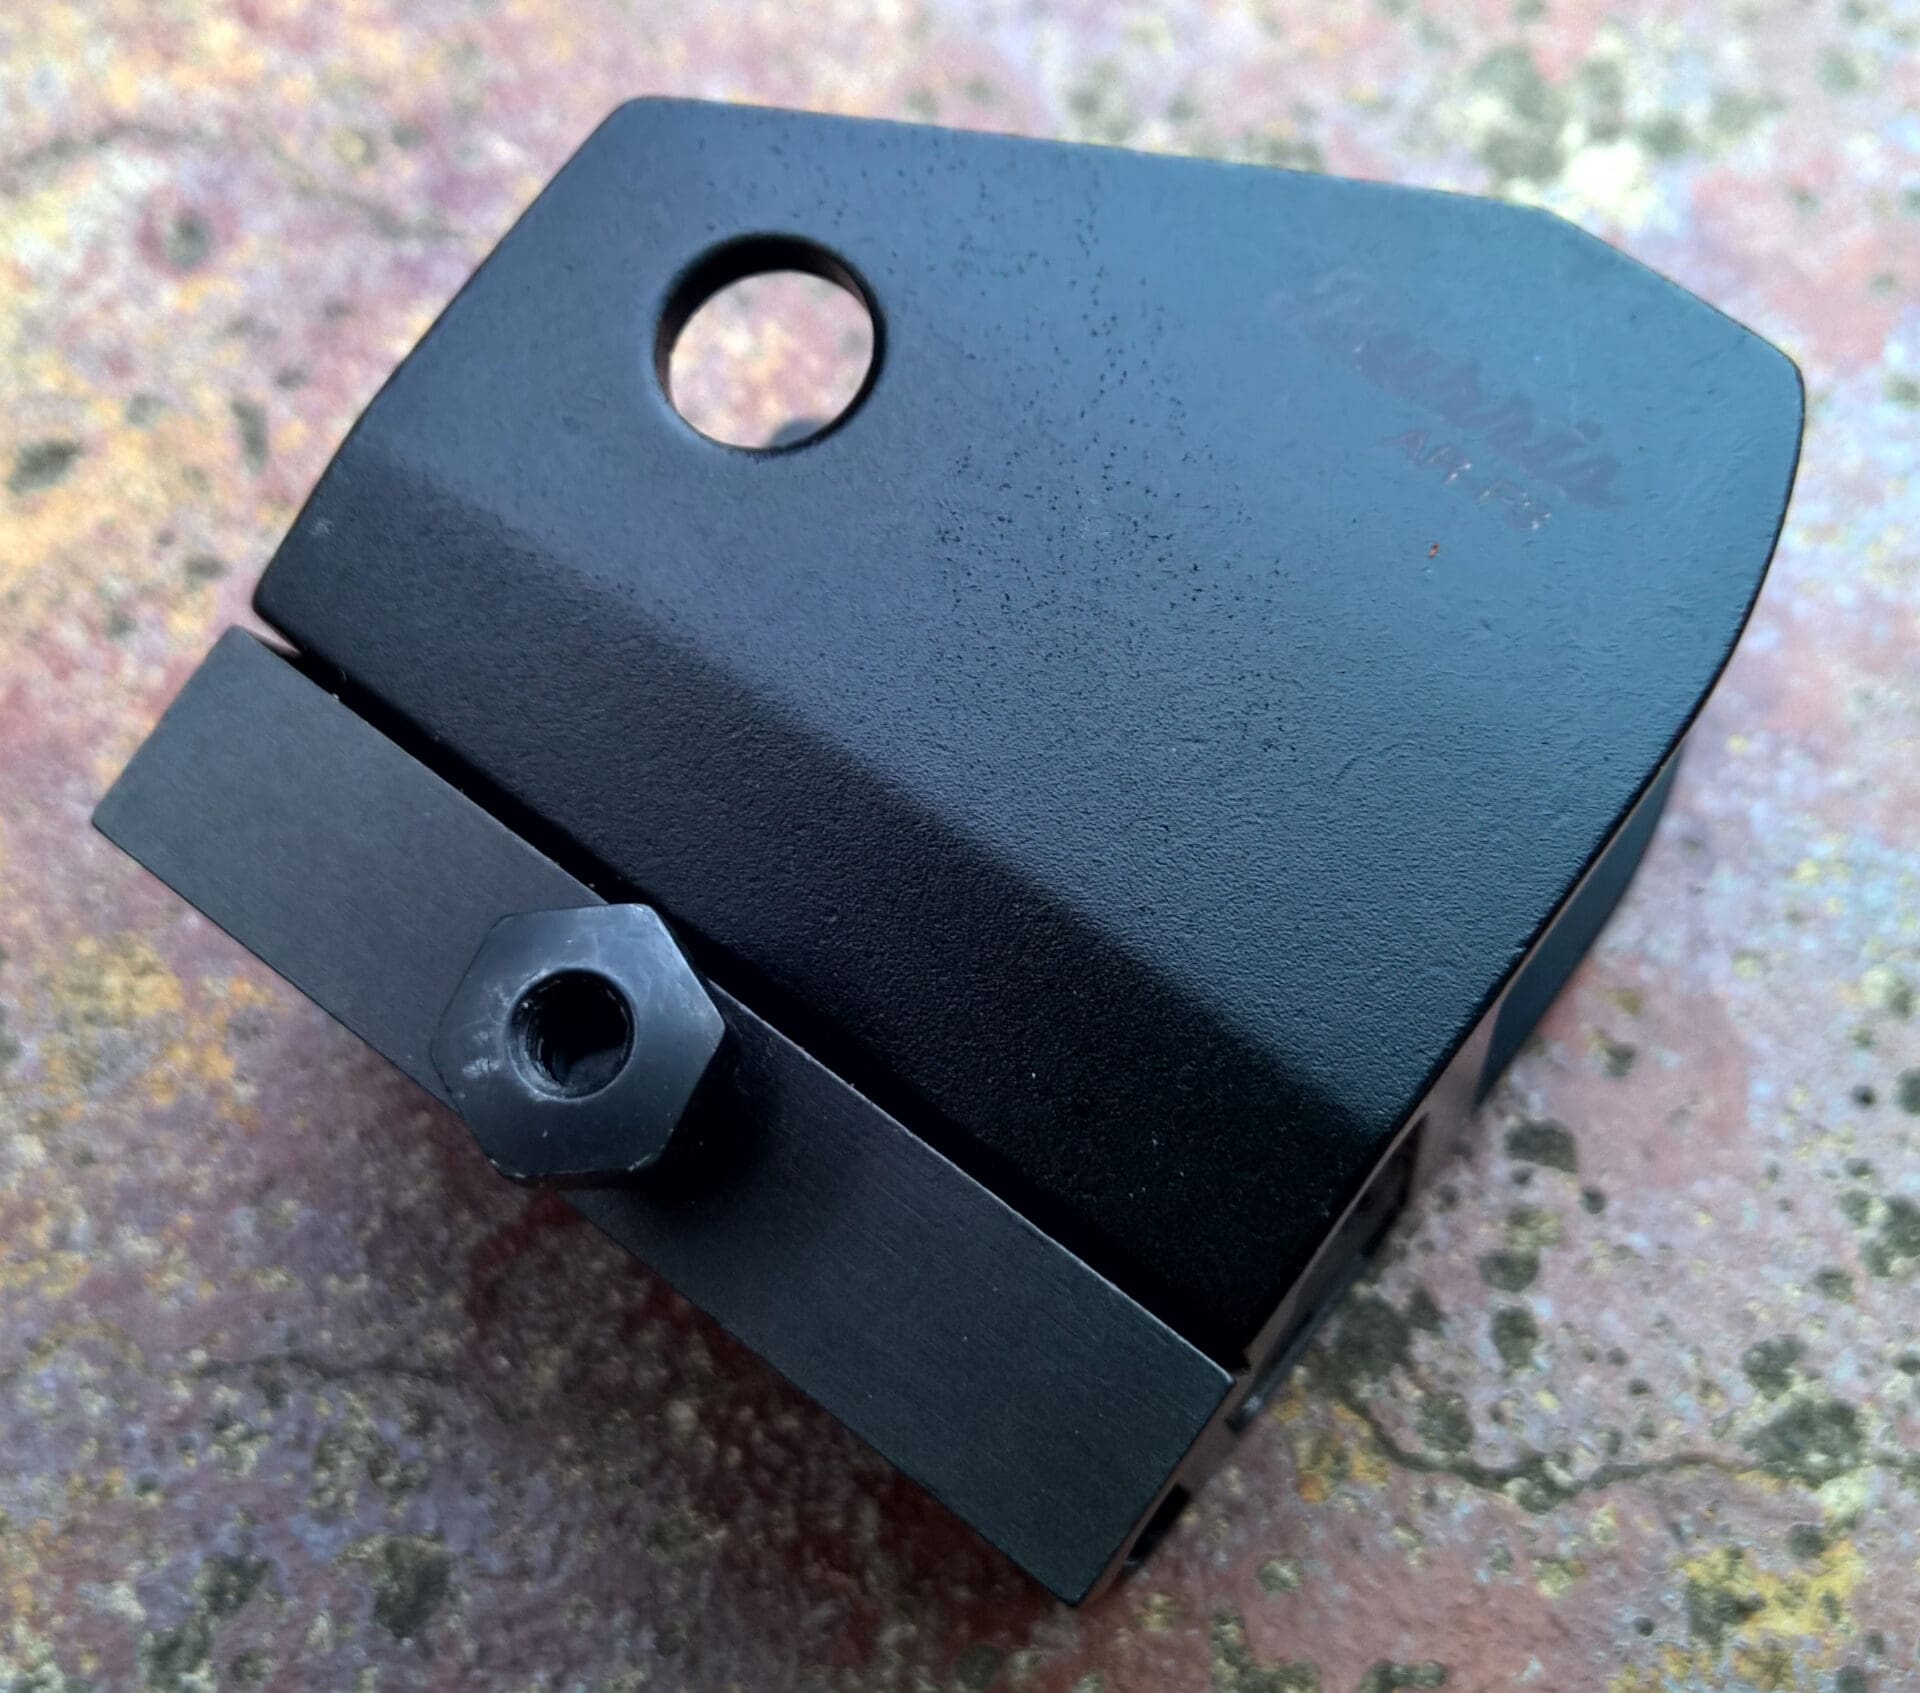
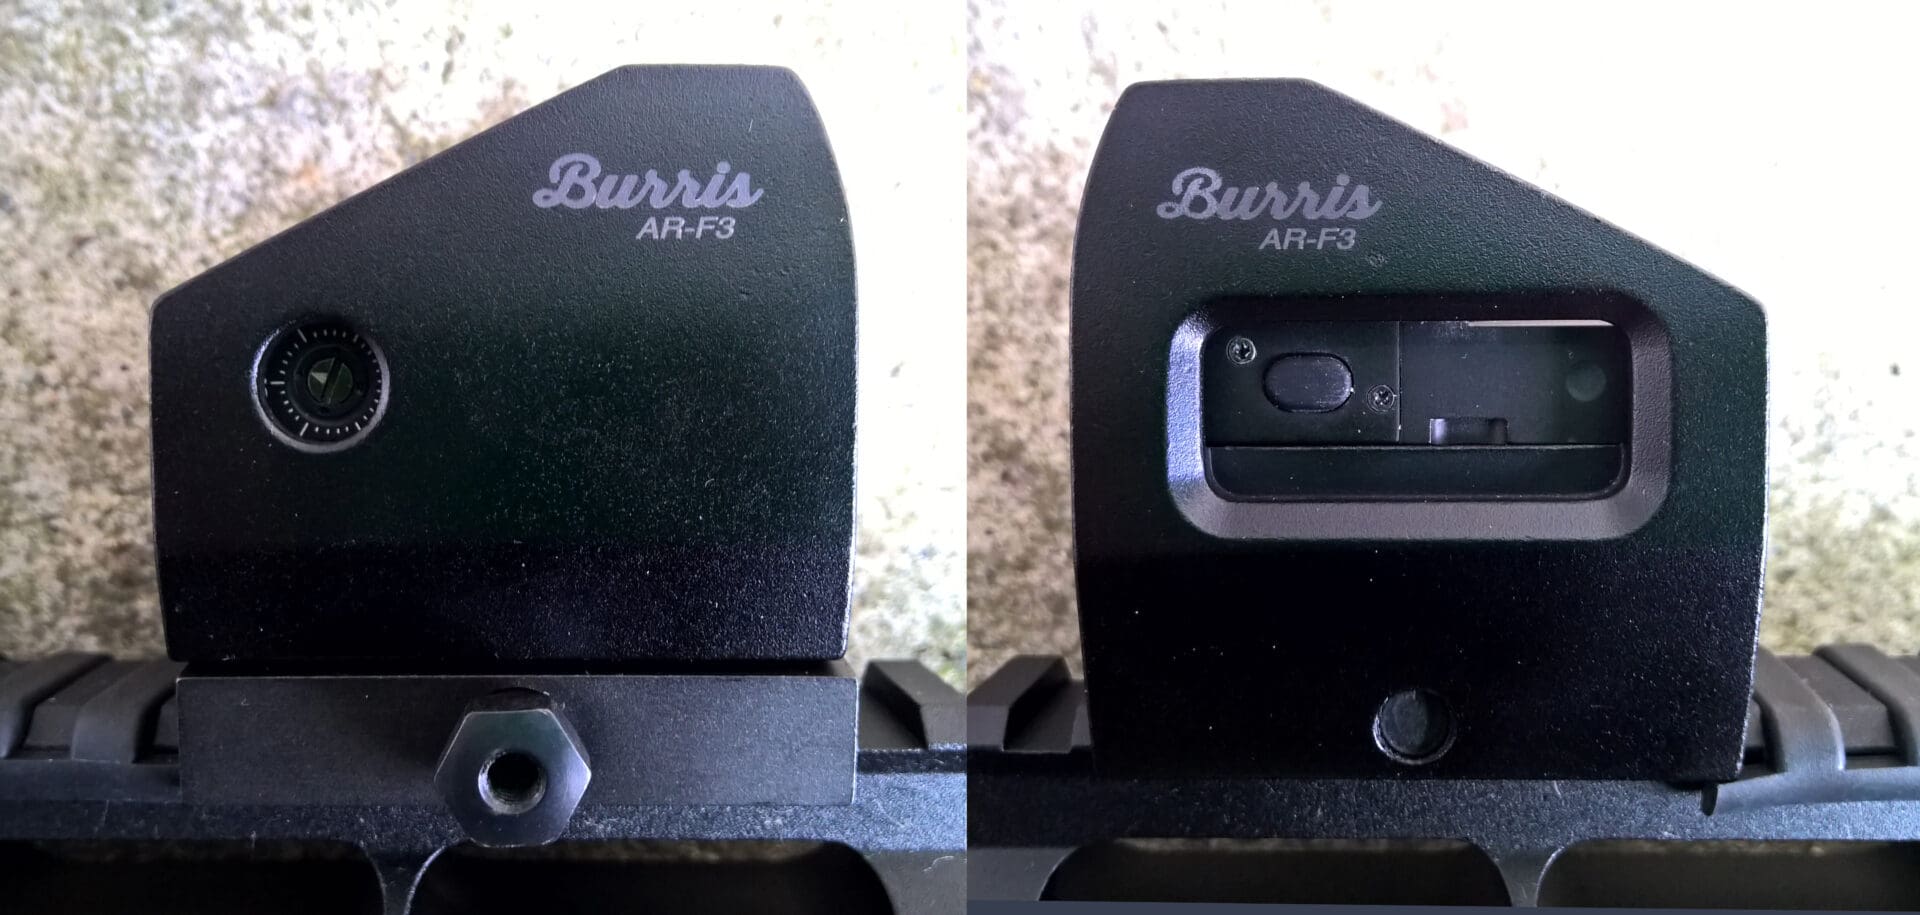
Then, of course there’s the actual mount (above, center), which is fairly robust, decently-finished, and designed to allow for co-witness between a FastFire RDS and standard iron sights.

Looking at the top of the mount, the alignment nubs, screw holes, and extra battery compartment are all easily distinguishable and clean of burrs/imperfections.
Note the recess in the side shield to the right of “Plus Side Up”. This recess allows for compatibility with the FastFire II’s on/off switch.
The Burris AR-F3 sight mount utilizes a two-inch long traditional side-clamp picatinny rail mount system. The hex nut on the cross-bolt measures 3/8″ and does not include a slot across its face to allow for the use of a Philips bit.
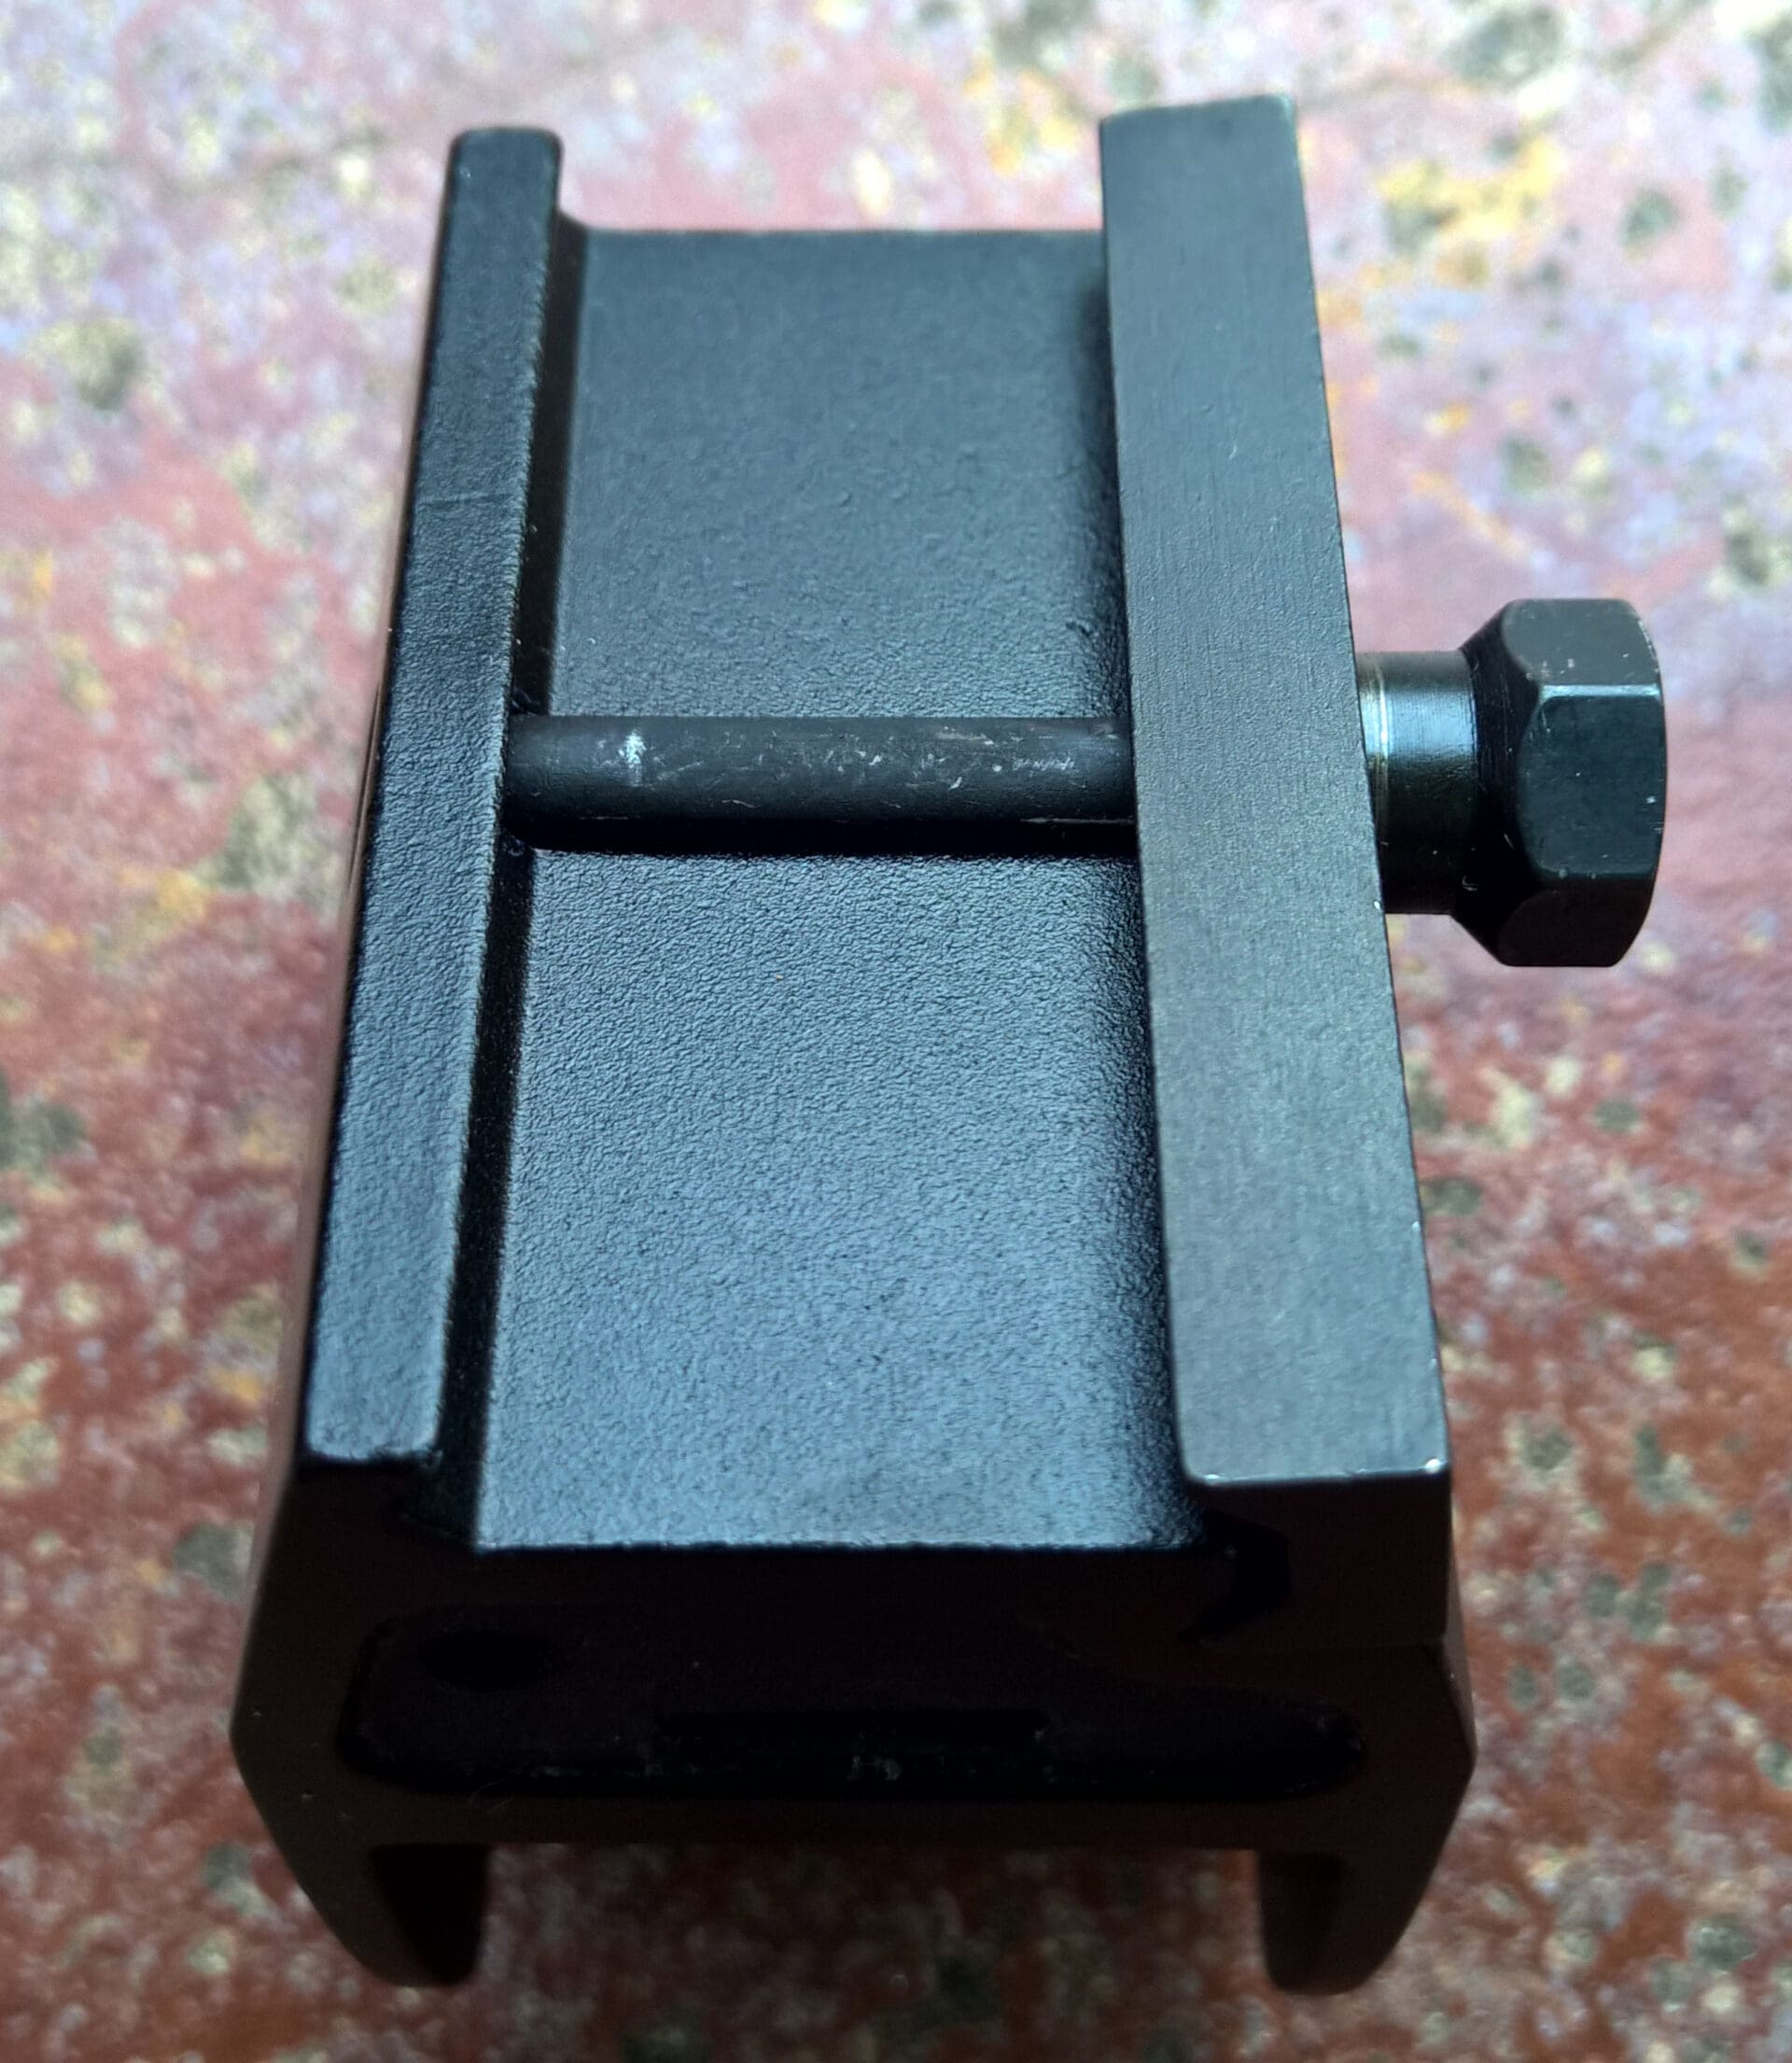
The cross-bolt itself is also disappointing in that, although they exist, its side walls barely protrude from the base of the mount and the bottom face of the bolt is well-rounded.
This leaves minimal surface area for the cross-bolt to engage the slot of the picatinny rail, especially during installation when a slipping cross-bolts is most common.
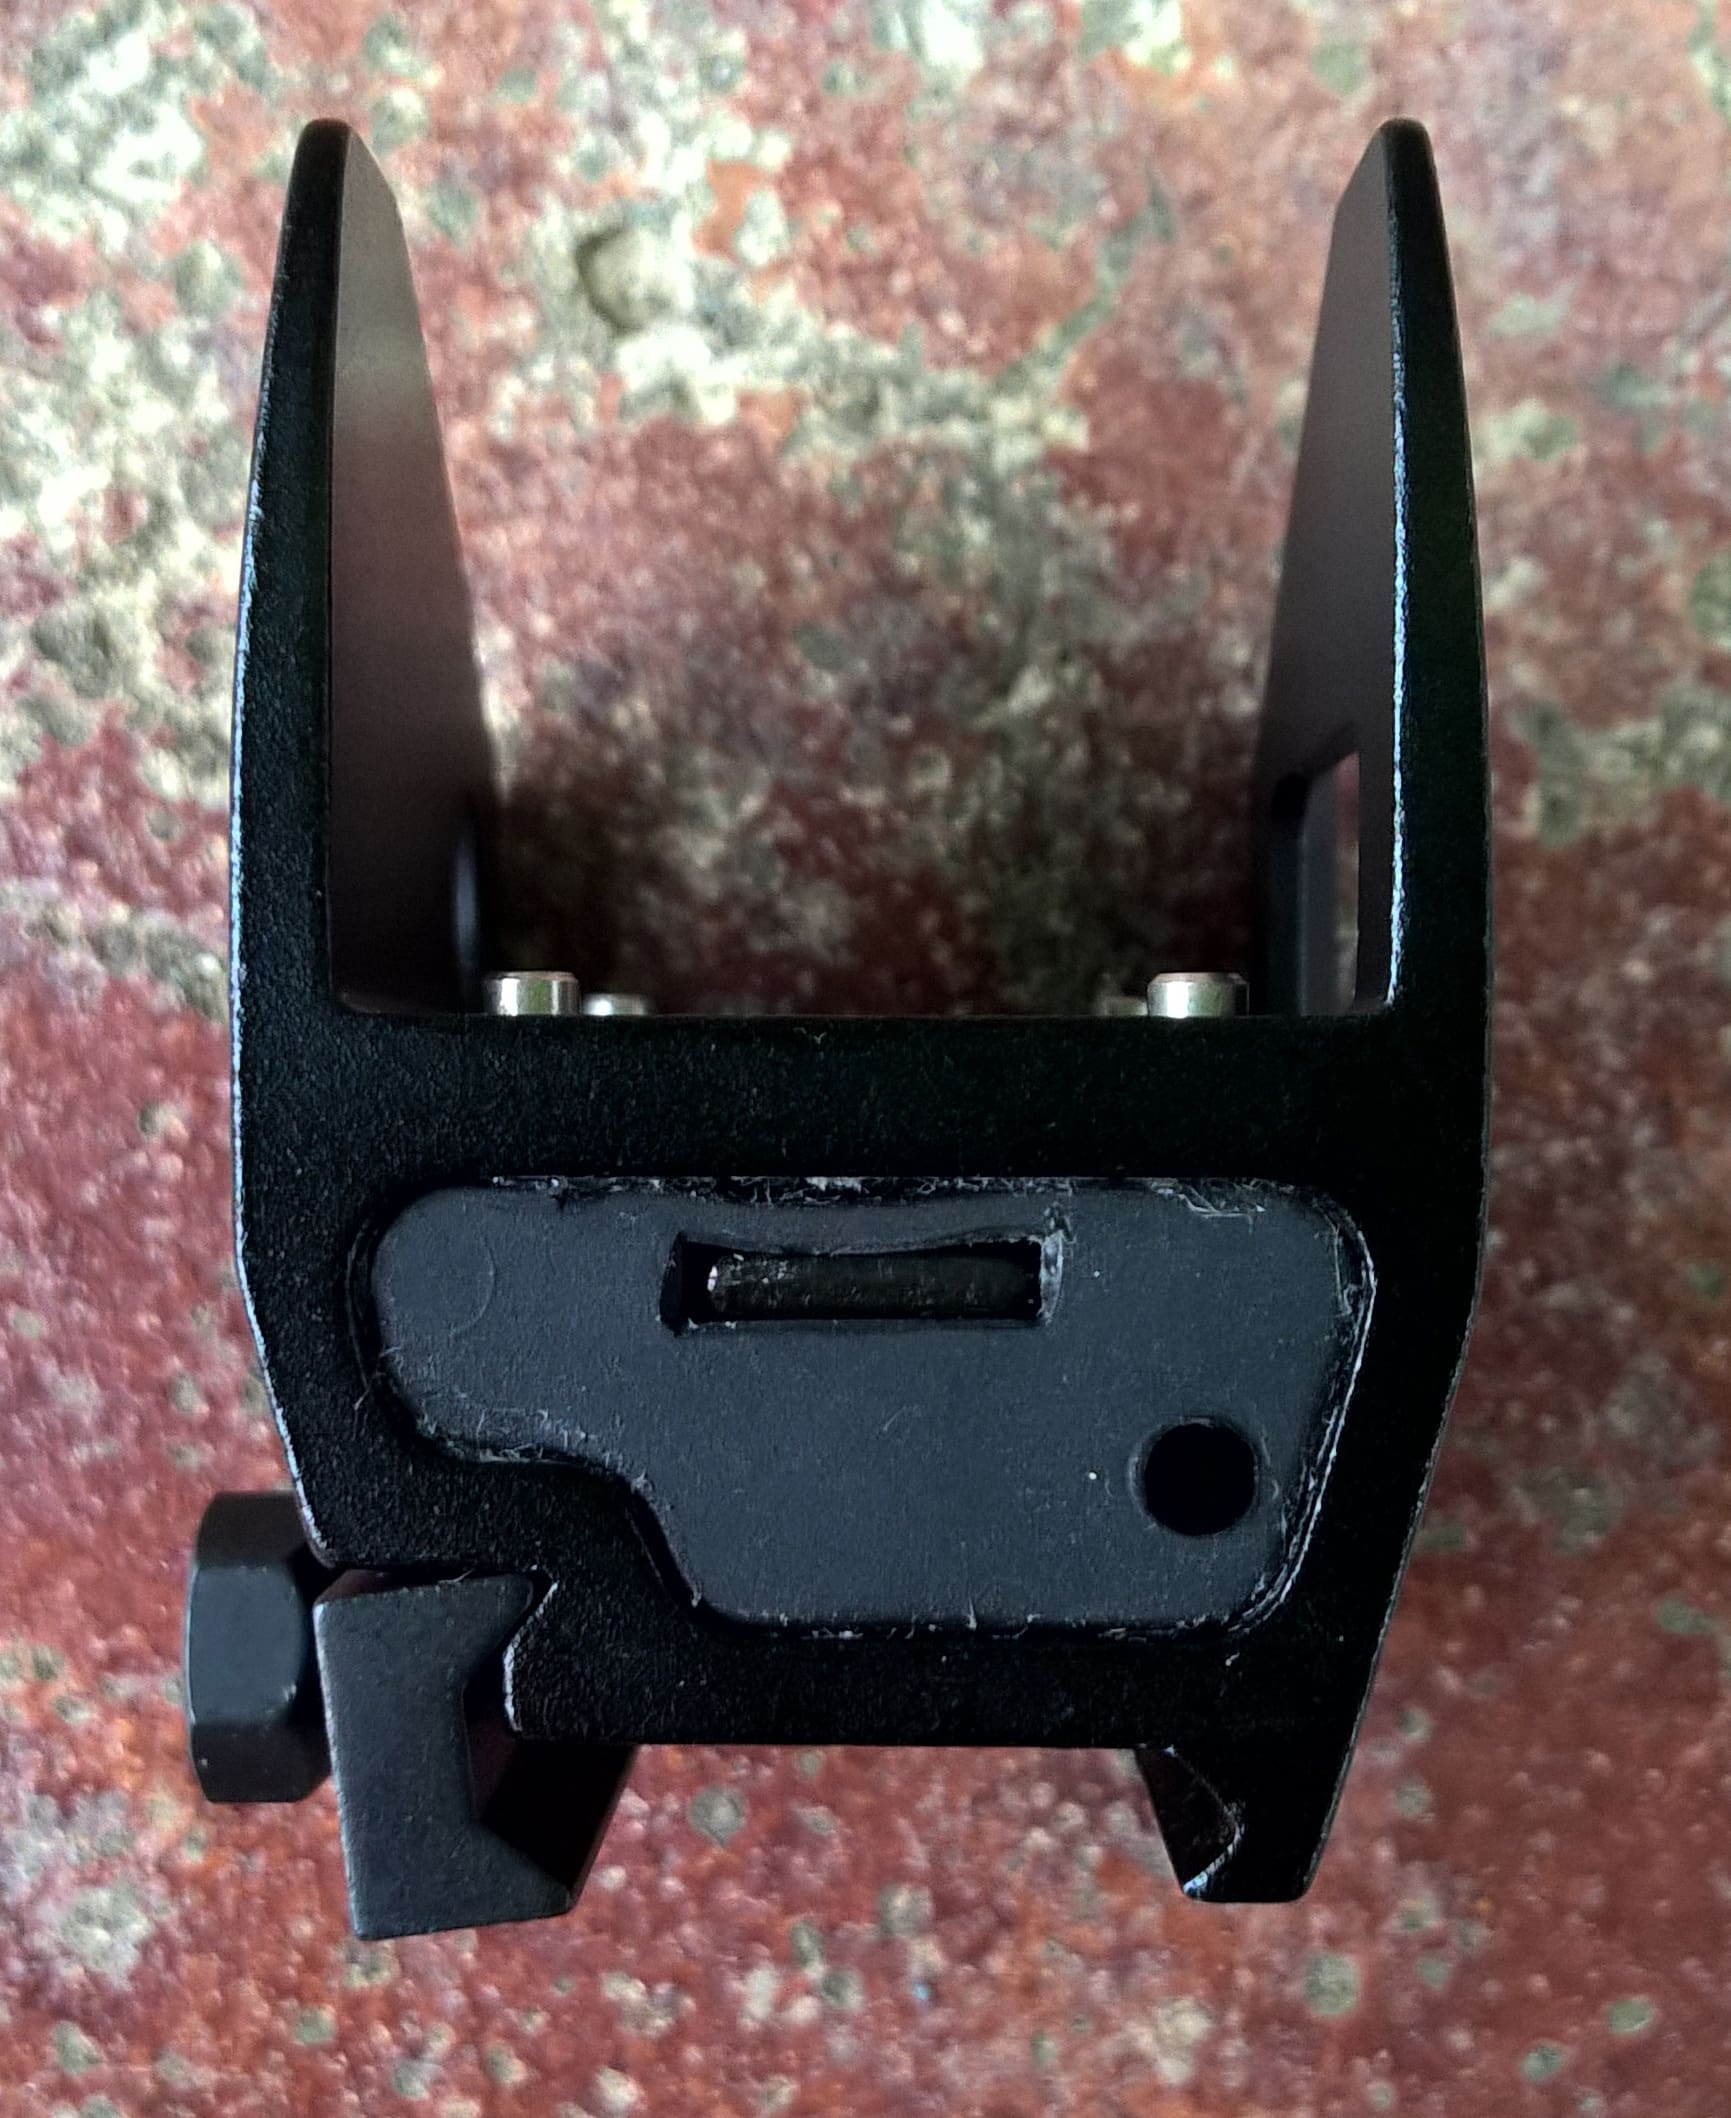
When we look at the front of the AR-F3 mount we realize that the mount is technically a skeletonized model; bored down its core from front to rear. What fills the space is a (not-so-well) glued-in rubber housing.
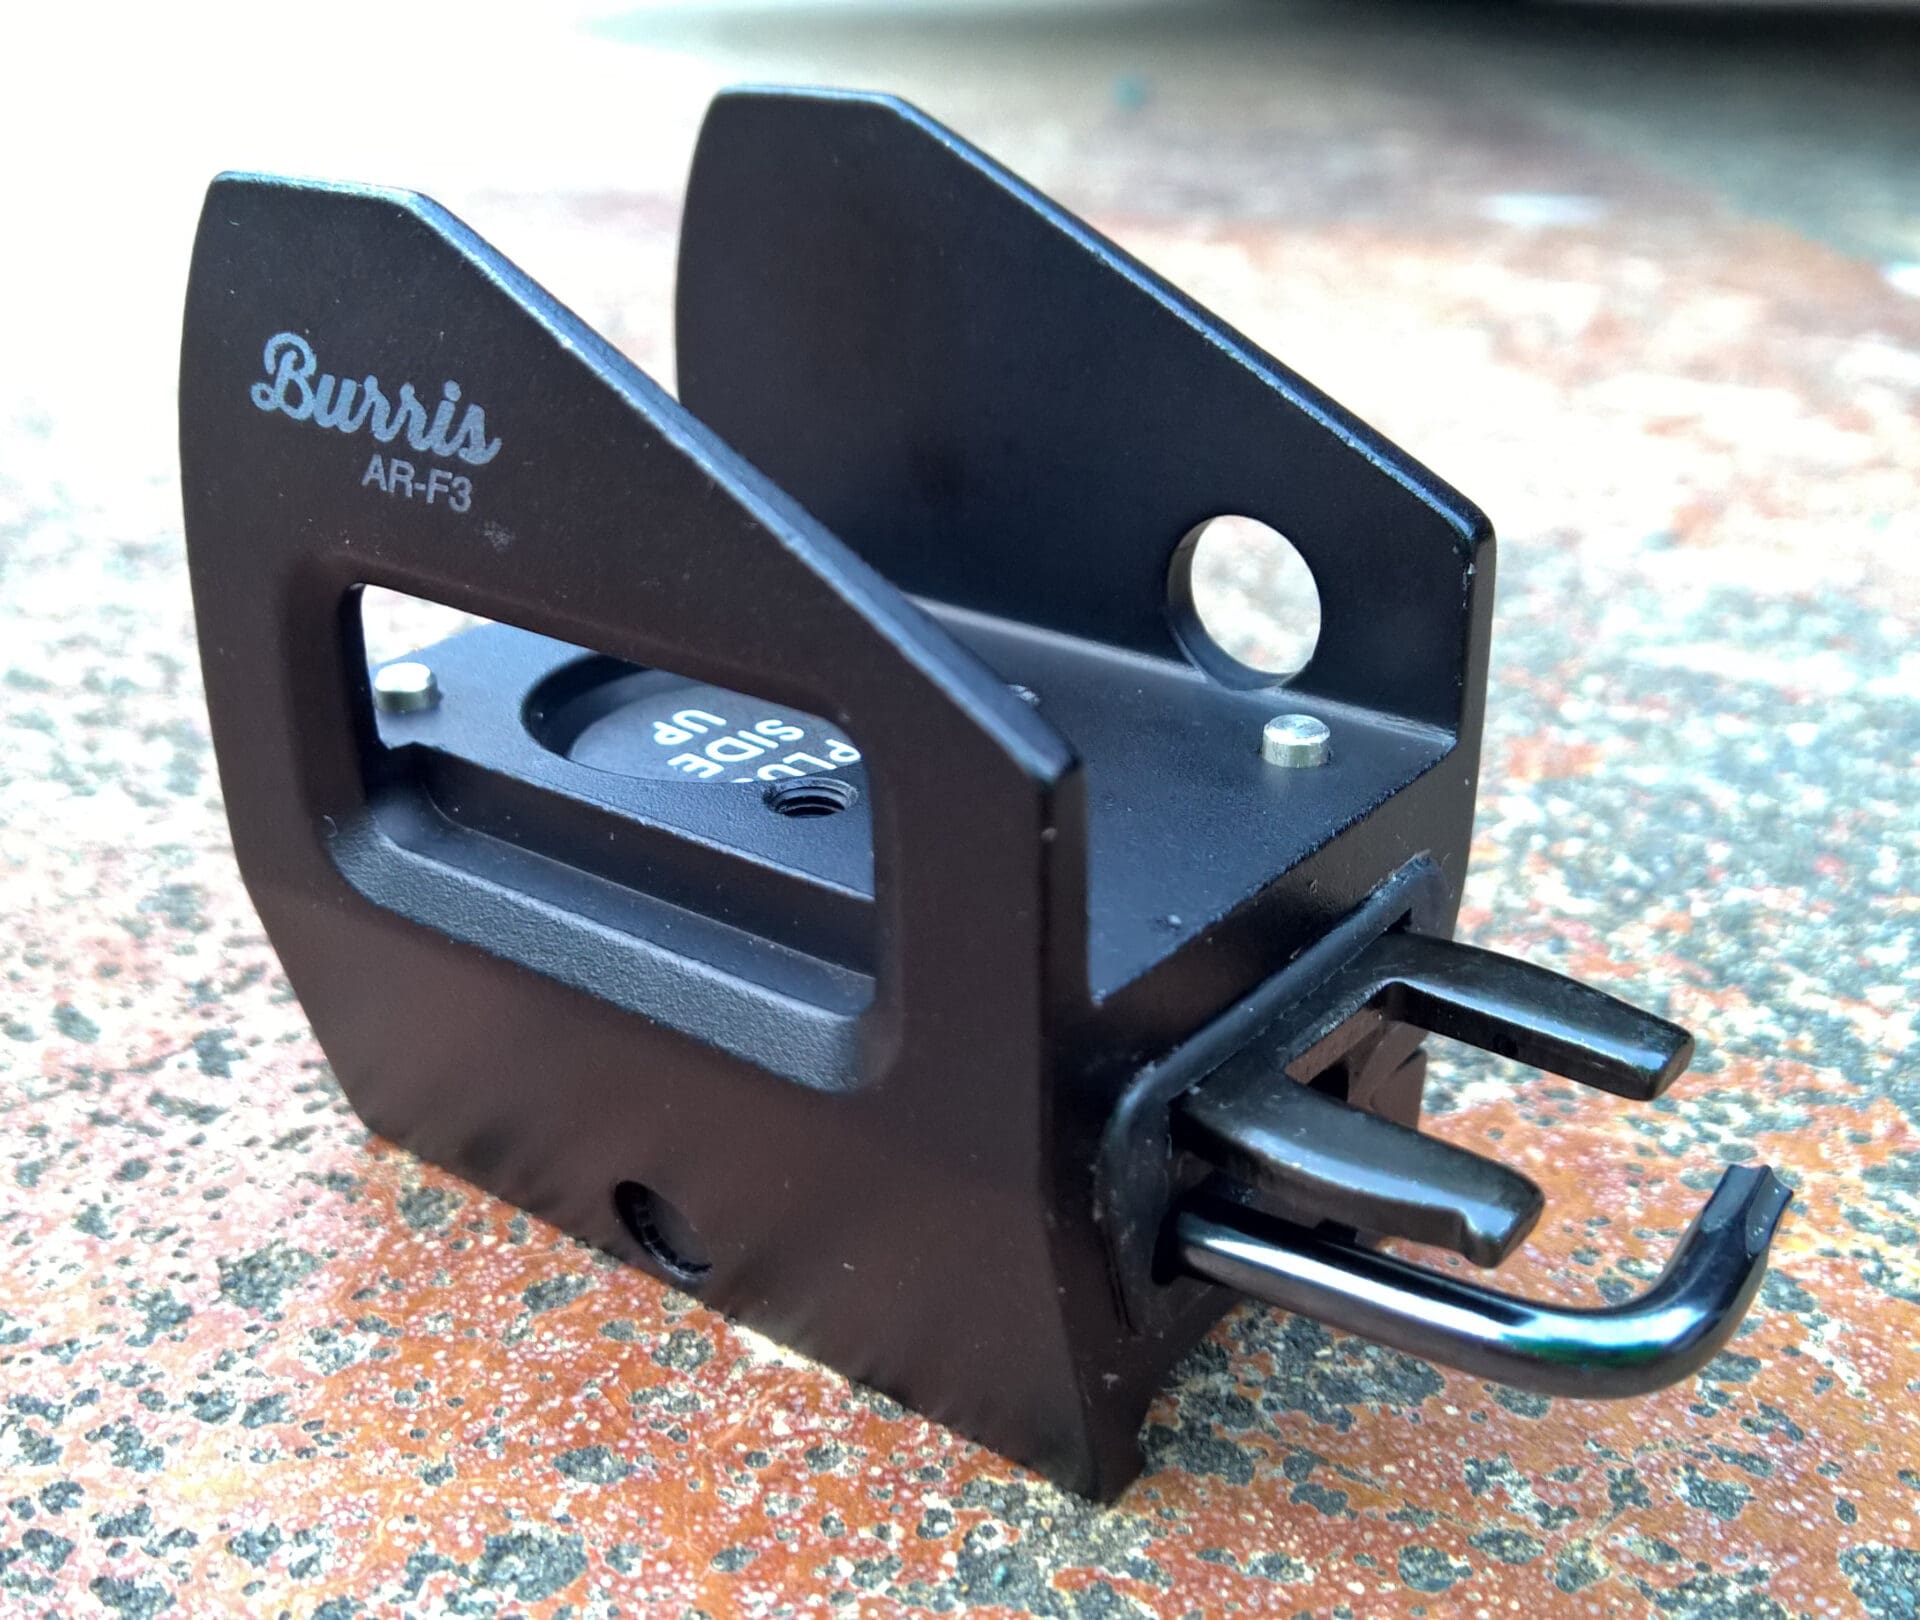
The rubber housing is full-length and snuggly retains a thin, short 3/8-inch wrench and an “L” wrench with a T-15 Torx head on the short end and slotted drive head on the long. They fit very well in the rubber housing and since you’re always looking at them while shooting – for better or for worse – it’s tough to forget they’re there.
Also, notice again in the above photo the cut-outs for windage and illumination controls on either side of the housing’s wings.

Sure, it’s always great to have back-up tools – especially that small slotted screwdriver for reticle adjustment. But if you correctly mount the optic within the housing, and the housing is properly mounted to the host firearm, the likelihood of ever needing the T-15 Torx head or 3/8-inch wrench is slim to none.
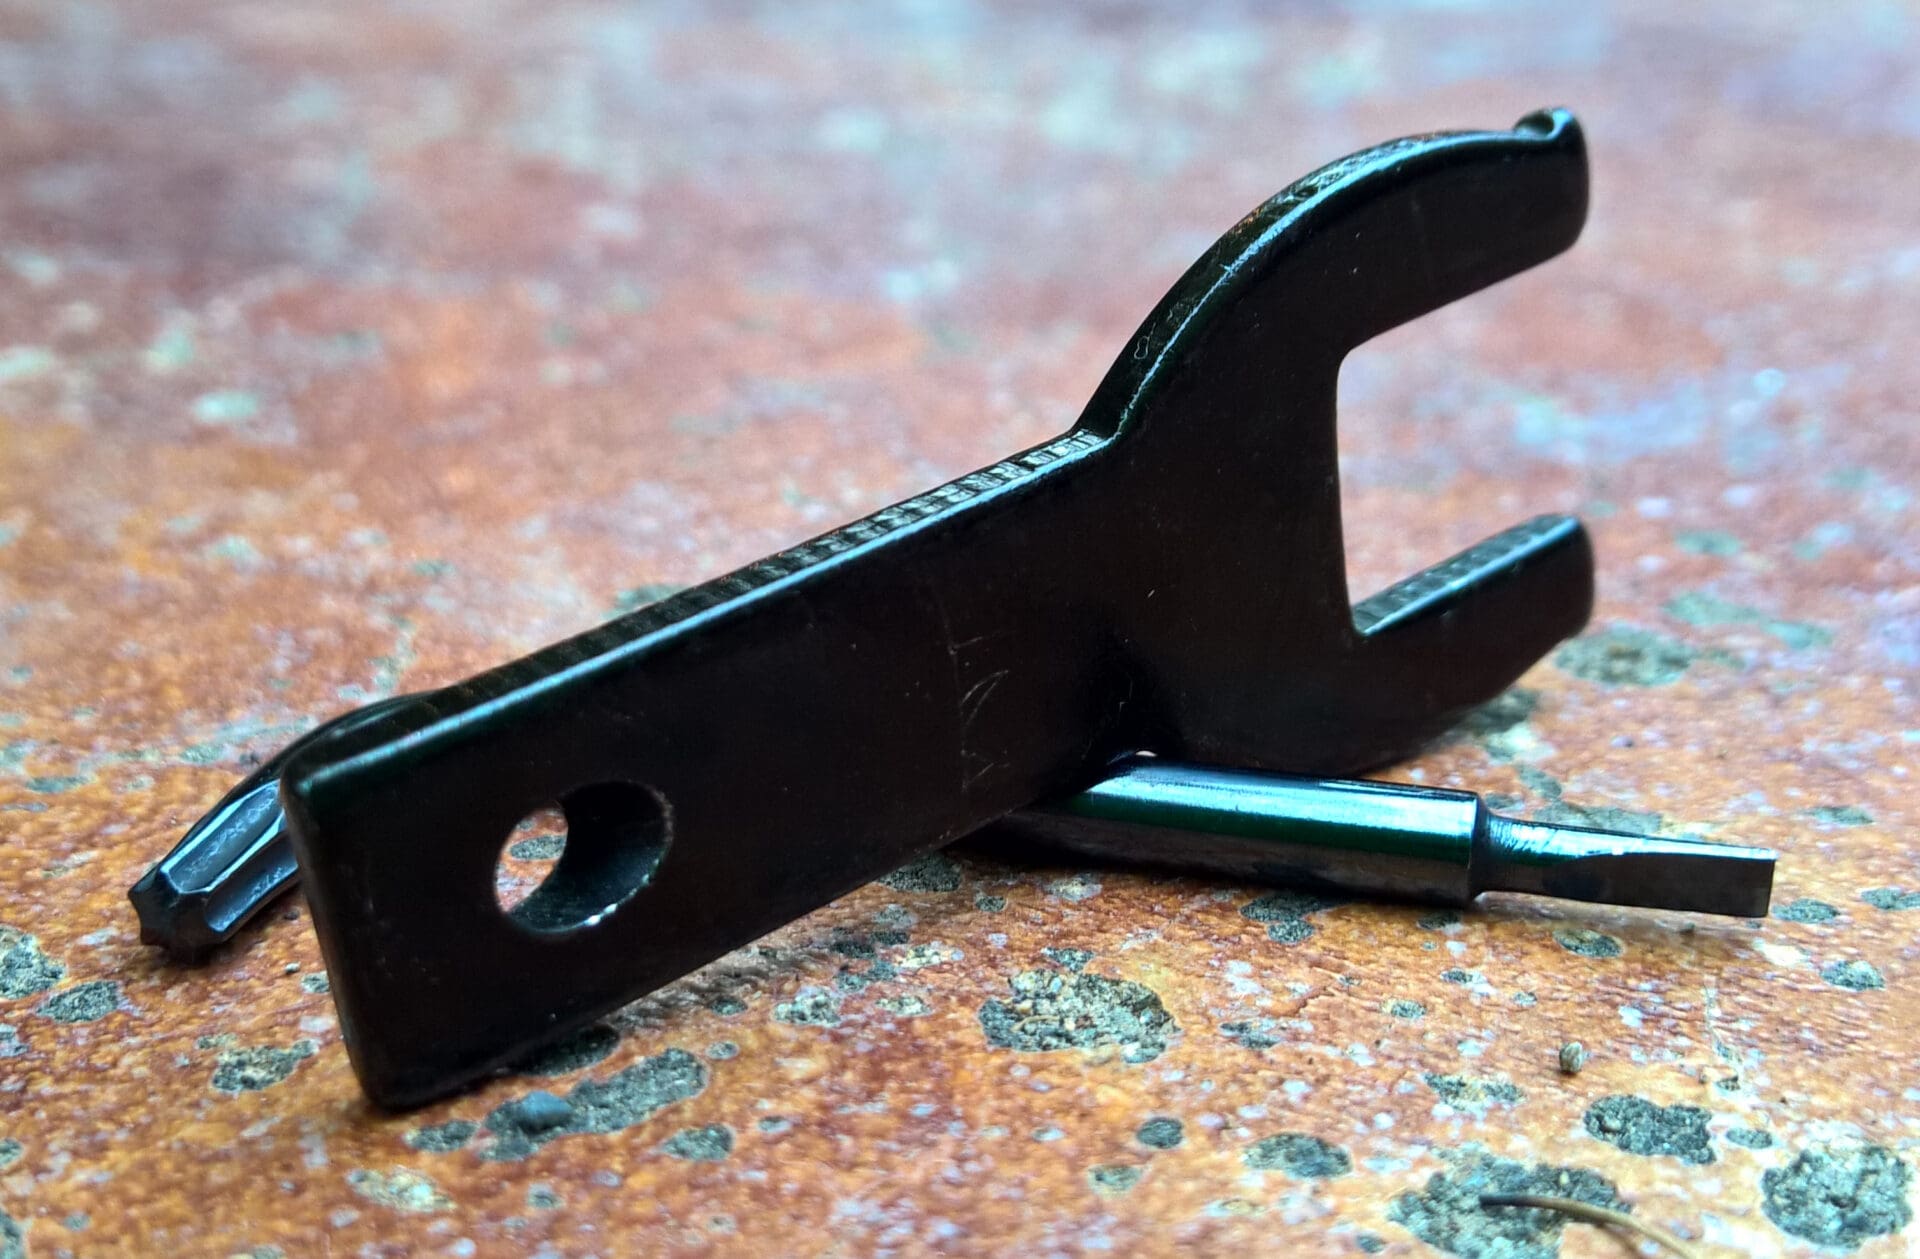
I’ve become accustomed to storing my small tools, batteries, and whatnots in the grip, and I am curious to see what the mount would look like without the rubber tool insert, so I’m giving serious consideration to tossing the tools in the “trunk” and pulling out the insert altogether.
From a weight perspective, the AR-F3 is not a player in the lightweight class. At four times the weight of the optic it houses, it is robust. And that’s without the included tools. Here are the raw numbers:
• 3.61 oz. – Burris AR-F3 Mount, no tools
• 4.04 oz. – Burris AR-F3 Mount, tools
• 4.69 oz. – Burris AR-F3 Mount, no tools, Burris FastFire III, hardware
• 5.13 oz. – Burris AR-F3 Mount, tools, Burris FastFire III, hardware
• 5.24 oz. – Burris AR-F3 Mount, tools, Burris FastFire III, hardware, extra battery:
• 1.04 oz. – Burris FastFire III
• 0.05 oz. – Hardware
• 0.45 oz. – Tools
Burris’ AR-F3 mount certainly has all of the basic features most people need from a red dot sight mount and I could go into further detail. However, wrenching on stuff (even if it’s an itty-bitty wrench) and actually using it is the name of the game so let’s switch gears and hit the workbench.
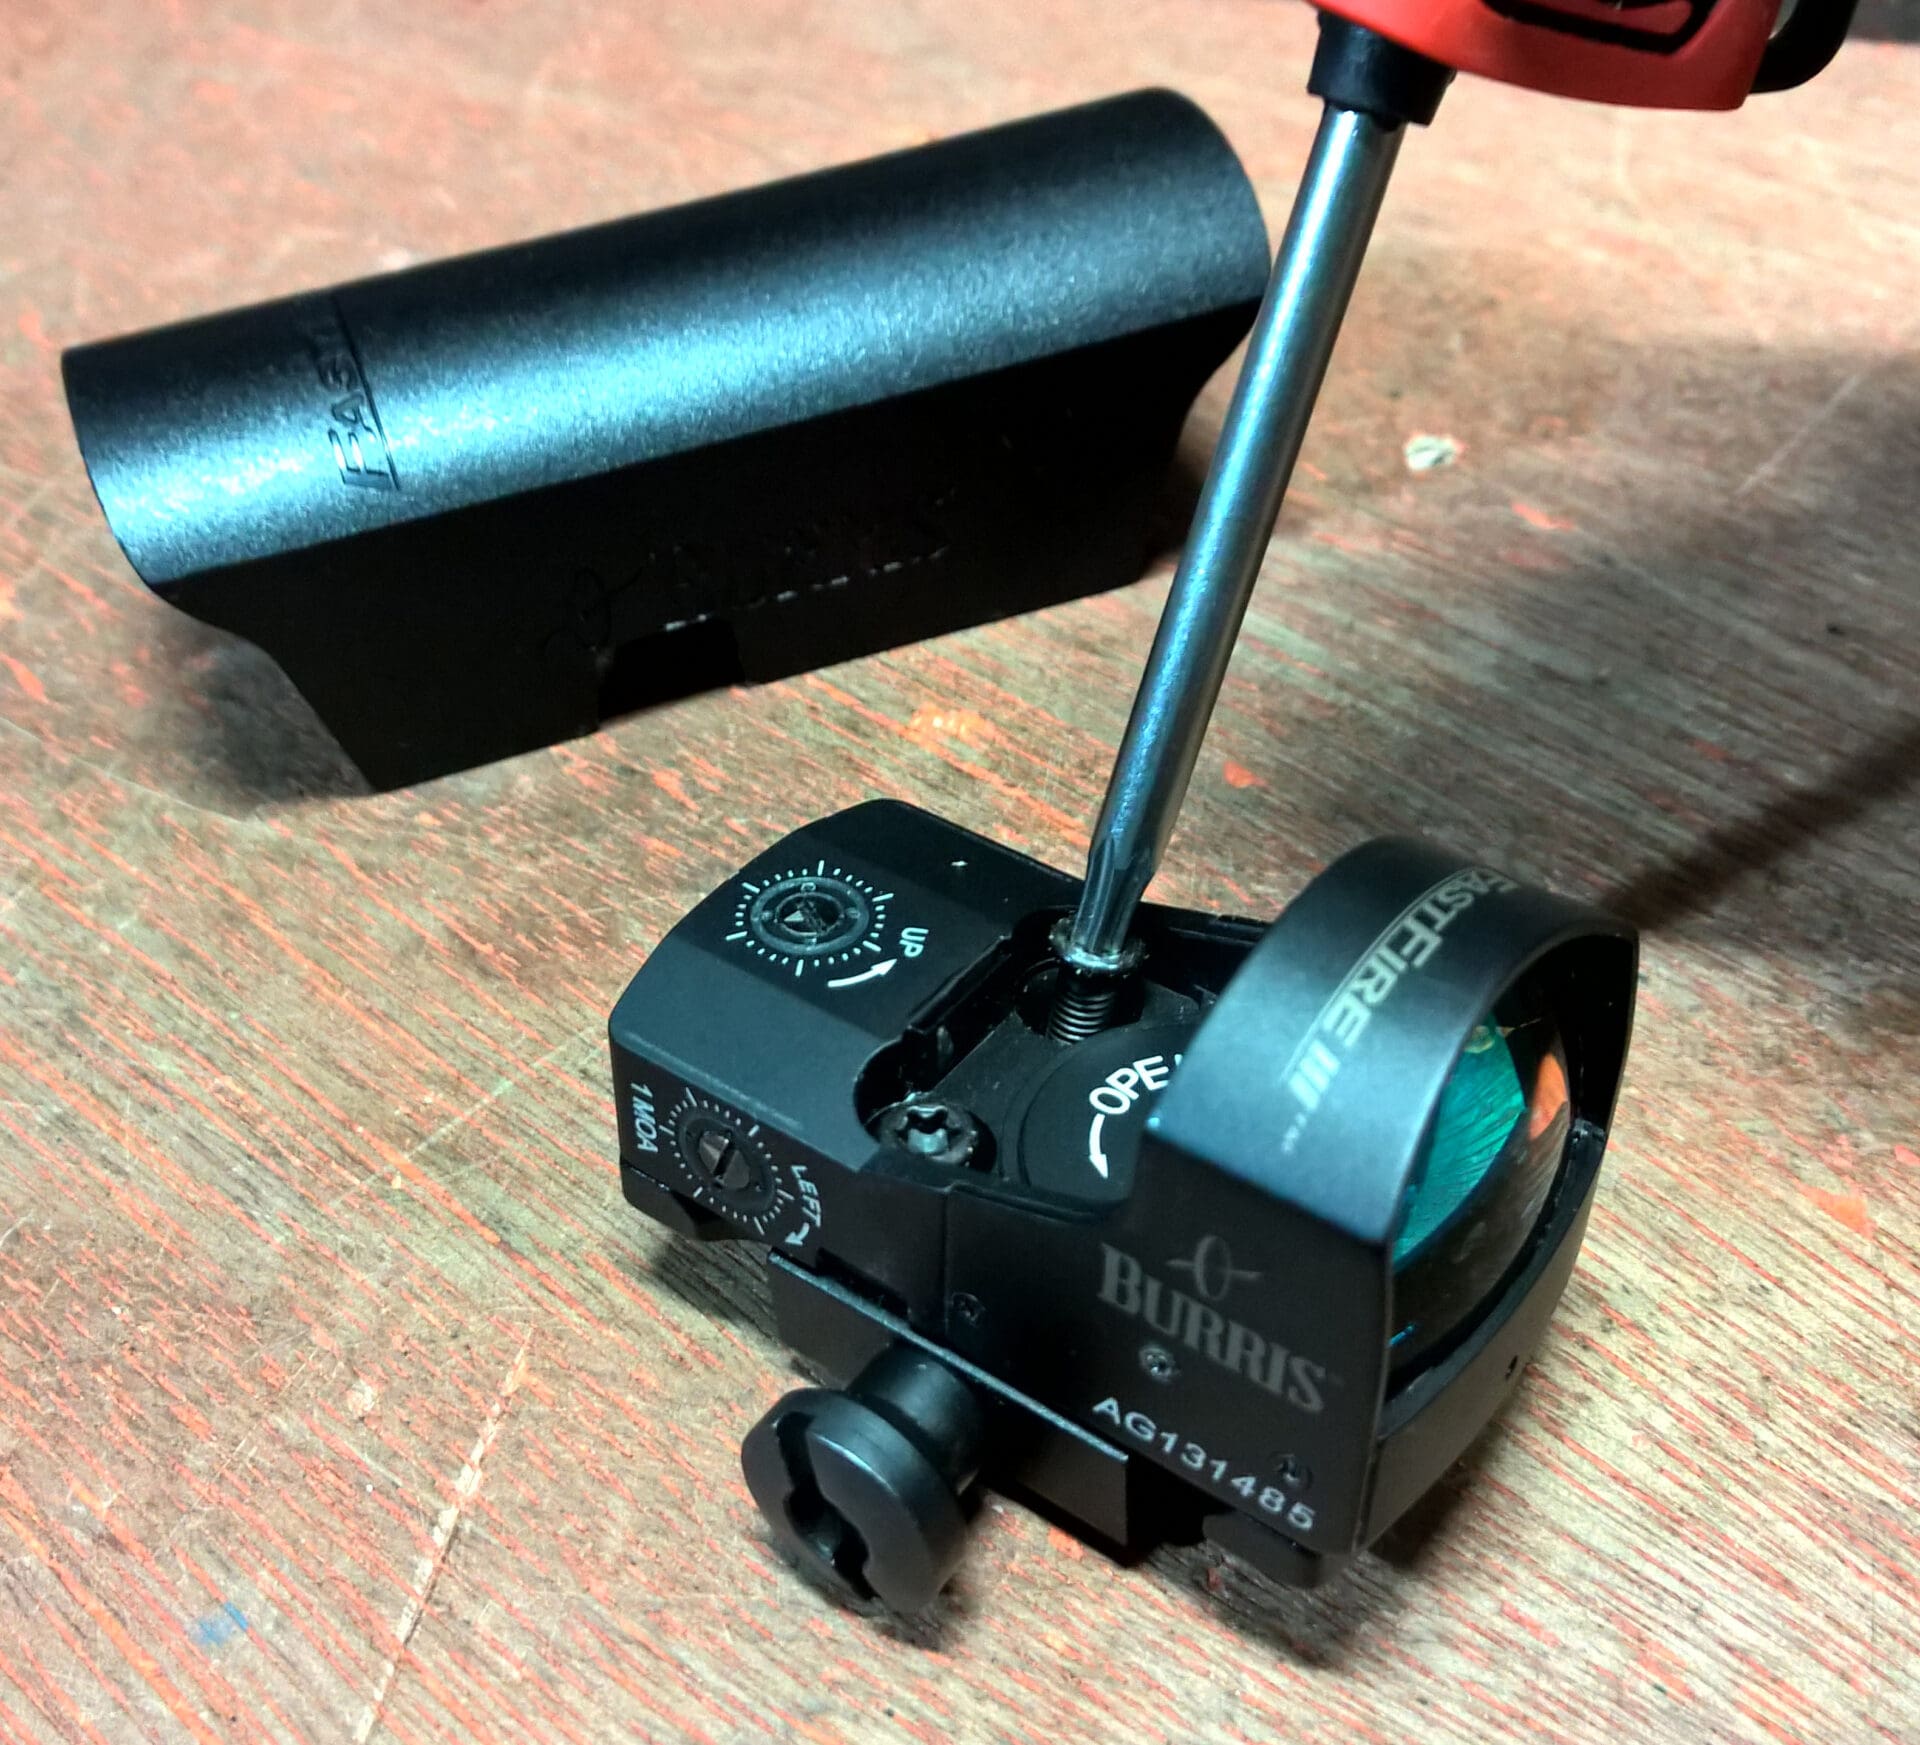
First things first, I needed to disassemble the FastFire III as it was currently configured. Its cover was set aside and then the optic was separated from the picatinny rail mount it had been married to for the last half-decade.
Even after routine use year after year, the screws were still holding tight and came out clean.
With re-configuration and installation on the horizon I gathered all relevant components and reviewed the brief set of instructions. Most importantly, the literature noted torque specifications for both the mounting screws (12 inch-pounds) and cross-bolt nut (20 inch-pounds).
It was clearly stated that the included rubber gasket (above, bottom right) is only need if installing a FastFire II RDS, which is why it accompanies the original 1913 mount and used mounting screws in the “not needed pile”.
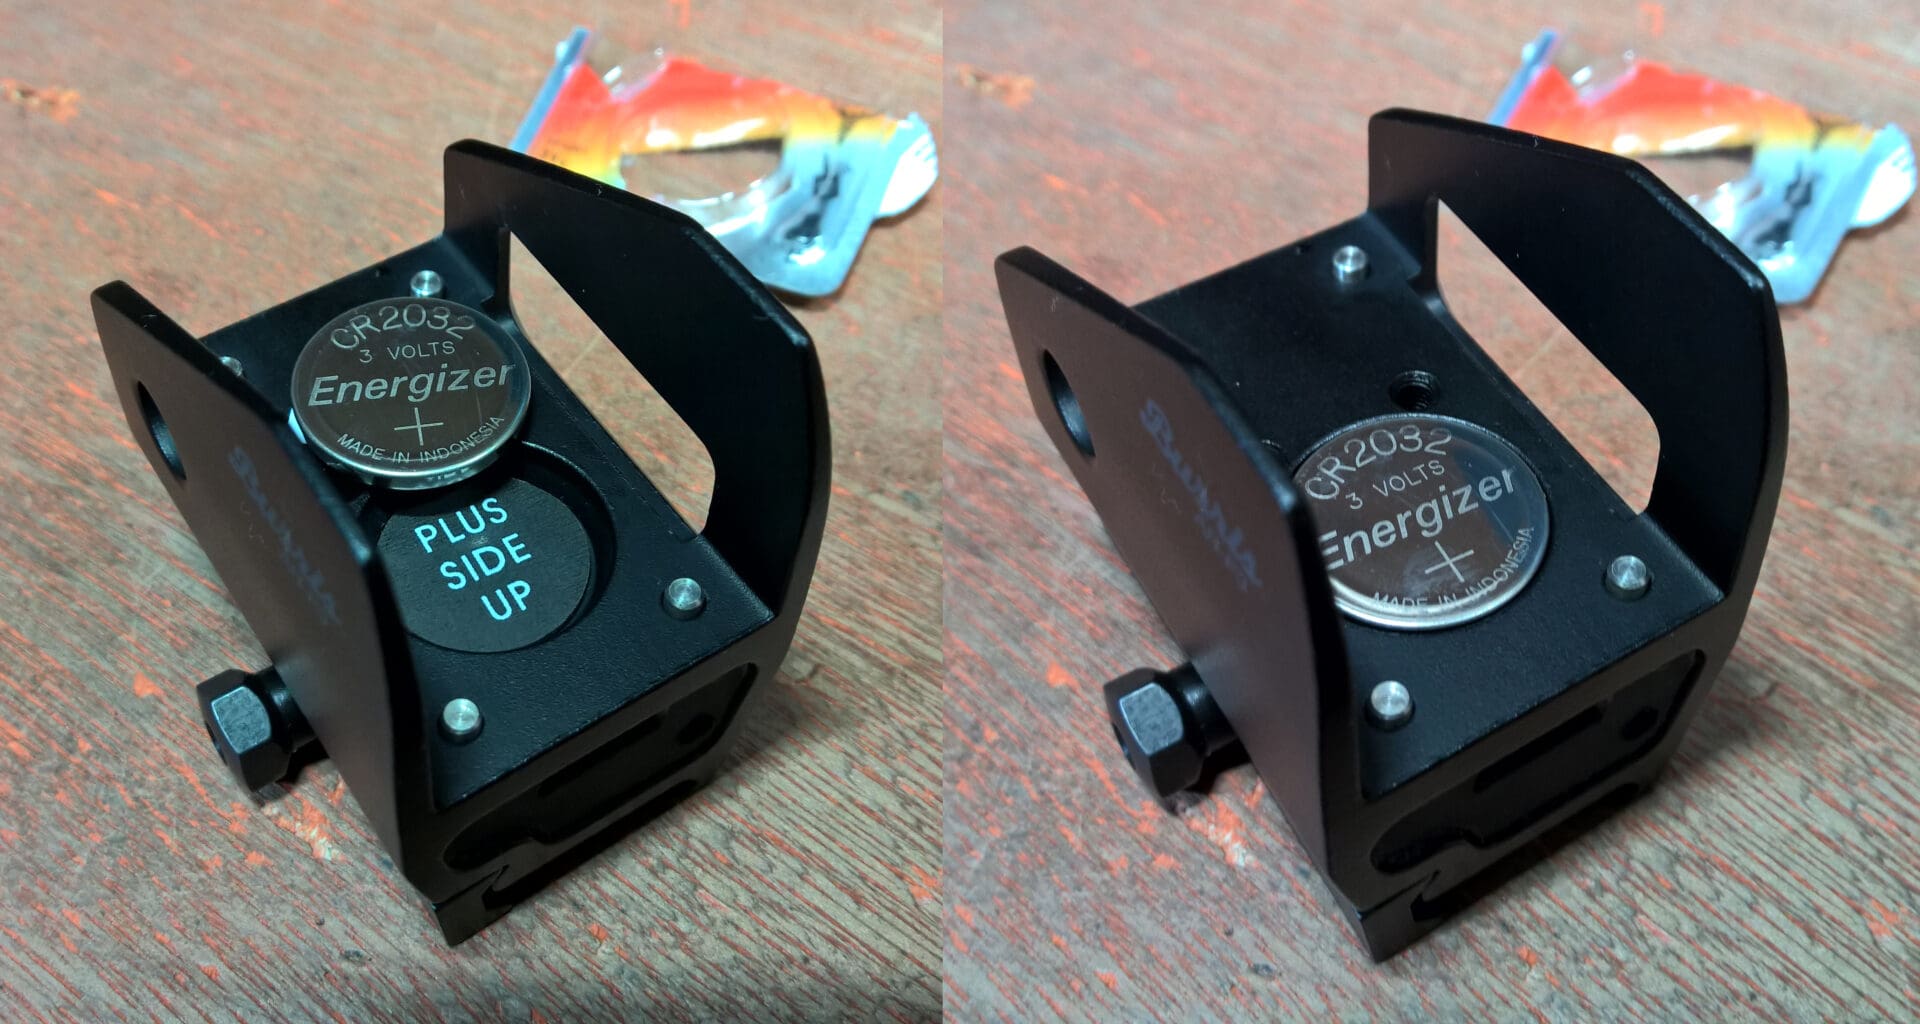
After rummaging inside the pistol grip I found my extra battery. The battery fit well within the confines of the AR-F3 sight mount’s topside battery compartment and sat flush with the base (above). The FastFire III’s built-in gasket will seal it from moisture and dust.
However, the downside is I now must remember it is there and also hope that the battery hasn’t become compromised. After all, I can’t examine it before removing the FastFire III, so the original storage spot (the grip) is still more appealing.
Knowing I should have had two extra batteries within the firearm to begin with, I added one back into the pistol grip and designated the one within the Burris AR-F3 mount as a secondary backup.
The Burris FastFire III dropped into the mount and settled over the alignment pins. Spacing and alignment within the mount was even and left very little, if any wiggle room in any direction.
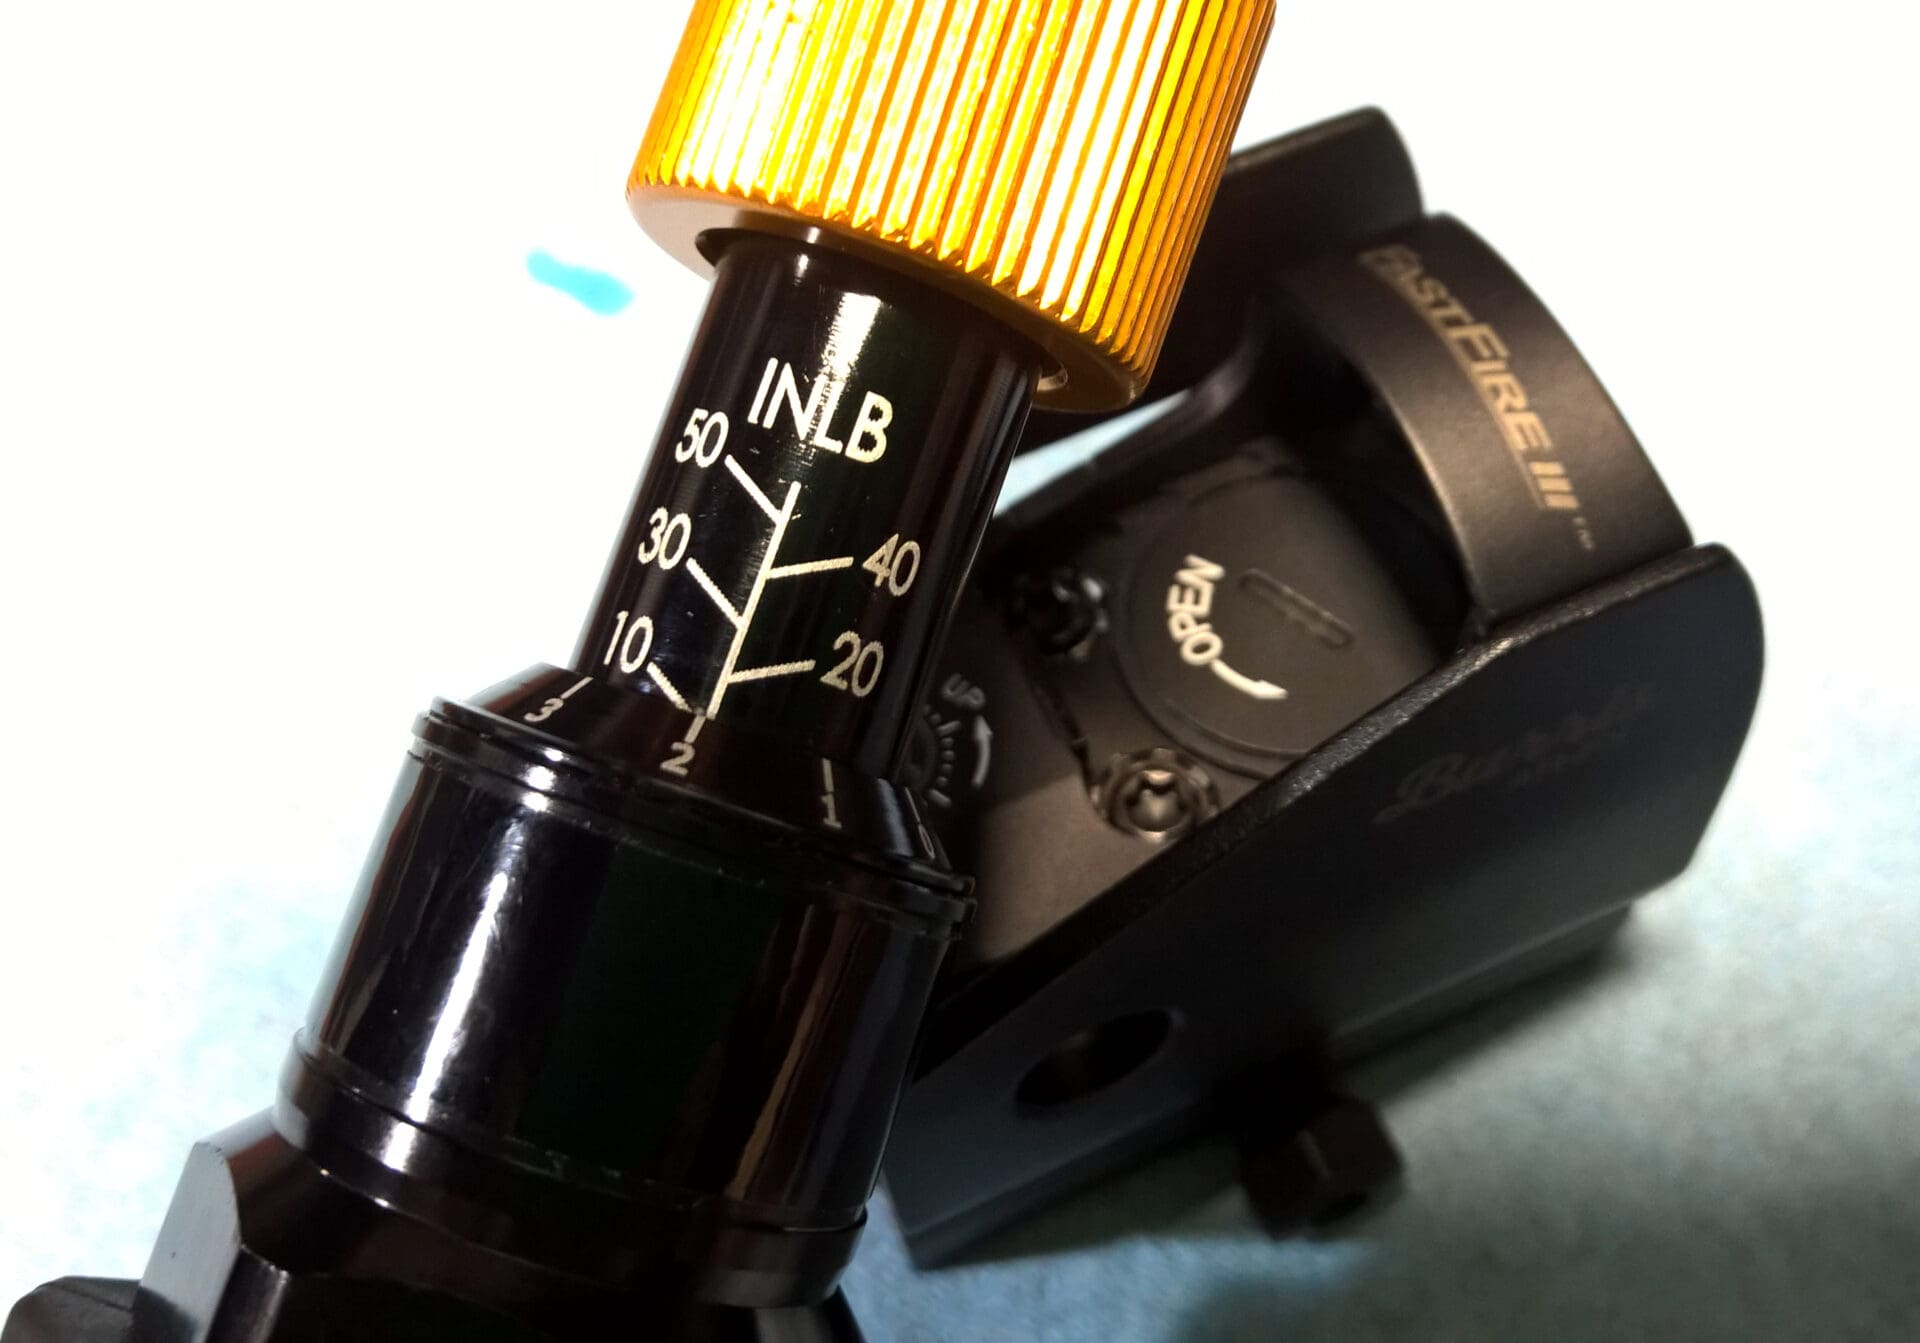
At this point I opted to forgo using the included wrench, reached for my Vortex Torque Wrench, and quickly dialed it to 12 inch-pounds on a T-15 Torx bit.

After mating each screw with a locking washer and dot of non-permanent (blue) thread locker, each one was tightened to specification without issue and the locking washers settled into place satisfactorily.
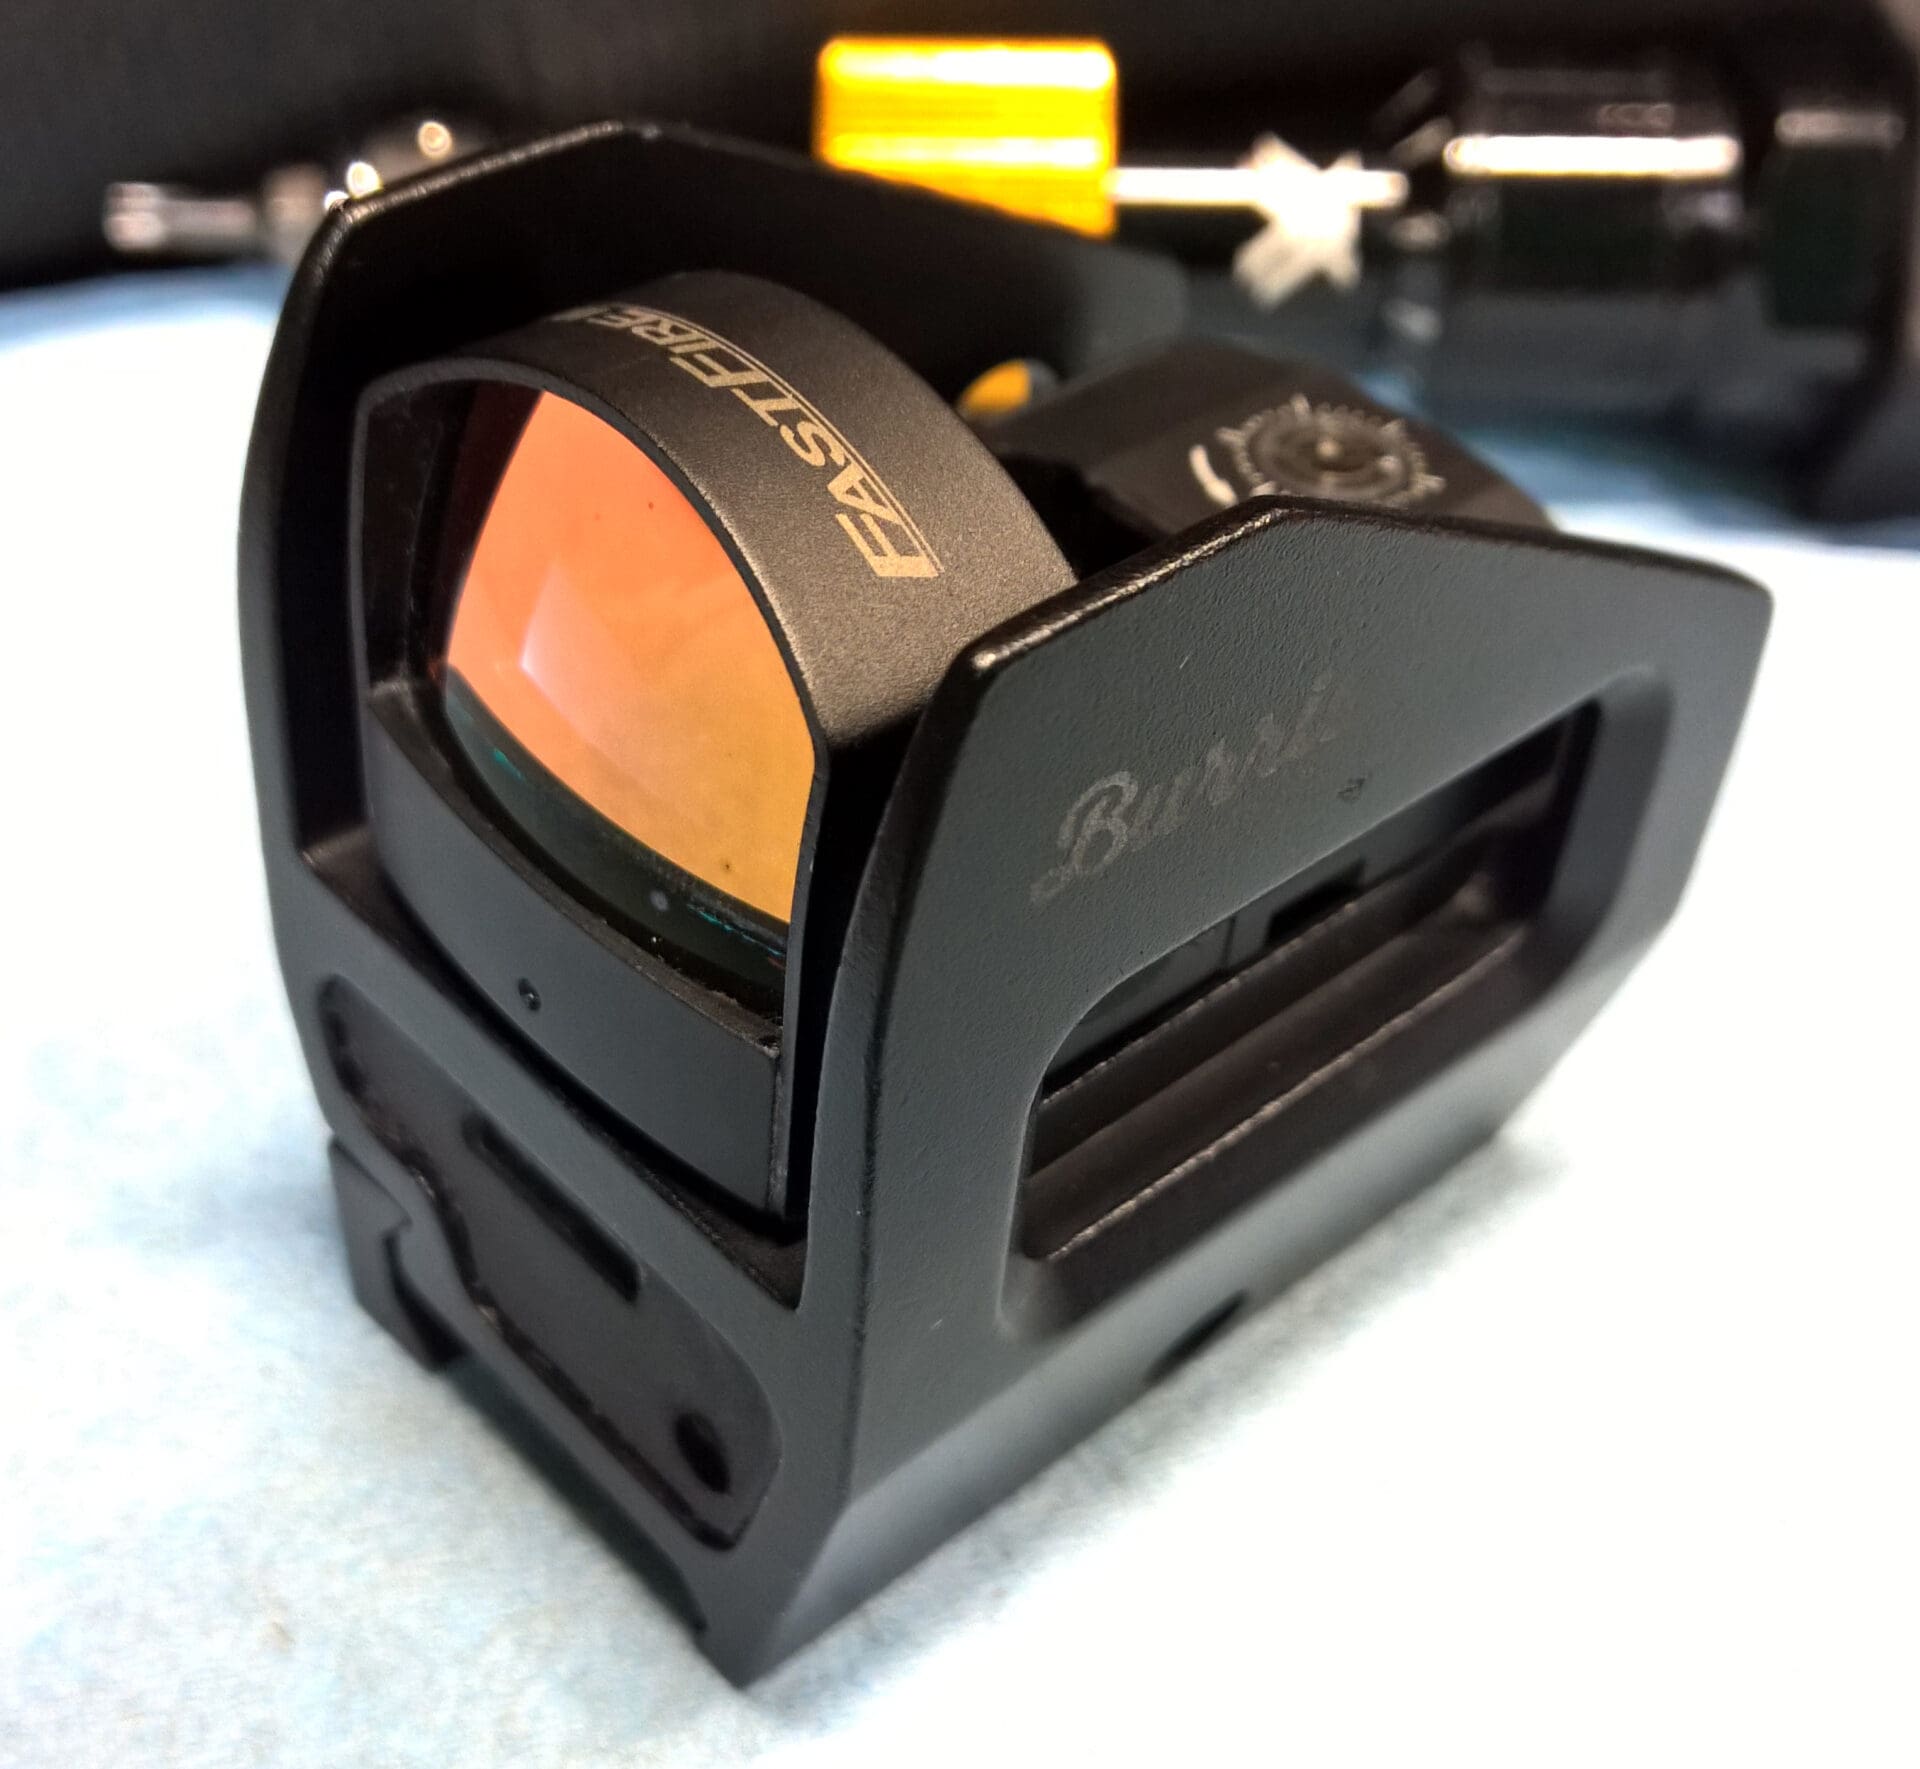
All-in-all, the roughly five-minute assembly was straight-forward and produced very solid results. Literally solid; the optic was very well-grounded to the mount and the connection was flush across the base.
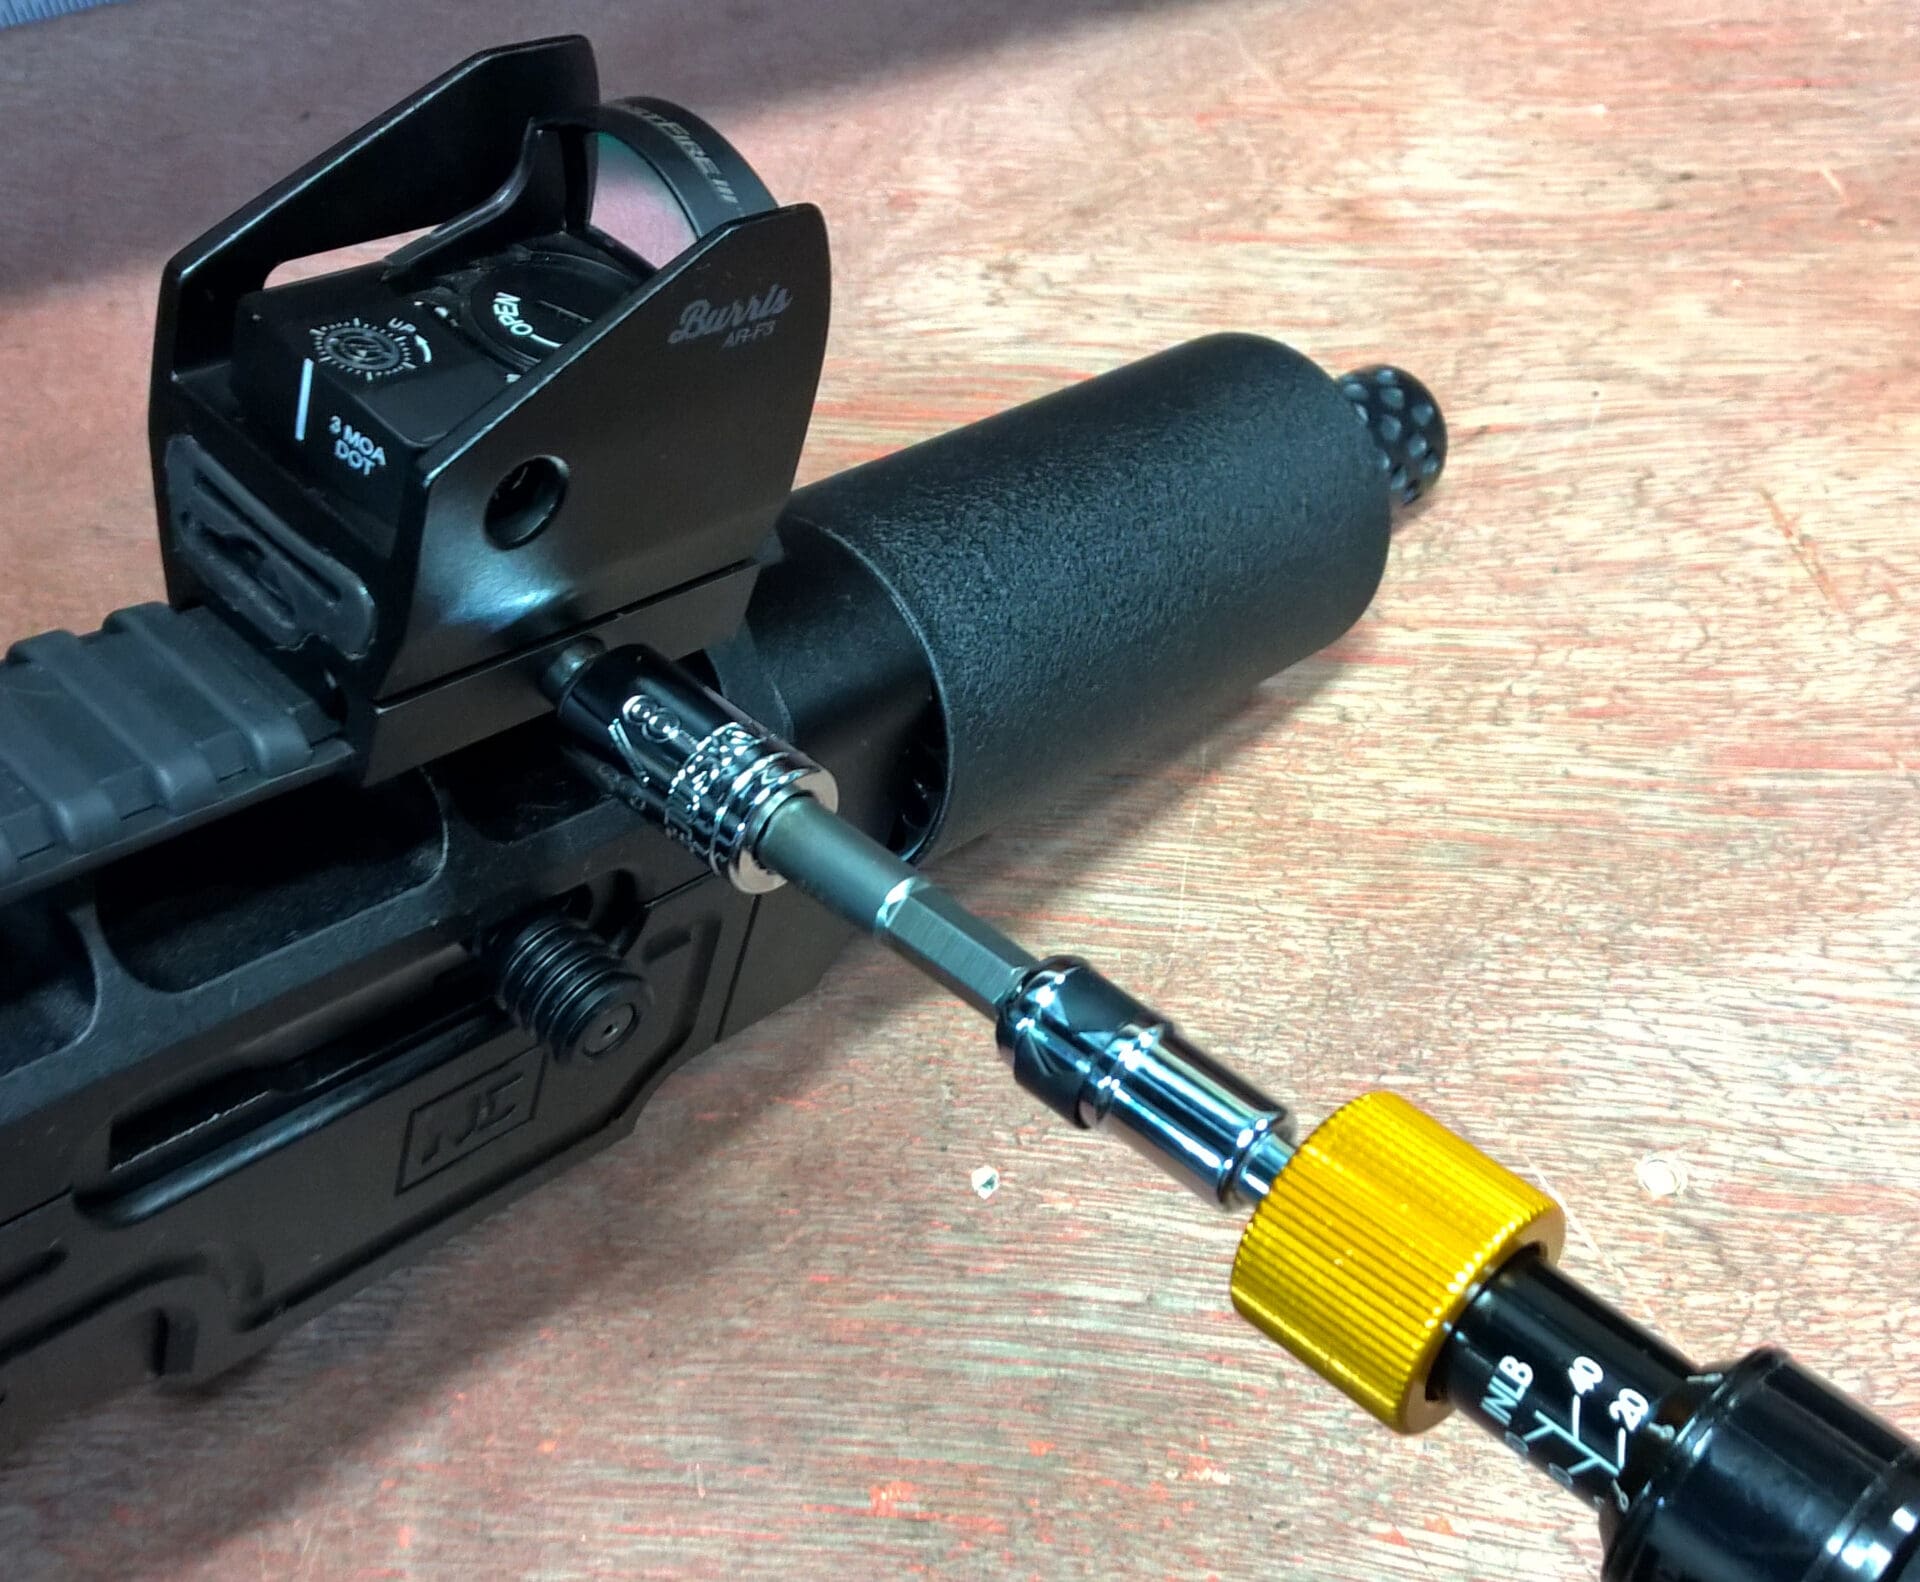
The Burris AR-F3 FastFire III assembly slid onto the host firearm’s picatinny rail and sat in place. After swapping the T-15 Torx bit for a 3/8″ socket on the Vortex torque trench using a standard 1/4-inch by 1/4-inch socket bit, the mount was locked into place at the recommended 20 inch-pound mark.
The fit of side-clamp bar was just okay. It functioned fine, but did not fit well within the side of the mount. It felt like the piece was an existing part that was incorporated into the AR-F3 mount rather than a component specifically designed for the sight mount.
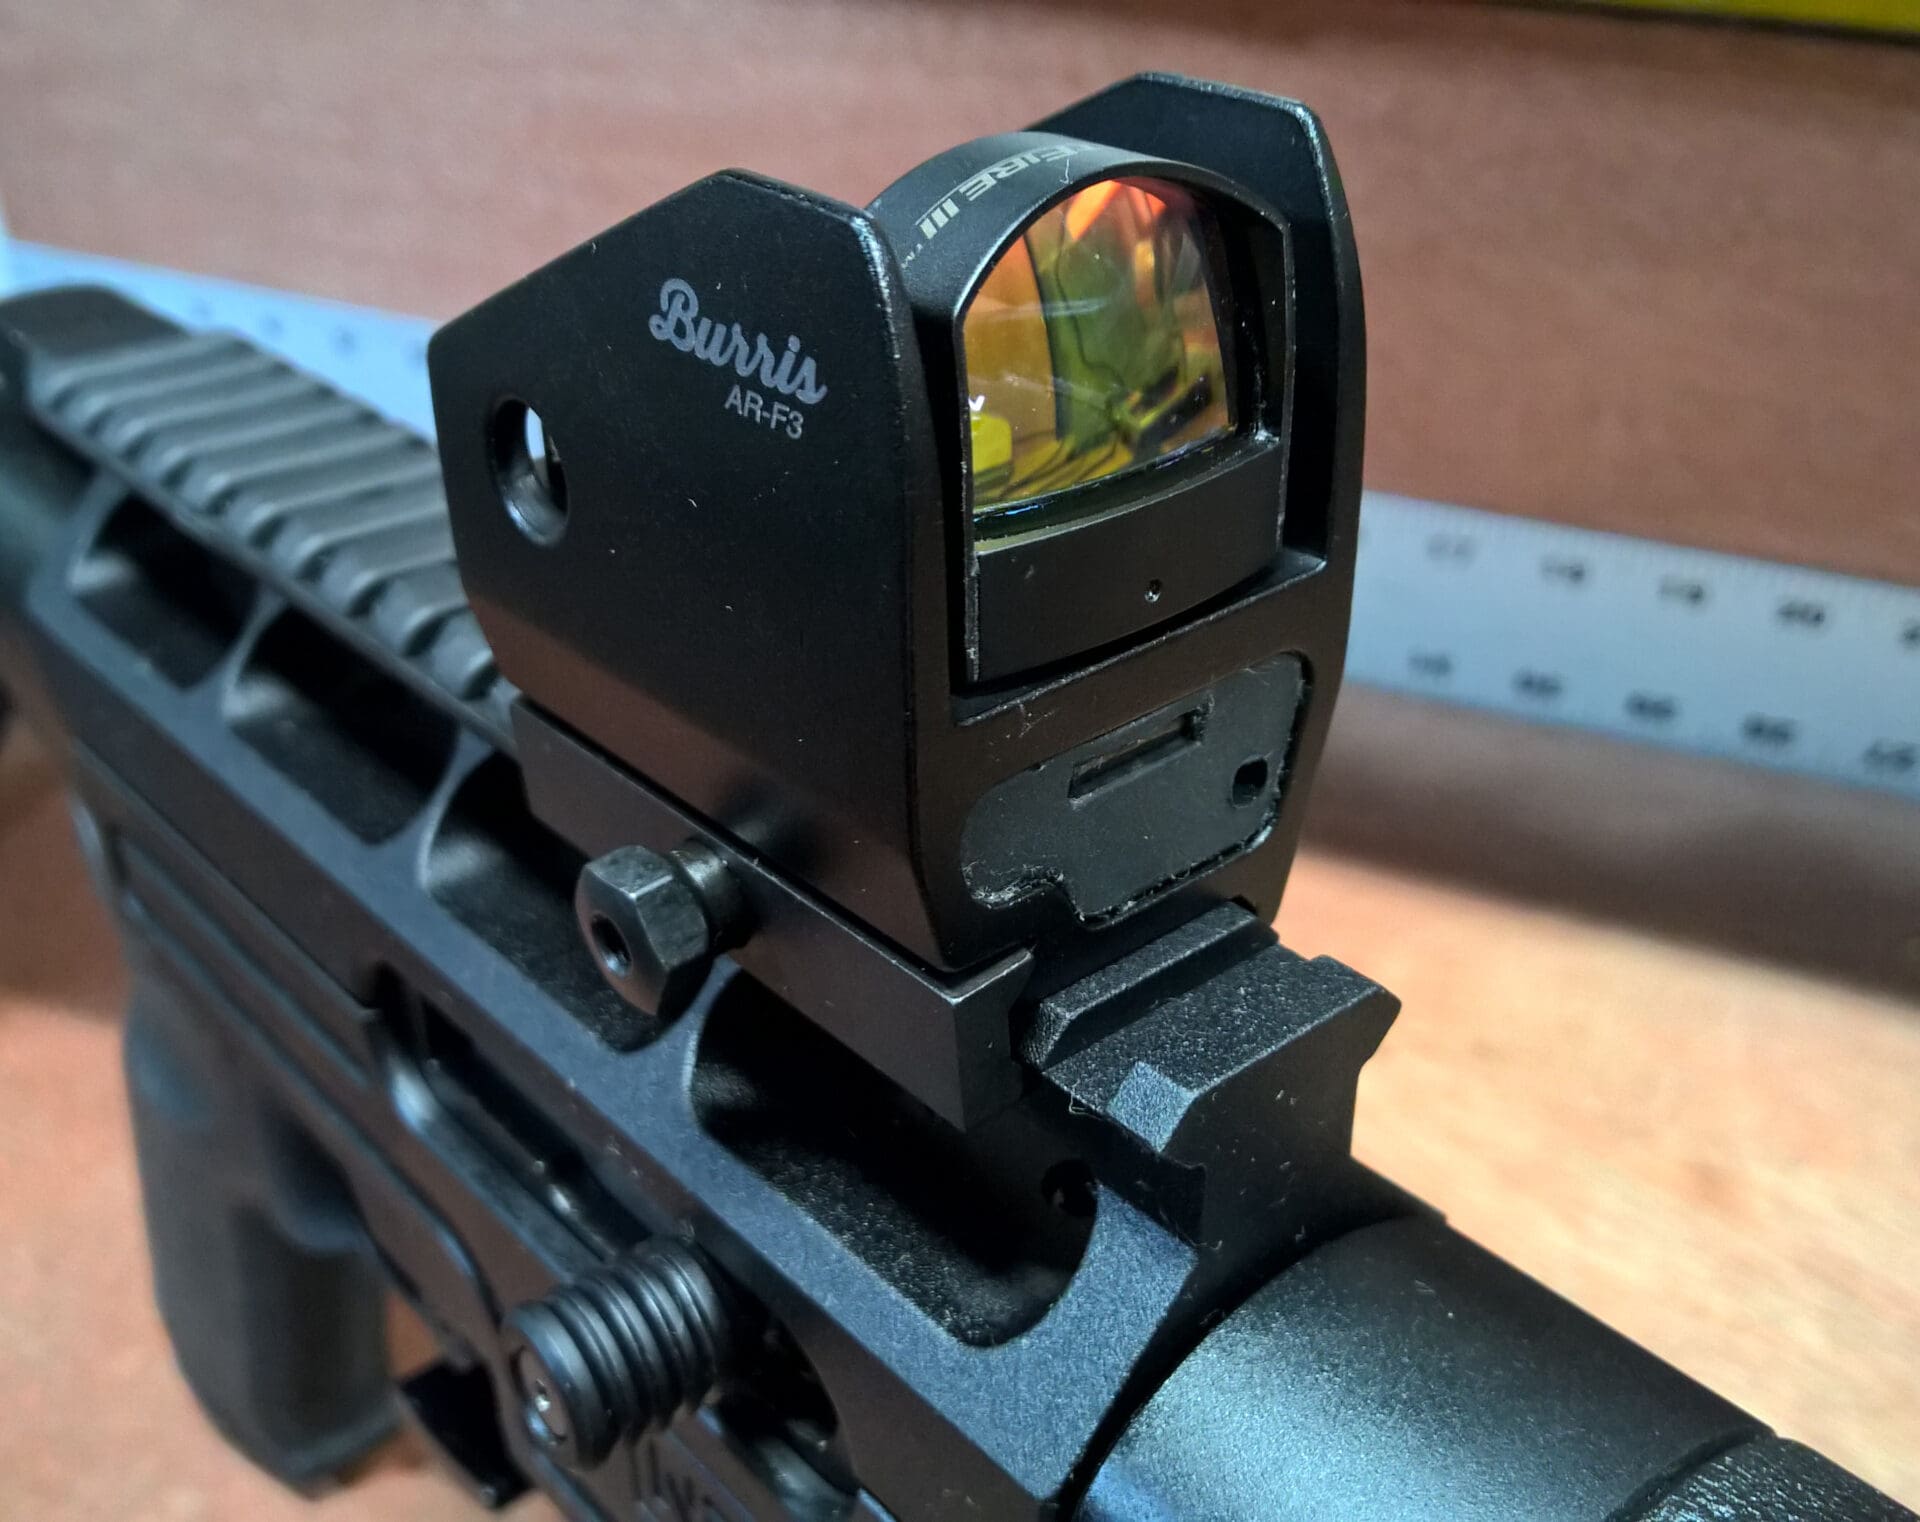
Nevertheless, the Burris red dot sight was situated snuggly in place and looked just dandy. The profile of the assembly is much larger than its previous configuration, but the cross-bolt nut is noticeably smaller and less intrusive when operating the bolt handle.
Even though the cross-bolt nut is a nice step-down in size from the standard 1/2″, I think Burris missed an opportunity by going with a protruding nut over a Torx head flush-mount cross-bolt.

From the front, the mount’s lines taper-off into the receiver, reducing its otherwise boxy look.
The right side of the mount (above, left) allows for easy adjustment of widage while the left side of the AR-F3 mount (above, right) has a wide, nicely beveled cut-out to allow access to illumination controls on both the FastFire III and FastFire II models.

For those of you that enjoy the view-through cover included with Burris’s FastFire reflex sights, it fits perfectly. In fact, I found the AR-F3 actually helped retain the cover.
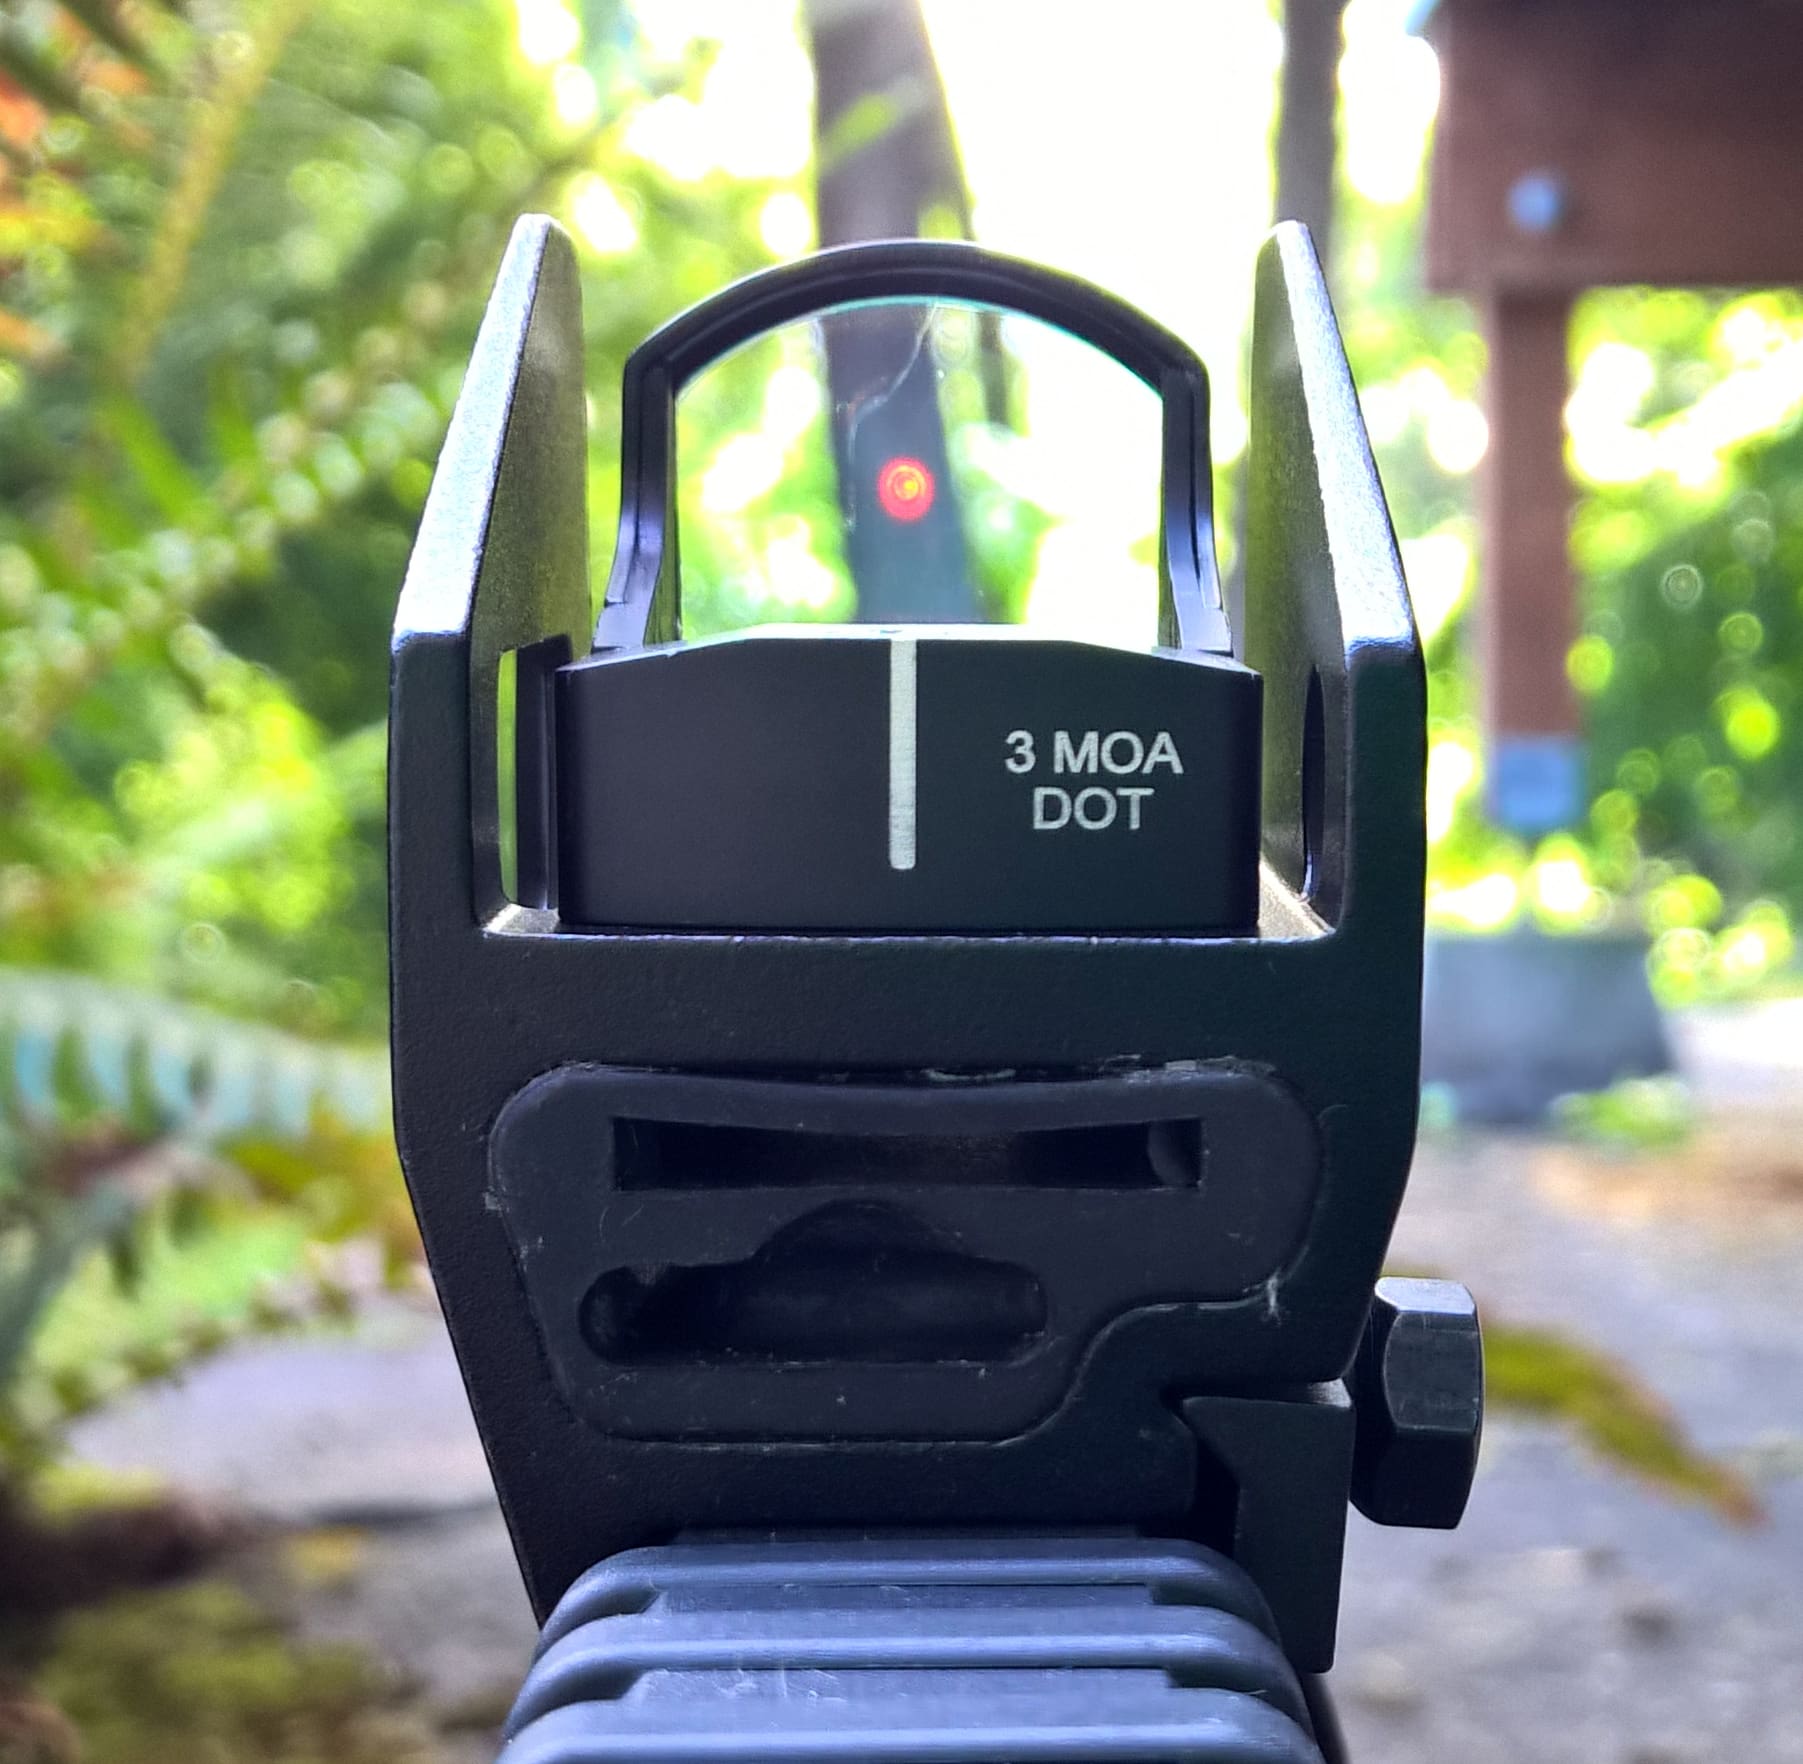
Without the cover, the mount’s side shields add a noticeable, but negligible amount of material to the sight picture. Picking up the red 3 MOA dot isn’t any more difficult with the mount. The side shields slightly darken the area behind the dot and help funnel your eye to it.

Most importantly, and aside from the fact that it lives on the ugly duckling above, the AR-F3 mount raises the Burris FastFire III to a much more appropriate height, allowing correct and quick acquisition of the illuminated reticle.
In addition, the optic is much more protected and the FastFire III’s controls and battery compartment are fully accessible.
I was expecting Burris’s AR-F3 sight mount for FastFire red dot sights to be the same level of quality as the optic, but that wasn’t the case. My FastFire III fit the mount well, installed without issue, and the mount secured to the firearm’s picatinny rail better than anticipated, but the poor quality of the side-clamp and rounded cross-bolt are worrisome.
The AR-F3 features a rubber insert that houses two small tools to help with installation and reticle adjustment, yet the insert is poorly glued into the housing. And if your optic and mount are properly assembled and installed, there should really be no use for the Torx bit or 3/8-inch wrench. I’m still strongly considering pulling the entire insert and storing the tools in my grip.
Burris has other opportunities to improve this mount, like swapping the protruding hex nut for a flush-fit T-15 Torx head screw, or redesigning the spare battery compartment so it is accessible without removing the red dot sight from the mount. Now, the mount functions fine, bringing the optic to a more usable position; plus it does a great job of protecting the primary investment. However, the mount simply isn’t the same level of quality as the mount and doesn’t deliver a full MSRP’s worth of value. If the mount tickles your fancy, your best bet is to buy it as a package with the optic or find it on sale.
Specifications: Burris AR-F3 Mount (Picatinny / Weaver)
Price as reviewed: $104 MSRP
Ratings (out of five stars):
Design: * * *
Burris’s AR-F3 mount is robust and weighty, even with the skeletonized core. It includes a rubber insert that holds a small 3/8-inch wrench, as well as a wrench with T-15 Torx and thin Phillips bits, although the insert is poorly glued into the mount. The full-length side-clamp works, but is a poor fit to the mount and rail. Windage and illumination controls are easily accessible.
Durability: * * *
The AR-F3 has thick side walls and wings and will most certainly protect your FastFire reflex sight. However, the poorly-fitting side-clamp and rounded-top cross-bolt are cause for concern. Before unboxing, the rubber insert had already begun coming apart from the housing it was glued into.
Usability: * * * *
This mount does elevate the optic to a good position for quick acquisition of the reticle, as well as correct height for true co-witness with iron sights. The mount’s wings are thick, yet thin enough as not to obstruct much of the shooter’s sight picture.
Overall: * * *
The Burris AR-F3, designed to pair with the RMR-style FastFire II and III red dot sights, is a good mounting system. It puts your reticle at the correct height for easy reticle acquisition and allows for true co-witness of iron sights. The rubber insert and tools are neat, but not necessary, and the side clamp with rounded cross-bolt and 3/8-inch hex nut are low-quality components. The mount works fine and fits well with FastFire optics, but the value is not there at full MSRP – find it on sale.
h/t Greeley, CO

")

Nice review, especially providing the weights of the different configurations. I have that setup on my weight-weenie sub six pound AR carbine. I took out the rubber insert and like the look, as it adds to the skeletonized look.
Good article. I haven’t used an open reflex RMR type optic on a rifle, only scopes or a variety of closed red dot optics, aimpoint micro, tr-25, primary arms, prism types, also looked at aimpoint pro, mro, etc.
Why would one go with the open reflex design over tube, bigger field of view, less like looking through a hole? The fastfire and mount aren’t necessarily a ton cheaper than the other red dot optics so I wouldn’t think this would be a pure price/value decision, so looking more for what preferences might influence one to go this route.
Don’t you need the torx bit to get to the spare battery in the recess of the mount underneaty the sight?
Maybe that’s why it’s in the rubber storage compartment.
Also, did you lock-tite the screws you need to remove to even get to the battery? Will that tiny torx wrench give you enough purchase to break that free to get to your extra battery?
Seems like there is an opportunity to reconfigure the rubber insert to store the battery there, along with a flat head to open the battery compartment on top of the sight, and ditch the torx and wrench in the toolbox. (with the battery in the rubber bit, no need to un-mount the sight to get to it….)
that poor charger.
Necro thread. Reviewer puts a CR2032 in the AR-F3 as a spare, when the FastFire III uses a much smaller CR1632… lol… dumbass