


For years now I’ve been a long distance shooter. For much of that time I’ve been missing targets at long distances. There isn’t any shame in missing. Most of you have missed more shots than you’ve made, except that one time you lucked out and actually hit that pop can that somebody else left on the target rail on the 300 yard line of your local range. That time, you had everything just right. So, as the title says, how does one go about figuring things out with only five shots? I’ll tell you one thing . . .
You won’t need a chronograph or a dope card. Let’s face it: you’ll never be so operator that your drop chart matches the one in Guerrilla Sniper. So what do us normal guys who don’t try out fifty handloads in one sitting do? Can we really live without pissing off everyone else at the range while we set up a chronograph and force them all to hold fire so we can stand in front of the line? Yes. Yes you can. And you can do it in only a few shots.
Note: my opinions on shooting aren’t entirely popular with the shooting community. (Notoriously enough, I do most of my shooting and hunting with a 13.5” .308.) What I’m about to say will bunch a lot of shorts in a lot of places. Here goes: velocity isn’t important.
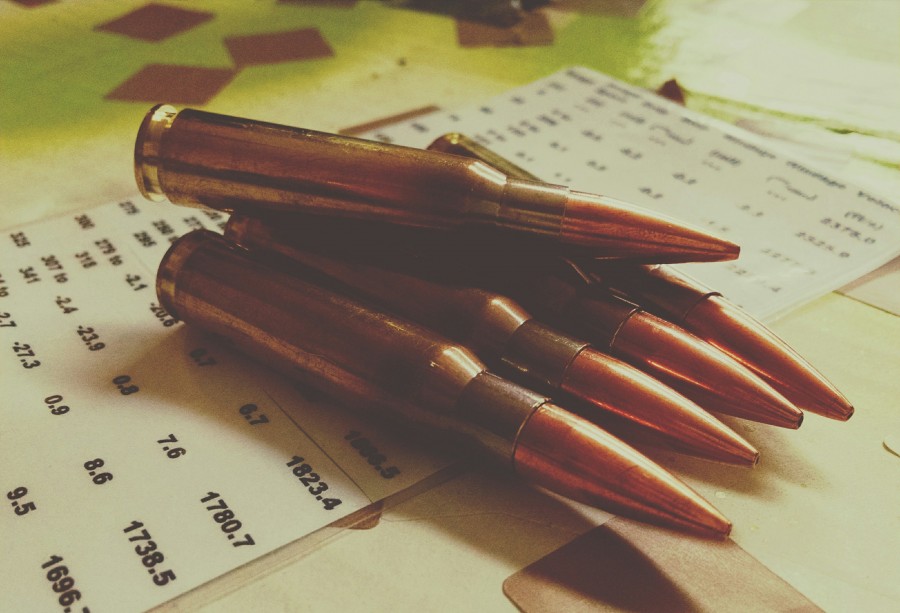
For my example, I will be using data from my .308 load of choice, which is a 168gr Hornady HPBT, Lapua brass, CCI 200 primer, and 43gr of Varget. That load produces 2400fps from a 13.5” barrel. What? 2400? Is that bullet even moving? Yes actually and I’ll elaborate on how to figure that out in a minute . . .
Considering that a bullet from a Marine M40A5 is only seven grains heavier and a paltry 100fps faster coming out of a 24” barrel, I’d say we’re doing just fine with the shorter barrel. It’s all relative, people. The bullet is what’s true. But why shoot a little gun like that when you could shoot another one? Stop it. There’s no practical difference at all. So let’s just go forward with this example.
Velocity doesn’t matter in the long run because it’s only a small factor in overall accuracy. You can have a super-fast load and have it be not-so-great. What should come first: consistency.
You should always pick the load that gives you the best results. Something totally and boringly predictable. If that’s a fast load, then good for you. I’ve found that speed isn’t key to accuracy at practical ranges. At 2400fps, my bullet makes one hole at 100m and .1 mil accuracy out to 1000m. (That’s 10cm at 1000m for those of you that measure in Freedom Units only.) The gun shoots, period.
Once you have your super-consistent load, zero it at 100yds/m. Make sure it’s actually zeroed, because you will need it to be precise for the next part. When you have it zeroed, find the longest distance you can possibly fire at. If that’s only 300 yards, that’s fine, but it won’t be as precise as longer distances. Five hundred meters? Even better. That happens to be the longest distance at my local range. If you haven’t picked up on it already, I’m a mil man.
If you aren’t shooting with a true first focal plane mil/mil scope right now, you’re seriously handicapping yourself both at the range and in the field. The benefits offered by a that kind of scope are literally too many to list. You should say ‘f—k it’ and go buy one today. Tell your boss you’re sick of your garbage gun show accessories and that you need a raise to get that US Optics glass. He’ll understand when you tell him how productive it will make you.
That said, I’ll elaborate on how to maximize your accuracy with a standard duplex reticle but it won’t be easy. Or will it?
Don’t touch your elevation knob no matter what range you’re shooting. Leave it. Use only your reticle, which should have real mils on it. The best and easiest way to do this involves shooting at dirt and steel and then at cardboard. Tape or glue a bunch of cardboard together and secure it to a berm somehow. Use your imagination. The cardboard should be about six feet high and three feet wide. Draw a dot in the middle.
Now line up and fire at the dirt in the berm next to it. Watch for splash and impacts. Since you’re shooting with mils, make note of the impact. It looks like that first shot may have been down 4.5 mils.
Okay, so now you have that. Check shot one.
Move your reticle over to your target and hold the nearest round mil onto the dot in the middle of your target. Since we saw the impact at 4.5 or so, we hold the 4 mil line on your target center. Fire again twice. Or more. (I said five shots is in the title, but you can shoot more if you want.) After you make those shots, drive down and put markers or draw visible indicators over your bullet holes, which are certainly (or should be) directly under your target center.
Go back to the line and look through your scope. Align the 4 mil line with the center and observe where your impacts are. For me, they are at 5.1 mils low of a 100m zero at 500m. Save that information.
For guys who don’t have first focal plane mil/mil scopes, the going is a bit tougher because you have no clear demarcations on your crosshairs and no ability to easily gather information. You may not have mils, but you do have a Sharpie. Here’s where it gets interesting.
If you’re really careful, you can actually take that permanent marker and draw mils on your glass. No wait. Don’t do that. I was kidding. Do not do that. But do get that marker and a measuring tape or meter stick. Those centimeters are what you want.
MOA is kind of a bitch system since there are various MOA versions. Is it actual MOA, like 1.06” at 100 yards or is it 1”? Lord, that .06 is gonna kill us. Quick! Get out that barely-relevant copy of The Ultimate Sniper and hope that it holds the answers. Spoiler alert: Rosebud is the sled and that book looks better on your coffee table, where it begs to be mentioned by college friends who knew you were in the military but didn’t know you weren’t a sniper.
Take that meter stick and make lines on your target. Yes, just like in school. If you are shooting at 500m, make the lines 5cm apart. That’s .1 mil at that distance, which makes 1 mil equal to 50cm. It’s all broken down into tens. If you’re shooting at 849 yards, .1 mil is equal to 8.49cm and so on. Take your standard duplex, zeroed at 100m, and hold it dead center. Actually look down your crosshair and see where the mil lines are. Make note of this.
Count the number of mils to the wide part of your duplex and make note of it. Let’s say it works out to be 3 mils at full magnification. It will change, so leave it on one setting for this procedure.
Now that you know that’s 3 mils, hold those 3 above the target and off to the side. Fire. Watch where it impacts next to the target. You already know that you have 3 mils to the dot. You are good at drawing and drew an additional 4 mils on cardboard. The bullet hits next to the 2 line. You make note of it, hold with the start of the duplex, so 3 mils, on the target center and fire a few more times. Then you drove down and check. Sure enough, you have holes at 2.1 mils. 5.1 again, but the hard way.
Now you know you have a bullet that impacts 5.1 mils low at 500m. Good for you, bruh, because it’s party time. Better put on your shades while reading this because your future is about to get bright.
Okay, so technically your gun now has two known zero points. Since I’m struggling as it is to keep this whole yards and meters thing straight, I’m just going to go full metric.
I know what you’re thinking. Never go full metric. Worry not, friend, I won’t come out empty-handed. Based on the fact that there aren’t too many velocities that will get your given bullet from A to B and put them all in the same place, you are then able to do the last and most critical part of this whole process. Data entry. Also, Microsoft Paint.
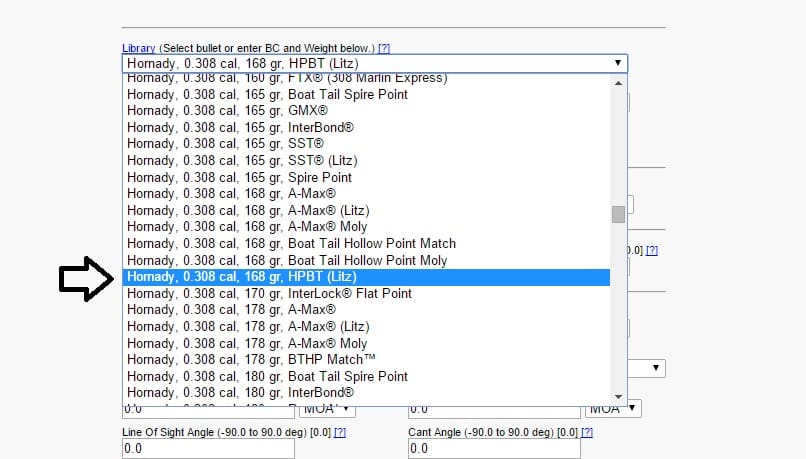
I usually do most of my ballistic work on the fantastic JBM Ballistics site. I don’t know what the hell JBM stands for, but it works and is probably the best thing you can use next to the Applied Ballistics app or the ATRAG stuff. You can use those programs the same way. Data stays the same. Anyways, go to jbmballistics.com and begin punching numbers. I select the Litz version of the Hornady 168 HPBT on the scroll menu. Don’t bother with the other inputs in that section.

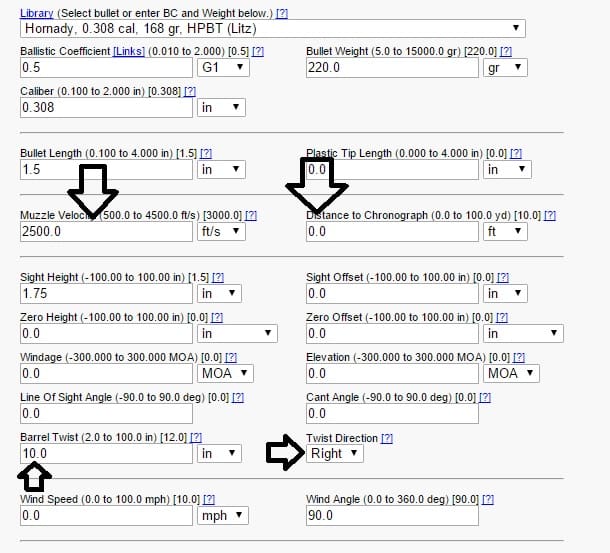
Skip down to the third column inputs. Muzzle velocity changes to an estimated amount of fps. Because we don’t know it is 2400 yet, we enter 2500 first. Distance to Chronograph needs to be 0.0 since we aren’t using one.
In the next set of inputs, don’t really mess with most of that. Sight height isn’t that critical, unless you eat nails for breakfast and mount your ACOG on your carry handle. Just give it a good estimate and call it good. I do 1.75”
Shut up! I hear you F-Class guys and this isn’t for you! You eat your own food over there. None of that cant garbage needs to be worried about in real life. Make sure you don’t skip the sections for twist rate and twist direction. The second one isn’t super critical, but just get it correct.

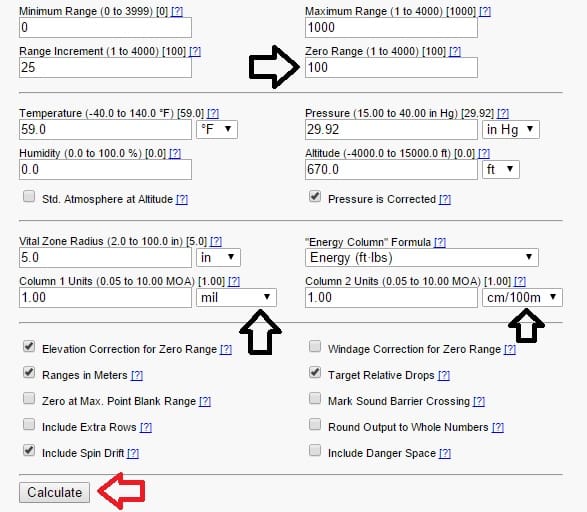
Ignore wind speed for this time. Make sure target angle is set at 90 degrees. Next enter min and max range. Set max as your actual max, so 500m for me. Enter 100m as zero distance. Go to the next section and enter atmospherics. I’m in West Michigan, so my typical elevation is about 670 feet above sea level. Enter the actual temperature of the day. We can change that later. Humidity can be simply set at 50 percent.
Big secret: humidity has no valid bearing on real shooting. Every fanboy seems to want to throw in humidity and Coriolis like they’re trying to impress someone, but it matters so little in real life at realistic ranges that it’s just safe to set it at 50 percent all the time.
Pressure isn’t as critical as people think, either. I’d just look it up and average it for your area. Mine is averaged at 29.92. Skip down and change the units to mil in the first column and to centimeters @100m in the second one. You’re good to go after checking ‘range in meters’, so press calculate.

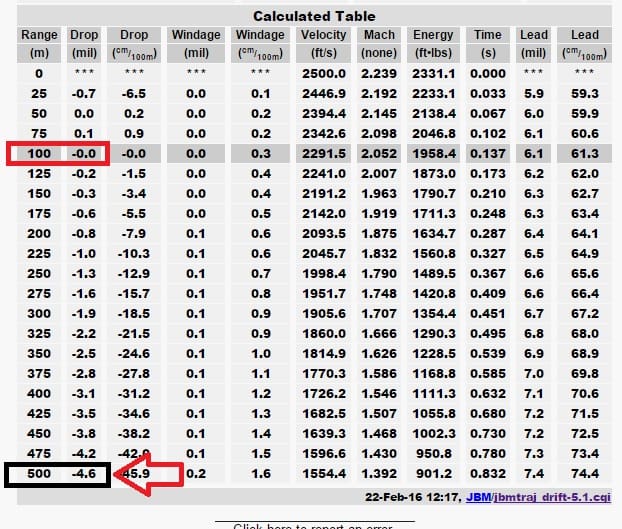
So, you have results. Your point A is 100m, but your 500m point B isn’t your expected 5.1. It’s at 4.6, so a half mil high. Too fast.

Just to be a problem, I’ll do 2300fps. Go back and change that variable. We’re at 5.6, so too slow.


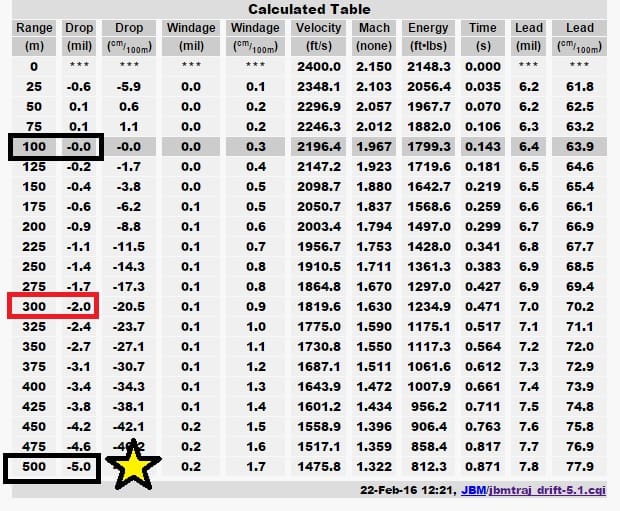
Ah, 2400. Just right. 5 mils of drop. Wait. What about that .1? What about it? If you’ve paid attention, that is 5cm at 500m, also known as one click on a mil/mil scope with .1 clicks. Close enough for what we’re doing. There will be some variance, but we can work with that. Don’t worry too much about being so precise. You will waste ammunition and by definition time and money. Keep it simple.

Next is the fun part: proof of concept.
Do not touch that elevation dial. Go back to the range or set your cell phone down and set up a target at a random distance…300 yards…900…whatever. Use your new-found muzzle velocity to predict a trajectory to your target. To get to 300m, I need hold 2 mil below my 100m zero. Line up and fire. I like to shoot at steel for this part. It’s reactive and gives instant feedback. Do that at any range you have and then print off your data.
You now have a range card that you can go in and edit at will tailored to your individual rifle. Play around with temps and such. You’ll discover that you will certainly want a temp-stable powder like Varget. The website will also let you include a zero at Point Blank Range, which is great for guys with the duplex reticles.
There you have it. Doing this saves you having to goof around firing at every individual range. Keep it consistent and you’re golden.
Remember, it isn’t about speed or barrel length. It’s about how uniform all your gear is. Get the very best gear you can afford and make the most out of each shot. Why waste 200 rounds when you can do it in just a few? Consistency builds confidence and confidence builds consistency. Aim small, miss small. Kneel before Zod. You get the drill.