


I fully admit to being a 300 AAC Blackout fanboy. Ever since Kevin Brittingham handed me a suppressed 300BLK HK416, I was hooked. A heavy-hitting caliber in the same familiar standard AR-15 platform? Sign me up! So as soon as I got back home, I started trying to build the perfect AR-15 in the wonder caliber. And after much trial and error, I think I’ve got it figured out. Let me take you through my journey, with pictures and build notes from each step of the way . . .
My first foray into the world of 300 Blackout was a 16″ version. I didn’t have an SBR-ed lower receiver handy, so while I was figuring out how to get that done I bought a 16″ 300 BLK upper from AAC and started tinkering.


The first iteration came out as a lightweight, minimalist carbine with very few extras. I didn’t have a silencer yet and didn’t think the subsonic version of the round had much capability beyond 100 yards, so I designed it like your standard “gunfighter” rifle kit — lightweight as possible and with as few attachments as I could get away with. The only “tactical” accessory I added was a TLR-1 flashlight, as I figured it could pull double duty as my home-defense rifle.
- 16″ AAC 300 Blackout Upper
- DPMS lower receiver
- Magpul MOE adjustable stock on the buffer tube
- Primary Arms MD-02 Red Dot (Aimpoint knock-off)
- Magpul MOE rubber grip
- BAD-ASS Safety
- Streamlight TLR-1
The rifle ran fine, but the configuration didn’t make sense given the actual performance profile of the caliber. I was treating it like a handgun round when in reality the gun is comfortable even at medium range (200-300 yards). Also, after the Crimson Trace Midnight 3-Gun, I realized that the TLR-1 just wasn’t putting out enough light for a rifle light and replaced it with a Surefire P2X Fury.
I brought the Blackout rifle out to Texas for my first hunting trip in this configuration, but after seeing the reality of hunting in my future state of residence I wanted to make a few modifications before taking it back out into the field. I needed to get a little more distance out of the gun and thankfully a few quick tweaks turned it into a completely different rifle.

The second year, I was ready. The rifle was perfectly configured for hunting here in Texas and allowed me to take down a beautiful buck within minutes of hunting season opening. But as always, there were issues.
- 16″ AAC 300 BLK Upper
- AAC 762-SDN-6 silencer
- DPMS lower receiver
- Magpul MOE rifle length stock
- Millet DMS rifle scope
- Warne RAMP scope mount
- Magpul MOE rubber grip
- Surefire P2X Fury
- BAD-ASS Safety
- Folding bipod
Like I said, the rifle was perfectly set up for hunting, but that was before the paperwork for my silencer came back. The beauty of the 300 AAC Blackout round is that it’s so perfectly designed to run quiet in a suppressed rifle. So the very next purchase after my 16″ 300 BLK upper was a 762-SDN-6 silencer. The 16″ upper was good enough when I didn’t have a can, but when you add all that weight to the end of the gun it becomes remarkably front-heavy and long. It was no longer acceptable.
Still, while I was waiting for my silencer paperwork to come back, I kept telling myself that the 16″ version was good enough. But having tried it, the truth was that it didn’t make a whole lot of sense. Especially when the ammunition is designed to burn completely in 9″ of barrel, there’s no appreciable benefit to having those 7 extra inches. I needed an SBR.
I wanted to use an ATF Form 1 to make my SBR, meaning that I’d be the manufacturer and therefore would need the name of my trust and my location engraved into the side of the lower. I considered getting the DPMS lower engraved and even filled out a Form 1 to start the paperwork, but then I was given a Franklin Armory rifle to test out and fell in love with their lower-receiver design. I asked really nicely and they custom-machined one for me with my information on the side before sending it to be annodized, meaning that there wouldn’t be any shiny spots or other blemishes in the finished product. I sent off the Form 1 for the lower even before it arrived at my FFL. A few months later I had my stamp in hand.

As soon as the paperwork cleared, I sold the 16″ rifle and bought a 9″ AAC 300 BLK upper. I decided to go with a mixed flat dark earth (FDE)and black color scheme to match the dirt here in Texas. I also upgraded the glass on the rifle from the Millet scope to a Leupold Mark AR Mod 1 1.5-4x.
The Millet scope had served me well, but it didn’t have all the features I wanted. The reticle wasn’t quite as detailed as I’d like and the turrets left something to be desired. It was a great beginner scope, but I needed to move up. Leupold sent me the scope to review and after I was done there was no way it was going back. So I bought it from them and then bought a second one for my competition rifle. If that’s not a glowing recommendation I don’t know what is.
The final change was going back to a telescoping stock from the fixed rifle stock that I was using on the latest iteration of the 16″ gun. With a 16-inch rifle, the extra length didn’t really bother me. But now that I was able to make the rifle much more compact, I wanted every single inch I could scrape off the gun.
- 9″ AAC 300 BLK Upper
- AAC 762-SDN-6 silencer
- Franklin Armory lower receiver
- Magpul MOE telescoping stock
- Leupold Mark AR Mod 1 1.5-4x SPR scope
- Magpul MOE rubber grip
- Surefire P2X Fury
- BAD-ASS Safety
At that point the rifle was good, it still could have been better. And there were three final tweaks to be made to get it to that perfect configuration.

The first tweak was upgrading the flashlight on the rifle. I had been using a P2X Fury, but my guy at Surefire handed me a M600 Scout Light and a KM2 white/IR head for the flashlight that would let me take full advantage of the night vision monoculars that Optics Planet had lent me for a couple months. While the flashlight performed as well as the older version in terms of output, the ability to switch to IR, as well as the included tape switch, made it much more convenient and stealthy, something I really liked.

Change number two was an internal adjustment. Now that the gun was much quieter, there was still the minor issue of the buffer spring making an awful racket in the stock. That needed to be eliminated, and thankfully JP Enterprises was on hand with a solution. Their silent captured buffer assembly completely eliminated the noise and made the rifle more enjoyable to shoot.
The final change was more cosmetic than functional. ODIN Works sent over a red XMR magazine release and it just looked badass on my gun. Needless to say, it was a keeper.
- 9″ AAC 300 BLK Upper
- AAC 762-SDN-6 silencer
- Franklin Armory lower receiver
- Magpul MOE telescoping stock
- Leupold Mark AR Mod 1 1.5-4x SPR scope
- Magpul MOE rubber grip
- M600 Scout Light
- KM2 White / IR head
- BAD-ASS Safety
- JP Enterprises Silent Captured Buffer Spring
- ODIN Works XMR magazine release
As far as I was concerned, the high-quality rifle was now perfect. Unfortunately, while the configuration was great, the parts kit didn’t stand up. The silencer was the first to go — the ratchet wore out on the 762-SDN-6, and while AAC happily replaced it (and re-cored my entire can), I didn’t want to have to deal with a “fast-attach” silencer again. The other thing that gave out was the barrel, since apparently stuffing tens of thousands of rounds of both subsonic and supersonic ammo down a metal tube has a tendency to wear it out pretty quickly. I needed a new silencer, and I needed a new upper with hand guard.

The silencer was the easy decision. Having been burned once already by fast-attach silencers, I wanted something direct thread this time. I reviewed the Liberty Mystic-X not too long ago, and it fit the bill exactly. A lightweight silencer that provided good sound suppression and sported interchangeable mounts? Sign me up! I ordered one, and when it arrived, it not only looked great but also made the gun feel a whole lot lighter.
The barrel was a little more challenging. I had gone with an AAC upper receiver last time simply because that was really the only quality thing available. But now the market was awash with .300 BLK uppers of all shapes and sizes, from Mil-Spec to competition quality, with your choice of gas blocks, Keymod and M-Lok attachment systems, and other options. I had my pick of the litter, and the Noveske 10″ .300 BLK upper receiver assembly with Keymod attachments spoke to me. I haven’t owned a Noveske product since I sold my first competition rifle in exchange for flight hours, and the rail on their upper receiver looked much slicker and cleaner than the AAC version. I had been mulling it over for a while, but when one showed up in my local gun store I was finally able to see it and touch it in person — and bought it on the spot.
One last modification was the bolt carrier group (bcg). The Noveske upper came stripped, so no internal parts. I added a BCM Gunfighter charging handle and the Cryptic Coatings bcg I tested a while back, and everything was right with the world once more.
I took the gun out to the range to test it out, side by side with my existing setup. With my previous “final” configuration, the gun was shooting 1.5-inch groups at 50 yards. With the new setup, I was down to 0.5-inch groups at 50 yards. A much needed improvement.
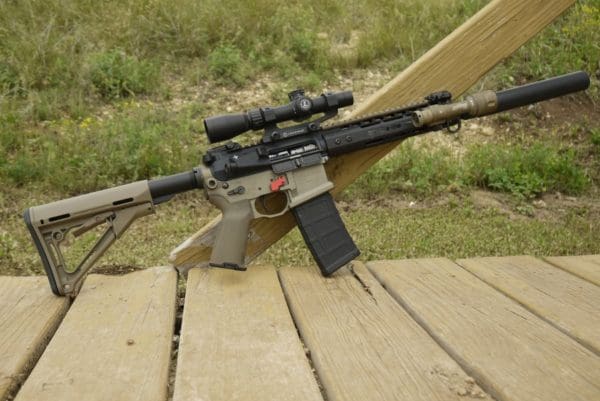
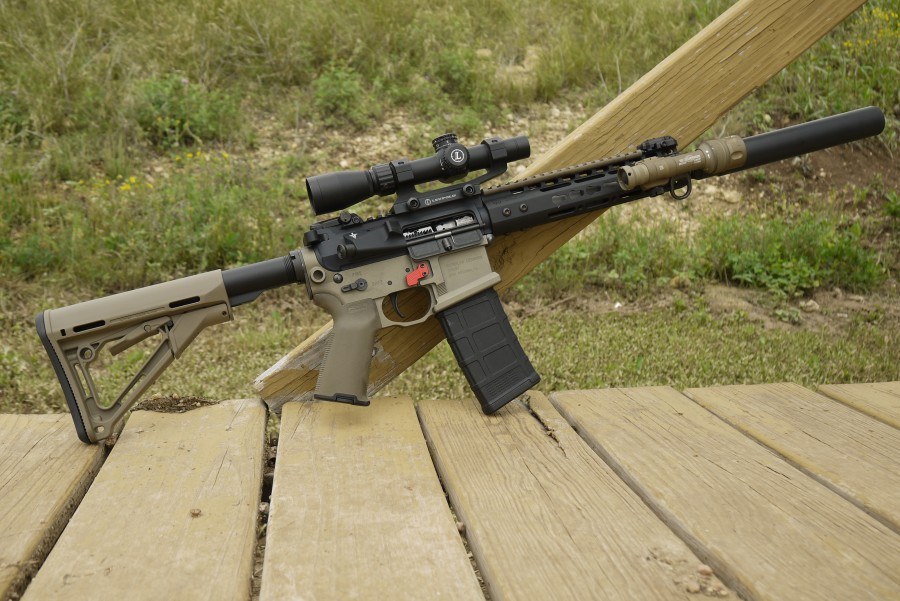
- Noveske 10.5″ GEN III .300 BLK Upper w/Forward Assist
- Liberty Mystic-X Silencer
- Cryptic Coatings Bolt Carrier Group
- Franklin Armory lower receiver
- Hiperfire 24E trigger
- Magpul CTR telescoping stock
- Leupold Mark AR Mod 1 1.5-4x SPR scope
- Magpul MOE rubber grip
- M600 Scout Light
- KM2 White / IR head
- BAD-ASS Safety
- JP Enterprises Silent Captured Buffer Spring
- ODIN Works XMR magazine release
Total cost: ~$4,764.90
That’s where the gun sits today, and I don’t foresee any major changes anytime soon. I actually plan to use this gun a lot less — I’m building the old upper into a new PDW build for farting around purposes. This gun just graduated to “safe queen” status.
More from The Truth About Guns:
5 Reasons You Should Build Your Own AR-15 Rifle
Black Collar Arms Announces Complete Bolt Action Pistol Build Kit
The Four Best AR Pistol Braces
6.8 SPC vs. 300 BLK – Which Way to Go in an AR Platform Rifle?
5.56 NATO vs. 300 Blackout Ballistics