


By Joe Grine
When you hear the name ‘JP Enterprises,’ the first thing you think of is race guns, a.k.a. fun guns. And with good reason, because JP Rifles are a common site at any major shooting competition where the AR-platform rifles are featured. In fact, the world-renowned AMU (US Army Marksmanship Unit) practical shooting team has won championships using JP rifles and JP components in their rifle builds. So when TTAG tasked me with building my first AR and writing about the experience, it was natural for me to seek out JP Enterprises for my “tactical” build . . .

Did I just say JP Enterprises and tactical in the same sentence? In fact, I did. What you may not know about JP Enterprises is that their AR rifles are also sought out by many elite military and police units as well. Tactical guns typically seek to maximize reliability over a wide range of environmental conditions and ammo/primer types, whereas competition guns are tuned to run at peak efficiency using select ammo over a rather narrow and carefully controlled set of conditions. But who’s to say that you can’t have a combination of both? The genius in the JP system is user adjustability.

JP was one of – if not the -first manufacturer to start making high-end AR parts back in the early 1990s. Some of you will recall that, back then, Colt ruled the roost, and there were only a few other brands that were vying for Colt’s market share (i.e., Olympic Arms, Armalite, Bushmaster, etc.). All of these manufacturers were making – or trying to make – “mil-spec” guns or some close approximation thereof. JP owner John Paul looked at these 2-3 MOA “mil-spec” guns and, figuratively speaking, held his nose. Sure, the AR platform had potential, but to make it truly great, John Paul knew that it needed better triggers, better free-float rails, and major “tuning” enhancements to the gas system. With the vision of perfecting the AR platform, John Paul rolled up his sleeves and got to work.

Another thing I really liked about JP Enterprises is that they were one of – if not the – first manufacturers to focus on the concept of user-adjustable gas regulation. Most ARs are over-gassed to ensure reliability over a wide range of conditions. But with John Paul’s interest in competition guns, he focused on ways to make the AR platform recoil less, vibrate less, have faster lock times, and use “just enough” gas to “git-r-done,” without wasting gas that makes the gun run inefficiently. The thinking was that less recoil equates to faster split times equates to better scores.

Obviously, pushing the efficiency envelope will test the reliability of the weapon, so the end user needs to decide how far to go. Often, that decision depends on how many of the environmental factors are in the control of the shooter. If you are using a wide variety of ammo under a wide range of temperature and climatic conditions, then you probably need to back off of obtaining peak efficiency in favor of reliability. Conversely, if you are a fair-weather shooter using consistent hand loads, you can push the efficiency envelop pretty far. The beauty of the JP components is that they put the control in your hands.
Of course, this opportunity to customize and succeed also presents the opportunity for failure. JP Rifles are intended for users that know what end is up. If you are a noob who isn’t willing to take the time to master the system, then perhaps it’s better to go with an idiot-proof over-gassed gun. But if you’re the type of guy who can tinker a bit and appreciates the nuances of gas impingement gun design, a home-grown JP build will make you a faster shooter.

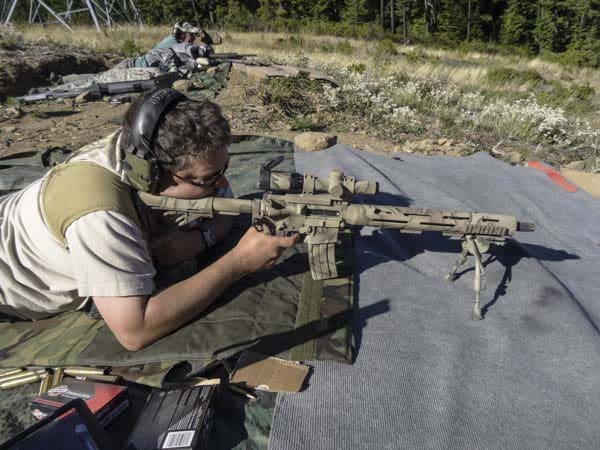
I’m a beginner AR builder with limited to no gunsmithing skills. So the primary goal of this project was to see if I could have success building a AR-15 from parts and to document problems I encountered. My strategy was to make up for my lack of gun-building experience by buying high-end parts. While cost wasn’t a primary limiting factor in this build, my budget wasn’t unlimited either. With that introduction in mind, let’s take a tour of my build, part by part.
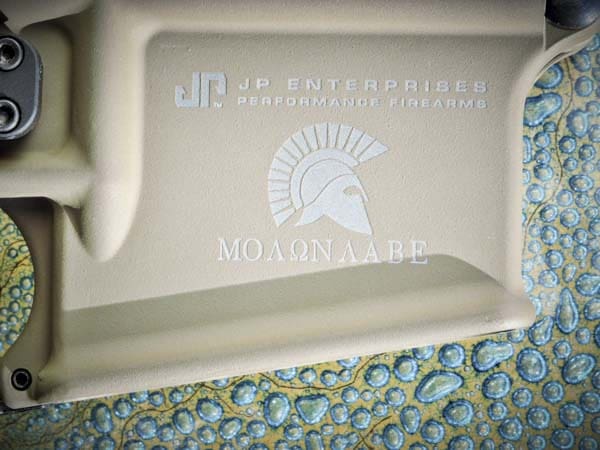
JP Forged Upper and Lower Receiver Set, Stripped, With “Molon Labe” graphic
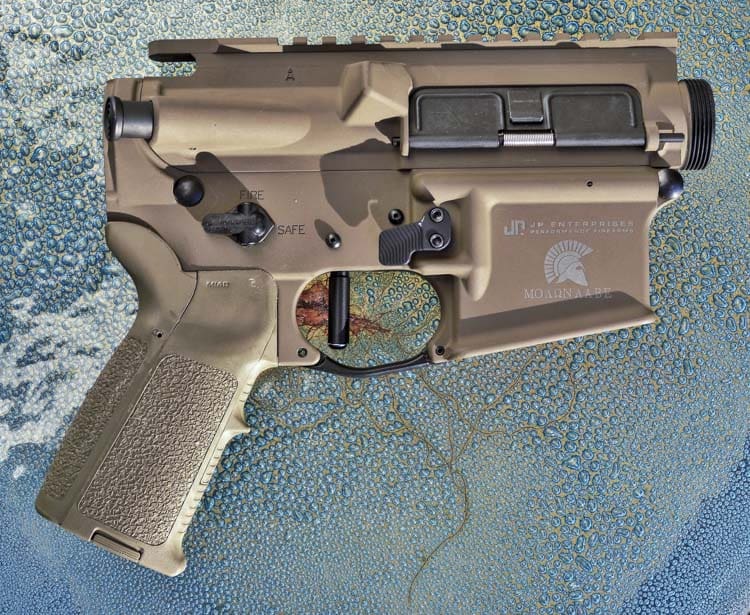

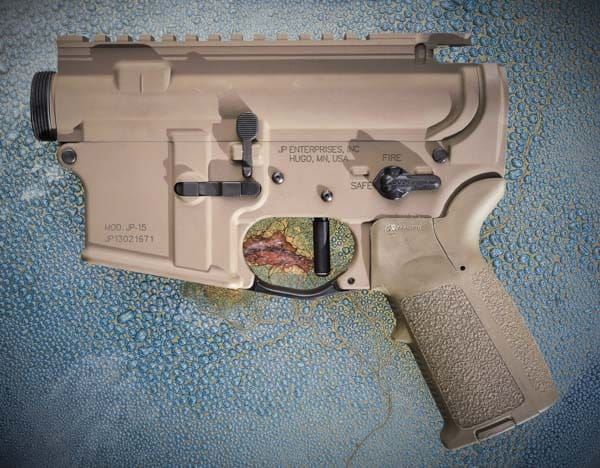
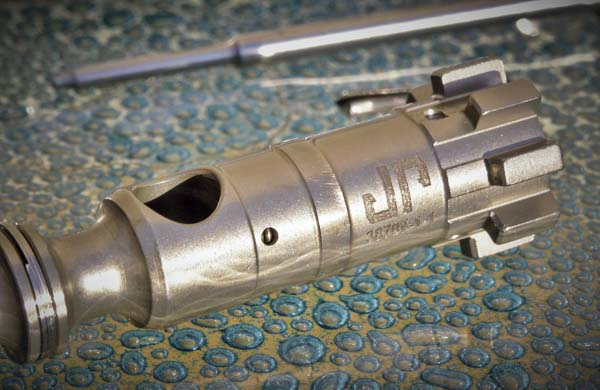
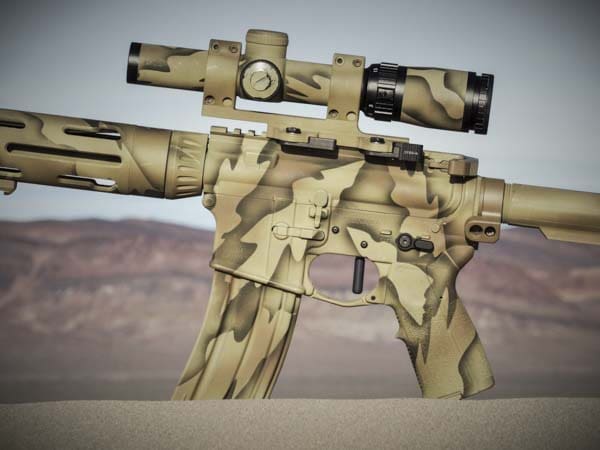
The heart of my build is a JP-15 Small-frame forged matched upper and lower receiver set. It’s made from the industry-standard 7075 T6 aluminum forging and, on its surface, isn’t fancy. No 3-D skulls, no ambi-controls, no built-in cappuccino machines. JP slightly undersizes the key trigger pin holes and focuses on tight tolerances to ensure that the upper-to-lower fit has no slop. Once in hand, I was impressed how tight this matched set fit together. At first I thought the pins were excessively tight, but they have loosened up slightly with time, without getting loose or sloppy. Everything was first class, as expected.
As an aside, I note that JP does offer a fancier-looking billet matched receiver set, but it’s more than twice as expensive as the forged set, and lacks the forward assist. Because I was intending to make a “tactical” gun (as opposed to a pure race gun), I figured I needed to retain that feature even if I was going to initially use a bolt carrier group that didn’t have teeth that interface with a forward assist. After all, BCGs can be swapped in and out with ease, but it’s not possible to add a forward assist at a later date.
I ordered the matched receiver set in flat dark earth (FDE) Cerekote. Just for fun, I also opted to get the optional laser-engraved “Molon Labe” laser mark graphic. This proved to be a mistake, since I didn’t realize that any future Cerekote application process that I commissioned would wipe out the graphic. I had assumed that the Cerekote applicator could add darker camouflage colors on top of the existing FDE base coat. I didn’t realize that you can’t paint over Cerekote once it has been hardened. So the applicator essentially had to bead-blast off the FDE base coat and start over, which wiped out the graphic as well. Noob mistake on my part, and it wouldn’t be my last.

Nonetheless, if you’re considering buying a JP with a lasermark, here is a photo showing a close-up of the receiver as sent to me:

Overall, I give the JP receiver set high marks. Noob tip: A tight upper-to-lower fit is crucial to accuracy, so don’t skimp with an ill-fitting mix-master set.
JP Low Mass Bolt Carrier
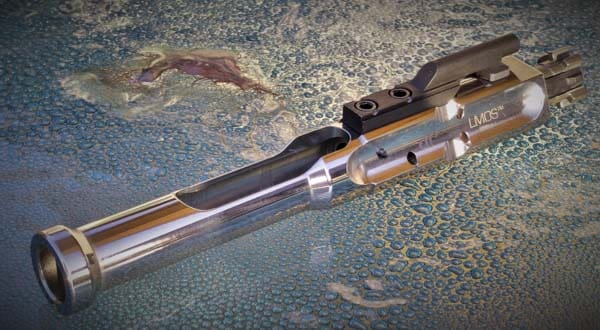

Before I settled on the camouflage color scheme, I initially obtained a steel Low Mass Operating System bolt carrier group (“LMOS”) in a polished stainless finish. Because I decided to opt for a camouflage finish, I had to purchase a second LMOS BCG, this time in a black QBQ finish. The fit and finish on these bolts is much nicer than a typical phosphate-coated Mil-Spec carrier. They are also two ounces lighter.
I really like the polished stainless steel version because it cleans up much faster than a typical Mil-spec BCG. More importantly, the weight reduction means that it requires less gas to set it in motion, and less gas equals less recoil equals faster split times. Understand that the LMOS BCGs are not really intended for tactical operations, as they lack the teeth needed to interface with the forward assist. Nonetheless, JP does manufacture a Full Mass Operating System BCG (“FMOS”) that does have the teeth.
In the photo below, you can see the detail of the polished steel bolt carrier. It is truly a work of art. But even if you don’t care about the aesthetics, that silky smooth finish results in a very smooth action, as compared to a typical mil-spec phosphate-coated AR-15.
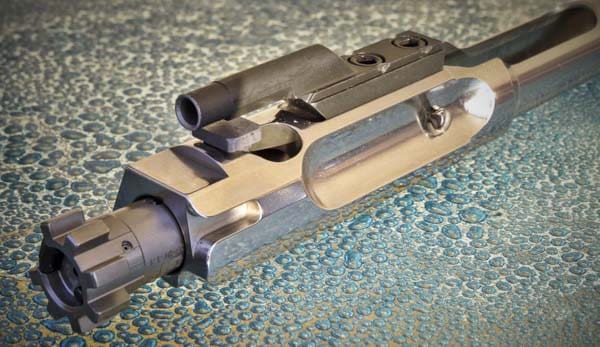

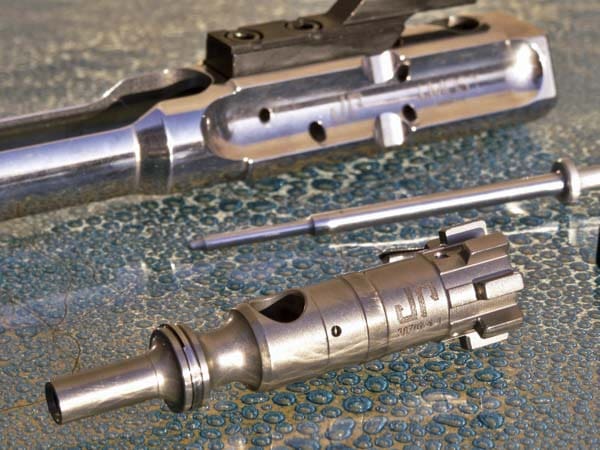
Mil-spec bolts are made from Carpenter 158 Steel, which is a proprietary 1960s technology and is apparently only available from Carpenter if purchased in large quantities. The steel alloy used to make the JP EnhancedBolt is called “SAE 9310.” I’m not an expert on metallurgy, but based on my internet research, there seems to be some general consensus that SAE 9310 carbon steel can be superior to C-158 for making bolts, if the heat treating is done correctly. Of course, whether a part is property heat treated is a bit hard for an end-user to evaluate unless the part breaks. Parts tend to work until they don’t, but as far as I can tell after 2000 rounds downrange, JP got it right.

The JP EnhancedBolt is not Mil-spec; its way better. In fact, it was designed to correct weaknesses in the basic Mil-spec bolt design. For example, JP adds additional material around the cam pin hole to eliminate this inherent weak point of the Mil-Spec bolt design. JP also adds its Enhanced Gas Rings and proprietary Enhanced Ejector, Enhanced Extractor (.308 and Grendel only). If you are in a pinch, you can use Mil-spec subcomponents, such as an extractor, in an EnhancedBolt without losing functionality.
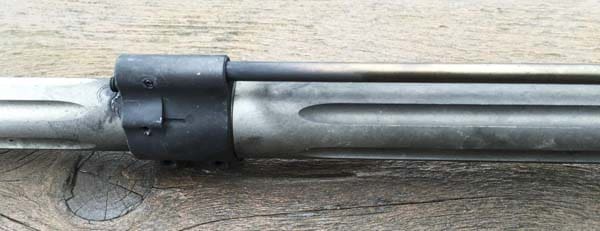
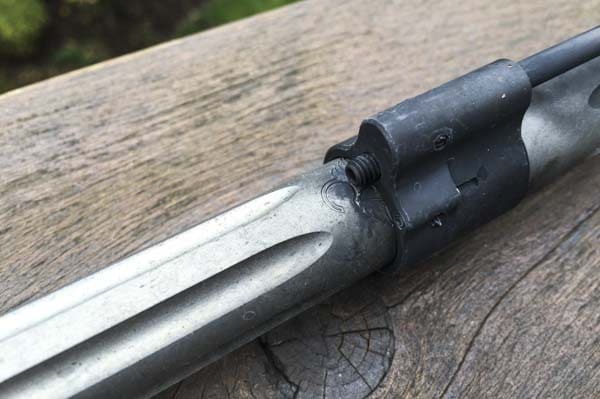
Syrac Ordnance Adjustable Gas Block
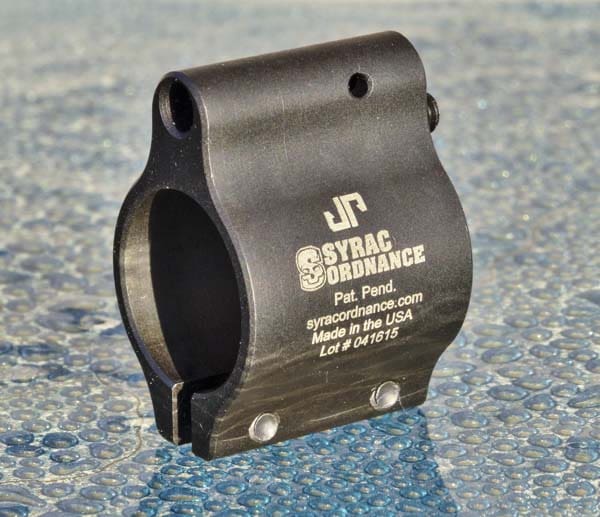

Part of going through the exercise of building an AR-15 using JP parts was to gain experience in the science of AR-15 direct gas regulation. One thing that becomes obvious when shooting many different 5.56 x45 caliber AR-15s is that some recoil less than others. While the recoil is always what I would classify as “mild,” some are milder than others. At first I attributed this purely to rifle weight, barrel length, etc., but I eventually came to realize that many ARs are simply “over-gassed” by the manufacturers in order to ensure reliability.
The downside? Over-gassed ARs have more felt recoil. So I wanted a really adjustable gas block so I could regulate the gas to make the gun a mild shooter. The Syrac gas block has a allen set screw that you access from the front of the rifle using a long allan wrench (included). The Syrac adjusts in 90° increments featuring tactile stops (four clicks per one complete rotation). Four full rotations from flush will open the gas port all the way. There is a detent and spring inside this gas block, so it is important to not unscrew the Allen screw out too far.
If you are going to run a slim fore-end such as the SLR Ultralight shown in the photo below, you need a low-profile gas block. The Syrac Ordnance/JP Generation II Minimized gas block with lockable detent adjustment seems to fit the bill nicely.
JP Silent Captured Spring for AR-15-type rifles
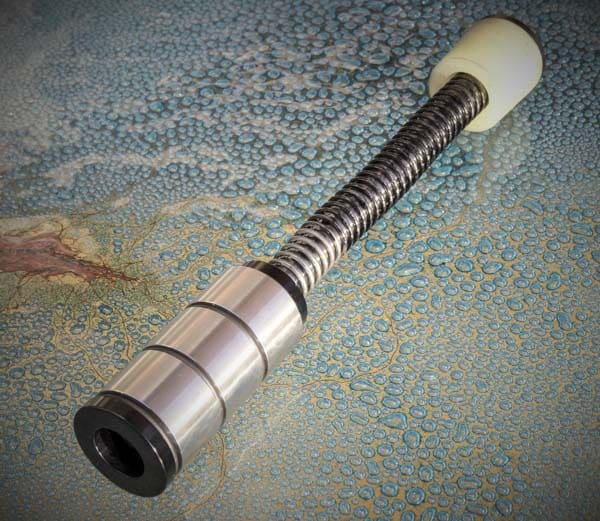

Besides the gas block, the silent partner in the gas regulation game is the JP Silent Buffer. Whereas the gas block adjusts how much gas enters the BCG, the buffer determines how much force is needed to operate the semi-automatic action. I now run these JPs in all of my AR-15s. The JP Silent B uffer is so awesome it may be the only “gear” that TTAG has reviewed twice: once by Foghorn and once by Jeremy S. And they both gave it 5 stars. I concur. I ordered the builder kit, which includes 5 springs with different tension strengths, so that the end user can manage and optimize the action’s loading sequence.
JP recently released a “Gen 2” version of the silent buffer that features a new aluminum guide rod for weight savings, heavier masses for more buffering mass and less chance of bolt bounce, full correspondence between SCS masses and H1, H2 and H3 buffers, etc.
JP Modular Hand Guard
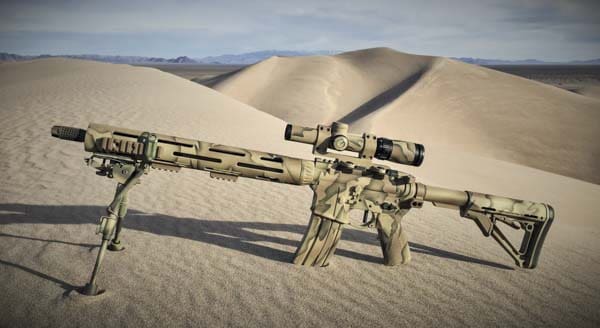

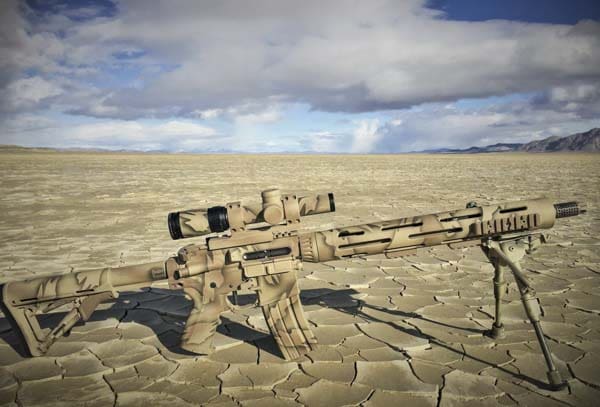
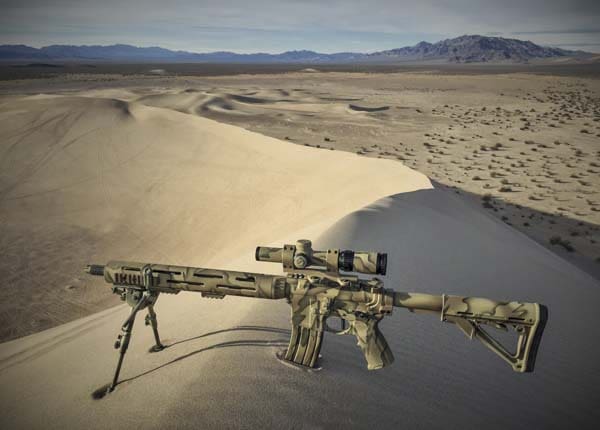
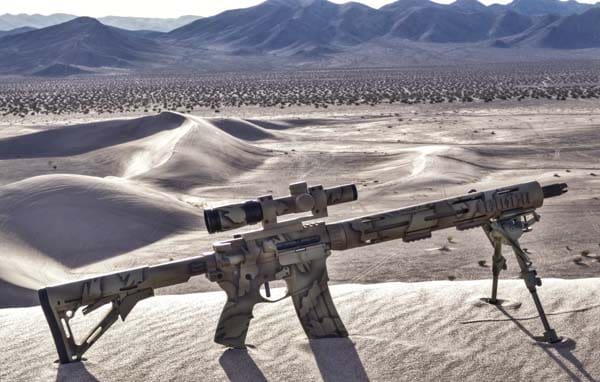
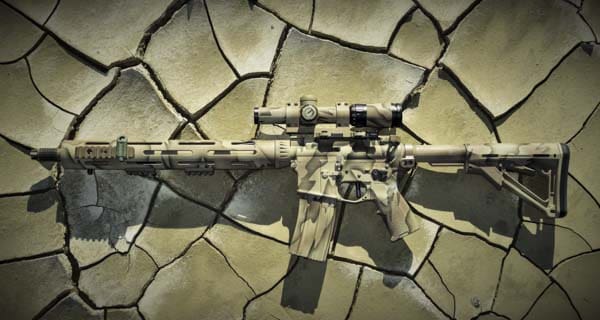
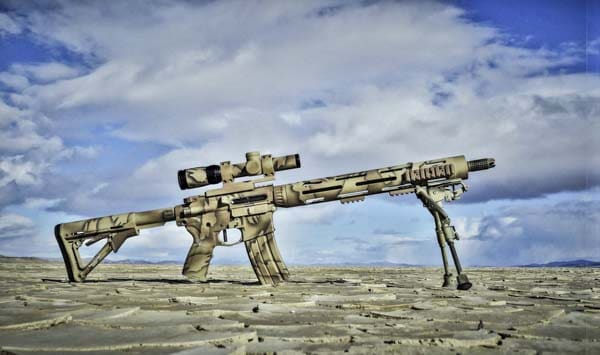
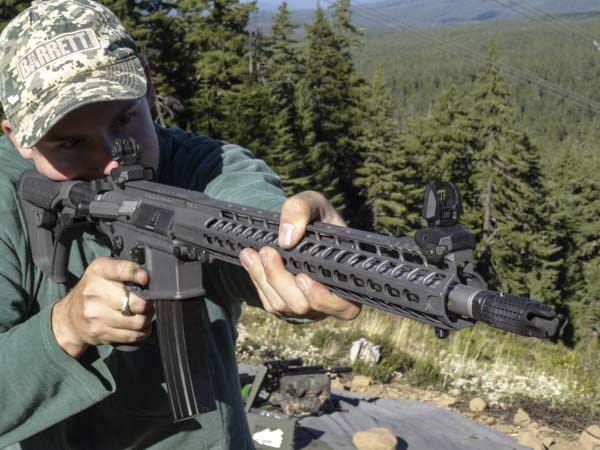
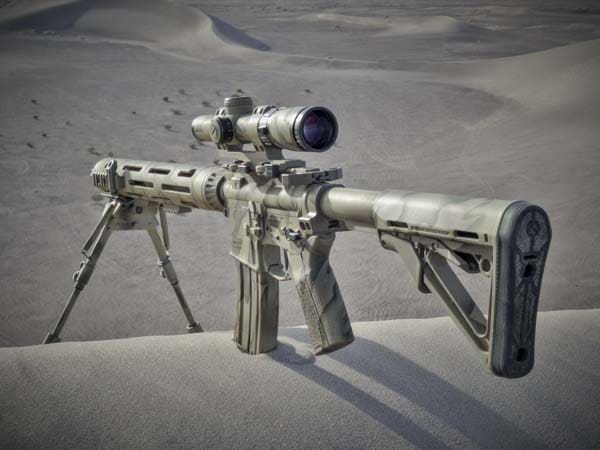
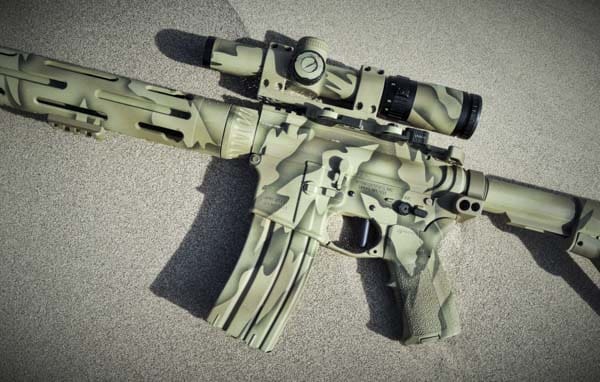
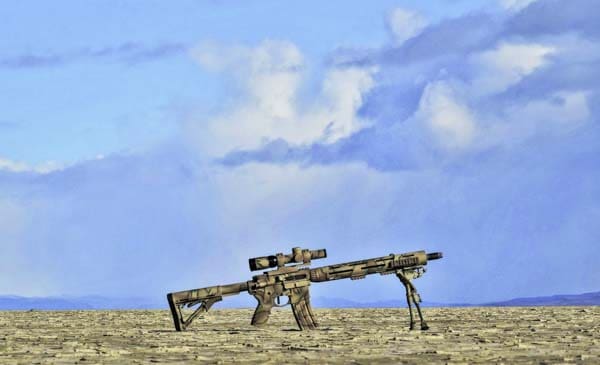
I built two ARs at the same time last year. On my “gray ghost” build, I went for fast handling and weight reduction, and used a 15-inch SLR ultralight rail. For the camouflage rifle, I assumed that I would be shooting at longer ranges with a bipod and a 6x scope, and weight was not as important as rigidity. So I went with the JP MK III Signature Series Modular Hand Guard (XL 15.5” OAL).
Why go with the JP rail? Well, JP invented the modular handguard back in the 1990s. The AR industry took a turn towards full Picatinny quad rails, but people gradually figured out that these heavy cheese grader rails were, for the most part, a dumb idea. And they everybody started building handguards with modular rails.
Honestly, I always liked the look of the JP tapered barrel nut. Besides that, the JP handguards are adjustable so you can ensure perfect alignment-to-bore axis. Why does that matter? Well, it mainly becomes important if you plan on hanging lasers, flashlights, and/or night vision optics on your handguard. If your handguard is not aligned with your bore, these devices won’t point in the right direction. Additionally, the internal diameter of the JP handguard is 1.75 inches, which allows you room to fit a suppressor inside that space for that “SD” look. Again, being able to adjust the handguard alignment becomes important if you go for that look.
I really like 15-inch handguards, in part because I like the thought of putting the front BUIS as far out front of the rifle as possible. I ordered 2-inch rail segments, but at some point I realized I screwed up because the top rail in the Mk III uses a different screw that cannot be used on the side or rear. The top rails are thinner than the other rails. So I eventually order the correct rail, but only after I had taken most of the photos for this article.
JP offers a few different versions of their adjustable handguard, and aside from aesthetics, the big decision-making point is weight. Mine is the older version, which JP calls the “Signature Series.” The new lighter version is called the “Rapid Configuration.” This version shaves off some weigh, but primarily benefits from an easier interface for rail segments that does not rely on backer plates. Since I liked the look of the classic JP hand guards and desired a bit of extra weight, so I went old-school. I’m envisioning eventually turning this gun into a 6.5 Grendel for longer range work
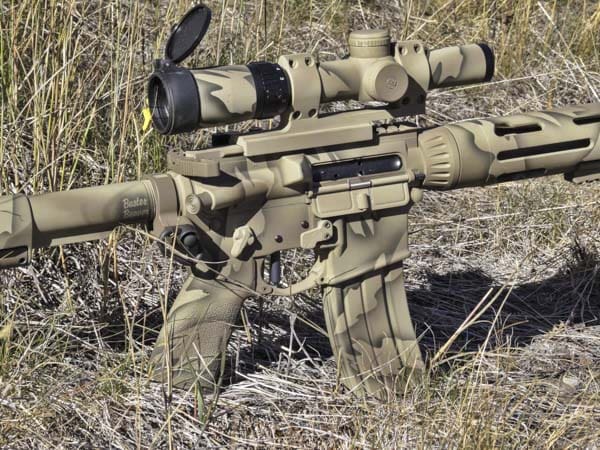
JP EZ Trigger Fire Control Package with Armageddon Gear Revolution Roller Trigger
I’m used to two-stage triggers in my ARs, and that is what I would choose for a true “tactical” rifle. However, I envisioned using this rifle to ring steel at 600-800 meters, and solely as an experiment, I decided to draw outside the lines and try out a single-stage JP “EZ Trigger” for my build. When I saw that JP sold a version of the EZ trigger with a flat face and a roller, I thought what the heck, let’s try it. If nothing else, I thought it looked cool. Part of the fun of building rifles is experimenting with new parts you haven’t used before.
JP Enterprises pioneered the adjustable trigger back in 1992 when it introduced its original JP trigger kit (JPFC-1 or 2, $119.95).
While more difficult to install and adjust than their EZ trigger, it was the first truly user-adjustable trigger. In 2010, JP launched the “EZ Trigger system,” making it easier for the end user to install his or her own trigger. Although it may have become eclipsed in print media by newer offerings from Geissele and others, the JP Original and EZ Triggers have always been a benchmark for all single-stage AR-15 triggers in terms of precision, reliability, durability, safety, and longevity. The kit comes with yellow (reduced power) and red (heavier / tactical) springs. The yellow/yellow combination is intended to be used for situations where want the best performance but your life does not depend on it (i.e. competition and recreational applications). The reduced power of these springs decreases lock times, which is otherwise fairly slow on a typical Mil-Spec AR. According to JP, the yellow / yellow combo will result in a release weight in the 3.0-3.5 lb. range on most receivers.
When installing the trigger, I again made some noob mistakes. I wanted to match this trigger to my Noveske 60-degree safety, but I have since found out that the two parts are not compatible without gunsmithing (i.e. filing). And I think this applies to most after-market safeties. So I went back to the standard JP 90-degree safety that came with the trigger pack. I found that the basic install of the JP trigger was easy, especially because the kit came with a DVD to help walk you through the process
Adjusting the EZ trigger proved to be much more difficult. I had some trouble along the way. After figuring out that the Noveske safety won’t work, I also had some trouble figuring out how to get the proper relationship between the disconnector tip and the hammer spur. Truth be told, the instructions tell you how to do it right, but without the benefit of hindsight, I didn’t find them particularly helpful. This was a bit frustrating, but at the same time it really forced me to learn how every part within the fire control mechanism works. In retrospect, this was a rewarding aspect of the build, even if it did not seem like it at the time. The photo below shows the three allan screw that you will have to adjust to get the trigger to function properly.
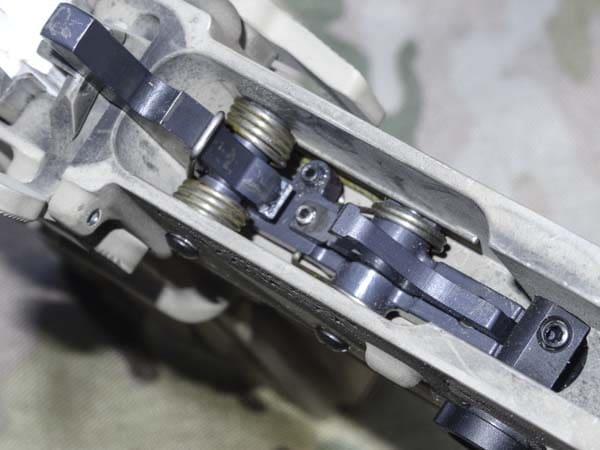
The JP safety features a “dog point set screw” that needs to be adjusted in order for the safety to function properly. This screw can be seen on the lower right in the picture set forth above. If you don’t properly adjust and Loctite this set screw, you can have a gun that fires with the safety set to the “Safe” position.” This happened to me at the range: I had readjusted the trigger and Loctited it down, and everything was going well. But…. (and there is always a but), I must have forgotten to readjust and Loctite the safety set screw. So there I was, at the range, finishing first 5-round string and feeling pretty good about the trigger. I then realized the safety had been on the entire time! Oops. Fortunately, it is relatively easy fix that simply required me to turn a set screw so that it barely touches the Sear, and then back it off 1/8th of a turn. If this set screw is not backed off for that 1/8 turn, it binds up and will not reset after a shot is fired. Again, the instructions go over this but it is an easy thing to forget. Given the obvious safety implications, you do not want to mess this up, esp. if the rifle is going to be something more than just a “bench queen.”
Another noob tip: yes, you really do have to use Red Loctite to ensure reliable and safe operation of this trigger. This may be unnerving to the novice builder, because you only have 15-30 minutes of working time (depending on conditions) before the Loctite sets. I was really nervous about screwing it up, so I tried to run the gun without the Loctite for a while, figuring I would get back to it after giving it a trial run at the range. But of course I forgot about it weeks later. As expected, it worked for a five hundred rounds or so, but it eventually failed in the middle of an advanced gun-fighting class I was taking. Derp.
I ordered the EZ trigger with the “Revolution” Roller trigger upgrade. Depending on who you talk to, the “Revolution” roller trigger is either best thing since sliced bread or simply a gimmick. Tom Fuller of Armageddon Gear designed the trigger and worked with JP Enterprises to build it. It is intended to help correct any trigger problems by only allowing the trigger to move rearward even the shooter errs and applies lateral forces. In other words, it makes it more difficult to have fliers caused by bad trigger manipulation.
According to JP Enterprises:
One of the common trigger control issues that causes inconsistencies for the precision shooter is lateral force applied to the trigger upon release. Instead of the straight-back, linear release that would be optimal, this lateral force results in a certain degree of horizontal dispersion or the “pulled shots.” So, when our friend Tom Fuller from Armageddon Gear approached us with his “roller trigger” idea, we saw the merit immediately and knew we needed to incorporate it into our AR fire control system. Attached to a modified version of our own trigger design with its improved sear geometry, the free-spinning roller of the Revolution Trigger auto-corrects for innate trigger control error by allowing your trigger finger to roll to a neutral position. Once you try it, you’ll see exactly what we mean and why this is the future of trigger control.
In addition to new rifle builds, the Revolution roller trigger option is available in two forms. The EZ trigger package is our standard full match kit including the entire array of our fire control components along with the new roller trigger. Alternately, the Roller Trigger Replacement Kit includes the trigger and our best-selling fire control springs to allow easy replacement of the trigger in a standard M4 carbine with no adjustments needed.
Does it work? I think so, but truthfully, it’s hard to say anything conclusive based on my testing. While I shoot very well with the roller trigger, it was difficult to attribute that success to the roller trigger itself. There are other variables related to the EZ trigger that make it great (such as the fact that the sear engagement was so precise). From a scientific standpoint it is hard to establish causation between good performance and the roller trigger itself. In other words, it is hard to evaluate the performance of the roller because it is difficult to isolate the roller as the sole variable affecting performance. Having said that, I don’t think it is merely a “gimmick,” but at the same, it really is doing nothing more than overcoming a training deficiency. In my opinion, the roller is not necessary if a trained shooter does his or her part by not introducing “lateral force” to the trigger pull. So from that standpoint, the roller will be useful for some shooters but not needed by others. In any event, I really like the feel of the flat front trigger and can recommend it without hesitation. I also think the roller trigger concept would show more promise if used with heavier triggers.
So to summarize, the JP EZ trigger is amazing: absolutely no creep, a light, clean break, and the trigger only moves 1/8″ or so, making over-travel virtually non-existent. However, if you are a new builder, you have to resign yourself to the fact that you are probably going to have to spend a good amount of time mastering the adjustments work. It is more difficult to install than a modular unit or a Geissele SG3. Because of the safety implications involved, do not use this trigger for anything over than a bench rest shooting until you are absolutely confident that you have figured out how the adjustments work.
Precision Armament EFAB and AFAB Hybrid Muzzle Brake
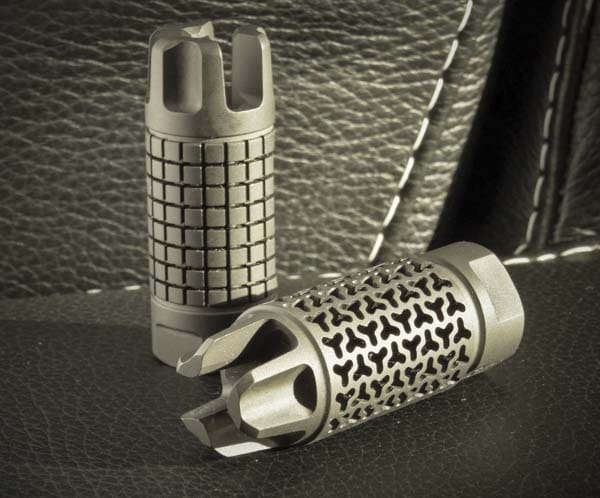

In order to keep with the tactical theme, I decided to go with a hybrid muzzle brake instead of a competition brake. The big difference is that tactical brakes (aka “hybrid” brakes) should place a premium on flash suppression, whereas competition brakes are intended to minimize muzzle climb and recoil, often without regard to noise, concussion, and flash. I had previously been really impressed with the quality of the Precision Armament M-11 and M-41, so I decided to give their Enhanced Flash Arresting Brake (EFAB) and Advanced Flash Arresting Brake (AFAB) hybrid brakes a try.
The ETAB and AFAB hybrid brakes are designed to provide both effective muzzle control with flash suppression even on short barrels. Pure muzzle brakes are effective at controlling muzzle rise, but typically exhibit excessive flash and pounding concussion. Precision Armament has figured out how to configure many small expansion nozzles to create turbulence which diffuses and quickly cools combustion gases, thereby providing adequate recoil reduction with greatly reduced flash and concussion.
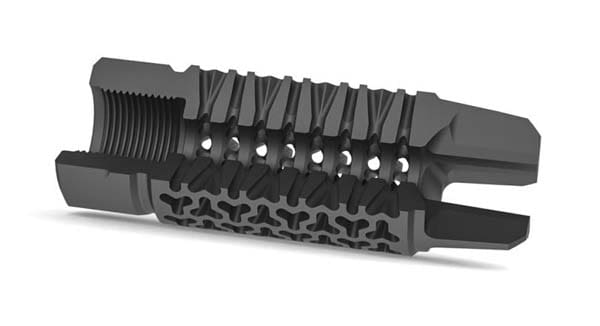

At $159, the EFAB is the more expensive of the two brakes. The machining on this brake is complex, so it takes a lot more CNC time to make the EFAB. However, the design is more than just an aesthetic enhancement. Rather, the ports are designed to expose the hot escaping gas to as much cool air as possible. The longer the hot gas stays concentrated, the more powder “flash” is exhibited.
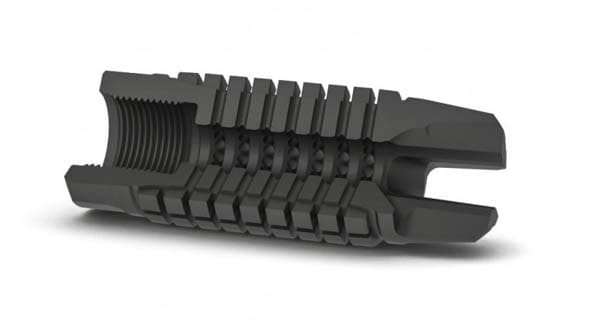

The AFAB ($109) is considerably less expensive than the EFAB, but seems to work very well. I definitely like the look, which is undoubtedly inspired by the Knights Armament’s now-discontinued $450 Triple Tap muzzle brake. Precision Armament makes theirs out of heat treated stainless steel with CrCN coating instead of the more expensive Inconel alloy.
Other Components:
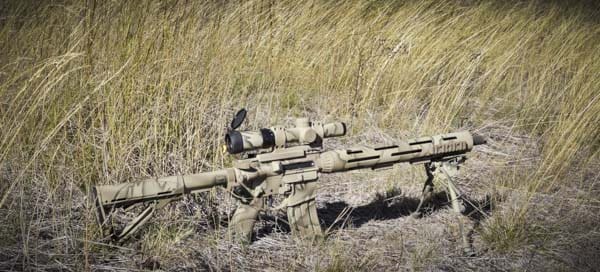

I equipped the camouflage rifle wish a 16-inch Spikes Tactical (Lothar Walther blank) stainless steel polygonal-rifled (1 in 8) barrel made from LW-50 with nickel-boron coating. For the gray ghost build, I used a fluted 16-inch Wilson Combat Recon barrel (1 in 9 twist). Why these barrels? Well, to be perfectly honest, I got them on sale while engaging in Black Friday retail therapy a few years ago, so I had them just laying around the house doing nothing. Both of these barrels are in the 31-32 ounce range, which is on the heavy side. While excellent, I might eventually try to lighten up the gray ghost build a ½ pound or so by swapping out the Wilson barrel in exchange for a “pencil” barrel. And I might eventually turn the camo rifle into a 6.5 Grendel.
The camouflage rifle features Magpul furniture, a Troy Pro-grade rifle slight adapter, a Bushnell SMRS 1 -6.5 x 24 scope mated to a LaRue Tactical SPR 1.5 scope mount. Both rifles are equipped with a Norgon Ambi-Catch and an Odin Extended Mag Release.
Custom Cerekote from Buster Beaver
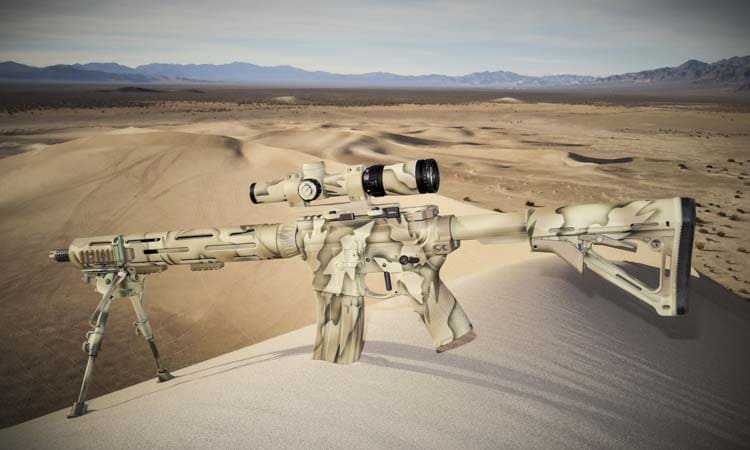
I really wanted this rifle to stand out from the crowd – and blend in with in the environment. A great Cerekote job is a great way to accomplish both of those goals. I called Chase Francis at Buster Beaver and ask him to complete my vision. Chase did a great job, even though it took forever. Cost was $600, which included coating the scope and my Benchmade Nimrarus Knife in a matching pattern.
So as long as you aren’t in a big hurry, Buster Beaver is good to go.
Accuracy & Reliability
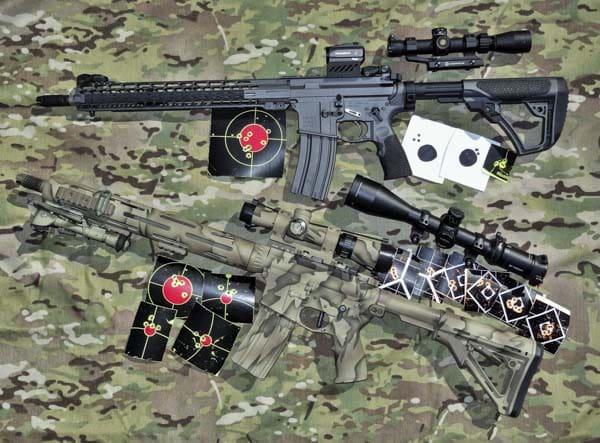

I am happy to report that the accuracy on both of the two builds has been outstanding. Accuracy using 69 gr. and 75 gr. factory match ammo is typically ¼ to ¾ MOA depending on the scope used, and M-193 ammo is roughly 1 MOA with magnified optics. Both of these builds have been impressive, both when I’m shooting sub-MOA groups from the bench (100 yards) or reliably banging steel 2/3 IPSC targets between 300-600 yards out in the field. My tentative conclusion is that the key to great accuracy in an AR-15 is to start with high-quality parts (especially barrels) and use high-quality ammo. There does not seem to be any need to “blueprint” the action or “true” the receiver in a manner similar to what gunsmiths do to Remington 700s.
Reliability, on the other hand, was initially a bit of an issue; it’s taken me quite a while to work through the kinks. I have already discussed the trigger issue in the camo gun, and that issue was related solely to “operator headspace and timing” on my part. Other than that initial SNAFU, the gun is 100% reliable and turns in sub-MOA performance.


The gray ghost gun, on the other hand, was not providing enough gas to get the bolt to lock back on an empty mag. This proved to be extremely frustrating when I attended a two-day gun-fighting course last fall, because it made it hard to run the reload drills correctly. After 1200 rounds +/- shot over two days, I noticed that gas was leaking out of both sides of the gas block, and the dimple on the gas tube had completely worn down. Turns out, I may have installed the gas tube incorrectly, because it was wearing down as the gas key on the BCG moved over it. Also, I must have not tightened the gas block enough because it moved a bit (Perhaps when the barrel got hot?). I had a local gun shop replace the gas tube because I was tired of messing with it. I talked with the guys at JP about this, and here is what they had to say:
“That is a lot of leakage on the gas block but its not all that uncommon actually, especially as fancy coatings and hard finishes are becoming more common. The harder finishes don’t seal up as well because the cant conform to each other. I use a smear of high temp Locktite (272) between the gas block and barrel. It makes a nice sealant and prevents a lot of that gas leakage. It really doesn’t hinder removal all that much especially on the split clamp gas blocks like that JPGS-SO. I also use the same thing when inserting the gas tube into the gas block, just be sure no locktite seeps down into any of the adjustment screws. Once the gas tube in installed flush it out with a steady stream of solvent like lacquer thinner or Break cleaner spray.”
Ok, good advice. However, even that did not entirely fix the problem. Initially, I thought the problem was my beloved E-Lander steel 30-round magazine with the white follower. The mag that I had Cerekoted to match the gun had a follower that protruded up past the feed lips. That same mag worked with all of my other ARs, but for some reason, on the gray ghost it appeared to be the reason the gun was malfunctioning. My theory was that it caused just enough drag on the bolt carrier group to prevent the BCG from locking back on the bolt catch. I sanded down the follower with my WorkForce Knife sharpener, which worked really well.
Unfortunately, that did not solve the problem, and in retrospect, it was not the issue at all. But I was again talking to the guys at JP about it, and they mentioned that if the Silent Buffer is out of spec by a few one-hundreths of an inch, that could cause problems with cycling. You see, the buffer only passes the bolt catch for a micro-second, and therefor there is little room for error. That got me thinking. I had noticed that my Cerekote installer had added two quarters in the buffer tube, but had never given any thought to the reasoning behind doing so. Suddenly, I had an epiphany of sorts: those quarters were preventing the silent buffer from working as intended. Once I took them out, the now rifle works fine. Derp. In fact, it was way overgassed, so, I was able to turn down the Syrac gas block three full turns, which in turn, mad the rifle recoil so much less that before.
So as you can see, I did encounter some problems, but at the end of the day, all were minor in nature. Nonetheless, this goes to show that even though you don’t need to be a master gunsmith to build an AR-15, it does take a bit more skill that putting together a Lego set. If you are willing to take some time to learn a few basic points, it should be within most people’s capability. Again, starting with high-quality parts is the key to a successful build, and once you have mastered the basics, its hard to go wrong with JP parts.

Specifications:
Caliber: 5.56 x 45
Operation: Direct gas impingement
Weight (camo rifle): 9.11 lbs including 18.5 ounce Bushnell SMRS Scope, and 7.1 ounce LaRue Mount, (8.2 lbs without optics / mount) no bipod, empty, no mag
Weight (gray rifle): 7.2 lbs with 3.2 ounce SIG SAUER Romeo 4 red dot, empty, no mag
Length: 37 inches extended, 33 inches collapsed
Ratings (Out of Five Stars):
Accuracy: * * * * *
Wow!
Ergonomics & Aesthetics: * * * * *
Of course I like it…. I built it. YMMV.
Reliability * * * * *
Now that I’ve worked out the parts compatibility issues and other kinks, both guns never malfunction.
Cost *
Yeah, custom builds look and run great, but it’s easy to get 2-4k into them.
Overall * * * * *
The good thing about a DIY build is that you get exactly the gun you want (or at the very least, the one can afford). The downside is that a custom build like this is probably not going to save you much money. Another factor to consider: if you order one or two parts from 10+ different suppliers, you’ll end up paying $100+ more in shipping costs.