


The first gun I ever built was a single-shot shotgun made out of scrap I found around the ranch. I was probably ten years old. It was awesome.
I didn’t make another gun for a few decades. Then it was a flintlock. It took me about 200 hours. Since then, I’ve built all sorts of guns, and all for the same reasons.
It’s fun. I learn a lot.

So it was with joy that I embraced the opportunity to review a few different products from 80% Arms.
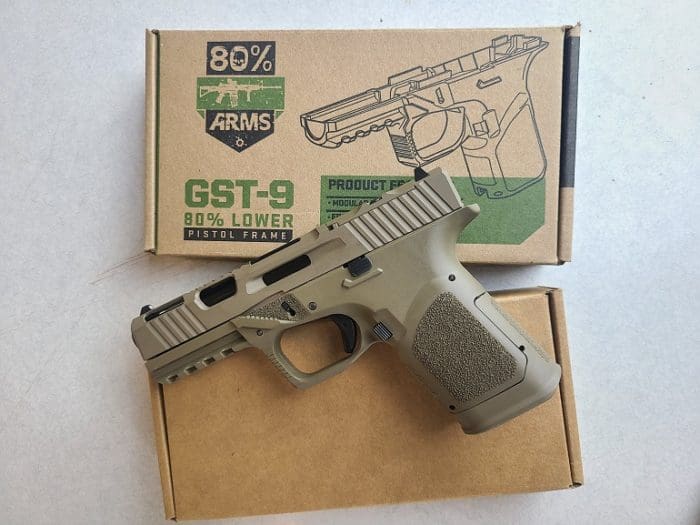
The first was their GST-9 Build Kit, which, along with their GST-9 Jig and a magazine, allows you to completely finish your own GLOCK(esque) striker fired double stack 9x19mm polymer framed pistol. If you’ve read about the problems other 80% makers have experienced recently, the 80% Arms build kit is different in that the jig and slide rails are sold separately. You have to buy at least two separate items to build and complete the gun.
The GST-9 Pistol Build Kit includes the GST-9 modular frame, grip extension, a Wraith RMR-cut complete slide, a match grade G19 fluted barrel and a G19 lower parts kit.
Despite the guns and other things I’ve built, I am functionally mentally retarded when it comes to making anything. Really, I’m a confounded electrician, a lousy machinist, and if the Lord had commissioned me to build the Ark, the porpoise would be the most intelligent life on the planet.
And yet, the total time to complete this build, from the moment I opened the box to the time a good pistol was completed and ready to shoot, was one hour and 55 minutes. I read all of the directions before I started, and then read and re-read them as I went through.
It was so simple that when it was finished, I function checked the gun, turned to a buddy, and said, “Holy crap, I can’t believe that worked.” Nothing is ever that simple for me. This was.
In order to save time and get the job done right, I used my buddy’s home shop, since he has all sorts of fancy tools. It turned out that I needed none of those fancy tools at all, and using his shop burned time since I didn’t know where the basic tools were located.
If you knew where all the tools were and had a solid plan before you got started, there is no reason at all that you couldn’t do a great job getting the lower receiver completed (the actual legal firearm) in less than 30 minutes. It took longer to assemble the small parts and the trigger into the frame than it did making the actual frame itself.
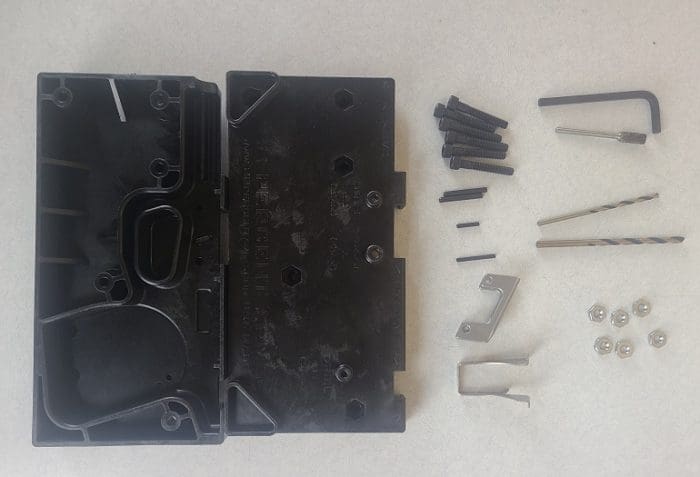
The tools I used included:
Drill bits and cutting bit (included with the kit)
Drill press
Dremel tool
Clamps
Wire snips
X-Acto knife
Compressed air
Metal ruler
File
1200 grit sand paper
Punch
Mallet
That’s it.
The instructions are short and very simple. They are so brief that, before I read them, I wondered if these were the whole thing and if I was expected to go online for the full instructions.
Those are the full instructions. It’s one page, front and back. Everything is color coded, and it’s just a few simple steps. When it comes to the basic process, you’d have to work hard to screw it up.

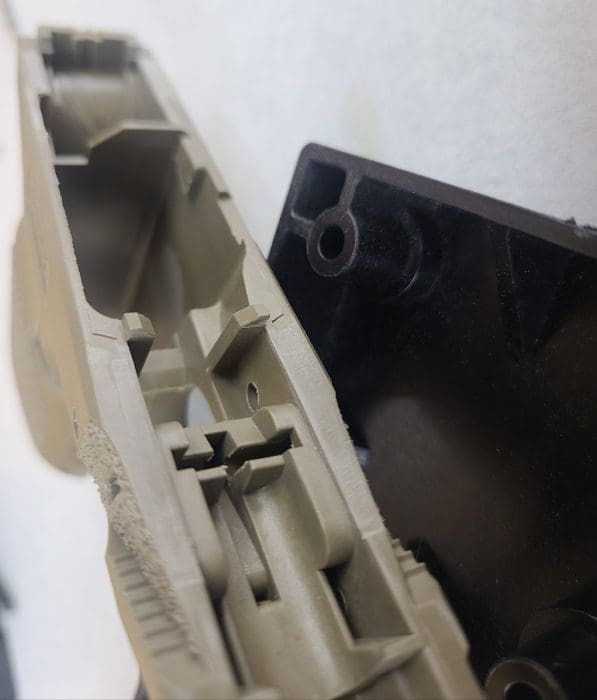
The only way you could really mess this up is by going too fast and not paying any attention. This starts with the four tabs on top that stick out from the frame.
You could remove these with a rotary tool, but really, flat faced wire snips are ideal and give you a flat cut right up against the frame. I followed this up with a wee bit of shaving with an X-Acto knife, which turned out to be completely unnecessary.
Next, the frame goes into the jig.
Again, the jig itself is sold separately. I had originally assumed that the jig was a one-time purchase deal, but this is not the case. The jig set must be purchased with each frame (price: $29.99). The 80% frame can not be completed on its own, as the slide rails come with the jig, not with the frame build kit. So you have to purchase both independent products every single time.

Put the frame, minus the rail sections you already cut off, into the jig and lock it down with all of the nuts and screws provided with the jig. Make sure the jig closes completely, but hand tightening with the short end of the supplied Allen wrench is all that’s necessary. The directions are crystal clear here. Just follow them.
Now it’s time to drill six holes.
I used a drill press, and something like that is helpful. It’s possible to do this with a hand drill, but you’ll need one with a bubble level and a steady hand. If you’re going to go the hand drill route, build yourself a simple frame to hold the drill in place and restrict is movement.
The ideal tool for this job would have been the Dremel Rotary Tool Workstation and a Dremel tool. The polymer isn’t hard to cut at all, and the drill isn’t doing much work. The simple Dremel $50 workstation/press would have done the job just fine.
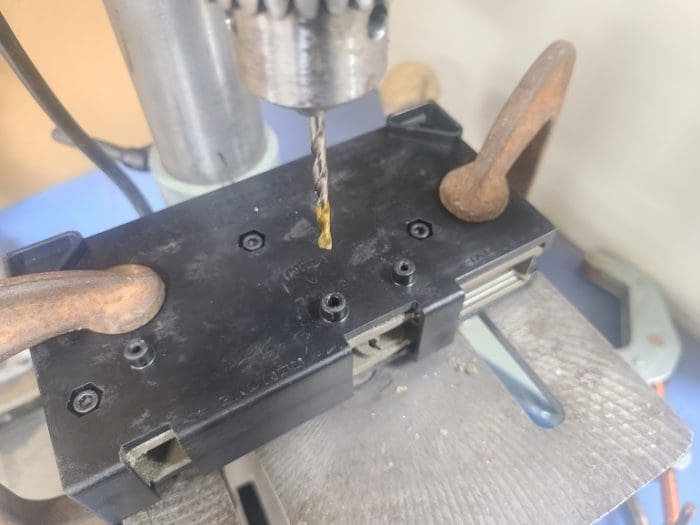
No matter what you use to drill the holes, you’ll need to make sure you lock the jig down nice and tight so that it doesn’t move at all when you’re drilling. This is the part that matters most. Take whatever time it takes to get this right. There’s no going back to put polymer back on the frame if you screw up.
I set the jig on the plate of the drill press and measured how far the press went down so that I could make sure that I didn’t drill too far through each side. You want to drill through one side, but not through to the other. The instructions are, once again, very clear here.
The instructions say the jig is intended to be in a vise during use. Many folks have a drill press. Fewer have a drill press with a vise set-up on the press platform. A vise isn’t necessary, but clamps are.
Keeping the press turned off, I lowered the ram with the centered bit inside the chuck until the bit was into the pilot hole column on the jig. I then locked the depth of the cut and clamped the jig in place, all while the bit was in the pilot hole column. This ensures that the jig will be exactly where I want it when the bit is raised, turned on, and lowered again.
The polymer cuts very quickly. There’s almost no resistance at all when using the supplied bits.
Carefully repositioning the jig for each hole on each side takes a bit of time, but it’s worth it. In short order, I had all of the holes perfectly drilled. I blew it out with compressed air and moved on.
Last is removing the material from the front of the frame (front cross blocking member) to be able to accept the slide. This is best done with the supplied cutting bit and a rotary tool, but there’s no reason you couldn’t do this with nothing more than an X-Acto knife and sandpaper.

Finally, I moved on to sanding this channel as well as where I removed the tabs from the top of the frame. For this, I simply started with a file, working the top with the flat and the front channel with the round. It took no time at all, and I finished by wet sanding with 1200 grit paper. Whenever possible, if you are sanding, use a guide like a dowel for round sections and a block for flat sections.
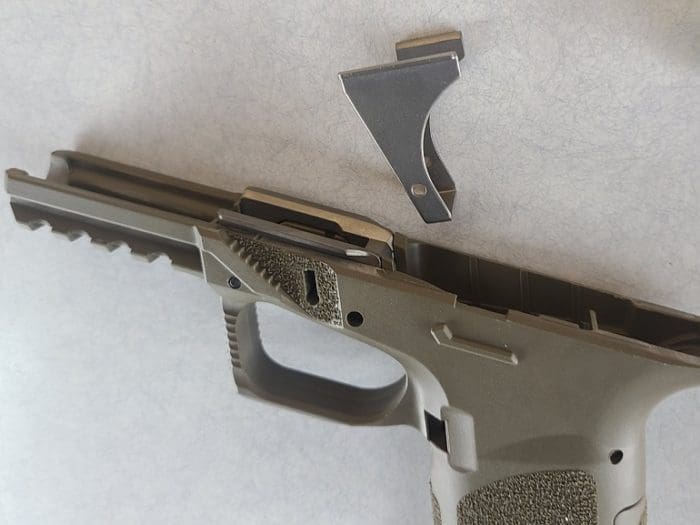
I took the rail sections from the jig kit and tested their fit. Perfect. We’ve got a firearm.
If you did everything right — and it’s hard not to — there’s really no need to put the rail section in at that time, as you’ll need to pull them back out to install the trigger. But still, it was nice to know it all fit together well before starting the rest of the build.
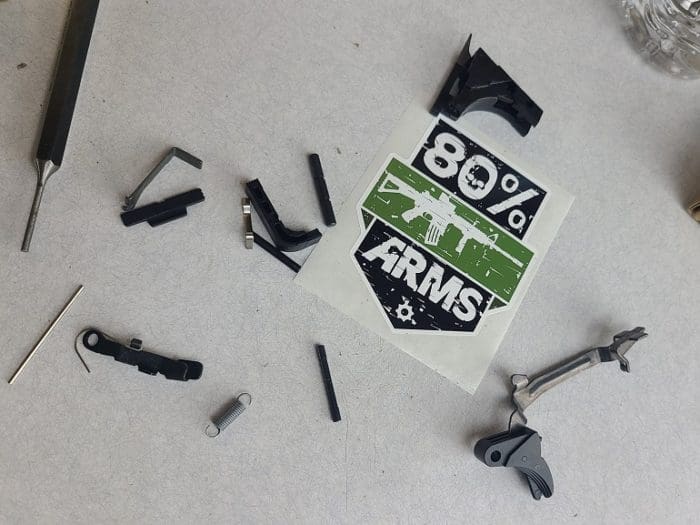
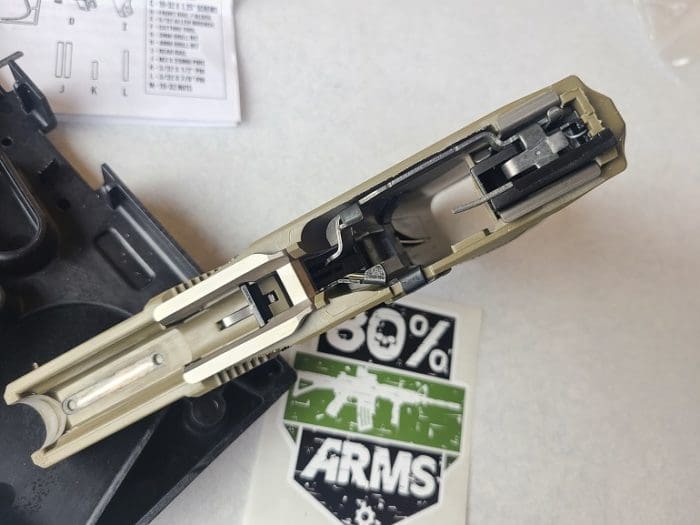
At this point, you’ll need to remove the trigger pack from the packaging. They look like stock OEM GLOCK Gen 3 parts to me. I pieced together the trigger, magazine release, slide stop, and then put the rails back on.
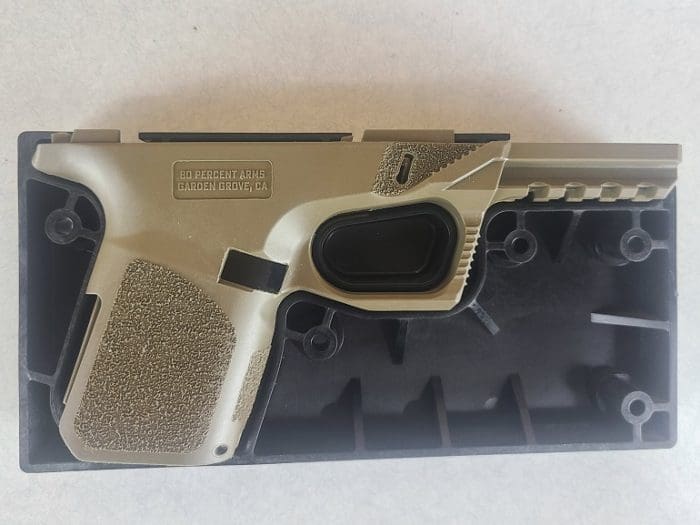
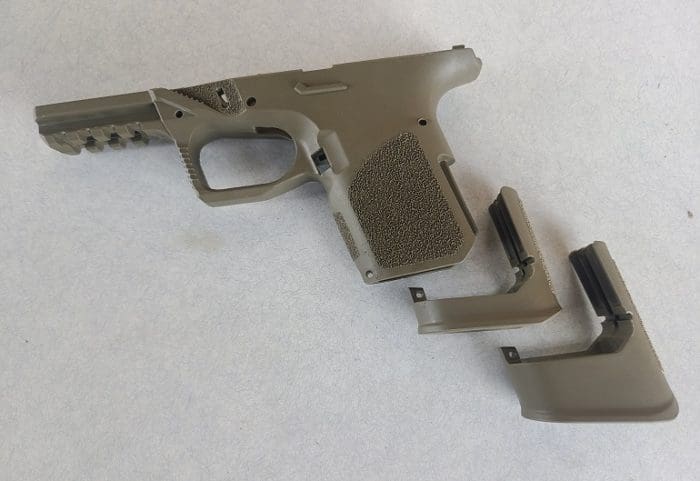
80% Arms’ frame build kit includes a modular grip. If you want a shorter, GLOCK 19-sized grip, pin in the shorter grip module. If you want a longer G17-size grip, pin in the longer module. They are completely interchangeable and you can go back and forth if you want.

Blow it all out with some compressed air, lube it up (this one got a liberal spray of the Rem Oil I had on-hand) and slip the included complete slide onto the rails.
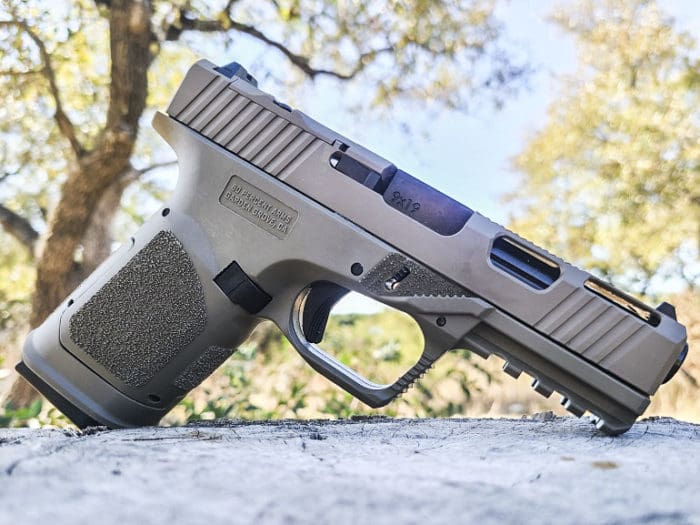
Voila! You now have a complete double stack semi-automatic 9x19mm pistol.
So, how does it shoot?
Pretty much like a GLOCK 19. Go figure.
I was close to the Range at Austin when I finished the gun, so I headed right over there. I didn’t have a GLOCK 19 magazine with me, but I did have a couple of magazines for a GLOCK 17 and one 33-round GLOCK brand magazine, and 200 rounds of range ammo.
At the Range at Austin I ran into someone shooting a GLOCK 19 — zero surprised there — and she allowed me to borrow one of her stock mags.
I loaded up a G17 magazine and pulled the trigger. Nothing happened. I racked a live round out of the magazine, noted a light primer strike, and did it again, with the same result. I had just sprayed the completed slide down with Rem Oil and mounted it to the frame 20 minutes before so I tried one more time.
BANG! Yay.
From that point on, for the next 200 rounds, not a single malfunction of any kind occurred with any of the three kinds of FMJ ammunition I tried, as long as I was using the G17 or G19 magazines.
But not a single round would even load on its own in the 33-round magazine. Every single one had a first round failure to feed, which required a tap to the back of the magazine to chamber it. Again, all of the other magazines worked flawlessly, so maybe this was a bad magazine.
Upon getting home, I loaded the same 33-round magazine with the same ammunition into a stock GLOCK 19 and tried it out. It loaded just fine. I swapped the frames, using the 80% Arms slide on the GLOCK frame, and the 33-round magazine loaded fine. Something is up with the homemade frame and the 33-round magazine.
What is particularly interesting is that I put another 100 rounds through the complete 80%, this time using Magpul G19 magazines and assorted hollow point ammunition, again, without a single malfunction. I then shot another 100 rounds of my own reloaded 147gr flat-nosed rounds through both the G19 and G17 sized magazines, manufactured by both GLOCK and Magpul.
Finally, after I thought the review was over, I had a friend offer who let me us his 32-round ProMag magazine. The gun had zero malfunctions of any kind with this particular extended magazine. If I didn’t have a GLOCK 33-round magazine, I wouldn’t have found any malfunctions at all in 432 rounds.
At no point after the initial assembly did I re-lube or clean the pistol in any way.
When it comes to precision, the homemade pistol shot just as well as the GLOCK brand GLOCK G19s. Which is to say, OK.
Shooting off bags at 25 yards, Armscor’s 115gr FMJ shot an average of 2.2″ five-round groups, averaged over four shot strings. I didn’t have all of the different types of ammunition I like to have on hand for a review this time, but I don’t think I need them.
This particular gun likes the Winchester Defender 147gr HP round, printing 1.8″ 25-yard groups on average. That’s a great, very capable defense round, and I don’t think I’d look any further for what to carry in this particular pistola.
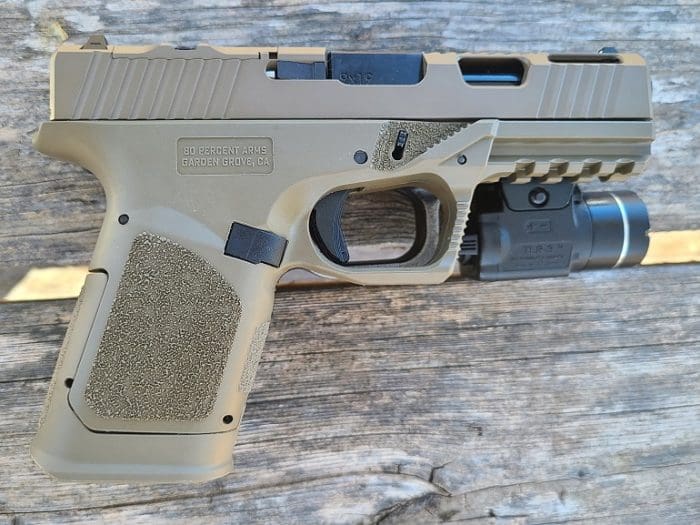
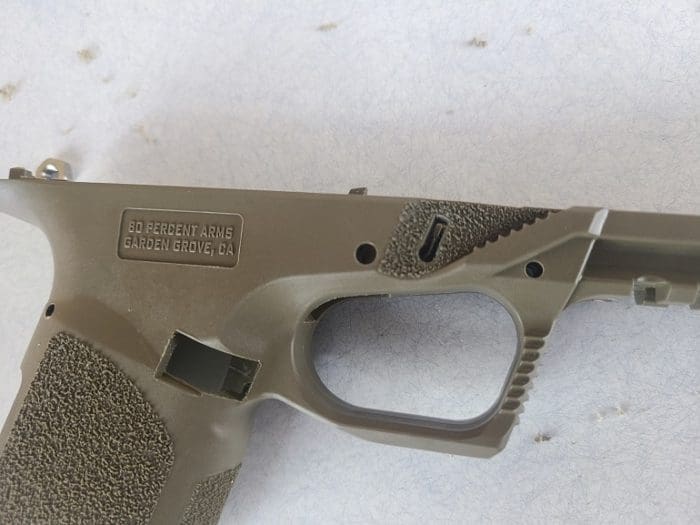
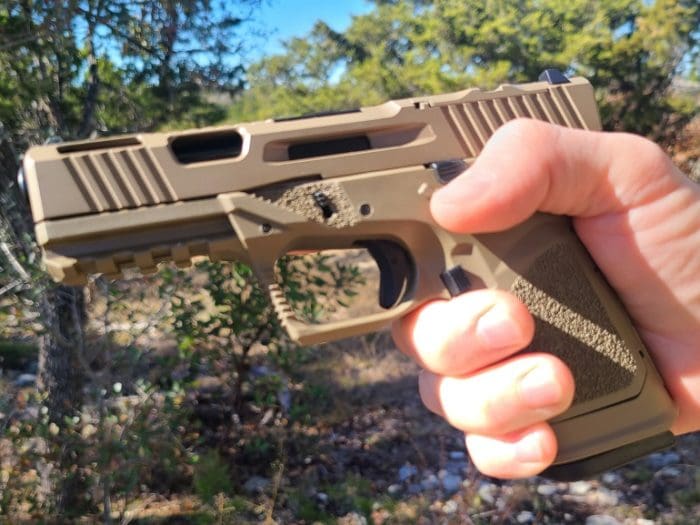
In shooting the gun I built from the 80% Arms kit, I noted a few real differences between it and the stock GLOCK frame. First, the modular grip is a tad bit larger in diameter. It’s well textured on every side, and seems to follow a very similar grip angle as the stock GLOCK. The above photo shows the GST-9 laid on top of a stock Gen 4 GLOCK 19.
You’ll also note that gone is the GLOCK brand GLOCK rail, replaced on the GST-9 with a standard Picatinny rail.

What I really liked was the small angled thumb rest cuts near the front of the frame. They fit my thumb perfectly, and not only provided a great tactile reminder of where my thumb should be, but also allows me to keep steady pressure there in order to reduce muzzle rise during fast strings of fire. It’s also a good position for your trigger finger to rest on when not yet ready to shoot.
If you choose to order the slide as well, it’s a bit of an upgrade from the stock Gen 3 GLOCK models. It’s got fancy cuts and a fluted barrel. The real benefit is that it comes pre-cut for an optic.
As a huge benefit, I was able to verify that this pistol fits a wide assortment of Kydex and leather holsters originally made for the G19.
If you’re looking for an inexpensive complete polymer striker fired pistol, this is not the way to go. The 80% build kit is $750, as much or more expensive than most new striker fired polymer pistols of this size. You’ll also need to purchase the jig kit separately in order to complete the build. Again, that’s another $30.
If you are looking for a polymer striker fired pistol to build now, this is not the way to go. The current backorder on the complete kit is about nine months, although 80% Arms says they are rapidly increasing production and plan to be current by the end of the first quarter of 2021.
The real reason to purchase something like an 80% build is that it’s fun, and you’ll learn a lot about how the firearm works and is put together. For me, that’s well worth the price of admission.
The 80% Arms GST-9 Build Kit and GST-9 Jig Kit were great. They let me build a very well functioning firearm, with more bells and whistles than most polymer-framed striker-fired pistols, in less than two hours with simple tools.
If I built another one of these, I’d do it with nothing other than manual hand tools, just for fun, and to see it done so easily. I didn’t expect to be so satisfied with the finished product, but I sure am. It turned out to be a fun build, and a fine little gun.
Specifications: 80% Arms GST-9 Build Kit
The GST-9 Modular Frame
GST-9 Grip Extension
The Wraith RMR Cut Slide – Completed
Black, Straight-Fluted, Match-Grade G19 Barrel
G19 Lower Parts Kit
Price: $749.99
80% Arms GST-9 Jig w/Tool Kit and Slide Rails
Must be purchased separately to complete any GST-9 lower receiver.
Price: $29.99
Rating (out of five stars):
Overall * * * * *
Simple and fun, the kit and jig end up allowing the user to produce a very capable firearm.