


(This post is an entry in our spring content contest. If you’d like a chance to win a Beretta APX pistol, click here for details.)
By: Jim Stevens
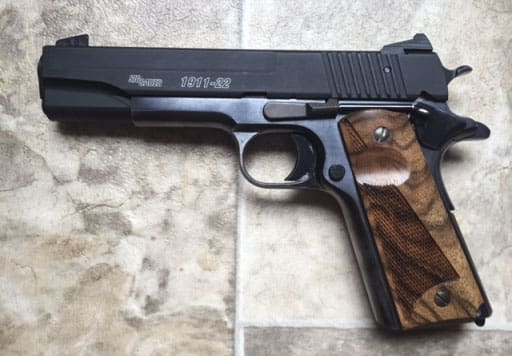
1965 was the first year the Chevy Nova was available from the factory with a V8. The SIG SAUER 1911-22 conversion is a lot like a 1965 Nova with a straight six engine: even if it’s underpowered compared to its more powerful brethren, it’s still fun to drive.
I love cars and I love guns. Thanks, Dad. When I was in college I worked as a trap boy at a gun club and that is still was one of my most favorite jobs of all time. I got to know all of the regulars, and one particular old scallywag named “John” had a 1965 Nova.
John liked me for whatever reason. I guess it was probably that I respected my elders, and I seldom showed up to work hung over. John offered to sell his Nova to me. Alas, powered by only a straight six, it was too underpowered for my 19 year old brain so I passed on the offer. I wish I could go back and correct that youthful mistake.
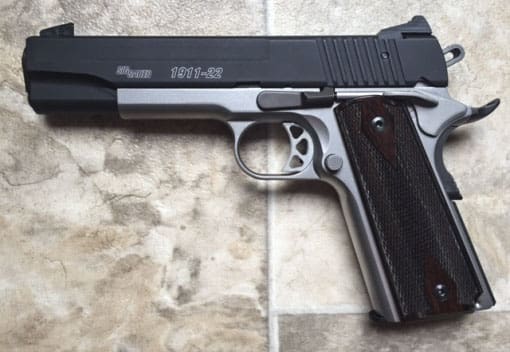
As I have aged things have changed a little and I love guns a little more than cars now. The 1911 is one of my favorites, and I did not make the same mistake this time. I chose both the full power version AND the lower powered version. I am here to tell you, it is fun to drive a 1911, even in .22.
THE KIT
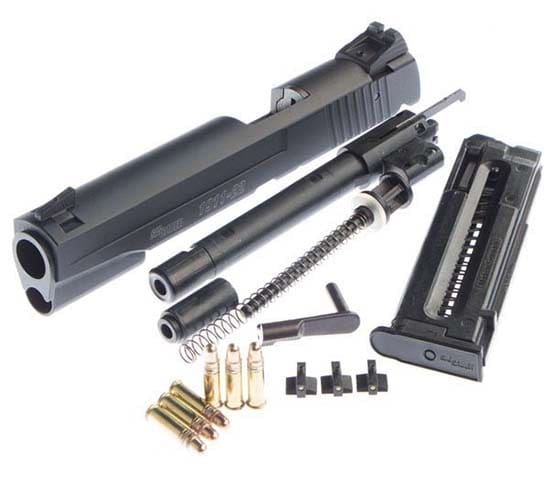
Here is what you get with the SIG SAUER 1911-22 Conversion kit:
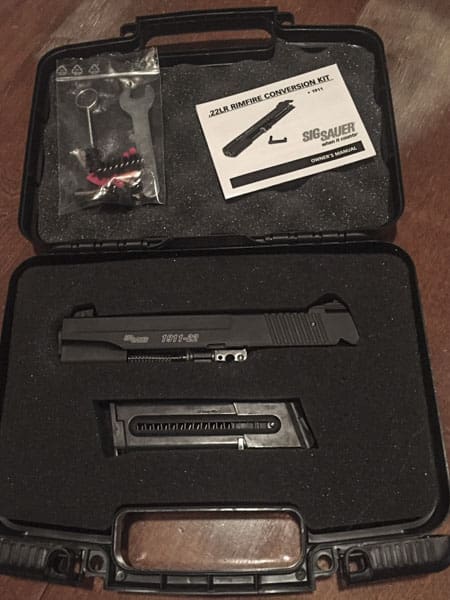

The kit comes in a foam lined plastic clamshell case. The upper is assembled with a plastic guide rod, recoil spring and spring cap (not plastic). They are all in place below the five-inch barrel and ready to be placed on the frame of the 1911 to be converted.
One ten-round magazine is included with the conversion kit. There is an owner’s manual, which indicates only high velocity ammunition should be used, and gives adequate instruction regarding installation, as well as indicating that the kit will NOT fit on most compact frames.
Finishing off the kit is a plastic bag containing several chamber flags, a wrench used to tighten or remove the barrel thread cap, two Allen wrenches, four replacement front sights of various heights, and a cleaning brush.
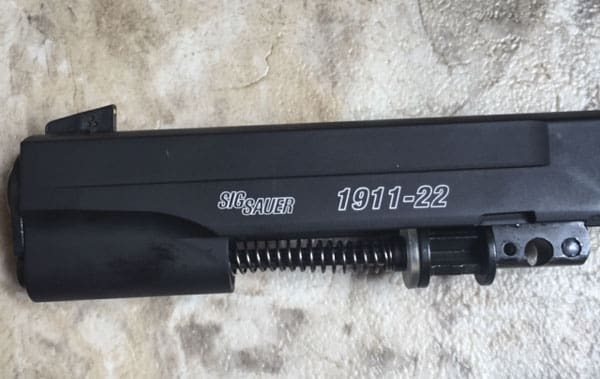
The matte black anodized aluminum slide is evenly finished and attractive. The slide, barrel, guide rod, and recoil spring of the conversion weighs only 11 ounces compared to the same components of the .45 which weighs 18 ounces.

The lighter weight is necessary due to the blowback operated action: the weight of the slide and the strength of the recoil spring are the only things holding the breech closed until pressure from the fired round drops low enough for the cartridge to be safely ejected. The .22 doesn’t have a huge amount of energy to work with, so the slide has to be light. It is!
FIRING PIN BLOCK
The conversion slide is fitted with a firing pin block. I would never advocate disabling any safety device, and you should never do so. If you do, you do it only at your own risk.

Having said that, if you have what is known as a series 70 1911 (no firing pin block), and you don’t remove the firing pin block from the slide; well, you will save more than you expected on ammo. If you choose to remove it, you can have it done by a competent gunsmith or Google the procedure and see if you might be comfortable removing it yourself.

I performed the whole operation in under five minutes. None of my 1911s have a firing pin block, so it was necessary for me to remove the block in order for the conversion to work on my gun(s).

INSTALLATION
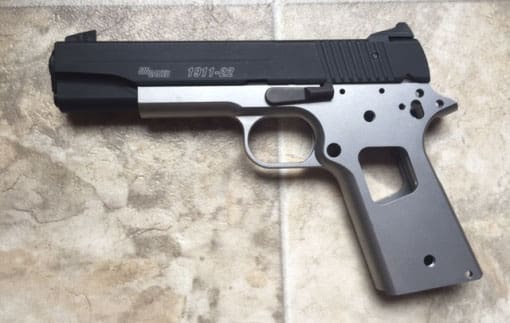
To install the conversion, the 1911 on which the conversion is to be placed must be empty and field stripped. Installing the conversion is exactly the same procedure as reassembling any 1911. The slide fit easily onto all the 1911 frames which I had available; a Ruger, a Colt, a project Foster frame, and a friend’s Kimber (9mm).
Fit was best on the gunsmith-fit frame (obviously) and was a bit loose on everything else (See figure 7). Not to worry, though. The conversion is not just from .45 ACP to .22 lr, but from locked breech short recoil action to simple blowback operation. The simple blowback operation makes the slide-to-frame fit — which is critical to accuracy in the short recoil 1911 — far less relevant.
FIT
The conversion barrel nestles into the valley where the .45 lower barrel lug usually dances with the slide stop and the barrel link. It fits tightly into this space and is held there by the slide stop which comes with the conversion kit.
Side-to-side fit of the lower “lug” of the .22 conversion barrel is quite snug, and the slide stop keeps it tight against the vertical impact surface of the frame (even frames cut for ramped barrels still have a vertical impact surface; it’s just smaller).
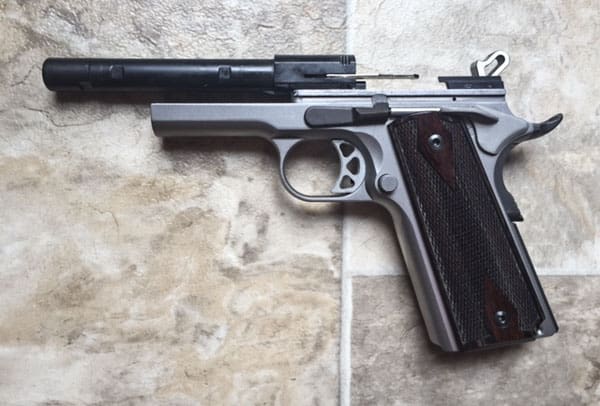

Thus, the barrel becomes mostly fixed. It is for this reason that good slide to frame fit is not as critical to accuracy in the conversion kit as it is to the full powered 1911 operating according to John Moses’ original plan. I say mostly fixed, because the conversion barrel will move some.
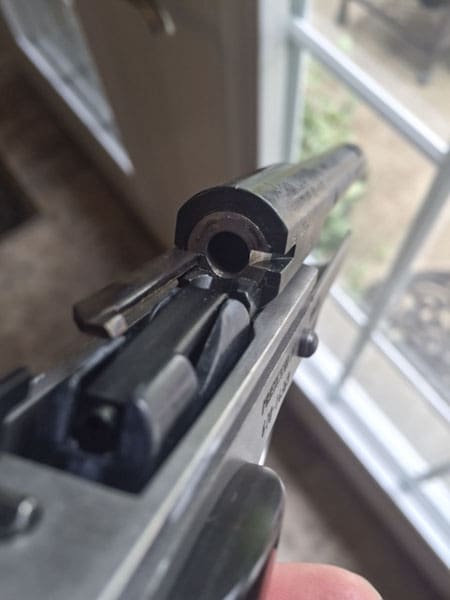
That takes us to the muzzle to keep the barrel in its proper alignment. The barrel is secured there by a traditional bushing in the slide. The last ½ inch or so of the barrel is threaded and a cap is screwed on to the end of the barrel there.
The stock cap fits reasonably well with the bushing. However, there are aftermarket kits which provide a cone shaped oversized cap and substitute slide bushing to provide a tighter slide to barrel fit at the muzzle. Stock bushing to barrel clearance was .005”, and you will see later that this fit provided good accuracy.
Regarding the barrel fitment, the literature with the kit warns that some fitment could be required on some guns. The conversion barrel fit onto my Colt and the project frame with zero issues. However, on my Ruger the “lower lug” of the conversion barrel was not seating deeply enough to allow the slide stop pin to be fully inserted.
I painted the lug with some permanent marker, and pushed it into the frame several times to see where it might be hanging up. A few strokes in the offending spot with a fine file, and it was fitting fine with the slide stop able to fully insert.
FEED RAMP AND MAGAZINE
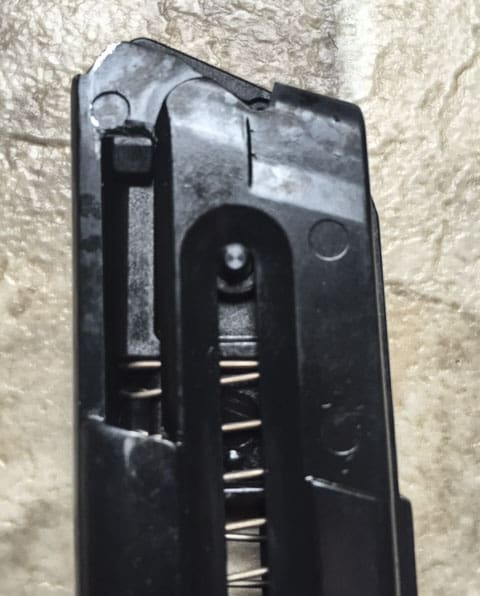
The picture below shows how the barrel feed ramp and magazine mate up. You can see that the feed ramp of the 1911 frame is not needed for the conversion to function. Regardless of caliber or ramp cut in the frame, the conversion will function.
You can also see in the picture that the conversion barrel has an integral ejector attached to it. So again, no matter the size and shape of the ejector in the 1911 frame, this conversion will function.
The magazine, which is very sturdy in construction, has a stud on both sides at the bottom of the follower. This stud can be used to pull down the follower as one loads the magazine. This makes loading easy and is similar to the operation of the Ruger MkII and MkIII magazines as far as loading goes.
The follower also has a shelf at the top which is designed to push the slide stop up when the magazine is empty; thereby locking the slide back after the last shot has been fired.
I was concerned that the steel slide stop meeting the aluminum slide could cause a wear issue. Only time will tell, but after the recent use, there is only very minor finish wear.
Additionally, the recoil spring against which it must operate is relatively light. So, this may be a non-issue. I will keep an eye on it, and report back if I see trouble at any time later.

RANGE TIME
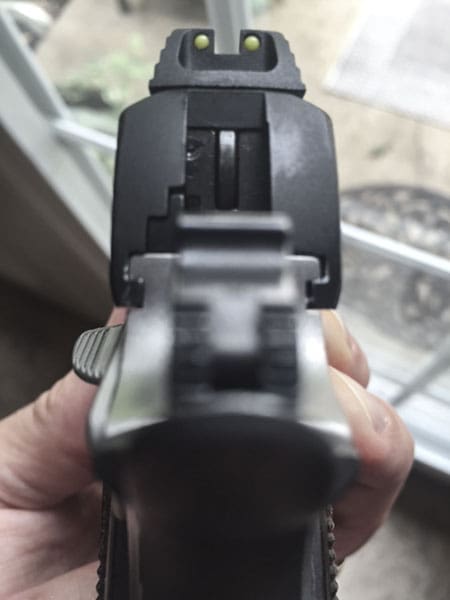
I never found out what it was like to drive a ’65 Nova with a straight six, but I did shoot my favorite 1911 with the .22 conversion atop the frame. It was fun. At 21 feet it was obvious the sights needed to be drifted, and possibly the tallest front sight with the kit put into place, but the group was fantastic.


There was one big hole to the right and slightly high of my point of aim with a few scattered holes close by. These were all done with standard power ammunition (Winchester), and the conversion ran very well with two failures to eject during those first 20 rounds. It locked back on the last round four times in those 20 rounds also.
I was anxious to see how this feature would work, so I loaded one round, four rounds, five rounds, and 10 rounds into the first four magazines. I was actually starting to get excited about the conversion functioning with standard power ammunition even though the owner’s manual indicates only high velocity ammo should be used.
I started to wonder if it was because my Ruger has a lighter than stock mainspring and the hammer was providing less resistance to the slide as a result. However, the next magazine proved that the owner’s manual was right.
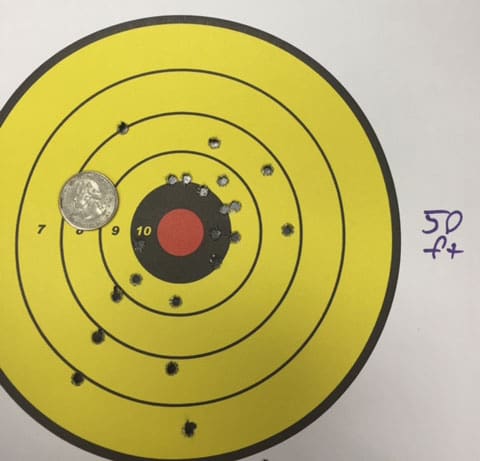
I moved the target out to 50’, and began more accuracy testing. Everything was great for five more rounds. Then, the failures to eject started, and continued for the next 15 rounds. I gutted through the accuracy test of 20 rounds, but it was a single shot pistol for 15 rounds. The picture below shows the group, and likely my frustration.

I switched to the high velocity ammo (Aguila HV) I had along and it ran as well as any .22 ever does for the next 140 rounds.
I had two more failures to eject, but those two rounds were squibs. They were so low powered that I stopped, cleared the chamber, and checked the barrel for obstructions, in case the bullet didn’t actually make it out of the barrel, so I would not have expected the slide to cycle at all after those rounds.
I even ran 40 rounds of hollow points through it (CCIs), as it was the only high velocity ammunition I had left in my bag. It fed the hollow points with no hiccups. Once I switched to the high velocity ammo and the pistol was functioning normally again, it also locked back on the last round each time the magazine was empty.
After I had regained confidence in the reliability of the conversion, I pushed the target out to 75 feet. That target is shown below. There are only 10 rounds fired (if you are counting, the tenth one is up between the “a” and the “r” on the word “target”. I will take a mulligan on that one). The reason for that, is that those were my last 10 rounds of high velocity ammunition.
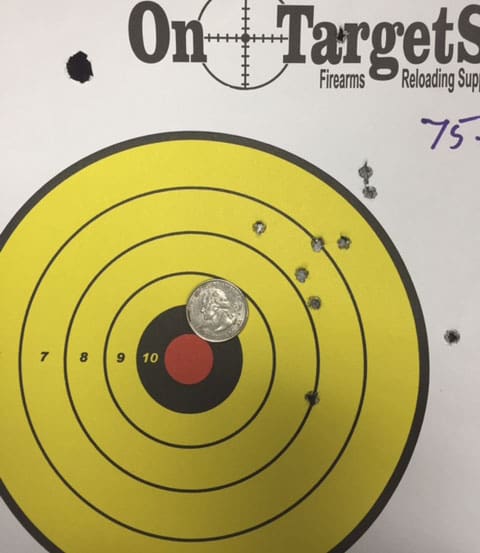

Obviously, I was concentrating a bit harder at that distance than I was for the 50’ target, and the gun was running reliably again. If you give me the mulligan, that is a 3.5” group. While that isn’t going to win any bullseye competitions, it does make the gun accurate enough to have plenty of fun.
I have put several hundred more rounds through the conversion. It still doesn’t like standard velocity ammo, but it continues to run reliably on anything with an advertised velocity up around 1,260 fps. I am as accurate with the conversion as I am with anything else, so the conversion is never a limitation on accuracy.
So far, other than rubbing the finish off the slide stop cut in the slide, I see no appreciable wear in the slide stop notch of the aluminum slide from steel slide stop itself. I continue to be very pleased with all aspects of the conversion.
QUIRKS
I did discover one other notable quirk, which caused two more malfunctions. If you attempt to use the slide stop to chamber a round from a fresh magazine, the recoil spring does not have enough force to do so, and the round will not fully chamber. I stuck one round on the feed ramp this way.
So, I discovered that you must use the slingshot method, but you must also push the slide stop back down as you pull the slide back.
This wasn’t a huge shock as the .22lr is a much shorter round than the .45 ACP. Thus, the slide starts from a more forward position, and the spring just doesn’t have the power to slam a round home from that position. It was easy enough to do, once I understood what was needed to chamber the first round.
Toward the end of this range trip, I managed to have a round leap up the feed ramp and darn near out the ejection port in the slide while I was loading that first round from the fresh magazine. This was the second malfunction as the loaded round failed to feed and ended up half-way out the ejection port sticking straight up.
I did a subsequent trip to the range for another 100 rounds of fun, there were no malfunctions during this trip to the range as I was using high velocity ammunition the entire time, and I had very thoroughly cleaned and liberally lubed all the reciprocating parts.
FINAL THOUGHTS
This .22 conversion from SIG SAUER could be used for several things. Training new shooters and plinking come quickly to mind. I think with a little sight adjustment, this kit could be pressed into service hunting small game. It won’t be for me, because I have better tools for that purpose, but the kit could be used for hunting.
I bought it for the purpose of getting more trigger time on my favorite trigger. I enjoy the heck out of 1911s, and I love shooting them all. I can do that cheaper now by doing at least some of that shooting with .22 instead of .45. I would also like to teach myself the skill of riding the reset, and it seems like a smarter idea to learn that skill with cheaper ammo too.
So there a lot of possible uses, and a lot of possible fun to be had by “driving” my favorite 1911 in a lower powered trim package. Unlike the Nova I didn’t buy, this one will be with me for a long time.
All of the above being true, this kit still may not be for everyone as there are several issues which could prevent it being a fit for a particular purchaser. The kit is not meant to go on anything smaller than a Commander frame. The firing pin block must be removed if it is to be used on a series 70 1911, and there were fitment issues on one of the frames in which it was tested. It did function as advertised once those hurdles were overcome.
I like this kit for my purposes, and I would recommend it to others with the caveats given above.
Specifications: SIG SAUER 1911-22 Conversion Kit
Caliber: .22 LR (Optimized for HV ammunition)
Action: Semi auto, blowback operated
Capacity: 11 (10 round magazines)
Overall Length: 8.6 inches
Overall Height: 5.5 inches
Barrel: Six groove, right hand twist, alloy shroud, steel liner, five inches
Sights: Black plastic “Novak” style with a standard three-dot configuration.
Finish: Anodized aluminum
Price: $305 (Retail Price), I purchased this one on sale for $149.99.
Ratings (out of five stars):
Style and Ergonomics: * * * * 1/2
It’s a 1911 and it fires .22lr. 1911 ergos and near zero recoil. What’s not to like?
Customization: * * * * 1/2
SIG bought German Sport Guns (GSG) several years ago, and this kit is functionally identical to the GSG kit and the GSG 1911-22 has a bit of following. Thus, there are accurizing kits, stainless guide rods, and aftermarket sights available for it.
Dawson Precision makes tritium and fiber optic sights for the GSG guns in a plethora of sizes to really tune your POA/POI. I even saw a company that makes a suppressor adapter for the barrel. Since the barrel is already threaded, you thread the adapter on the current threads, it extends the length, and provides threaded space on which to mount the suppressor.
Also, you are meant to put it on top of a government or commander sized 1911 frame. You may not have heard, but there are some custom options available for those.
Accuracy: * * * *
It is not hard to find more accurate .22s, but this kit is plenty accurate for most uses.
Reliability: * * * 1/2
It won’t eat everything, but if you feed it according to the owner’s manual, it runs as well as any .22 is ever going to run.
Overall: * * * 1/2
While I really like the kit, it may not be for everyone. The kit required no alteration to fit my Colt, and I could have used it on that frame as it came (after removing the firing pin block from the slide).
However, it required slight alteration to fit onto my Ruger frame. Some buyers may be disappointed by such an issue. Also, I had to remove the firing pin block in order to use it on any of my frames. Again, not a problem for me, but could be an extreme disappointment to some.
For those reasons ONLY, I knocked it down 1.5 stars, but the conversion is 5 stars worth of shooting pleasure.