
I have only known a few people aside from professional gunsmiths who have taken up the challenge of building their own custom 1911. I know a fair number who own guns built by famous 1911 shops, but I had to look long and hard to find someone who had actually hand-fitted one himself. Still, I decided to give it a shot and this is the first of two articles documenting my efforts.
All the parts featured here can be found at Brownells. Included in this article are product numbers so you can see exactly what I used for this project.
The parts list is as follows:
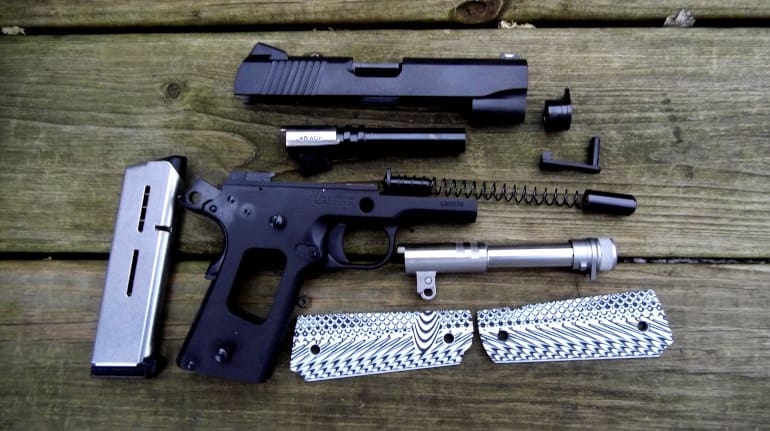
Commander Sized Frame: 100-028-402WB
Commander Sized Slide: 100-028-391WB
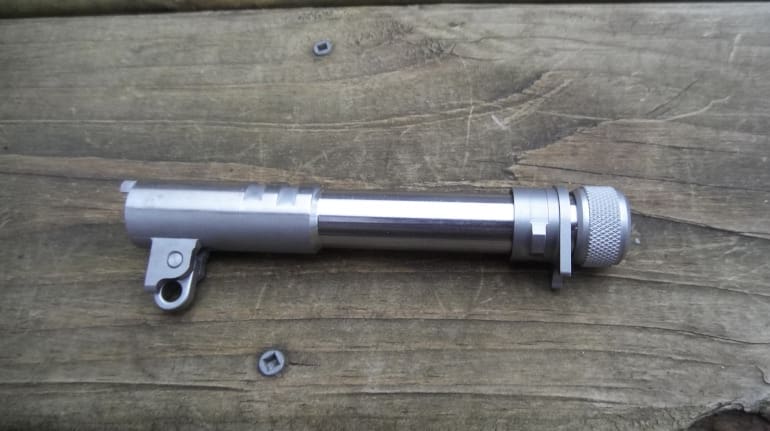
Ed Brown Threaded Barrel: 087-000-102WB
VZ Grips: 100-011-278MB
Spring Upgrades: 965-000-177MB, 087-000-046WB, 087-000-045WB
Magazine: 965-047-470MB
The tools I went with for this were basic and somewhat rudimentary. I only had one power tool, a standard Dremel, and I used it only in the event of aggressive material removal and final polishing. The entirety of this project was otherwise accomplished with 100 and 320 grit sandpaper, jeweler’s files, Brownells lapping compound (083-041-800WB), and some cold bluing solution.
I will warn you right now that this was a difficult and time consuming effort that required a great deal of patience and resolve. I certainly could’ve sent all the parts off to a local custom shop and had a gun in hand when they were done, but that’s not at all in the spirit of what I wanted to accomplish here. I wanted to make a gun that was both useful and fun to shoot, but with the added pride of having fitted it myself.
I selected these parts to make the build more accessible to most readers in case someone wants to do something similar. The frame with pre-installed grip safety and slide came preassembled, but that didn’t mean they were pre-fit. The frame has some difficult parts already installed and staked, which reduces the type of specialized tooling required to finish this gun.
I went with the commander-sized slide and stainless steel barrel to save frontal weight and length because I knew I wanted to do a suppressor-ready barrel. The finished pistol will also make a good carry gun. The same process I used here will work for any length barrel and slide, so if you want to do a 5-inch or even a small 3-inch pistol, the process is the same.
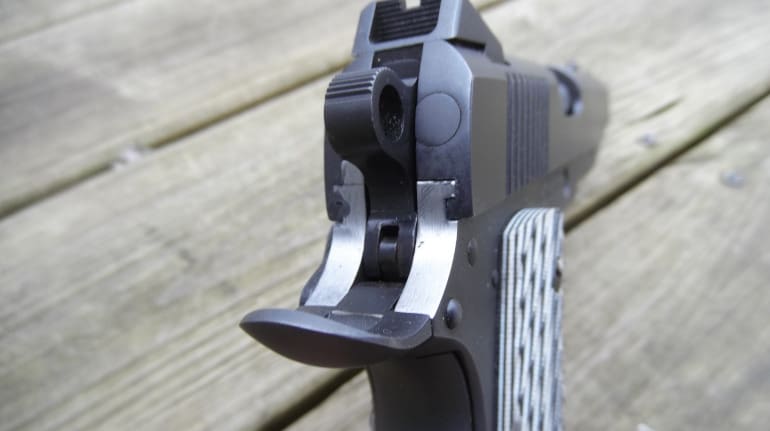
I started by degreasing everything. I completely disassembled the frame and slide and made sure that they were clean and free of debris and oils. Upon initial inspection, I believed this would just be a matter of just doing a bit of polishing, but I was profoundly wrong.
If you believe that basic 1911 parts are interchangeable, think again. The slide wouldn’t actually fit onto the frame rails at all. I couldn’t even get it started.
At this point I began to question my choice of projects. Fitting the slide to the frame is generally considered the first step, and it’s critical to not remove too much material. The slide rails on the frame were far too high and wide, so I had to remove material along the flat portion of the underside. I checked my dimensions with a micrometer as I went, every time I removed material. I knew that it would be a long haul.
All the black finish ended up vanishing from the interior of the frame. It was a slow and tedious process to sand, polish, and try to fit the slide. I could only remove a little at a time for fear of going too far, and it ended up taking my the better part of six hours to get the slide to move on the frame. In the age of slapped-together builds, this was a lot of work. When it was finally done, I smiled and tried to assemble the gun.
And I was stopped again.
While the slide to frame fit was precise, nothing else was. I had to lap in nearly every moving part starting with the barrel. Fitting it also took several hours of trial and error. Not only was the barrel slightly oversized, the locking lugs weren’t locking.
Again, I had to remove tiny amounts of material on the lug areas and the area where the barrel touches the face of the breach. In addition to this I had to lap in the barrel bushing at the muzzle to make it all line up correctly.
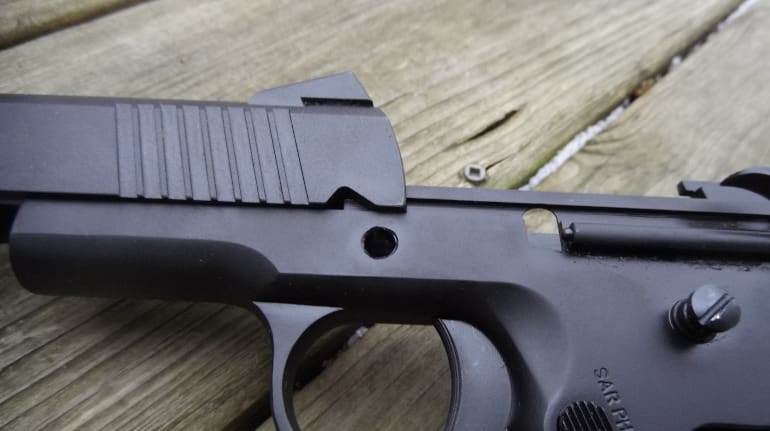
After that the next job was fitting the safety and slide stop. Those were difficult projects in and of themselves.
The slide lock was too thick to allow the slide to move when it was installed, so I had to re-contour it and thin it out so that it would let the slide travel. This led to problems with the barrel link and other areas inside the slide. I had to again go in and remove small amounts of material from the barrel lugs to make it all work well in unison.
I sort of botched contouring the safety. The frontal edge was too long to allow the safety to engage, but I began removing material from the wrong area. I just got it in my head to do that for some reason. I corrected it in time, though, and thankfully it’s hard to tell that I goofed.
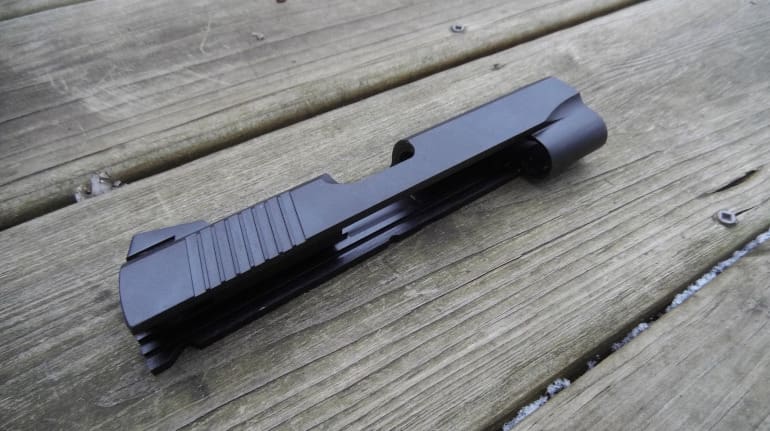
The next job was the area where the slide and frame meet at the rear near the hammer. The frame stuck out quite far and it was very unsightly.
I used the Dremel to contour this part as I would probably still be filing today if I had elected to go with hand tools here. I made this area blend nicely and then cold blued it to match. The color isn’t exactly the same, but it is what I have for now.
After all of this, I reassembled the gun to see if it would move smoothly, but was still too tight-fitting. The parts were all fighting each other and nothing really wanted to move. I decided to pay my friends at Precision Rifle Company in Dorr, Michigan a visit to see if I could use some of their higher grit lapping compounds and de-greasers. It should be noted that they don’t do handguns, but lapping compound is used in many precision applications in the rifles they build.
I lapped the hell out of the thing and after about ten minutes of furiously working the slide, I had a gun that was locked up tighter than a safe door. I laboriously disassembled it and sprayed it out. When I reassembled and lubricated the finished product, I was rewarded with something that actually felt like a functional gun. The action was slick and buttery and the lock-up was tight and crisp.
In my next article I’ll detail tuning the gun with various types of springs and how it performed during my first range sessions.
Special thanks to Brownells and to my friends at Precision Rifle Company for getting me out of a tight spot (literally and figuratively).
This article is for informative purposes only. Some of the methods and testing measures used in the completion of the firearm are unorthodox and may be dangerous. Neither the author or TTAG assumes any responsibility for anyone attempting this same project or a similar one. Building a firearm can be dangerous and in some cases deadly.
A competent gunsmith should always be consulted to determine the safety of a given project.


This is one of my dreams for some day. Or maybe was, haha. That’s a ton of work.
Buy Jerry Kuhnhausen’s 1911 book.
Sound advice, thanks.
Using his book and being careful I was able to build up one of those original Para Ordanance P-14s when the frames first came out back in the 80s. I used a bbl already fitted to the bushing. Good descriptions and pics to fit bbl to slide, slide to frame, inner works, etc. You’ll need a good mill to fir most adj rear sights and to put in a dove tail for the front if you go that route. Trigger sear fitting is quite easy. Just go slow and check often on everything. Gun shot very well but later traded it for an STI custom after a year or so.
His books are excellent resources even if you don’t intend to roll your own. Also has S&W revolvers, Colt Dbl and Single Actions. Not sure what else.
Cool project, and nice write up so far. I’ve “built” a few ARs and Glocks, but as I suspected, this is a full order of magnitude more involved. Still on the bucket list, though.
Looking forward to part 2!
I love projects like this! I’ve done two, both refurbishments of older, worn, not especially valuable, but rather cool guns. The first was a Marlin/Glenfield 60 that I stripped to bare wood and white metal (all external parts – the action was in great shape so I left it be) and then refinished to like new – cold blue and high temperature paint on the aluminum, stain and polyurethane on the stock. Lots of sanding and smoothing here (and you really have to in order to get polyurethane not to look and feel cheap and gloppy), but it came out really nice and shoots great. The other is a Stevens 820b that I again stripped down and refinished. That one needed some mechanical work too: new firing pin, new spring for the slide catch. I have learned a lot from doing these, and I’m hunting around for a next project – trying to up my game each time. Plus this is a fairly inexpensive way to add nice, meaningful pieces to a collection. Each of those cost me about $80 for the gun, plus materials and parts. I could probably turn a small profit on each if I decided to sell (I won’t).
Kudos to the author for taking on a cool and demanding project – sounds awesome!
Second handgun I owned was a 1911 build. Great gun. Did not run into anything like these issues. I did stone the sear down just a skosh too much the first time.
Dang.
Hopefully it helps people understand why good 1911s cost $$
Well there are multiple 80% frames out there, I did the buffalo.us stainless frame, a Smith and Wesson stainless used slide. Fitting the Kart barrel was harder than fitting the slide. If you get the broach to cut the grooves, you can add 2 dial indicators to get your measurements real accurate. The fixture to file the frame to height and the broach was very accurate, withing .0005 on pin locations. Brownells sells the lapping compound as a kit, I bought the special stainless cut files from MSC, get the sharpening stones from Brownells. I used a oscillating spindle sander to fit the back of the slide to the frame and beavertail. The plunger tube staker is self explanatory. I used wolf springs EGW barrel bushing, beaver tail and grip safety, mid length trigger, Ed Brown sear, hammer and disconnector. I grit blasted it to give the stainless a matt finish, topped it off with a walnut grip. It shoots 230 gr round nose and 185 Gr semi wad cutters with only 1 failure to extract in 200 rounds. I did my homework, read everything I could find and used commonly used parts that the professionals also use. I may build another one some day. I spent more on tools than the pistol. It was a fun project.
+1 on The Buffalo stainless frame! I used one to replace the cracked aluminum frame on a Kimber pro carry 2 I picked up cheap. I finished mine on my mill. I lapped the slide to the frame and had to fit a few other parts but nothing too bad. The pistol is better than it ever was before.
“You’re a better man than I am, Gunga Josh !”
Have made 7 of these, when younger I have one left, a very good one it is a lot of fun, tedious but worth every hour of doing, hade a couple of good .45 manuals, on how too, made first one as a regular 1911A1, then experimented with grips hammers lockup polishing and fitting got good on triggers (blowing horn} only tools were a Dremel, some needle files, hand files< small vice with rubber guards, a 10 different grits of sand paper
and a magnifying glasses, well worth it won a few IDPA contests with it
Great, and timely article.
I’m about to venture into just this thing…well sort of. I am going to try my hand at fitting an ambi thumb safety on a 1911 that I have. It has a great trigger and is extremely accurate. I am left handed, and think that I would enjoy the gun even more if it was set up for me.
I actually bought a few inexpensive safties to experiment with. And I have a Wilson Combat unit for when I “get it down”.
This sounds a lot more fun than doing an 80 percent 1911, which is what I plan to do. You NEED a milling machine for the slide rails, and it’s a total pain in the butt.
If I was going to do it, I’d do it alllll from scratch. Unassembled slide and 80 percent frame, barrel, all the parts. That sounds like a lot of fun to me.
You dont need a mill to build an 80% it just makes it easier…than using a file
Yes and no.
For an example, I would never bother to fix the beavertail safety on a 1911 with a mill. The setup would just take too long, and I’d need a custom cutting tool to get the result I want. Using a file is so much faster.
This gets me to another topic: I despise Dremel tools and the way too many people use them on guns. From my perspective, there are few ways to bungle a job on a gun with more certainty than using a Dremel.
So how did they make this for the war effort? I can’t imaging that many hours of fitting going on. There must have been some sort of control at the factory. Maybe if you made all the fitted parts made at one site you would have a better match if components?
Mass production had been around for awhile. I wouldn’t have thought 1911s were so custom fitted as to not be interchangeable. Wow.
That’s simple; The guns were loosey goosey instead of being “tight as a safe” for accuracy. They were minute of bad guy guns not bullseye shooters.
That depends on who made them. Some companies with experience in fine machining made some darn fine 1911’s for the war effort. Singer (the sewing machine company) made some very nice ones IIRC.
1911’s were made for government contracts on production lines with lots of job-specific tooling.
What most people really don’t understand today is how much tooling is required to make masses of guns. Make individual guns with weeks or months of time? OK, no problem. Give me some hand files and polishing paper, perhaps some stones, and a very basic lathe, and I’m off to races.
Want hundreds of them made per shift? Well, now you need to give me a year (or more) before I turn out the first instance of the gun. In that year, I’m going to create a lot of tooling and fixtures to hold parts in such a way that I can make machining operations happen very quickly, with little setup, and with sufficient repeatability that the parts hold tolerances.
The tolerances need to be loose enough to allow for a little wear on the cutting tools and the basic accuracy of the machines themselves, as well as how repeatable the setup of the part on the fixture is.
Salute! I dont have the patience or resolve. I leave it to the pro’s at Les Baer for my “custom” 1911’s. They supposedly draw file everything. No lapping compound. Les doesnt like it and says you cant get rid of it once it’s on the gun. I don’t know. My rifle smith sent out a 1911 to a very reputable and famous parts manufacturer who has staff to do a limited number of accurizing jobs that must include said mfr’s bbl and bushing. Didnt shoot accurately before it went out and didnt shoot any better when it came back. It’s an art and I aint no artist.
I got involved with this kind of thing too in customizing my M1991A1.
Just the TOOLS to properly fit a barrel to your slide will cost you more than $350 on Brownells including specialty files for those locking lugs on the barrel and reamers and go-no-go gauges to make sure your chamber is properly aligned and is the proper depth AFTER you fit everything else to your slide.
I fortunately have had the privilege to encounter renown and competent gunsmiths to work on this for me and show me what to do fitting my own stuff like just a simple EXTRACTOR! Turned out the simple SS extractor shipped in the original gun from Colt was MIM. Yep, an MIM 1911 INTERNAL extractor. Never would have known unless a professional had looked at it.
IF your gun shoots well and is worth a damn after you finish, it will be more chance than skill. Have a competent and experienced 1911 Pistol Smith look it over and make the necessary corrections BEFORE you fire it.
I commend you for your efforts and this will surely be a most memorable learning experience.
Nice project and nicely written – this is true amateur gunsmithing, far beyond AR assembling, or for that matter AK receiver folding. I haven’t yet tackled my 80% 1911 project, but might this winter.
Regarding the contouring at the back of the frame/slide interface. I seem to recall reading somewhere that if you get much overlap in one direction or the other (slide over frame or slide short of frame) that it’s due to incorrect lockup at the slide lock pin/barrel/slide interface. I could be wrong, but anyone care to comment?
Good series on a build by Mosin Virus (Full30).
This article makes you wonder how a black market 1911 can be made in a jungle workshop in the Philippines.
Southern Cross,
I believe the black market builders have considerably better tools, even in their jungle workshops.
You’re probably right, plus let’s not forget the value of raw experience. If you’ve built dozens by hand you’ve likely picked up a few tricks along the way
Been there. Done that. Very satisfying. Gun shoots great… But I also never want to do it again.
I agree. Frustrating and fun and satisfying all at the same time. But I’ll buy a Ruger or another brand next time and just do a trigger job and some other mods. $1300 to start is out of most gunners budget.
Hah, I just picked up an inexpensive snub-nose revolver and had to remove a significant amount of steel from the “site” notch on the top strap. With nothing more than a simple flat file and about 20 minutes effort, I removed about 0.040 inches of material. Now that site notch is centered on the bore of the barrel and I expect it to shoot accurately.
After just two applications of cold bluing compound (with nothing more than a cold water rinse in between applications) and then a thin layer of gun oil, you cannot tell that I ever did anything.
The key was being very slow and very careful with that file — checking the progress every three or four passes. If you have reasonably steady hands and a good eye, you can do it as well.
Great write up – thanks!
In the 90’s I built one from a basic Springfield MilSpec finished 1911, and added an oversize Wilson barrel/bushing combo, Brown Beavertail and ambi safety, with a McCormick titanium hammer/sear/trigger combo plus other quality components and springs.
With reference to Jerry Kuhnhausen’s 1911 book and “The book of the .45″ by Ken Hallock I fitted the OEM slide to the frame old style (read vice, drift, and hand tools), fitted the oversize Wilson barrel/bushing, slicked up the McCormick parts and had a machinist friend mill in Bowmar adjustable rear and matched a Patridge style front sight to it.
I can’t recall how long it took but I took my time with this labo of love.
I thought it shot OK, was able to regularly achieve 2” groups off a bag at 25 yards with a 200 grain semiwadcutter at 900 fps.
I’ve done an officer sized, cco sized, hi cap commander, government and 2 80% builds. All run great and feed everything. The hardest part to fit is the front sight. Take your time, go slow, lots of resources online.
Heinie figure 8 night sights in Novak dovetail. Just get the file from Brownells
If you’re going to build one at all, be sure to get FORGED steel frame and slide.
Those will definitely withstand thousands of 10 mm +P+ rounds from Underwood ammo.
I’m talking 1700 fps 115 gr bullets.
http://www.fusionfirearms.com will have all the parts you need, including 80% to finished frames and kits.
4″ slides to 7″ slide kits.
If you can think of it, they have it.
Reading your experience reminded me of my 1911 build, 41 years ago. Like you some parts fit while others wouldn’t go at all. In the end I had a local gunsmith help finish the build. It shoots great with every so hiccups. It has a special place in my gun safe and in my heart. I still have the sales ticket from the place I bought the frame from. It cost $57.00. Stainless steel frame at that too. Lot of money back in 1978, for a young person. I would love to build another one but I think I am going to pass on it. Just finished my first AR build and enjoyed it. It’s unfortunate that a 1911 build can’t go together as well as an AR. Enjoy your new build, look forward to read how it shoots.
Yup. Well said.
The AR build goes together only as easily & well as it does because the barrel manufacture mounts the barrel extension onto the barrel for you. The barrel tenon is actually spec’d to four decimal places, and most home builders could not headspace the barrel if they had to machine the tenon and put on the barrel extension themselves, and if it were not headspaced correctly, the bolt might not finish going into battery.
Built a full-size 1911 from Caspian parts. Wasn’t as hard as I thought & now it’s my favorite gun. Worked slowly & called them a few times for help. Contemplating building one from an 80% frame now.
Commie kalifornia has pretty much destroyed the home built effort. A dream I’ll not get a chance to accomplish. You folks in free states, please enjoy (for now) and keep up the good fight.
Fitting up a 1911 isn’t all that difficult, if you really understand what has to fit, and why.
Jerry Kuhnhausen’s book is a very good starting point.
Learning how to drive a file is an essential skill with you take on projects like this, and most people don’t have the patients to learn how to really master driving a file. Heck, their vise isn’t even mounted at the correct height on their workbench…
“…when you take on projects like this…”
Thanx for the tip on those parts from Brownells, junk, nothing fit.
I thought the whole idea here is that YOU fit the parts. That’s what the article is all about…
Well it is not an AR, so hand fitting is the way it works on a 1911. The only real critical machined items are the holes in the frame, feed ramp and barrel fit. The rest is file fit. Back during the war, they had hundreds of parts in bins, grab one, if it fit, install, if not grab another until it fit. There are about a dozen manufactures of 1911 parts, some is MIM, others are billet, some is cast. With these variances hand fitting is the ONLY way to get a custom gun and filing is about the only way to get them to fit.
If I bought a frame and slide from the same manufacturer and they didn’t fit together *at all* I’d be returning them… I double checked the Brownells listing and they’re listed as being “assembled, fitted and tested”. The heck?