
Mounting a new rifle scope correctly is pretty important. If done wrong, you will constantly struggle with finding a good position behind the scope and the adjustments you make when shooting won’t make sense.
There are two keys to properly mounting a scope. First, make sure the scope is in line with the barrel. Second, make sure the scope is square to the world.
You get the scope in line with the barrel by first getting the gun level, then placing the scope directly on top. The scope is then leveled so that the vertical reticle line — and by extension the elevation adjustment — is in line with gravity. This is often done with bubble levels.
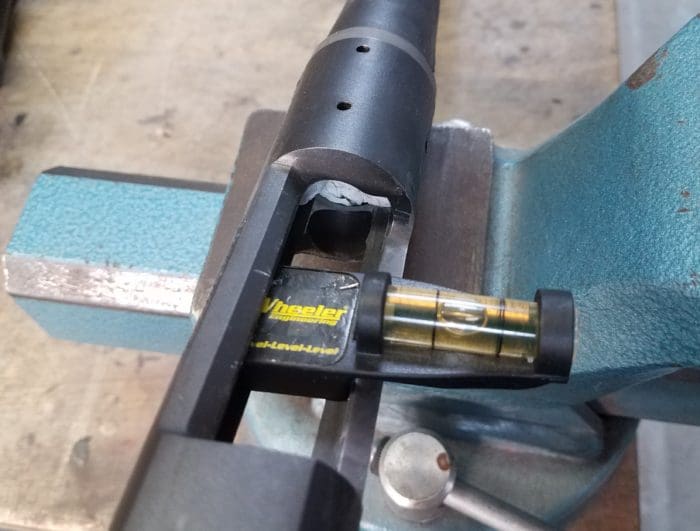
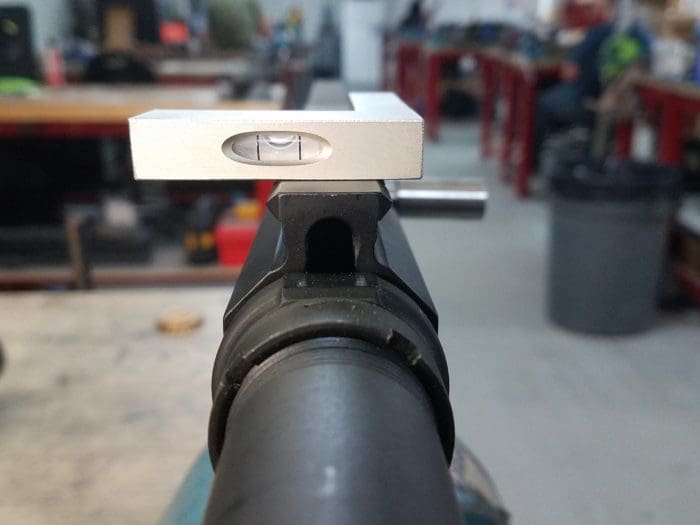
Level the gun by placing a bubble on a flat surface like the action rails or Picatinny/Weaver rails.
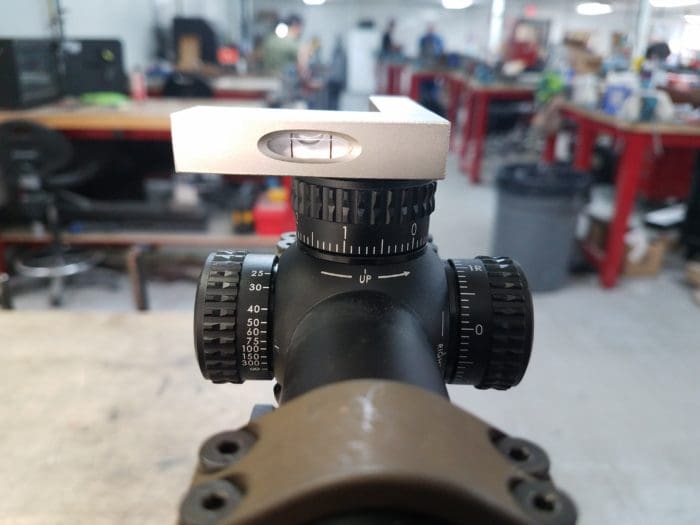
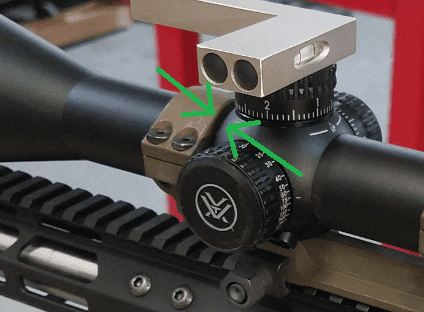
Once you know your rifle is level, you then level the scope by putting a bubble on top, specifically on the top of the elevation turret.
Once both bubbles read level you then torque the scope ring screws to spec without disturbing anything. The scope is now level to the gun which is level to the world. This will allow all drop compensation to work properly without adding mystery drift and unexplainable dope errors at distance.
Another good way to see if your reticle is properly level is to use a plumb line. It ultimately accomplishes the same thing as a bubble level, though it tends to be more accurate.
Ideally, I will do both. Hang a plumb line (something weighted at the end of a piece of string) in front of the rifle so it’s visible, but has a similar thickness to your scope’s reticle lines.
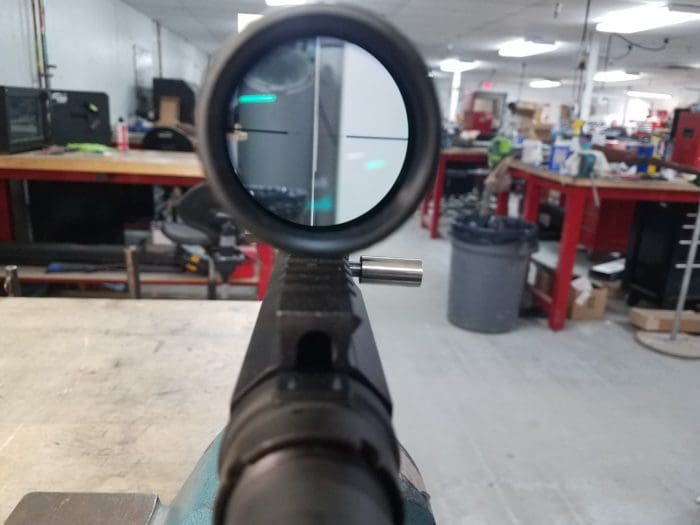
Level the gun with a bubble, level the scope with a bubble and fine-tune the scope with the plumb line. There should be one consistent line from the string through the reticle.
It’s critical that the gun’s bubble be level when doing this. If the scope’s bubble is a little off, but the reticle matches the plumb line, I will defer to the plumb line. That’s because the turrets aren’t always perfectly square to the lead screw/reticle. Fine-tuning with a plumb line should eliminate small errors caused by this.
I hold to compensate for drop, so this is good enough for me. If you dial in for drop, you might want to run the elevation turret to the top of its movement and back down, ensuring that it stays in line with the plumb.
The reticle should be in line with the turret screw, so they should match, but scopes wear out, things break and manufacturers make mistakes. It doesn’t hurt to double-check that everything is running the way it’s supposed to.
The flat portion at the bottom of the turret housing is the best surface on a scope to use when squaring.
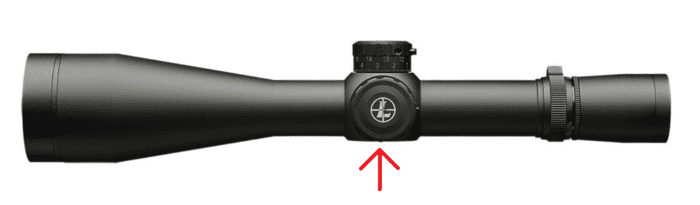
Unfortunately, it’s at the bottom, so not a very convenient place for a bubble. If you have a bubble setup that will work, use it on that surface instead of the top of the turret. I know guys who have stacked feeler gauges between the scope base and the top rail of the rifle to make them as parallel as possible.
This isn’t viable for all rifle and scope mount configurations, but I’ve heard it works quite well.
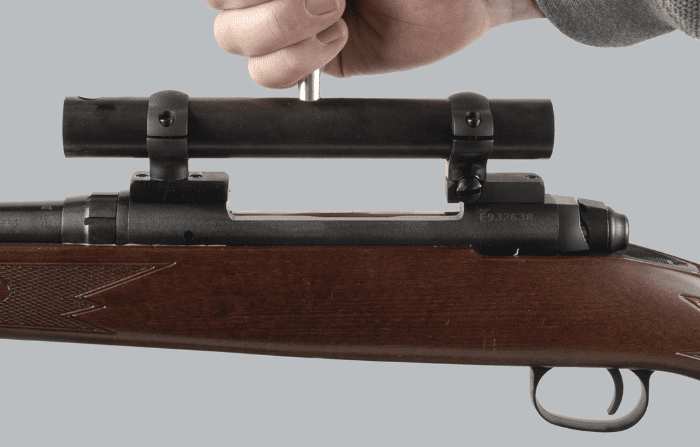
When tightening the scope ring halves together, you will have to do it in stages. In the beginning, the rings should be loose enough to allow the scope to move while being tight enough to stop it from flopping over due to the weight of the turrets.
Once level, tighten it a little then re-confirm that everything is level. Sometimes the scope will move. You should have enough wiggle room for fine adjustments.
Carefully tighten to spec and re-confirm. You will want to tighten the screws down in a cross pattern and tighten both rings at the same time. Don’t tighten one completely before you’ve even started tightening the other.
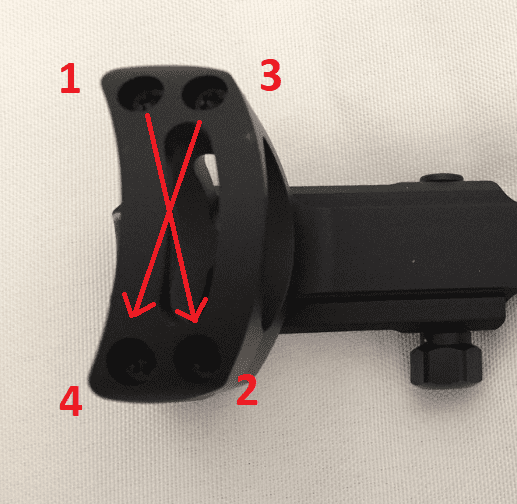
Make sure the top half of the ring is evenly mounted. The gaps on either side of the scope should be equal.
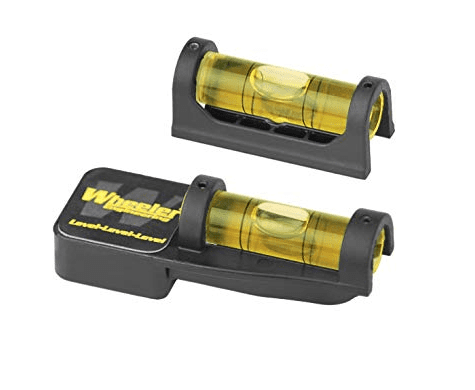
Torque values for scope ring screws and scope mount cross bolts will vary. Refer to your product’s literature for its recommended inch-pound values. The Wheeler Engineering – Fat Wrench is inexpensive and handy for this job.
Never Loctite your ring screws. Torque them to spec and confirm torque before shooting.
Next is a little shooting voodoo; all the guys I’ve met who are obsessed with accuracy will torque their scope rings screws in the exact same pattern every time. That way the pressure is being applied exactly the same, minimizing any shifts that could be caused by new stress.
This is done when confirming that the screws are still torqued to spec before you go shoot. This is likely just superstition, but it also can’t hurt. It’s also not something I personally do.
Eye relief is the distance your eye should be from the scope to obtain the maximum field of view when looking at your target.
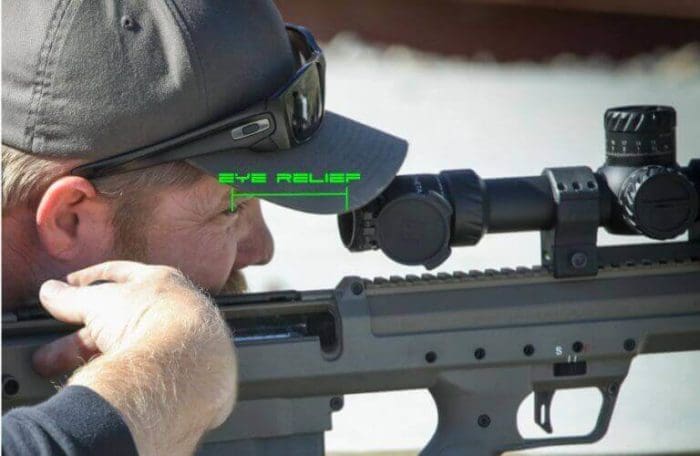
Too close or too far will result in scope shadow. Eye relief distance varies for different scopes and changes depending on how zoomed in it is. Set your eye relief to whatever position and power you will most likely be shooting in.
Keep in mind that your head’s natural position on the stock changes depending on your shooting position. It won’t be the same in the prone as it is when standing. If this is a short-range hunting rifle that will be shot from sticks on 4-6 power zoom, set up a similar shooting position to establish your eye relief.
The important part is that your head is in the same position on the stock when the eye relief is set. If you will be shooting the rifle from a bench with the zoom maxed out, set your eye relief for that. Get in position while sitting, zoom in all the way and move the scope forward or back until the eye relief is correct.
Depending on how your scope is mounted to the rifle, you may need to do this by sliding the scope itself forward and back inside the rings. Because of this I usually determine my eye relief before leveling the scope. If you have a ton of rail space like on a flat top AR-15, eye relief can be easily changed by moving the scope and rings forward or back.
A scope’s “correct” position on the rifle is 100% shooter-dependent. If you don’t have a specific position that you will be shooting in, set the eye relief in the prone position at max power. When shooting in alternate positions you will have some leeway and adjustment ability with your head position. When prone you can’t as easily or comfortably adjust your head position forward and back. That’s why setting the eye relief for this position is a good default.
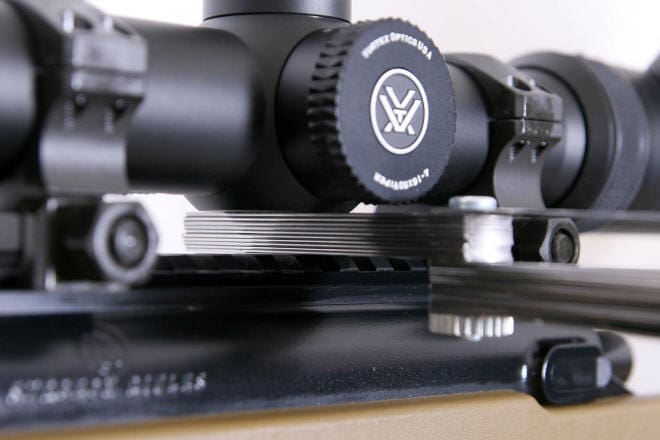
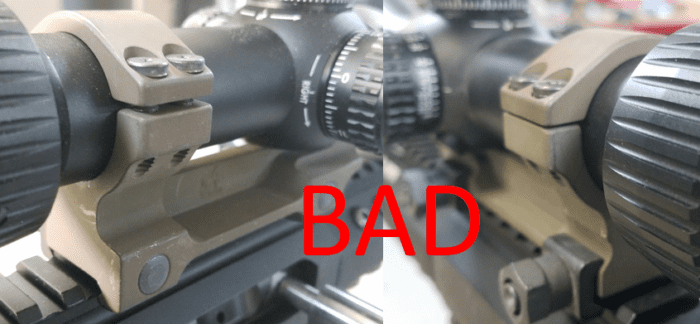
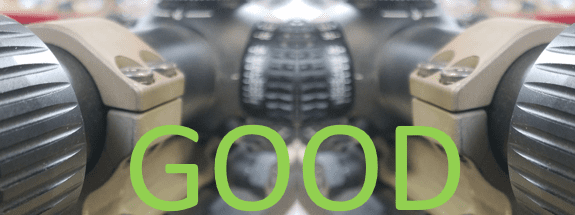
If I have plenty of rail space to properly adjust my eye relief, I will also set the scope in the rings so that the turret housing is touching the back side of the front ring.
This may be more voodoo, but it was something my sniper section did. By butting the scope up to the front rings as pictured, you minimize the chance of the scope sliding in the rings under recoil.
The rearward recoil force of the gun when fired is sharp and strong. Throughout the entire firing cycle that’s when the scope is most likely to move in the rings.
Setting the scope in the rings like that is only possible if eye relief is not set by moving the scope in the rings. Since plenty of scopes are set without this in mind, it might not be a thing, so take it as you will.
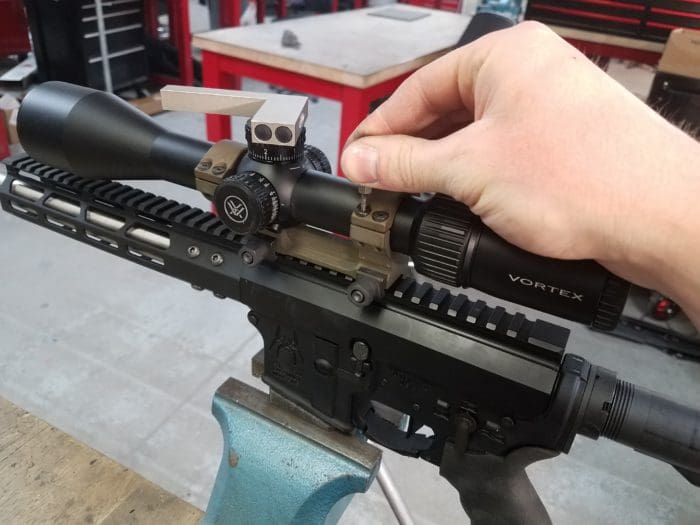
Following that same principle of recoil being the strongest force exerted on the scope, press the mount forward on the rails as you tighten it down.
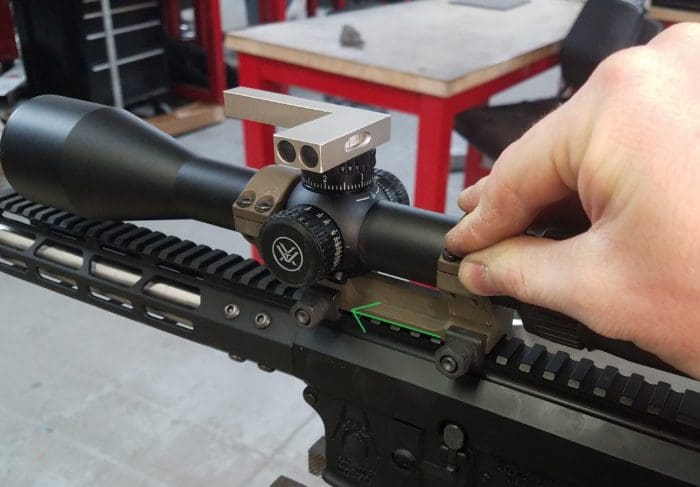
This too should eliminate any chance of the mount — and by extension the scope — moving under the force of recoil.
Lapping your rings increases the rings’ holding force by increasing the surface contact between ring and scope. It also evens out the pressure, decreasing or eliminating stress points and ensures that both rings are properly aligned with each other.
Leveling scopes can be aggravating since they don’t always want to cooperate. It’s frustrating getting everything level the way you want only to have it move when you start tightening the screws. But, doing it right and getting it as close to perfect as possible is well worth the time and effort.
Mounting the rifle in a gun vise, shooting sled or something similar that gives you the flexibility to make the gun level while keeping it fixed in place is a big help. That being said, I’ve leveled more scopes with the rifle sitting on its bipod than otherwise.
There are also jigs like Badger Ordinance – Dead Level Scope Leveling Device that allow you to level the scope in the rings independent of the rifle, though this only works if you have the rail space to fine-tune your eye relief. You could try marking where you want the scope set in the rings for proper eye relief and then level it in the jig, ensuring the mark stays in the proper spot…if you really want to use the jig.
There are plenty of ways to level a scope. As is the case with so many things in the shooting world, the result outweighs the method. As long as the scope winds up properly leveled to the gun (and the world) you’ve succeeded.
")


You didn’t really discuss a good way to find and set eye relief.
I do this:
Get in the position from which you’re doing most of your shooting. Put a piece of making tape on the stock so the front edge of the tape is where your eye is.
Now, mount your scope.
Get a white piece of paper and a small, bright flashlight.
Shine the flashlight through the front of the scope straight towards the rear. Put the piece of paper behind the scope.
Notice an image of the light is made on the paper, like a photo negative. Move the paper until the image projected by the scope is in clear focus. This is the ideal eye position for the scope.
Move the scope until the perfect focus has the paper where the front of your tape is. Your eye box will be dead on.
Your right, the article got pretty long so I didn’t end up addressing specific ways to find eye relief. That’s one of the great things about comments, things I’ve overlooked or didn’t properly address can be addressed here.
That’s a pretty cool way to precisely find the eye relief. I’ll definitely give that a try next time, thanks for your input.
I’ve always used scope shadow as my gauge. Ill mount the scope where I think I want it, get a good position on the gun and see if there is any scope shadow. If there is, I will move my head to confirm which way I want to move the scope to eliminate the shadow. I repeat this process until I’m satisfied. The emphasis is on reacquiring a good shooting position so that I am not subconsciously moving myself to eliminate the scope shadow.
You discussed a lot of good topics but neglected a few very important details:
1. The best tool you have for this task is the human eye. Coupled with a sturdy bipod or rest and a clear day, you should be able to do this more accurately, for free.
2. The reticle is not always true to the scope tube on cheaper or historic scopes.
3. Torquing cap screws will often rotate the scope.
4. If you index your scope to the rail using the flat bottom of the scope, a deck of playing cards works better than feeler gauges – they will not mar the finish and the cards are waxed so they slide free easily.
5. Making sure the top cap is evenly mounted is not always correct – TPS rings for example snug one side down first and then torque the other side unevenly.
I’ve tried a ton of tools and tricks, and the way I level scopes now is to simply set the rifle on a table in a rest of on a sturdy bipod, and place my face behind the stock looking at the mounting rail surface. Get it level to the eye, then rotate the scope until the horizontal line is level. Tighten the ring caps in multiple steps evenly (1/8 turn, next screw, repeat until torque value is reached).
Do not forget point #1 – the human eye can see horizontal/vertical lines FAR better than it can tell how centered a bubble is within a vial of mineral spirits. Also worth noting – rifles tend to rotate slightly when shouldered; bench-perfect reticles are rarely perceived perfect when shouldered.
Well I thought it was very useful and plan to try these techniques.
The scope does NOT need to be level to the rifle, the reticle needs to be level to the world. Otherwise, turret corrections will send the bullet sideways instead of straight up/down and left/right. Many shooters actually prefer a slight cant to the the stock while maintaining a level scope.
A scope level is REQUIRED to shoot accurately since the eye can not adequately determine the level of the reticle precisely enough. The ONLY must is that the scope level is level to the reticle and the scope is leveled every shot.
Interesting. I was about to make a claim that the cross hairs need to be in alignment with the bore center, but after a couple minutes meditation on the subject I came to the conclusion that would only matter if the rifle is held perfectly level when shooting. In an exaggerated scenario, the rifle is held at a 45 degree tilt and the scope is tilted to match the bullet will consistently land an inch and a half or so in the direction of the cant. I’ve always used a mirror to align the cross hairs with the bore (as best I can) figuring that was good enough for the ranges I shoot, but even that’s not necessary. I had calculated that with my .260 zeroed in at 225 yards a degree = 3/4″ of discrepancy at 500 yards, so if you can hold between 11:59 and 12:01 that’s +/- 4.5″.
That can balloon quite a bit at a thousand though. Probably your best bet is just to get a good spotter and adjust your shots accordingly.
I think your original impulse is correct. The vert. crosshair should pass through the bore center. And you need to hold the rifle vertical when shooting. On a range it’s not hard to get very close to vertical by eye. Some complex hunting or fighting environ. I couldn’t say.
It is true that the gun stock could be canted or tilted, but to do it right, you’d have to re-drill the Weaver ring screw holes so that the ring axis is vertical when the stock is canted.
Alignment with the bore is only necessary to account for the parallax error from the line of sight being above the bore. Theoretically you could mount the scope beside the barrel, or 45 degrees off.
Elevation adjusts for the effects of gravity over the bullet’s time of flight. Regardless of its position relative to the bore, the important thing is to shoot with a level scope such that elevation adjustments are parallel to the force of gravity. It’s certainly possible to adjust an angled scope, but you would need to employ trigonometry to do it right.
You are correct, the gun does not need to be level. The scope needs to be level. The scope does need to be in line, vertically, with the barrel, which is what I said in the beginning. If the scope is not vertically in line with the barrel, the bullet’s path will have horizontal movement through the reticle. For example, if the rifle is canted left 45 degrees, with a normal scope mount, the scope will not be vertically in line with the barrel. It will be offset to the left slightly. This means that at 50, the bullet will not only impact low but right of the point of aim. at 200, it will be high and left. The bullet will continue to drift left. If this rifle is shooting at a fixed known distance, this is a none issue. Set point of aim, point of impact at that distance and be done. For shooters engaging at various distances, especially longer ranges of 800+, that setup is not desirable. It can be compensated for. Leupolds D-EVO scope is an excellent example of how a scope can be offset and still work. But if you look at its reticle, it has drift built into it to compensate. Gov. William J Le Petomane shows some great math explaining the same thing. Though not a significant error up close, it is still not desirable at long ranges.
Honestly, there is too much to cover, on this topic, for a single article. I tried to present good introductory information in a way that could apply to the broadest range of shooters. Diving into canted rifles felt a bit complicated for what this article was intended to be. I don’t think id of had the space to properly address it either. I barely had the space for what I did address.
You definitely aren’t wrong, but I don’t want newer shooters being misled into thinking that they can cant their rifle, keep the scope level, and be good out to 1000 yards without any additional compensation (other than wind). Long range shooting sports like PRS and ELR are growing in popularity so in my mind this is a legitimate concern.
‘Honestly, there is too much to cover, on this topic, for a single article.’ – Which is why we have a comments section.
I had more to say but I got blocked again.
I’m sorry that keeps happening.
blocked
Well I had some interesting commentary but TTAG blocked me for some reason.
Yea, I got the same thing.
Hey, TTAG –
Any chance you ask your ‘code monkeys’ to loosen up with length of the comments?
It’s keeping DG from bequeathing his wisdom on us…
Thanks for the tip on the plumb bob. I’d thought of using it but my possum brain had the plumb attached to the rifuls front stock screw. Duh huh. It doesn’t seem to matter though, because when I duct tape and bailing wire the scope to the riful sht getz all fckdup anyhow.
Oh, come on TTAG. Let the Gov. talk. I’m learning.
There’s basically a condensed version in my reply to d.
the best way i have found to set eye relief is to close your eyes and shoulder the rifle the way you would to shoot it. now open your eyes. this prevents you from hunching or stretching your neck to see through the scope. lastly adjust the scope to your eyes with or without glasses depending on if you use them when you shoot. nothing worse than looking through the scope while hunting and everything is blurry because you focussed the eye piece without your glasses on.
Wow. So who would have thought you need to buy all the additional crapola to ‘properly’ mount a scope? I would like to see what the author thinks I need to change a flat tire. Hint: neither is ‘rocket surgery’.
I never said you need to buy anything. I mentioned some things that are helpful. A piece of string isn’t extravagant, and a level is pretty much required in order to level a scope. I also said that I’ve leveled more scopes with the rifle sitting on its bipods than any other way.
Perhaps this is a failing of mine, but I rarely shoot past 300 yards. I set most rifles with a “battle zero” where the round hits a couple inches high at 100 yards and even at 200 yards. A minor cant in the scope from mounting or from human error in how I shoulder is a small fraction of those couple inches. I’m not a good enough marksman to worry about a small fraction of a couple inches at 200 or 300 yards.
That said, if I ever get around to setting up with a round, rifle, and scope capable of reaching out a thousand yards consistently, I will definitely reference this article
That’s definitely not a failure. That is completely appropriate for how you shoot. There is a very wide range of rifle shooters out there, what I outlined is just a good starting point. A sort of “you can’t go wrong if you do this” type of thing. There is quite a bit of leeway in order to accommodate different shooters and shooting styles.
My procedure to mount a scope is simple and probably good enough for the vast majority of recreational shooters and hunters.
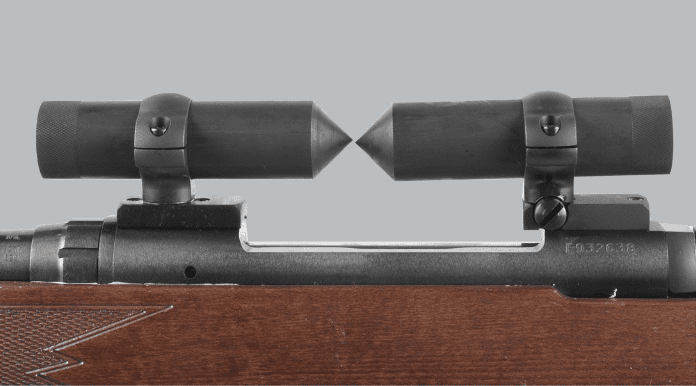
First, I determine that the front and back pieces of my scope mount are “true”, meaning that they are the same height and parallel. I simply rest the scope in the bottom half of the rings (which are attached to the rifle) and look for any gaps between the scope tube and the mounts. When the mount is “true”, you will not see any gaps. (I have mounted about 10 scopes and all mounts have been “true” so far.)
Second, I determine how far forward/backward to mount the scope. I install the tops of the rings (loose enough that I can easily slide the scope forward and backward), rest my cheek where I am comfortable on the butt stock, and move the scope to the position that gives me the best view through the scope. As another commenter suggested, consider shouldering your rifle with your eyes closed to determine where your cheek rests on the butt stock. Put a small piece of masking tape on the scope tube (touching one of the mounting rings) so that you know how far forward/backward to clamp it down.
Third, stand up, hold the rifle “plumb”, and aim at a horizontal or vertical reference. Then, rotate your scope in the rings until your scope’s reticle aligns with the reference and tighten the rings.
That last step can be a little bit tricky since there is no hard-and-fast way of knowing for sure that you are holding your rifle perfectly plumb. Just do not be in a rush, do your best, and call it good enough.
It’s worth checking eye relief at low and high power and standing vs from a bench. Most triple digit $ scopes have significantly more eye relief at low power than at high, which works for me since I hold my eye farther back when shooting from the shoulder.
Yeah, that is true Governor (scope may have considerably different eye-relief distances at different magnifications). And if you are going to shoot prone, establish cheek/eye position and eye-relief from that position as Matt stated in his article.
Darn it, I was trying to keep things simple!
Ultimately if you’re going to be shooting from a variety of positions you’ll have to set your priorities and make compromises accordingly. It also doesn’t hurt to know your preferences and the rifle’s limitations before you purchase a scope. I, being tall, tend to like to stick my face out right on top of my thumb when shooting. A longer LOP would be the best option I suppose, but I tend to find most scopes with too much eye relief and I’m always wanting to push them as far forward as possible.
Damn I did mine wrong. I guess I’ll have to redo it. A real shame because it has been hell o’ accurate and just how I like too.
Personally what I did is attach some Magpul mounts and screwed them into a 2×4. Mount the scope to that.
I disagree about using thread locker. Thread locker came with my Bobro mount and is recommended by them for installation. Why would you want to waste time re-tightening your screws prior to every shooting session?
I have had more than a few Remmington 700’s that are drilled and tapped poorly . There would almost be no way to clamp the receiver/muzzle square and level and mount the scope properly. I have seen others that have been so bad that a choice had to be made between getting another rifle, or have the mount holes filled, drilled and rethreaded. Not a cheap fix. Saw this actually done on a Sako. That rifle shot hole in hole at 100, and nearly that at 200, but it was low and left by nearly 5 inches of target at 200. At further out it got much worse. Sent the rifle out and when it came bach it was perfectly on target at 100, 200, and even 300 yards after lapping and mounting with only 1 very thin shim. Always ask before you buy a rifle, what the seller will do if things like this occur. Some of the used rifles are used rifles for sale because of problems. I want to shoot a rifle cold with at least 10-12 rounds on paper to see if I want it. Read the forums. Guys admit that they sell poorly preforming rifles to get their money out of them.
It’s interesting to know that using a level is also important when mounting scope rings on a gun. I’d like to know more about scope accessories because I want to be more accurate with my shots. I think that using scopes would be a good idea.
I always keep my scope dials well-oiled/lubricated. That way, it is easier for me to make adjust as they are smooth.