
By Kevin Wabiszewski
You’re ready to throw that new glass on your rifle and see what damage you can do from afar. First, you’ll have to zero that scope. If you’ve never done that before, it’s important to learn exactly how to perform and replicate the process so that you can swap out future scopes and get back to sending rounds downrange quickly.
Keep in mind that sighting in a rifle scope can be a frustrating experience if you don’t know how. Here’s how to do it quickly and easily.
Quick Start
Below is a quick start checklist to get your rifle and scope zero’d. Be sure to have a good understanding of what goes into each step. Take this list with you to the range to ensure you don’t skip a step.
- Mount the scope
- Buy the right ammo
- Print or buy good targets
- Set up your target
- Boresight your rifle if able
- Get in a good shooting position
- Shoot a three-shot group at 25 yards
- Adjust your scope
- Repeat steps 7 and 8 until on target
- Move the target to 100 yards
- Shoot a three-shot group
- Adjust your scope
- Repeat 11 and 12 until you’re zero’d
When to Sight In/Zero a Scope
First off, many people use the terms “sighting” or “zeroing” to describe the same thing. The process involves adjusting your scope so that the bullet hits where you’re aiming at a certain distance. So, when is it a good idea to zero your rifle? The answer is, it depends, but here are some instances where we definitely recommend it.
New Scope or Rifle
Don’t you love that new scope smell? How about the smell of a brand-new rifle? I’m only half-joking here, but getting new gear for your boomstick is almost like buying a new car. Unlike a new car, when you buy a rifle and/or scope separately or in a combo together, you don’t get a “drive ready” setup unless the gun shop already did the zeroing. And even if they did, it’s always a good idea to check it yourself.
Swapping a Scope Between Rifles
In general, any time you make a change to your rifle and scope setup, it’s necessary to do a zero. If you happen to have two rifles that are exactly the same and you swap the scopes, they might be pretty close to being zeroed, but you can’t count on it. And the process of swapping the scope means you’ll have to re-zero.
Moving a Scope on Your Rifle
Moving a scope — front to back, side to side, up and down, whatever — calls for a new zero. Any time you loosing the rings and reposition the scope on your rifle, it won’t be zeroed any longer. Slight changes in scope position shouldn’t be that noticeable, but a good rule of thumb is to zero anytime a scope is moved.
Dropping a Rifle
Whenever a rifle falls or experiences a violent impact, it’s possible to thow off your scope. Some scopes are much better at taking a beating than others, but if you have time for a new zeroing it doesn’t hurt to do a few test shots to check it.
Note that shooting a round is in itself a fairly violent experience for a scope, depending on caliber. If you have a high-powered adjustable optic for a heavy caliber rifle, there is a chance at some point the scope will start to shake loose, especially if not mounted properly.
When Your Rifle Isn’t Used for a Long Time
If you are someone who shoots a rifle on a regular basis, you know well what the status of your weapon is. On the other hand, when your rifle sits in a safe for two years you probably won’t remember whether it was shooting accurately.
It’s a good idea to check the zero on any rifle you haven’t used in a while. Some people claim that scopes can lose their zero over really long periods of time due to the hardware aging, differences in temperatures and humidity, etc. If you’re going to store your rifle for a long time, I would plan on zeroing it when you go to use it again.
Mounting a Scope
Dropping a chunk of change on a high-quality scope just feels good. You practically walk on clouds, proudly carrying your package to a table to unwrap it from its temporary cardboard prison. Carefully, you remove the plastic wrapping to reveal a beautiful piece of optical art. Now you take it to your rifle and realize you are missing something. How are you going to attach it to your rifle?
If you are buying a new scope, make sure you also buy the proper mounting hardware specific to your rifle and/or mounting rail system. Talk to gun shop employees and let them help you get the right size rings or mount for your use. Remember, a mount has to fit both the rifle and the optic.
Mounting the scope isn’t as easy as just plopping it on the rail and torquing the ring screws down with all your might. Make sure you read your manual and find out what torque to use on the screws. If you tighten them too far you risk stripping the screws or worse, crushing the scope tube itself.
Eye Relief
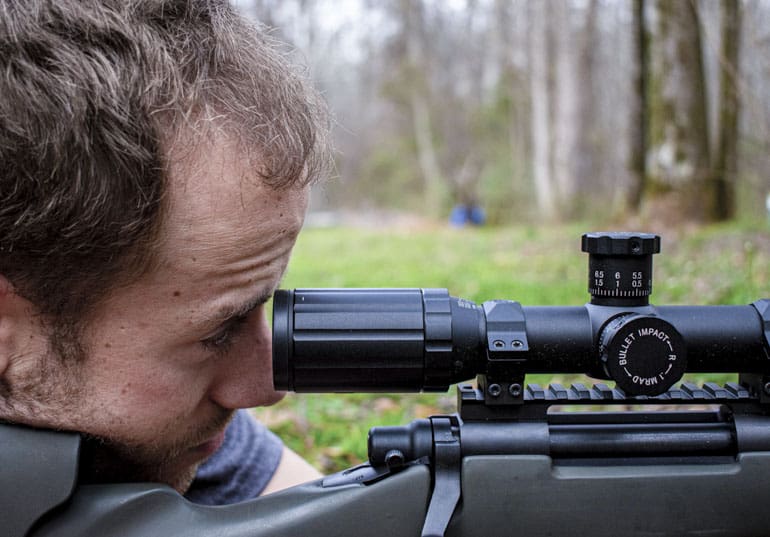
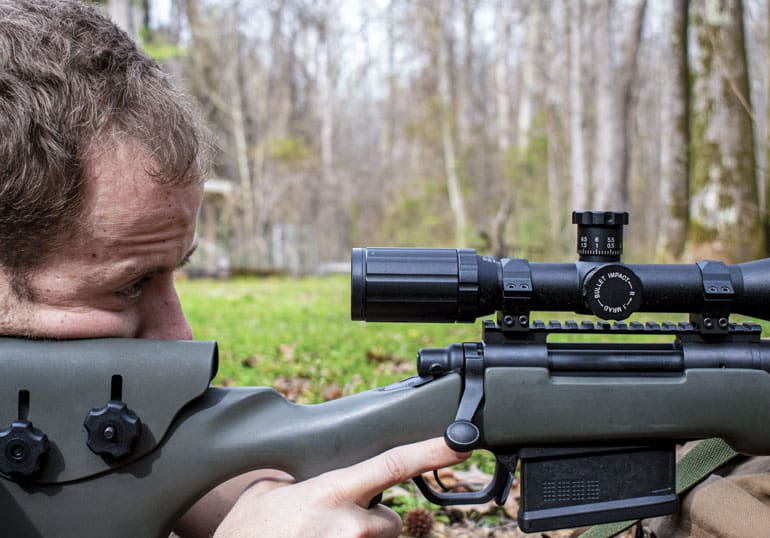
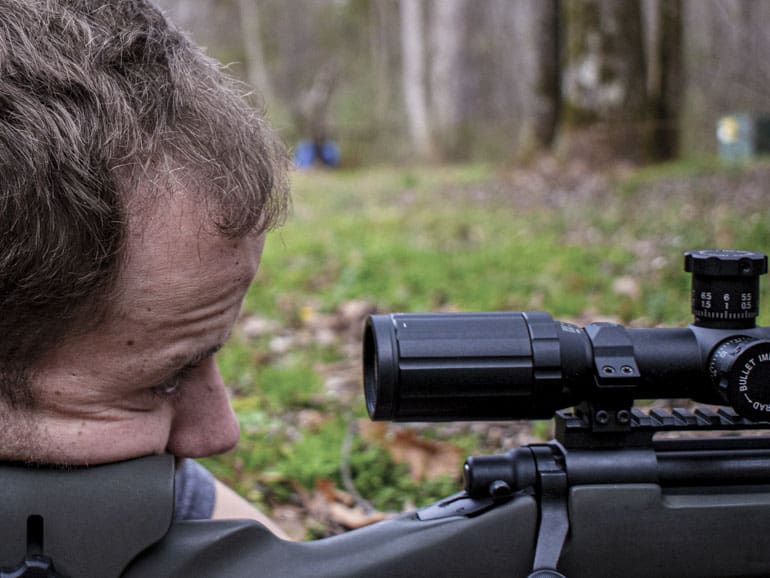
Eye relief is the distance from your eye to the scope. If you are too far away, the sight picture won’t fill up the scope. The goal when mounting your scope is to start by getting into the position you will most likely be shooting your rifle (sitting, standing, prone, kneeling, etc.).
Too close and… Well, this is a great way to experience “scope bite” and maybe earn a black eye you’ll have to explain to everyone later. Scope bite happens when the recoil of the rifle drives the scope back toward the shooter’s eye.
Too far and… Not only can I not see the full sight picture, but I also can’t position my body properly behind the rifle to handle its recoil and sway.
Just right and… My body position is comfortable and I have a full sight picture though the optic.
The right distance I would want my eye to be from the optic is going to vary for each optic. Eye relief is something most optic brands will use in their marketing materials so you should be aware of what the eye relief will be before purchasing. Eye relief will also change slightly depending on the shooting position.
As a general rule of thumb, the closer the target, the more eye relief you might want to have. Red dot sights and reflex sights are often considered unlimited eye relief which means you can use them with your face close or far away from the optic.
Make sure the rifle’s buttstock is firmly placed into your shoulder. Let your cheek fall naturally onto the buttstock. Now, starting with the scope as far away as possible, begin moving it toward your eye until the sight picture fills up the scope. Stop there and note the position on the rifle. It might help to put an identifying mark there with a pencil. You may want to slightly tighten the scope down at that point, but you’ll still have some work to do.
Leveling and Final Mounting
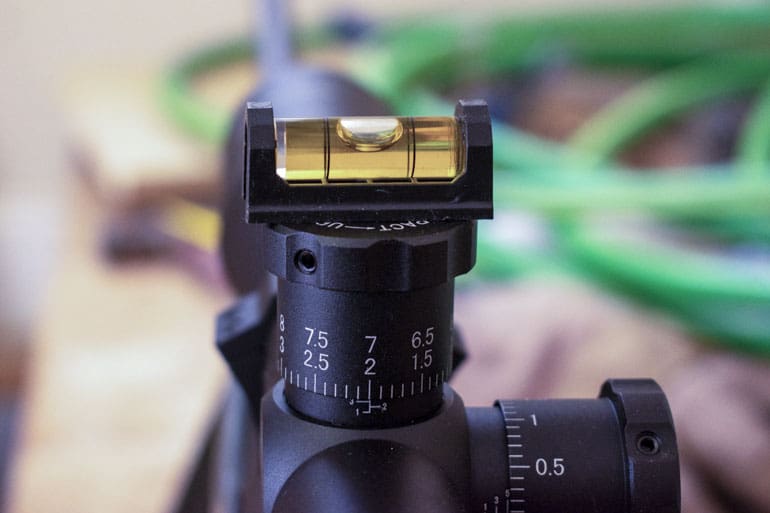
Lots of people eyeball the level when mounting their scopes, but getting your scope truly level on your rifle is critical for accuracy when shooting longer distances. That’s why a rifle level comes in handy. Two little rifle levels can be had for a couple of bucks, so you don’t have much of an excuse not to do it the right way.
First, find a spot on the rifle — usually on the rail — where it’s flat and place the level there. Now, watch the bubble and level the rifle. Adjust the rifle’s position and secure your rifle once it is level. You might have to level your rifle before you mount the scope if there is no flat place with the scope on. If this is the case, use a vise or something that will hold your rifle perfectly in place while you mount the scope.
Next, place the second level on your scope’s adjustment knob and rotate the scope in its loosened rings until it’s level. Take care when rotating the scope tube that you don’t move toward the butt or muzzle ends and inadvertently change your eye relief. If you accidentally move it fore or aft, use the pencil mark you made earlier to realign it.
Once your scope is level, make sure both levels still match. If during the process of scope leveling the rifle became “unleveled,” adjust the rifle again before adjusting the scope. Both rifle level and scope level should be exactly in the center of the leveling tubes.
Now that everything is level, start tightening down the ring screws according to your scope manufacturer’s instructions. Take your time and tighten them evenly in a crisscross pattern. The top portion of the tube clamp needs to be pretty close to parallel with the bottom clamp in order to ensure proper clamping force is applied. Be sure to torque all screws in both rings evenly. Again, use a torque wrench set to the manufacturer’s recommended setting.
Adjust the Focus Bezel
The scope should now be properly mounted with the correct eye relief and leveled. All that’s left to do is make sure the reticle is properly focused. Aim your scope at a solid color background like a wall or a cloudless blue sky. Note whether the reticle (crosshairs) is blurry. If it is, rotate the focus bezel or turret until the reticle appears sharp.
Without moving your head, close your eye for several seconds. Your eye will rapidly adjust until it makes the reticle clear so closing your eye will reset the “autofocus.” Open your eye and look at the reticle. If the reticle was blurry before your eye adjusted turn the focus knob again and repeat closing your eye and adjusting until the reticle is sharp immediately after opening your eye.
Buy the Right Ammo and Target
Having a properly mounted scope means you are ready to get out to the range and start shooting. First, though, you need ammo and something to shoot at. Pay close attention when you make your selection of these two crucial items.
Ammo
Any ammo you buy will do the job of launching bullet bullet downrange. However, low-quality bulk ammo won’t give you nearly the accuracy of match grade premium ammunition. If you only want to plink steel targets, don’t worry about buying premium ammunition, but if you are going for accuracy at longer ranges, spend a little more money for the ammo.
Once you choose a particular load, stay with it. If you decide to zero with cheap ammo and then take premium ammo hunting, you can expect your shots to impact somewhere other than where you aim. You might hit the target, but you might completely miss. So, find the ammo you want to hunt or compete with and use it for your zero. Cheap ammo can be used for plinking when you aren’t worried as much about accuracy.
Why does ammo selection affect accuracy? Well, the ballistics of the bullets in-flight change depending on what ammo you select. There are many different combinations of gunpowder loads and bullet types and weights on the market. This is a topic that gets pretty deep so just know when you change the bullet weight, powder weight, brand, etc. you are changing the ballistic profile and you’ll want to re-zero for that load.
This is all-important because some scopes are specifically designed to be used with a specific caliber and bullet weight. Some scopes may also have special caliber-specific reticles or other ballistic tools like on-board range finders that calculate bullet ballistics and so on. The point here is that all of this can have an effect on your zero.
Targets
We have included a printable target with this guide that can be used at 25 yards and 100 yards. On the printout, you will find a “click guide” that will tell you how to adjust your scope depending on what range you are shooting and what type of scope you have. Our target has one-inch blocks that make it very easy to measure how much to adjust.
A printable PDF version of that target is here.
Since there are so many targets on the shelves at the local sporting goods store, make sure you pay attention to the target’s grid size. Sometimes the grid isn’t quite 1 inch, or they may be measured in centimeters. Stick with 1-inch grid squares unless you understand when to use the metric system.
Setting up Targets
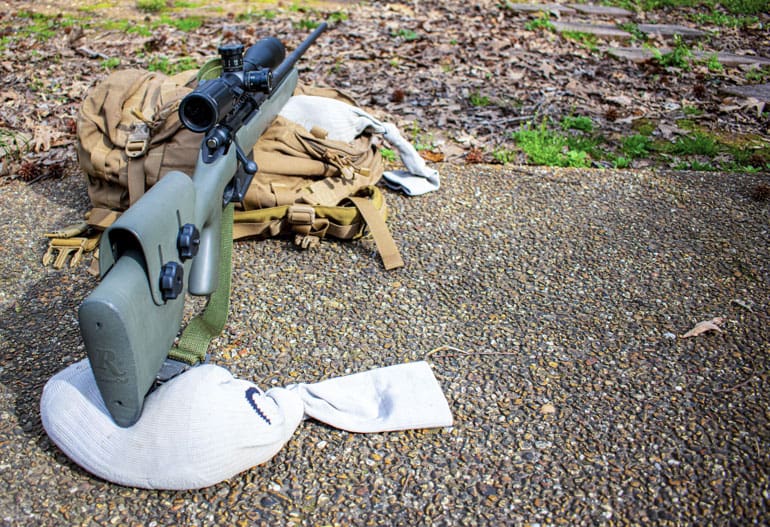
It’s time to get down to business. Before you head out, make sure you have some sandbags, a range bag, or a bench rest to brace your rifle, depending on your shooting position. When getting a good zero, it is very important to have your rifle fully braced.
If you want a brace that doesn’t cost anything, just take some tube socks and fill them with dirt or sand. I keep several pairs of socks in my rifle drag bag just for this reason.
Your first string of shooting will be at 25 yards. The reason to shoot at 25 yards is to make sure you are close to the bullseye. If you go straight to 100 yards after mounting a scope, you might not even hit the paper.
Try to get as close to 25 yards as you can. You don’t have to be exact, but it will make adjustments much easier if you are at 25 yards and know how many clicks will move your shots at that distance.
After getting your scope zeroed at 25 yards, you can move the target to the 100-yard line.
Boresight Your Rifle
Bore sighting isn’t essential, but iit will save you time and ammunition at the range when zeroing. Skipping this step can result in your shots completely missing paper even at 25 yards. If you can’t disassemble your rifle easily to where you can look down the barrel and scope at the same time, you can buy a cheap laser bore sight or just skip this step.
If you own a rifle like the AR-15 or a bolt action rifle, bore sighting only takes a little disassembly. The bolt on a bolt action rifle can easily be removed for this step. If you have an AR-15, remove the upper receiver and bolt carrier group.
With the bolt of the rifle removed, sit behind the rifle and look down the barrel. Aim the barrel directly at the bullseye of the target. Now, secure the rife in place so it doesn’t move. Now look through your scope and adjust it until the reticle is also on the bullseye. Double-check that both the barrel and the scope are pointed at the bullseye without moving anything. If no adjustments are necessary, the boresighting is complete.
Shooting Position
Stability is key when zeroing your rifle. Ideally, you want the rifle to be completely braced without much help from the shooter. Place a sandbag or rucksack underneath the foregrip of the rifle. Do not rest the rifle on its barrel. That will negatively effect accuracy. Then [lace a sandbag under the buttstock.
Firmly place the buttstock into your shoulder, hopefully without taking its weight off the sandbag. All you are there for is to keep the rifle from flying off the rest when firing. Place your trigger hand on the rifle and your non-shooting hand on the sandbag under the buttstock. You can raise and lower your sights by squeezing or releasing the rear sandbag under the buttstock to get the sight picture through the scope on target.
Adjustment Turrets
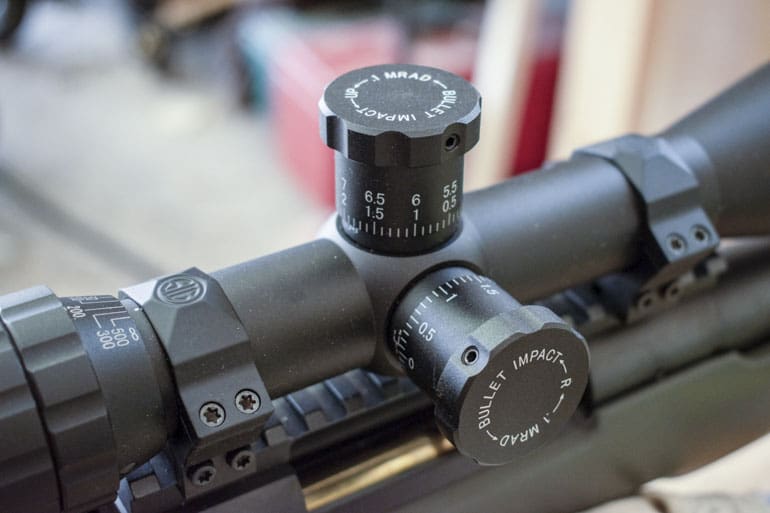
This scope adjusts in MRADs but MOA scopes also have similar instructions.
Not all adjustment knobs look like the ones in the picture. Most hunting scopes are meant to be zeroed and never touched again in the field. These types of turrets are hidden beneath turret caps. Unscrew the cap and you’ll find what looks like a flathead screw. Use a quarter, a bullet casing, or a multi-tool to adjust these types of scopes.
MOA and MRAD scopes are different. We won’t get into the details about the differences in these types of scopes. Just know that MOA (minute of angle) is most commonly used for those using Imperial units (feet, yards, inches, etc.). MRAD (milliradians) scopes use the metric system. Both types have their advantages, but the main thing to remember is an MRAD scope is easier to sight in on a range that’s measured in meters. MOA scopes are easiest to adjust on ranges that are measured in yards.
Regardless of what type of scope you are using, they can be effectively zero’d on any type of range. For most ranges in America, all you need to know is this:
1 MOA = 1 inch at 100 yards and ¼ inch at 25 yards.
1 MIL = 3.6 inches at 100 yards and 0.9 inches at 25 yards.
These guidelines are located at the bottom of the printable target, so you don’t have to Google the numbers on the range.
25-yard and 100-yard shot groups
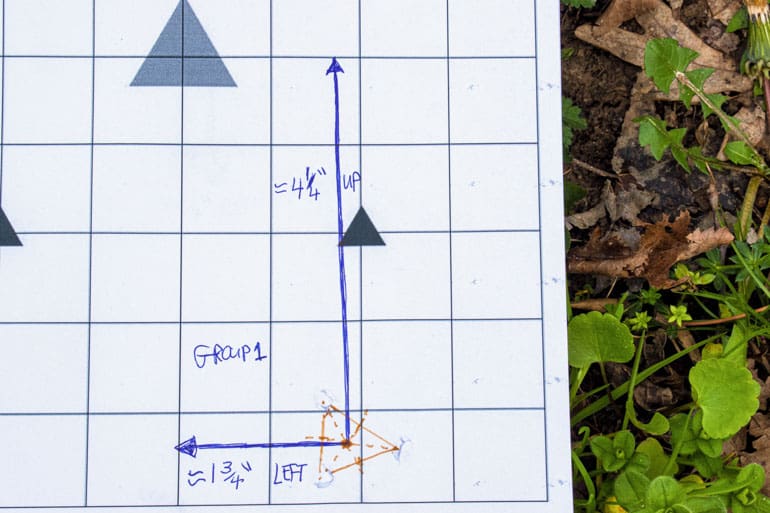

Get in position to shoot with your target placed at 25 yards. Aim dead center and slowly squeeze the trigger while you are at the bottom of exhaling (breathing pause). Do this for three shots.
When the shots are complete make sure you can safely walk downrange to observe your target. Using a pen or a pencil, draw lines from each bullet hole to form a triangle. Since there will always be variations in where the shots are, we find the center of the triangle because it gives us a good point of reference for where the barrel is really pointing by averaging the impact points.
To find the triangle center, mark the halfway point on each line. Draw a line from this halfway point (midpoint) to the triangle corner (center of the bullet hole) directly across from it. Do this for all three sides. You should end up with three lines that cross at or near the same point in the center of the triangle. This will be where you will measure the vertical and horizontal distance.
One thing to note: if you notice two bullet holes that are very close together and one that is many inches away, don’t include the third one in your measurement. More than likely this “flyer” was a result of pulling the trigger violently or some other factor caused by improper shooting technique. Having the rifle properly braced will avoid most of these errors, but if you find yourself with a “flyer,” just shoot another group.
Once you find your triangle center, measure the distance you need to adjust left or right (windage), and follow the guide at the bottom of our printable target for how many clicks to move your adjustment turret. Next, measure the vertical distance to the center of the target, up or down, and make your scope adjustment as necessary.
In the second image above, I need to move my shot placement ¼ inch left and 1 inch up. I follow the directions on my scope turrets to move the bullet impact the correct amount. If I’m at 100 yards and using an MOA scope, I will rotate the appropriate number of clicks to equal 1 MOA up. I do the same for adjusting left, but only need my clicks to add up to ¼ MOA.
Continue shooting groups, finding the group center, and adjusting your scope until you are consistently in the black (bullseye).
When you are done at 25 yards, move to the 100-yard line and repeat the above process with a clean target. Shoot a 3-round group, find the center of the triangle, and adjust your scope until your group surrounds the bullseye.
If you’d like to save a little time walking downrange after each grouping you can grab a good spotting scope and check your groupings without having to leave your shooting position.
Wrapping up
Getting a good zero isn’t rocket science, but sometimes it might feel that way. Hopefully, this guide has shown you that it’s much easier to do properly than going out to the range and just “winging it”. Always keep safety in mind when you go to the range and ever expect other shooters will abide by the same strict safety rules you do.
Happy shooting!
Kevin Wabiszewski is the founder of MarineApproved.com.
")


You should probably clarify that mounting the scope is a step to take BEFORE going to the range. For people who don’t have the tools or experience or are scared of it, places like Cabela’s will mount and boresight your scope for you (even if you didn’t purchase it there, though going at a non-peak time is recommended in that case). Just remember, there’s no guarantee that the person working there actually knows what they are doing…and many don’t. Even the people who basically know how to mount a scope probably don’t do it truly correctly.
Things that you didn’t mention in the article: you can fine tune so reticle is level by tightening the screws more on one side than the other for the last, very fine adjustments. Also, when selecting rings, make sure to get the lowest rings possible that keep the bell of the scope off the rifle. An incredibly common mistake is to get medium or high rings on a standard bolt gun with 40mm objective, when low are almost always sufficient. Generally, at the stores that will mount them for you they will default grabbing medium or high so they know the scope will clear, but that isn’t the best way to do it.
For beginners–rings come in different heights (low, med, high, etc) as well as different sizes (1″, 30mm). The size corresponds to the size of the tube of the scope (generally 1″ for most). The height increases the distance that the scope sits above the bore. You want the scope to be as low as possible. The higher you have it, the more you will be looking down at the point of impact and the farther off the bullet trajectory you will be as the distance increases.
1. How to mount a scope. Buy this: https://scalarworks.com/shop/quick-detach-mounts/leap-07/
Looks nice, but on the pricey side.
I’m somewhat fond of Aero Precision mounts, myself, although they do tend to rotate the tube a little during final tightening.
Worth every penny and you can save money if you bundle it with one of the scope options (and they are good ones at that). They are really nice mounts. Buy once cry once.
I agree. Last one I did took five tries to get right. But I love the way way they look.
Scope do NOT need to be leveled to the rifle. The reticle NEEDs to be level to the earth otherwise turret adjustments wont be true. A scope level needs to me mounted to the scope and leveled to the reticle and the shooter needs to use the level when shooting
Well, It helps if the scope/rifle package are level relative to each other before you try and level that to earth. To be honest this is all best guess as none of these little bubble levels are even close to precise. Based off my very expensive Starret level I use on my lathe I give up.
It does not help at all.
Especially because the turrets may not be perpendicular to the crosshairs.
With my optic level to the world, my rifle is canted slightly out. I do this because it is very repeatable and comfortable for me.
A slight cant (of the rifle, optic is plum) is not noticeable out to 1200yds at least. I know this because that is the furthest I regularly shoot.
The optic only has to be close.
Instead of all this hookum, everyone would be better off spending the money on ammo and time on shooting.
You may not trust my knowledge, but I have been taught by some of the best shooters in PRS. I then confirmed this info in the real world.
Or don’t zero your scope and wonder why the zombies keep getting closer even though your reticle is bisecting their melons.
Or, as one of my friends says “I dont adjust my sights. I just walk the rounds onto the bullseye.”
Uhuh.
there is probably good info in the article but I could not read thru it all. Having just done this today on a 6BR, I forgot the most valuable thing you can do, BORE SIGHT your rifle. Line up the bore on the target center you are using and adjust your scope accordingly. I spent 5 rounds shooting at center, top right and left, bottom right and left. And then the light bulb went on, bore sight dummy. Done and done. Next shot was 6″ high and 6″ right. Made those 2 scope corrections and the next shot was bullseye.
Another point about boresighting, the scope directions will be reversed from the directions on the scope turrets.
But it is a quick way to get on the paper.
Last bolt gun I needed to setup a scope on I had one of those laser widgets you slide into the muzzle and tighten so a collet inside grabs the bore. I lacked a bench and all was eyeballed.
Owned a exercise machine at the time with cables from an overhead bar to pull up weights. I put on all the weights, and linked the cables together so I could rest the gun upon them.
After midnight I turned out the lights and opened the back door. With the weight machine near the front of the house I was able to look the length of the place, out the back door. Found I could just see the corner of a an office building of about 3 floors I think. I set the laser on that corner and adjusted the scope.
Using Google Earth I grabbed a screen capture of the satellite view. Knowing the exact dimensions of the house and wall around it I was able to work out the distance to the corner of that building.
Come the weekend I drove out to open BLM land to a spot I knew. I’d looked up the ballistics and expected an elevation error. Turned out to be pretty close to what I expected, couple inches one side and low. An easy correction then.
That was no one of the first Ruger American rifles in .30-06 with the new Made In USA Redfield scope from Leupold, at that time. Gun has remained on target ever since, though to be fair I don’t get out much to shoot it any more.
More likely to take the old 1903 Springfield (Remington 1938 SN) 🙂
That Wheeler level kit is pretty tits. You just eye ball level, clamp on the barrel level, then use the adjustment screw to match it to your reference level (the step in this article using the flat spot on your rifle.) At that point if you jiggle the rifle you have positive confirmation to get it back to level.
The Information is very useful , a good refresher .
I usually shoot a group. Then put the crosshairs on the group and adjust them back to the bullseye. If shot one is significantly enough off that you are sure it’s off…one shot will do. Aim at the shot and move the crosshairs back to the bullseye. Quicker, saves ammo.
Nobody caught why the above method is backwards? Properly – Sight on the bull, then adjust the reticle to the center of the group.
Cheap ammo has a place when setting up a new scope. I like to use it to get on paper and get a rough zero which is then further refined using the match ammo. Just make sure that the cheap ammo has the same bullet weight. Much cheaper doing it that way then doing it all with match or hunting ammo, especially when boresighting isn’t doable.
Since this is a beginners article and I think most beginners usually purchase less expensive rings (or even if they are not inexpensive rings), I would recommend spending 30 dollars on a Wheeler lapping kit and lap the mounting rings. I’ve seen plenty of people get a good zero and then wonder why it gets further and further off with every shot they take. It doesn’t matter how much you tighten down the screws if you only have 10% contact with the tube.
Nice scope!
DO NOT let anyone mount anything on your rifle from Cabelas in Wheeling WV ….trust me .
What stock is that on the rifle?
This is very helpful.Thanks for sharing.
Very informative thanks for sharing
Much Informational for me because i was confused about that but now all cleared. Appreciated
Most new shooters and even experienced shooters struggle with mounting and zeroing their rifle scope. This article covers the method I use to mount a rifle scope on an AR-15 rifle. And it has a free printable rifle scope target at the end. Whether you’re new to hunting or a seasoned pro, sometimes it’s just good to brush up on your shooting skills and what better way than with a FREE printable target? I found a great video that demonstrates how to zero a rifle scope (something I’ve never tried before in my life).
Much useful information for me because I was before perplexed, but now everything is obvious. Appreciated
The majority of inexperienced shooters, as well as experienced shooters, have difficulty mounting and zeroing their rifle sight. The method I use to mount a rifle scope on an AR-15 rifle is described in this post. It also includes a free printable rifle scope target. Whether you’re a novice hunter or a seasoned veteran, it’s always a good idea to brush up on your shooting abilities, and what better way to do so than with a FREE printable target? I discovered an excellent video that shows how to zero a rifle sight (which is something I’ve never done before).