
The modular, easily customized AR-15 is everyone’s favorite “build your own” rifle. Nothing gives you more satisfaction than putting one together yourself (and simultaneously infuriates so many anti-gunners).
Some, especially first-timers, will buy a parts kit that includes everything you need. You can pick one up for as little as $99. That’s a good idea, if for no other reason to have the parts on hand. Others will want to individually select every component so the finished product is exactly what they want when it’s complete.
Whatever approach you take to your build, this guide will go over the process of assembling an AR-15 lower receiver. We’ll take a step by step approach, but this is intended just for your information. If you don’t have the right tools or aren’t sure about doing building a lower receiver yourself, be sure to talk to a qualified gunsmith.
To clear up any possible terminology discrepancies I’ve included a full parts list of the AR-15 lower.

Tools
You don’t need any fancy or expensive tools. I’m using Allen wrenches, a roll pin punch, an AR-15/M16 armorer’s tool, lower receiver vise block, and a small flat head screwdriver. That’s it.
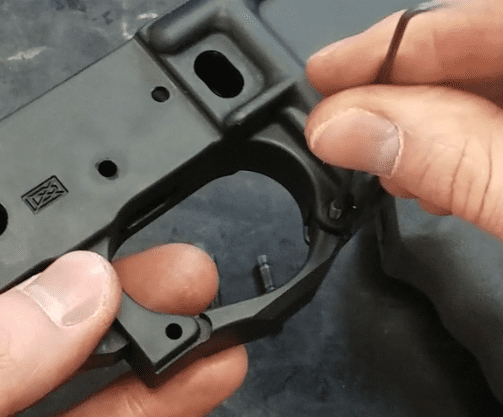
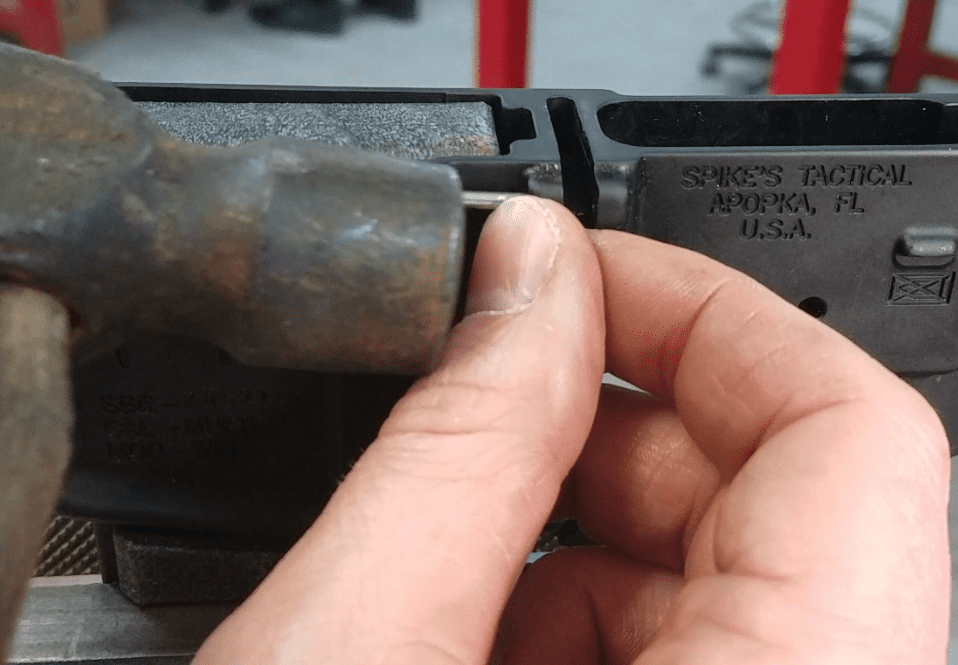
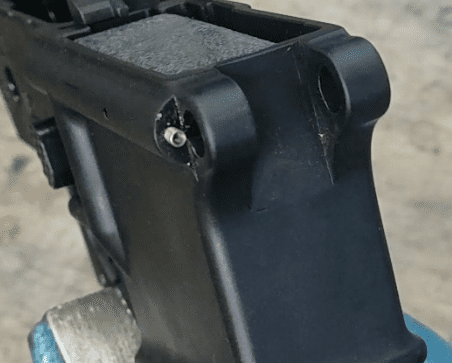
Trigger Guard Assembly
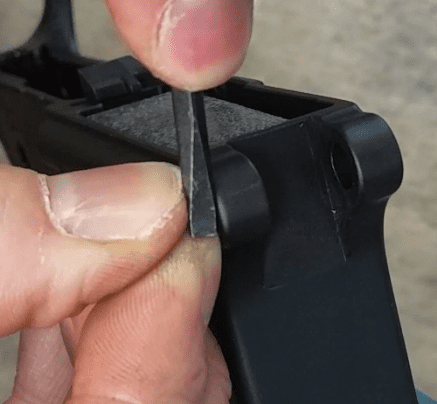
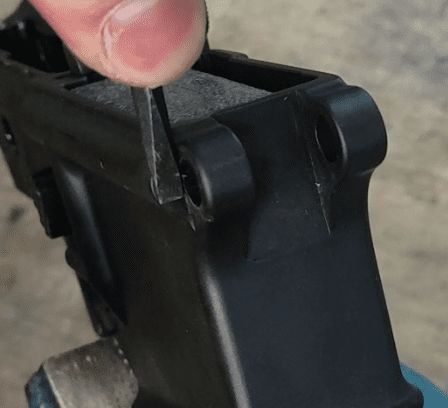
My trigger guard utilizes a set screw and roll pin. Some use spring-loaded detents. Either way, set the front of the trigger guard.
If yours has the spring-loaded detent, depress the detent and slide it into the lower until it pops into the hole. Line up the rear holes and hammer the roll pin in.
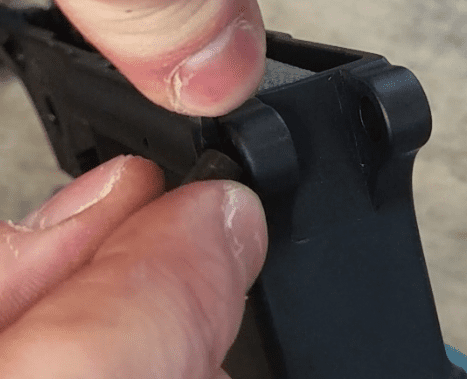
I finish it with a punch to make sure the roll pin is centered in the hole.
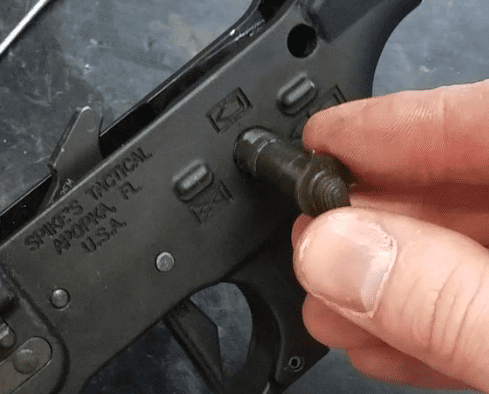
Magazine Catch Assembly
Grab the three pieces of the magazine catch. Insert the magazine catch into the lower receiver.
Put the magazine catch spring over the threaded end from the other side.
Then screw the magazine catch button on.
You should be able to get the button on by a few threads before it reaches the lower. Push the button deep into the lower and continue to screw it in by twisting the magazine catch.

Grab a magazine and test it out. You can tune how deep you need to push the button to drop the mag by screwing the magazine catch in and out.
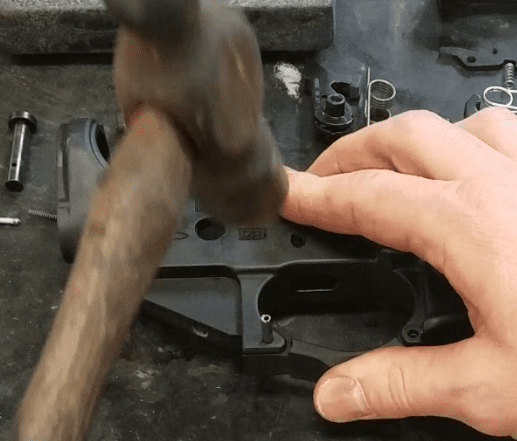
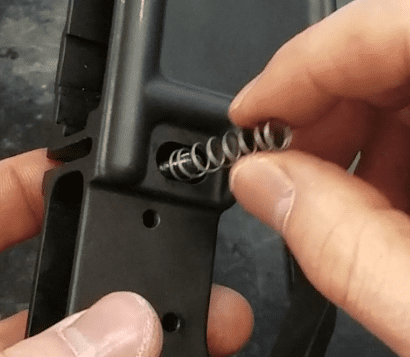
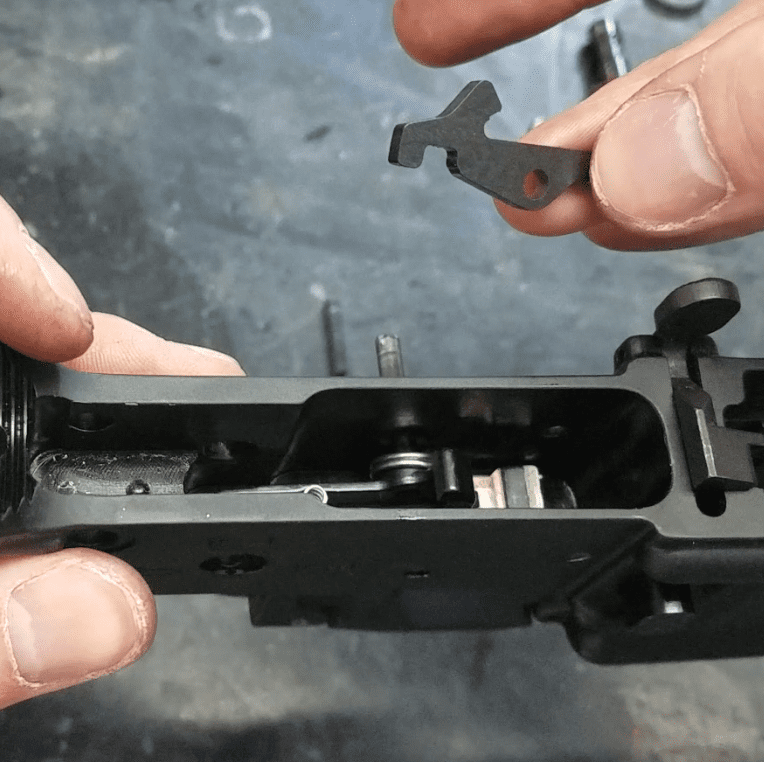
Bolt Catch Assembly
Gather the four parts of the bolt catch assembly. I like to get the bolt catch roll pin started in the lower first.
Install the bolt catch spring and buffer.
Line up the bolt catch and pound the roll pin through. I carefully tap the roll pin in with a hammer while I hold the catch with my other hand. Once the pin is holding the catch, I’ll finish it with a punch.
A vise and vise block are really handy (and inexpensive) tools for this step. You could also use pliers or small clamps to squeeze the roll pin in. If you’re worried about marring the outside of the lower, put some tape on it, take your time and be careful.
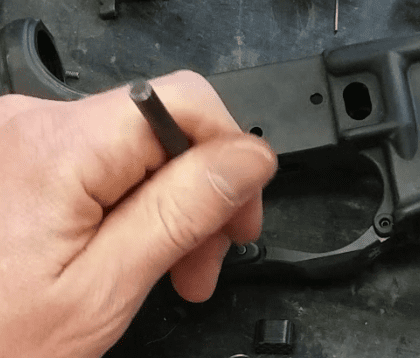
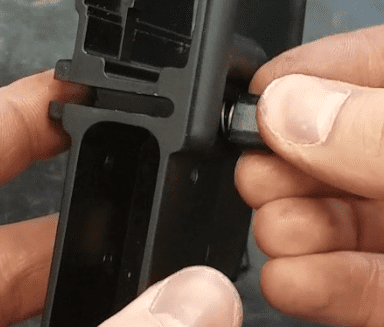
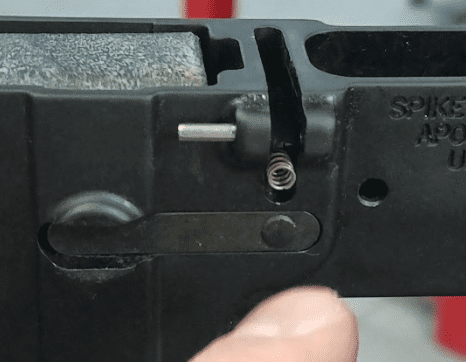
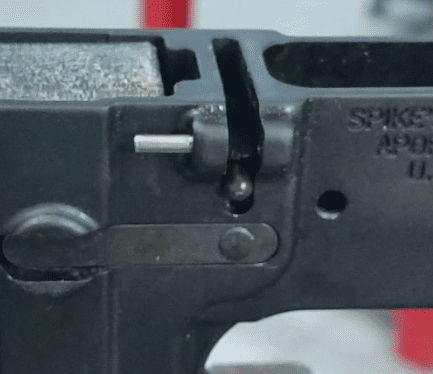
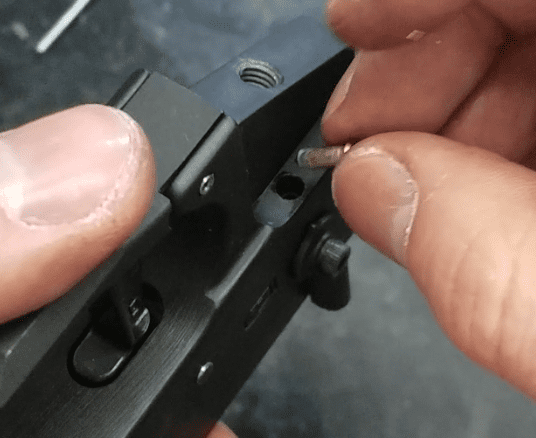
Pivot Pin
This one can be tricky, but is made much easier by a vise or a third hand. First, install the pivot detent spring.
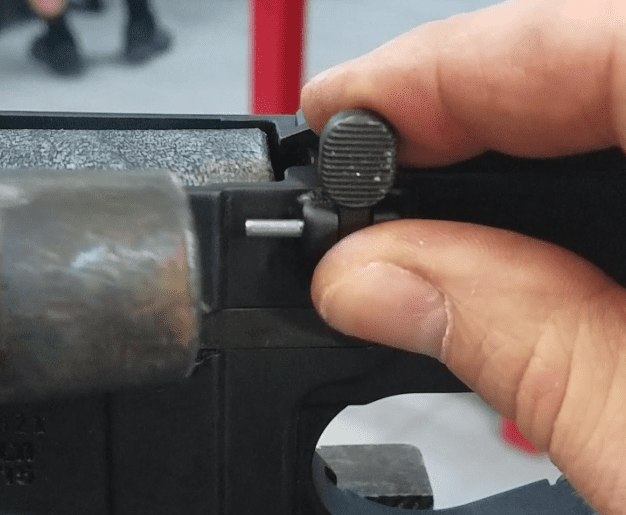
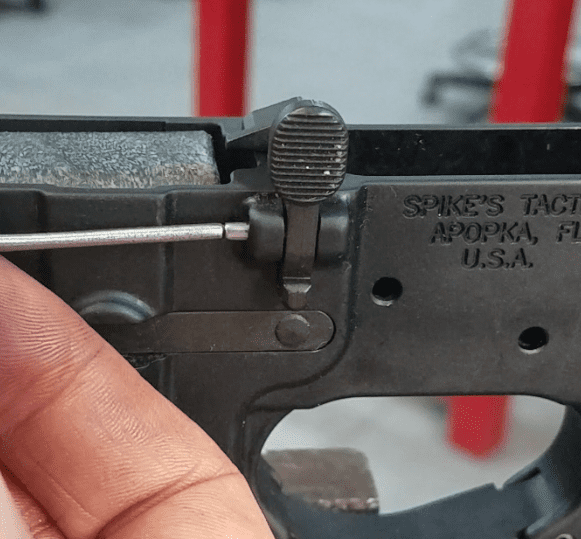
Now install the pivot pin detent. I used my index finger and thumb as guides to hold the detent as I press down from the top with a screwdriver.

This method works well for me, but there is no one right way to do this. Just get that little detent held in the hole by something thin enough to allow the pivot pin to access its hole. A utility razor works well too.
Start the pivot pin in the hole and remove the screwdriver.
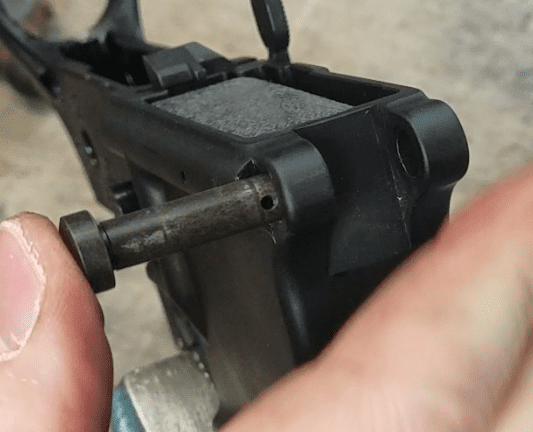
Twist the pivot pin until the detent drops into the trough on the pivot pin, if needed. There are some handy tools on the market that make this step easier, like Brownells pivot pin installation tool, but they aren’t necessary.
Be very careful when installing the detent. If you slip and it goes flying, good luck finding it.
If you can, drape a cloth or towel in front of the lower so if the detent does get launched, it won’t go too far. A wall works, but the detent will bounce or ricochet and still may end up lost. You might even want to buy an extra or two for your first build, just in case.s
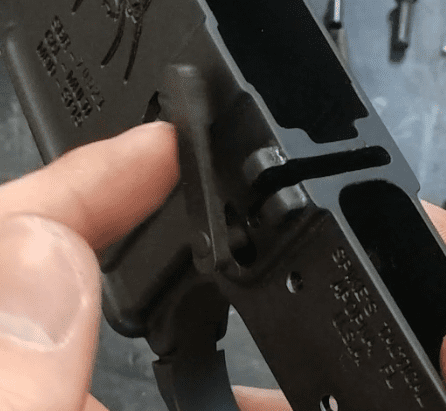
Trigger assembly
Start with the trigger. Make sure the trigger spring is installed correctly.
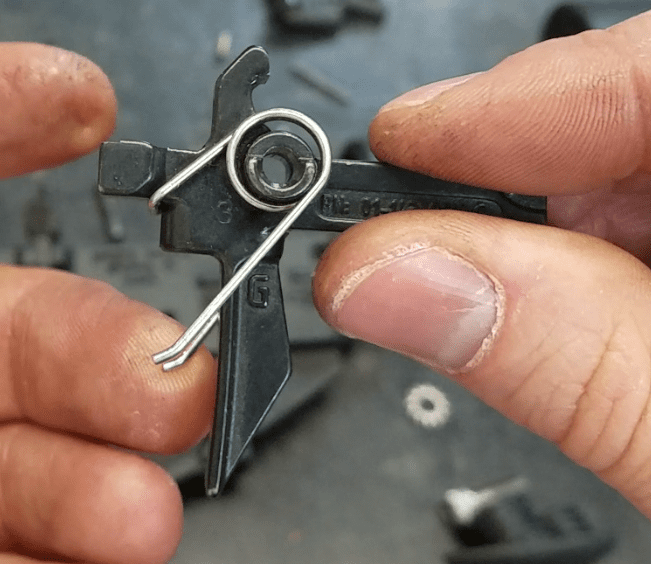
Grab the disconnector spring. Notice how one side of that spring is flared. That side goes into the slot in the trigger.
I like to install the trigger and get the trigger pin started on one side.
Grab the disconnector, make sure it’s oriented correctly.
Line up the hole in the disconnector and drive the trigger pin through. The trigger spring puts tension on the trigger. You will have to apply some pressure to make sure that the trigger’s pin hole is still lined up with the lowers trigger pin hole.
Next, grab the hammer. Make sure the hammer spring is installed correctly.
Put the legs of the hammer spring on top of the trigger/trigger pin.
Push it down until the hammer hole lines up with the lowers hammer pin hole and drive the hammer pin through. Like the trigger, the spring tension cocks the hammer, so you will need to apply sideways pressure to make sure the holes stay lined up on the far side.
Do not dry fire! The hammer will hit the lower receiver and eventually damage it. Cover the hammer with your thumb or hand to prevent it from hitting the lower as you ensure the trigger assembly is functioning correctly.
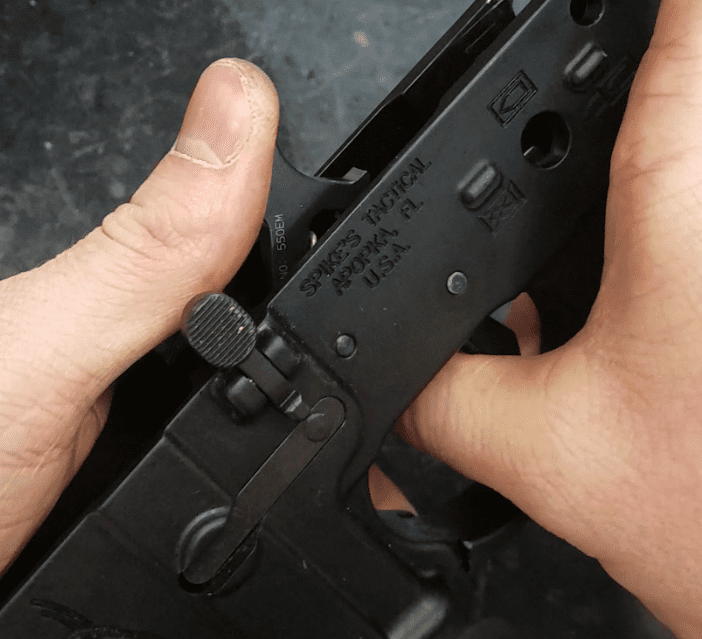
Pistol Grip and Selector
Put the hammer in the cocked position. This will allow you to insert the safety selector switch into the lower.
Grab the pistol grip, pistol grip screw, pistol grip lock washer, selector detent, and selector spring. Install the selector detent, pointed end goes in first.
This may help you visualize how the trigger and safety will work together.
Now put the selector spring inside the grip.
Get the grip started onto the lower. It may be tight and require some force. As you seat the grip, make sure the spring stays straight.
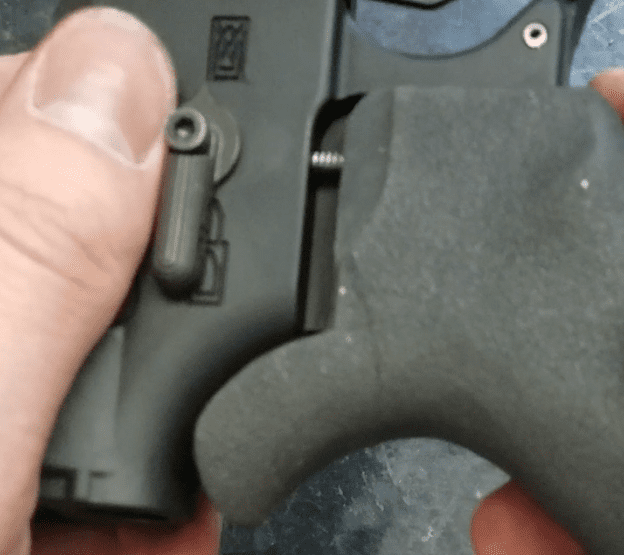
If you aren’t careful, the spring can bend and become pinched between the grip and the lower. This can damage the spring and impede its function. Now put the lock washer over the screw and screw it all together.
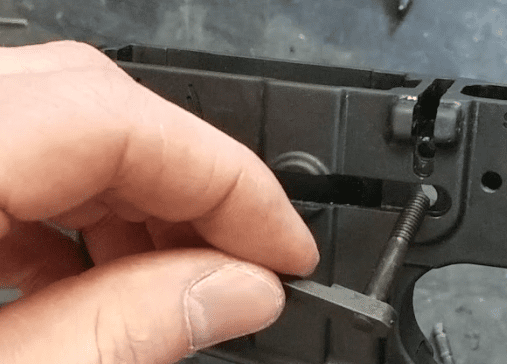
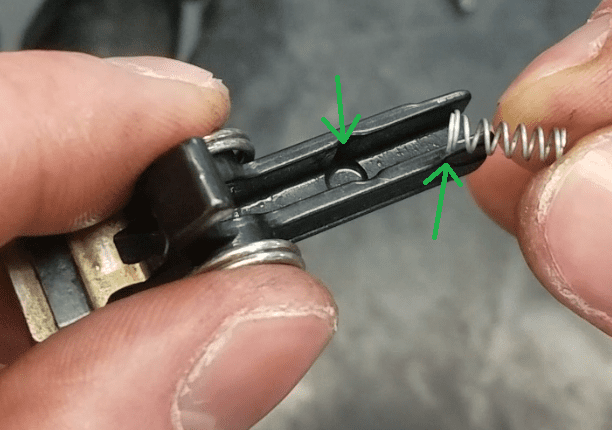
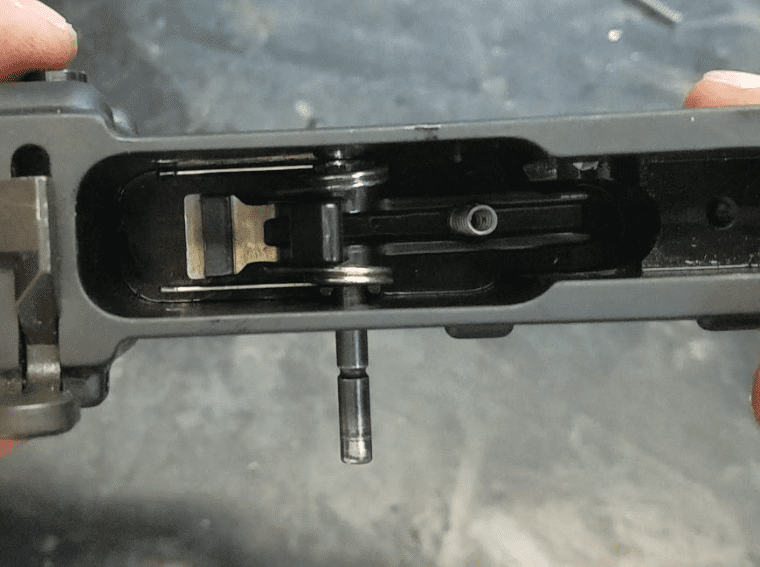
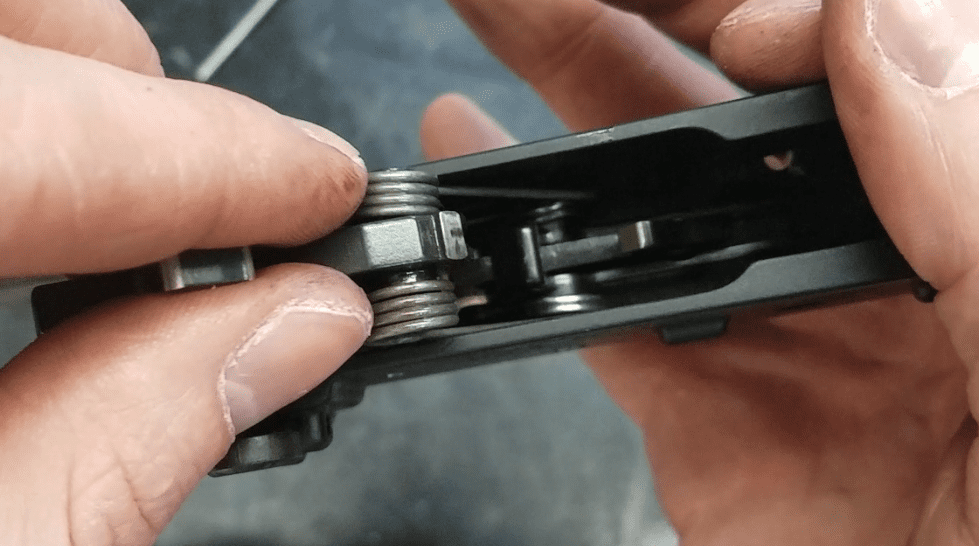
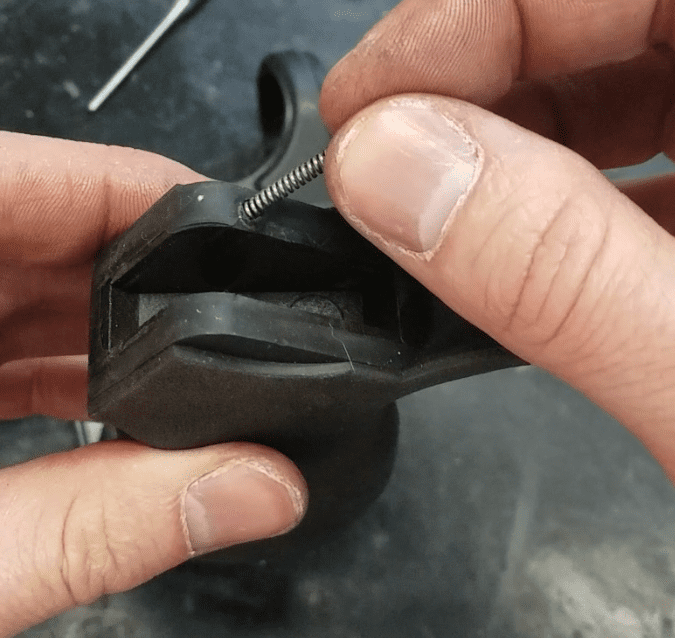
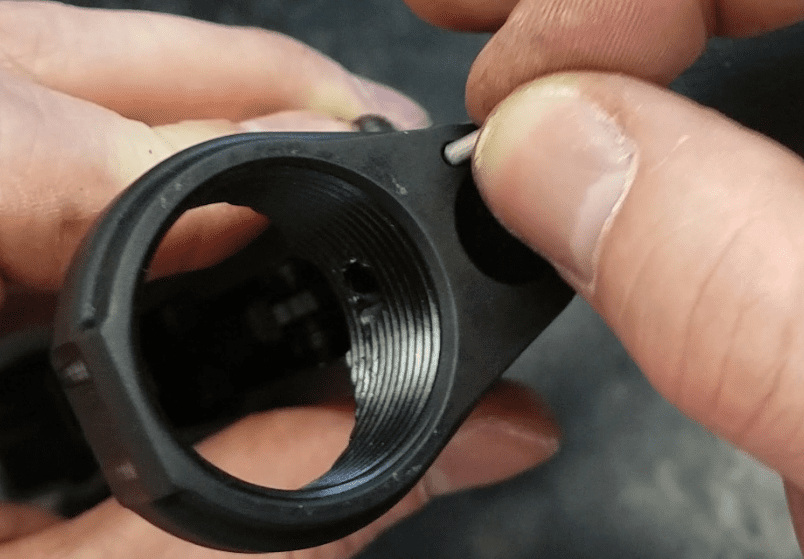
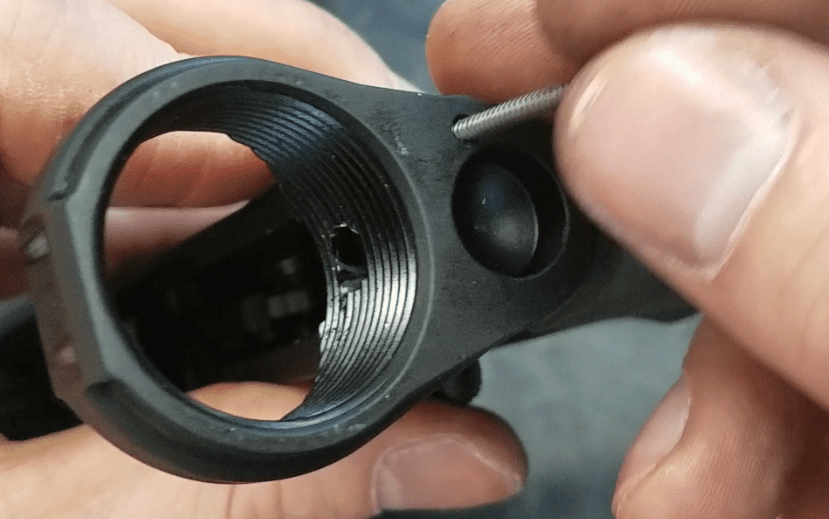
Buffer tube assembly
This step is also made much easier if you use a vise and vise block to hold your lower. First, insert the takedown pin.

Install the takedown pin detent and takedown detent spring.
Grab your buffer tube and screw the castle nut on as far as it goes. Make sure the “castle” part of the nut points rearward. Then put the stock latch plate on the buffer tube. Make sure it’s facing the right direction, with the indentation pointing into the lower.
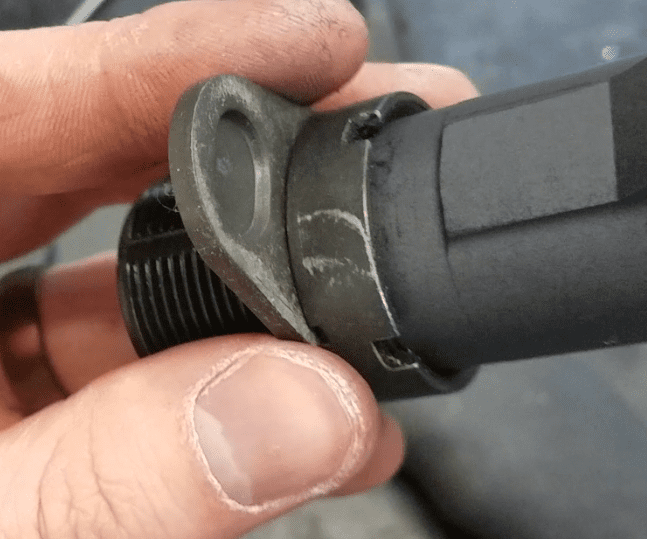
Keep the plate pressed against the castle nut as you begin to screw the buffer tube into the lower. Screw the buffer tube in until it gets close to the inner hole in the lower.
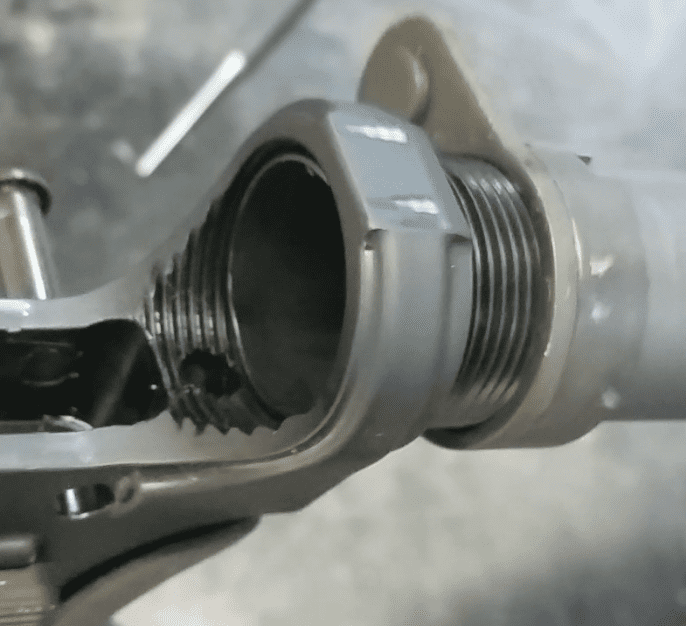
When it’s close, install the buffer retainer spring and buffer retainer. Depress it and screw the buffer tube in another ½ to one full turn, until the buffer is oriented correctly and the buffer retainer is captured.
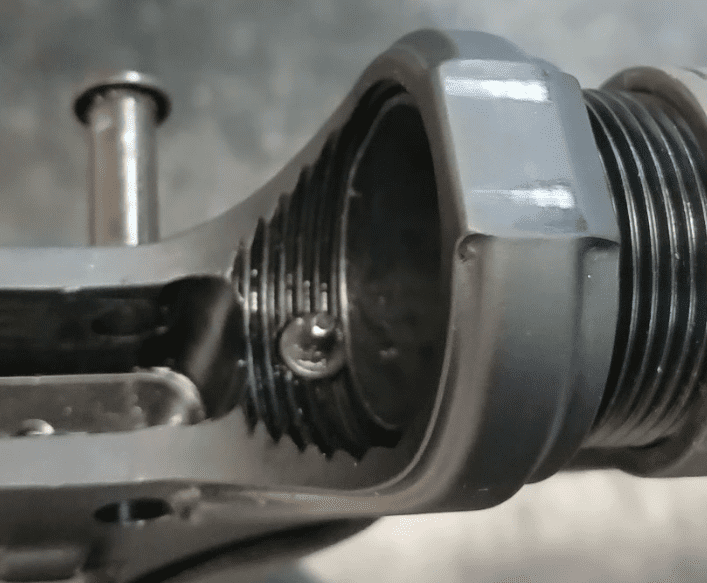
Push the stock latch plate against the lower, making sure the takedown detent spring doesn’t get pinched and tighten the castle nut.
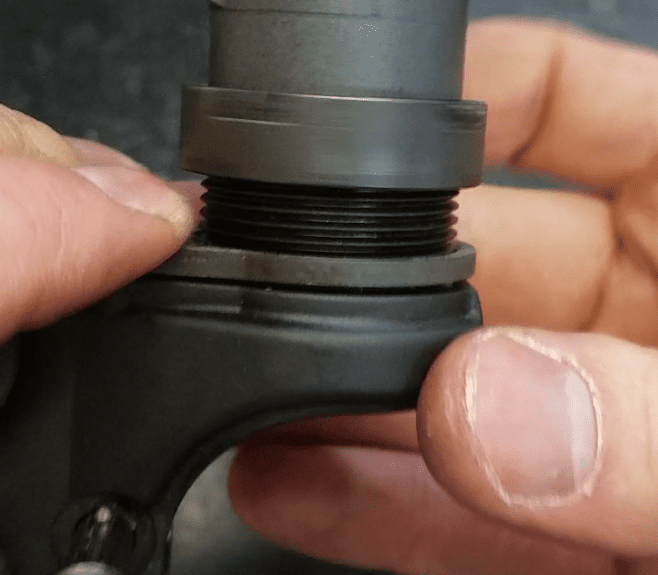
Grab your armorers’ tool, or a buttstock wrench, and get it nice and tight. Make it snug, but don’t tighten it so much that you damage you lower.
Once everything is good and tight, insert the buffer spring and buffer. You can stake the castle nut in position, or not. I don’t, and probably never will. I’ve run mine after only tightening the castle nut with a wrench without it coming loose. If I was really worried, I’d Loctite it before I staked it.
The Stock
The stock is inserted and removed by pulling the adjustment lever on the stock down and away from the top of the stock. Then slip the stock onto the buffer tube and release the adjustment lever.
There are many different stock designs out there now. The stock you choose may stray from this basic design, but the majority will follow it.
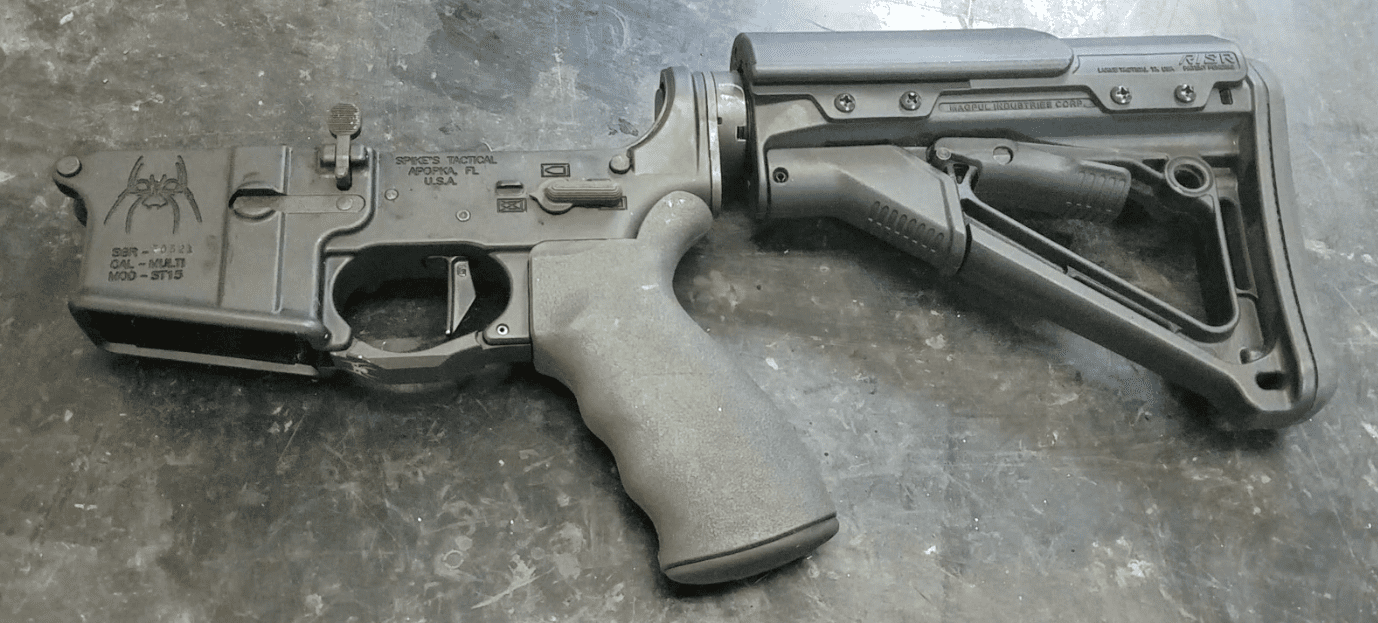
You should now have an assembled and functioning AR-15 lower receiver.
Although they aren’t required, I do highly recommend having a vice and lower receiver vise block for the job. My first build was significantly more aggravating trying to do it on my living room table. Those two items make the job significantly easier, holding everything for you while you work.
There are a ton of different aftermarket parts out there for AR-15 platform rifles, so be sure to read any instructions that come with the ones you buy. Also, because tiny pins under spring pressure are involved, eye protection is highly recommended.
Good luck and have fun.
Matt Sandy is a gunsmith who competes in both USPSA and PRC matches.


Vice block isn’t necessary.
The tool for putting the pivot pin detent in is much handier.
A vise block is a must unless you already know what you’re doing. And I that case you would already be using one. I love the Magpul BEV block. Here’s a good intro to is use.
http://professorprepper.blogspot.com/2019/01/the-magpul-bev-block-ar-tool-essential.html?m=1
I use a 1/4″ clevis pin for the pivot pin and detent.
https://www.homedepot.com/p/1-4-in-x-2-in-Zinc-Plated-Universal-Clevis-Pin-815418/204276164
Good trick.
Thanks… Great idea!!!
https://www.magpul.com/products/bev-block-ar15-m4
Must have.
Absolute must for barrel installations. A Geissele Reaction Rod works well too, but the BEV block works better in my opinion. You may have to shave down the locking lugs a bit depending on the barrel/barrel extension manufacturer.
And at half the price of the Geissele Reaction Rod… O well I guess my Reaction Rod can multitask as a bludgeoning instrument… 🙂
Tell me about it🙄 I had to buy one for my AR10 build because there is no other real option. The thing is just a solid chunk of steel.
Adult Lego’s. We had our Lincoln logs but they don’t take ammo. I have built a few, fixed a lot. Picked up a match grade Bill Wylde SS barrel for 50 bucks including the upper, cause the guy who built it torqued the barrel nut to about 70 foot lbs. Freezing didn’t work, heat didn’t work. But careful cutting with a dremel cut the barrel nut, not a mark on the upper. 🙂 Now it is on another upper for target. Shoots tight.
They may not be the hardest thing to DIY out there, but at least know your limits.
Two hints I’ve had over the years:
-Get a 1/4 Clevis pin (the one with a hole in it for a retainer pin) and your punch. Slide the detent/pin in through the hole into the lower then turn it so that they can’t “sproing” out. After that you just “swap” the take down pin in.
-You should probably have backing for the trigger guard roll pin. Never done it myself but seen a few of these broken off.
They make a specialty punch for the bolt catch. Haven’t ever used it but I can imagine it makes life a lot easier.
For anyone that hasn’t done it yet these are a fun, easy build overall.
For the bolt catch I use a pair of channel locks with rubber tape on one end to keep from marring the receiver and squeeze the pin in. Works slick as long as the tape doesn’t chew through.
Never had much luck whacking the pin in with a hammer, too much too little to hold, some guys grind the pin to a point to assist starting, that works well.
“You should probably have backing for the trigger guard roll pin. Never done it myself but seen a few of these broken off.”
Agreed. That should have been in the article. I used the slim rubber handle of a pair of small pliers that fits perfectly under the ear, supporting it.
A bit of goggle-fu will turn up tales of woe in regard to the trigger guard ears. I’d rather have it supported than risk a break.
I saw a builder use a 1 1/4-1 1/2″ c clamp with a small piece of inner tube glued to the non adjustable leg of the c clamp and he just turned down the clamp screw and drove the trigger guard pin in slick as snot.
I asked hi why he used the clamp ,he said no chance of breaking the leg off the lower that way.
With folks like PSA selling complete lowers for $129 with free shipping I doubt I’ll do a lot of tinkering(anyone USE their lower/upper)?!? Got a lot on my plate in my old age. Stocking up is obviously a great idea. There’s mucho internet & YouTube instruction out there too…
PSA lower – be careful. Went to a Project Appleseed event (highly recommended!) and a guy had two of these for himself and son. One worked sporadically (NG on a timed event!!) and one crapped out totally. I’d pass on them.
Built tons of PSA setups, any problems I have run into such as missing pieces or poor fit was quickly replaced by them. Otherwise I have dozens of units running fine, they need a good break in with good ammo but after that no issues.
Keeping in mind some has a lot to do with what you pay, a nitrated bolt carrier doesn’t require the break in period a phosphated one does.
I roll my 80% lowers thru my Ghost Gunner 2 and have used several different manufacturers. Every one that I’ve built gets mated with a PSA complete upper. I have built 5 so far and they are flawless.
Here’s a tip:
If you’re worried about marring the receiver when you drive in the bolt catch roll pin, then get a roll pin punch. They have a little dimple in the end of the punch to keep it centered on the roll pin. Makes driving in a roll pin in a situation like the bolt catch very easy.
Those are starter punches. I have a set of both starter and finishing punches to make the pin flush. I thonk Brownells makes a special tool just for the bolt catch pint that’s flat on one side so it lays flush with the receiver. I just use masking tape to protect the receiver.
I’ve heard of people using slip-joint / Channel Lock pliers with electrical tape over the jaws to press in all their roll pins. Sounds like a good idea but I haven’t had any luck with the method. I still just tap them in.
I do the channel lock with rubber electrical tape over one end, works very well, pin slides right in.
I can’t hold the pin, punch, hammer, and all at once to save my life 🙂
Use of a KNS Precision bolt-catch-retaining-pin,in place of the roll pin eliminates the hassle and possible scaring of the lower during installation and if later one wants to add a different or extended bolt catch it makes it simple.
https://www.rainierarms.com/kns-precision-bolt-catch-retaining-pin/
If you have a drill press, you can use it to “push” the roll pins in to their required positions.
Or use an Aero Precision M4E1 lower, and make your life vastly easier. No trigger guard installation, 4-40 set screw for the takedown pin spring, threaded bolt catch pin, and a nylon tipped tension screw to get rid of ‘receiver rattle’. These are by far my favorite lowers now.
This. I love working with those lowers.
Just started a new build on an Anderson lower today. I threaded the rear take down detent/spring hole with a 4-40 tap to thread in a set screw. I got a pack of set screws from Amazon, but you can probably find them at Lowe’s etc.
I also have an Aero M4E1 lower to build!
Building AR 15’s is addictive,can’t build just one.
That said the only step and guidance provided I differ with is the front pivot pin installation. I have the 25.00 tool and frankly it’s a waste of 25.00,I use the method using a tooth pick and safety pin,it provides success and a lot less lost springs and detents,I put the link to this method below,have fun because building lowers is fun.
How to Install Front Pivot Pin
That’s pretty slick.
It just works.
I gave away my 25.00 tool and warned the fellow and told him the procedure I lined out,he tried that first and told me latter he too passed on the tool to yet another fellow.
This is a well-done article. A lot like rebuilding a carburetor or distributor back in the analog days. Nothing I “liked” to do, but did when I needed to do it. For me, if the lower has to be bought through an FFL, it defeats the purpose of building it. I am not into custom rifles and don’t have the machining setup for an 80% lower. But it is good to know that a repair is no more difficult than what we used to learn in shop class.
Given the Socialist book burning raids and content striking, Is it possible to provide this article as a PDF for download or add a link to print the article?
“Is it possible to provide this article as a PDF…”
CutePDF Writer –
It’s a utility you add to your computer that converts a web page, *any* web page, into a PDF file you can save…
http://www.cutepdf.com/
Even better is to grab a book on Ebay or Amazon on a complete guide to AR15 assembly and maintenance. They aren’t very expensive and they contain a lot more information such as types of lube for barrel extension threads, reasons for gas system lengths, tolerances, trigger group types, etc…
Here’s where I got my start. Great Book.
https://www.fulton-armory.com/thear-15completeassemblyguidebuildyourownar-15.aspx
While preparing to install the trigger guard I highly recommend that a series of coins be taped together to fill the unsupported ear on the bottom of receiver where the pin passes through. If not supported the ears are easily snapped off when attempting to drive the pin in.
You are putting the bolt catch roll pin in the wrong way (no proper training I guess). THE FIRST THING THEY TEACH YOU IN ARMORS SCHOOL IS YOU NEVER HIT A ROLL PIN WITH A HAMMER. Your example of detent instructions is poor, I have been building them for 35 years +
Ya know, that whole 35+ years of armorers experience would look a bit better if you could elaborate on how YOU would install the pin instead of leaving the audience on the seat of their pants…?
FYI, I agree mushrooming the pin with a hammer isn’t the best, I drive them in with either a clamp, pliers, press or vice. Ive done trigger guards on the press but generally pliers work fine then set with the punch.
I believe I dislike the uppers dust cover C clip more than the bolt catch pin.
Boy is that takedown pin tool a godsend. The first one I built had me inventing new curse words. The Magpul Bev block is good for a mag block. I have pieced a full tool kit together over a few years when things were on sale on Brownells or Midway and I had some cash I would be happy to part with. I have yet to build an upper but I have done a bunch of handgard changes for various people. So putting an upper together should not be that hard. I have a couple lowers in inventory so I am thinking about getting a couple upper stripped uppers and a spray gun and doing some paint work.
Uppers are stupid easy.
Pin in the forward assist assembly, dust cover slides in and gets that super baby C clip (worst part).
pop the barrel on and spin on a barrel nut and torque. Add the gas tube and block and handrail and shes done. Pop the go/no go gauges in to verify and send it.
Use a $1.50 clevis pin for the front detent take down pin. Prevents frustration.
Астрологические программы. http://astrologia-profi.ru Профессиональный астролог проводит обучение астрологии, вебинары по астрологии. Консультации астролога, прогнозирование событий, анализ личной жизни, профориентация детей, подбор условий для эмиграции, анализ совместимости мужчины и женщины
Астрологические программы. http://astrologia-profi.ru Профессиональный астролог проводит обучение астрологии, вебинары по астрологии. Консультации астролога, прогнозирование событий, анализ личной жизни, профориентация детей, подбор условий для эмиграции, анализ совместимости мужчины и женщины
Гадаю дистанционно 30 лет. Оставьте ТОЛЬКО !!! сообщение в Вотцап на телефон +1 (248) 730-4177. Я С Вами свяжусь сама. На неизвестные звонки не отвечаю