Several years back, I took a class at the SIG SAUER Academy where one of the instructors made a brief statement that fundamentally changed my views on modifications made to firearms. The essence of it was, “Any modification should help you shoot the gun better. Anything that you have to fight has to go.” That advice slowed my urge to mod every gun I acquire unless that change was going to help the gun help me. Grip modifications for polymer framed handguns were relatively new to me at that time, but the more I’ve played with stippled pistols, the more I’ve found that I like a grippier texture. The problem was the price, the lack of customization, and the wait. For better or worse, Oregon Trail Defense has provided a solution to those problems . . .
For those not in the know, stippling is the process of creating divots or impressions in the surface of a material, usually the plastic frames of today’s defensive pistols. These are permanent modifications with the upside being that the newly stippled surface provides a bit more grip and purchase than the original molded texture. The downside is that if you go crazy, you can damage a firearm beyond hope. As such, there are several professional shops that will take your money and firearms and return a professionally stippled product. Wait times are anywhere from days to months and costs vary just as much.
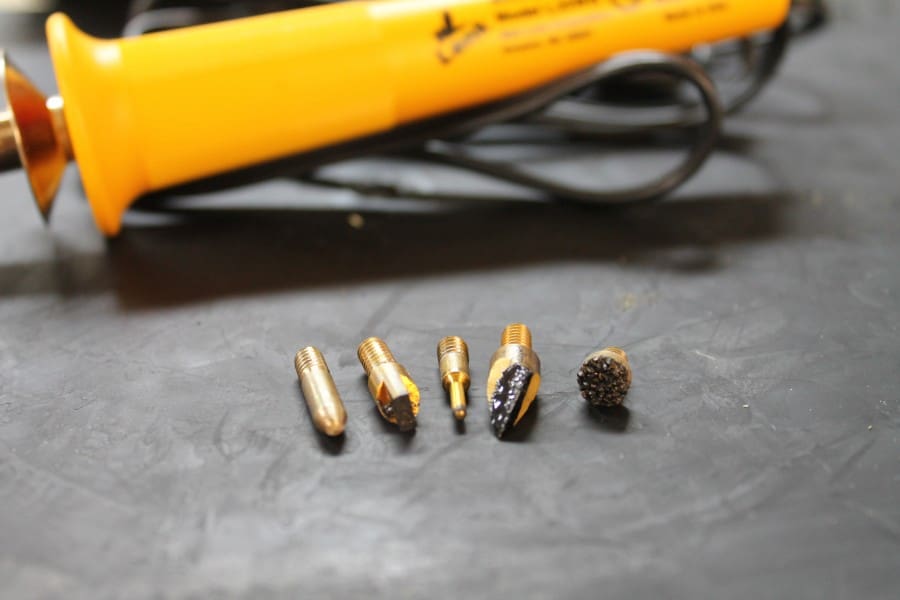
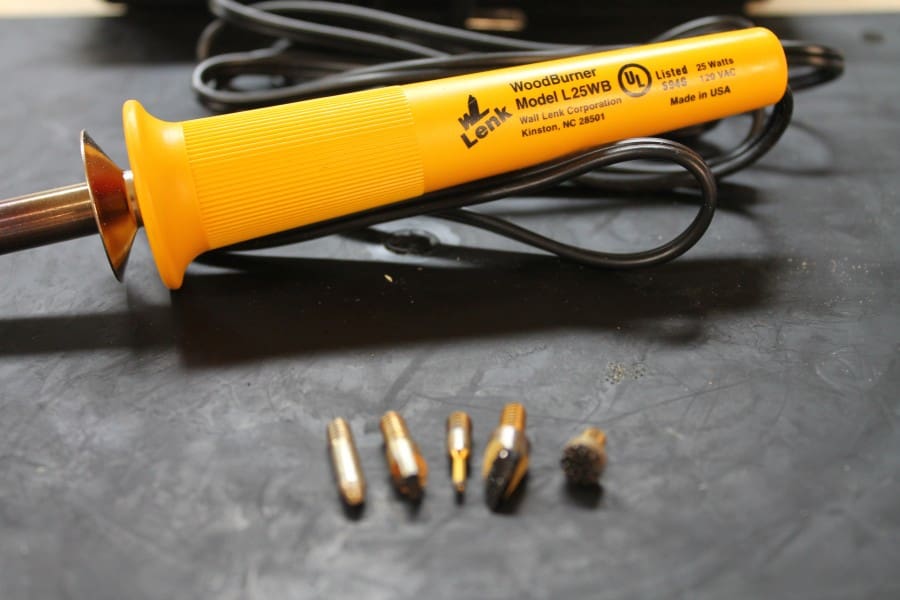
Many DIY-ers elect to purchase the tools of the trade — in this case, a soldering iron or wood burning kit — and go at it alone. The Oregon Trail Defense tool kit doesn’t claim to be much different that those options. In fact, it still says Lenk WoodBurner on the side.
As far as I can tell, most of the Lenk WoodBurners on the internet differ from this package in three ways. First, they’re the thirty-watt version while this is the slightly lower power twenty-five-watt version. Second, they don’t come in a handy case that also does double duty as an awesome practice surface. And most importantly, they don’t include the waffle tip you see pictured on the right. More on that later.
Setup is supremely simple. Select the brass tip of your choice and screw it into the WoodBurner. Plug the WoodBurner in and let electricity do its thing. Mine got noticeably hot after thirty seconds and was up to max temperature in just a few minutes. From there, simply press the hot tip into the plastic of your gun, and start making patterns.
Oregon Trail includes two pointed tips, good for making circular pattern stipples, and a sharp blade and “notch” tip that are great for making aggressive divots. I spent the better part of thirty minutes burning all sorts of designs into a spare A2 grip. I found that a quick trip across the belt sander was a great way to knock down the high spots of the original texture, and then I could commence stippling to my heart’s desire. The relatively low wattage of the OT kit made sure that I didn’t plunge any of the tips straight through my practice pieces.
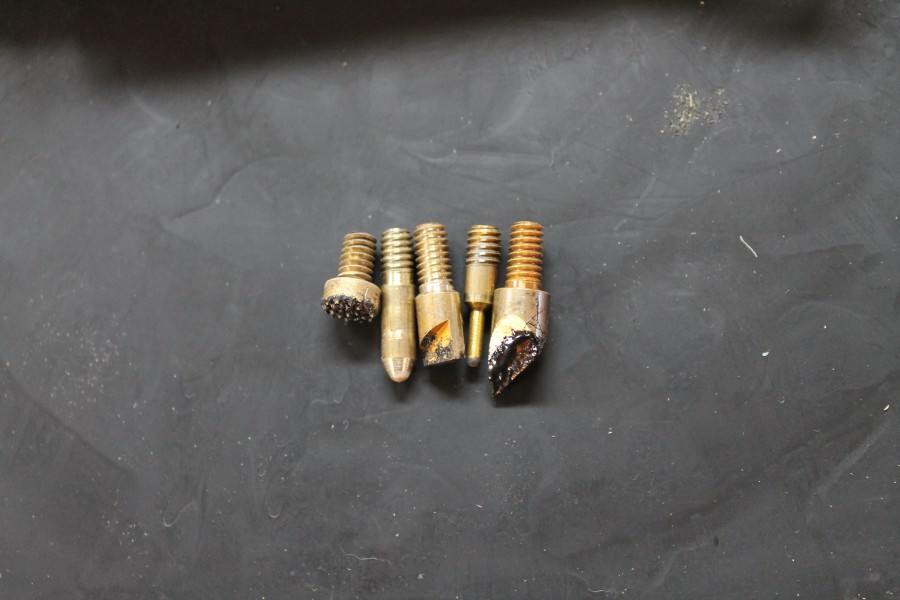
The last tip that I tried was the waffle tip, the one you see on the left above. The Oregon Trail team shows this tip being used to create deep circular impressions in the material of choice, but I elected to dab it on the surface in a quick and slightly random fashion. I was able to create a pretty nice, even, rough texture all over the A2 grip, but I found that the longer I worked, the hotter and more malleable it got. Eventually, I had a bit of mush on my hands, and my texture was lost.
At roughly the same time, I realized I was getting sick of the smell of burning plastic, so I placed a small fan near my work area. Once the A2 grip cooled, I got back to work and found that the fan also helped keep the piece cool and further defined the texture. Compared to the side I’d done without the fan, the texture was quite a bit more even and had a much more consistent, sandy feel to it. Feeling good about my skills, I plucked a handgun from the safe.
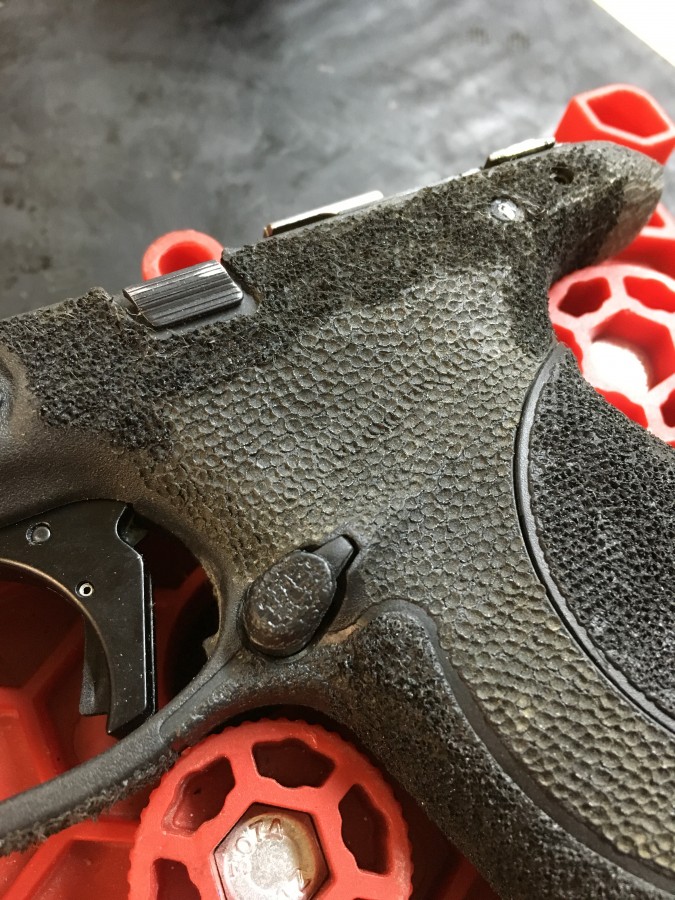
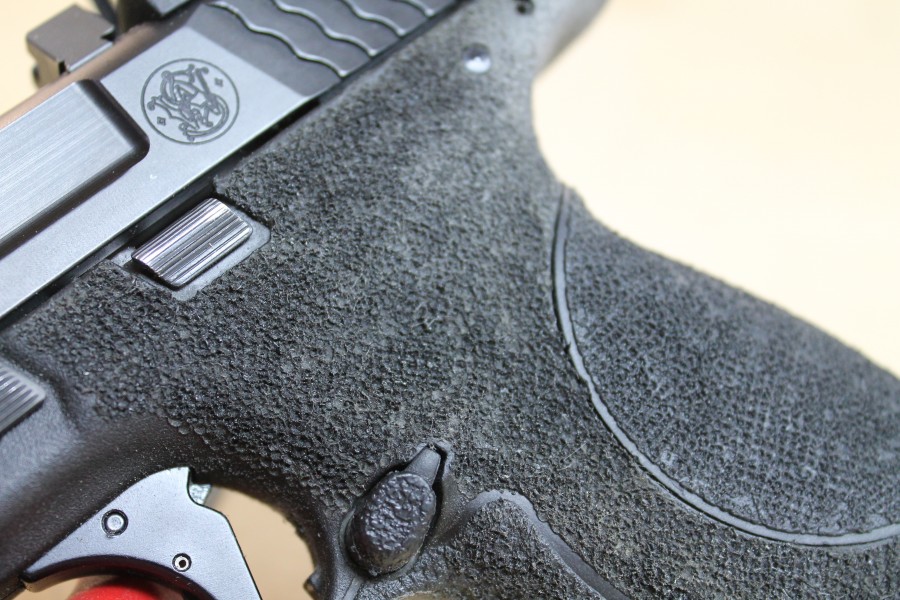
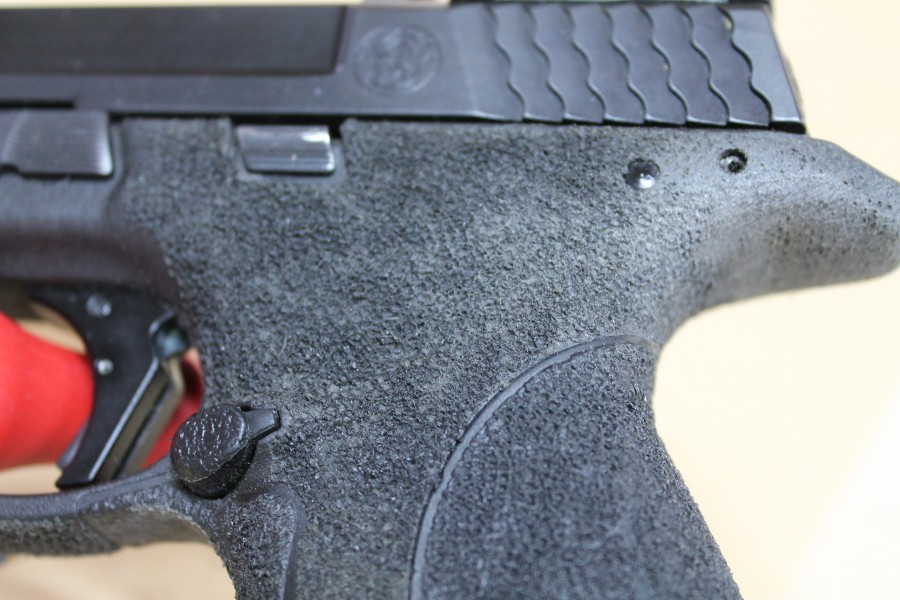
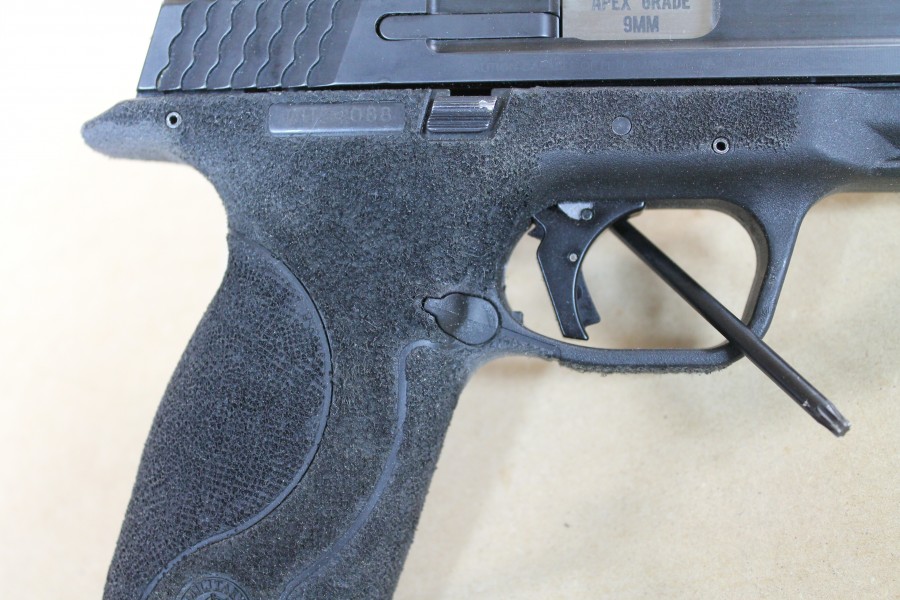
As you can see, my M&P9 had already gone under the iron, so to speak, prior to my ownership of it. The stippling was, shall we say, not great. Figuring that it couldn’t get worse, I started in with the waffle tip, the fan, and quite a bit of patience. Much like going over old tattoos, the waffle tip slowly covered up the prior owner’s work with something that was passably better. You can see the line above between old and new. And much like tattoo work or house painting, I had to go a bit further than the previous owner to cover up the previous job. The result was a gun covered in a sandy and very grippy texture.
Dry firing the gun, it became immediately apparent that parts of the grip were going to rub me raw unless I wore gloves. Specifically, the area around the backstrap. Out came the Dremel and a bit of sandpaper. A few minutes later I had it smoothed down a bit so as not to chew up my hands.
The end result is admittedly not pretty, but to be fair, it wasn’t great to start with. If your ultimate goal is to make really aesthetically pleasing designs, I have no doubt that the Oregon Trail kit will help you get it done. You’ll also likely ruin some items along the way.
If you want your gun to be beautiful, remember the only way to get to Carnegie Hall: practice, practice, practice. If artistic flair isn’t that important to you, but function is, the Oregon Trail Defense kit is still a good bet. You’ll have a grippy gun (or several) and you can adjust the location and texture to your individual liking. Just beware, it might not look good when the smoke clears.
Specifications: Oregon Trail Defense Firearms Stippling Kit
- 25W WoodBurner
- 5 Tips
- Hard Case (doubles as practice medium)
- Stand
- Price: $48.95
Rating (out of five stars):
Overall Rating * * * * *
Short of having a rheostat to control the heat at the tip, I think this kit is ideal. I played with the pointed tips a bit, but the real star of the show is the waffle tip which creates a nice, even, sandy texture that does great things for your grip…wet, dry, muddy, or bloody. As someone who’s prone to losing the little bits like those that come in the kit, the included hard case is a great touch on an otherwise fine American-made product. At $50, it’s much less expensive than paying someone else to do the work, and you can be guaranteed that you’ll be the only person to blame if the job doesn’t turn out well.


This is ugly as hell, like many (most) stippling jobs. Stippling can- and should- be both functional and aesthetically pleasing. There are all kinds of techniques and styles, and none of them are particularly difficult. Burst stippling, vortex, cross hatching, wide dots, etc. Check out Weapon Worx or just Google “gorgeous gun stippling” or something similar to see what stippling SHOULD look like.
It’s a black plastic gun – how visually appealing can it get? Appearance wise and before the stipling, it was already on the same level as cheap plastic garden tool to me.
If stippling was as functional as some people want me to think then Smith and Wesson would be offering it from the factory. Right now it strikes me more as “my gun is better because it’s DIFFERENT.”
https://www.smith-wesson.com/firearms/mp-45-shield-thumb-safety
I’ll just stick with a $20 soldering iron.
Wow, Kee I don’t think these guys like your stippling job. Clearly your second hand Smith is not a safe queen, nor should it be. Doesn’t have to look pretty, no one is parading her around the party saying ” hey everybody, look what I have in my pants!” Fellas, take it for what it is, a gear review. If you think it could be done better, get the kit, write your own review, send a pic and win a Sig clone.
Thanks for the review Kee, I’ll look into that when I get a M&P. If. No when. Probably if.
touchy
I hated handling a Glock before I had a used G19c go under the iron at my local outfitter. Now (along with some smart shaving) it’s one of my favorites. It’s the same stippling found on this: http://tinyurl.com/goaeec3
So there’s definitely a place for it. But I would have never attempted it myself, no matter how nice the soldering/wood-burning kit.
That looks alot like the PPQ grip texture, but grippier. I like it
What’s that smell?
Oh, that. It’s my resale value going up in smoke.
I’ve never modified any of my grips. But if I did, I think I would opt for Talon Grips instead. At least that can be removed.
“What’s that smell?
Oh, that. It’s my resale value going up in smoke.”
Is there a ‘rule-of-thumb’ on how much a bad stipple job kills the resale value of a plastic wonder?
No. A used polymer gun is pretty much a used polymer gun no matter what’s been changed. A good stippling job can actually raise the value if it’s sold to someone who wants that on a gun.
Well lets ask the crowd. For me, If I saw the m&p in the article in a used gun case It would have to cost less than $40 for me to buy it and only if you proved it is still functional.
Instead of permanently scarring your firearm, you could just add some Talon grips and if you change your mind just peel them off.
http://talongungrips.com/
I have a Talon Grip on my XD and it’s amazing.
Kee,
It’s your gun, probably not a BBQ gun, looks like it’s for utility only – not a safe queen. If it improves your grip and shots – great. Thanks for the article.
If you want to try out the grippier texture on your pistol before committing to melting plastic, I recommend Talon Gun grips.
I’ve stippled my Benelli Nova (pump and grip) that I use for 3gun. Easy job. Turned out well.
Resale value? What is that? Why would you sell a gun…sounds Communist.
” Why would you sell a gun…sounds Communist.”
Selling a gun = Capitalist
Surrendering a gun ‘For the good of society’ = Socialist, Communist, or outright Marxist….
For those who are worried about ‘ruining their plastic gun’, I would like to remind you that one can blow a hole in your body with a pistol of any sort, and by owning one, you are saying to society that you are a mature, responsible, and safe adult, who will not inadvertently shoot yourself in the face, hand, foot, or otherwise. So if you are mature and responsible enough to own and even carry a firearm, but not enough to take a 25 watt heating device to a piece of plastic without causing the stars to fall from the heavens, perhaps you should reconsider owning a firearm in the first place….Maybe pepper spray? Nah, could spray yourself. Perhaps just stay indoors.
Laser cut grips are great and pretty, but for those who are concerned about function, put some water on your gun then see how grippy laser cut rubber grips are, or even skateboard tape. Stippling is for work guns, not safe queens.
“Pick your stipple, attach, plug it in and let electricity do its thing”.
Electrons are a wonderful thing.
Especially when gleefully leaping from the anode to the plate.
Making a beautiful purple color on the glass envelope…
Wow, that is a horrible stippling job.
And this is from someone who is generally pro stipple, but not if it looks like that.
This is my PX4 that stippled with a $10 soldering iron.
http://i1232.photobucket.com/albums/ff366/Aerindel_Prime/photo_zpsomvtakfn.jpg
Nice, I avoid stippling like the plague. I have done a few small things. My bodyguard .380 flat fitting magazine base plate, and an area on the frame near the barrel to rest my non dominant thumb so it doesn’t slide forward and get shot off. I used a medical device that was free after a toe injury and used to burn through my toenail, very high heat, very fine tip, it does not look great like yours but functions. I have also done a small square on my BlackHawk! Retention holster, if using leather glove, I can engage the button a little quicker.
TALON GRIPS BLOW. tRY DRAWING FROM CONCEALMENT A FEW THOUSAND TIMES AND TELL ME IF THEY HOLD UP! Just take your time people and you can do a very pleasing (functionally and visually) job. I just did my first and it turned out pretty damn good for using a 20$ variable watt soldering Iron.
https://www.instagram.com/p/BQsgcQQjwQrhnCOBv2peGMBIeBszmc_brV8e3c0/