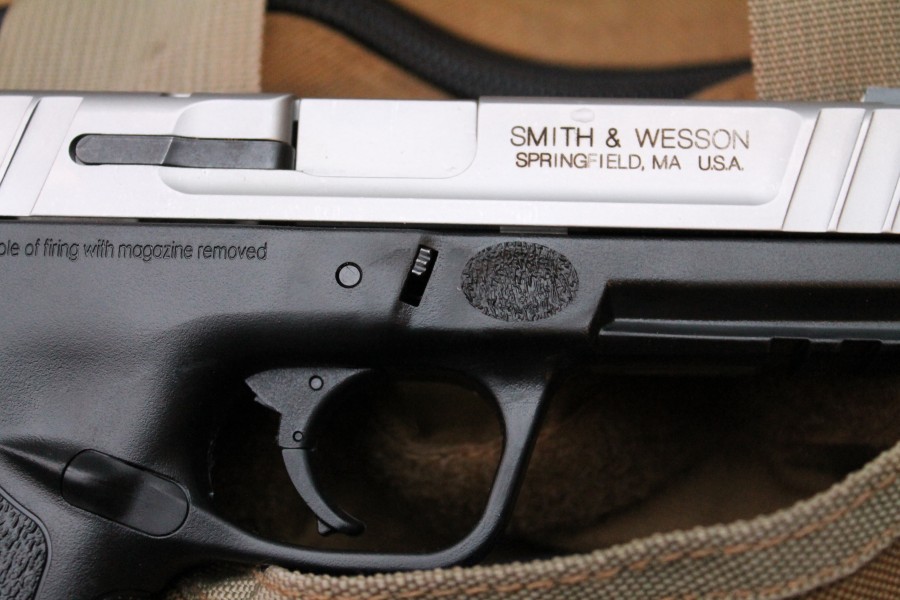
There are two (gunny) things I hate: low combs on rifle stocks, and crappy triggers. And readers, the Smith SD9 VE trigger ain’t nothin’ to write home about. Coming in around 8 – 8.5 lbs, it’s a gritty, terrible road to get there. And like all (or most) things, it can be fixed. But spending a few hundred dollars upgrading a gun that has an MSRP of $379 probably doesn’t sit right with most people. Law of diminishing returns and all that. Our friends at Apex Tactical happen to agree, which is why they sell a Spring Kit for $19.95 that can clean up that mess S&W left in your safe . . .
I’m no stranger to the Sigma family of pistols. In fact, I did a writeup back in late June on how to take a Sigma trigger from awful to decent for less than $5. And while the SD series isn’t a Sigma, the guts of the pistol don’t lie. There are some crappy trigger genes in the SD9’s DNA. But for the price of a meal for a family of four at Subway, your SD doesn’t have to be so low brow.
The 4-piece Spring Kit from Apex contains a trigger return spring, a striker block spring, a striker spring, and a slave pin to help during installation of the trigger return spring. The kit promises to improve the overall characteristics of the SD trigger and bring the pull weight down from the 8’s to the 5’s.
Installation
As with all of their kits, Apex provides a handy video on how to install your springs.
I found Scott’s video to be very well done and extremely informative. Truth be told, had these instructions been written, there’d still be a pile of SD on the bench. Scott is clearly a talented guy, and if you follow the instructions, you too can install one of these kits. My only issue during the install was getting the trigger return spring pin out of the frame. It took me two weekend sessions and probably 2 hours of struggling before I finally got it. When I emailed Scott for some pro tips, his response was the following.
I’m sorry you’re having trouble with the SD kit install. The most difficult part is the removal of that pin. It’s the same process as removing the Glock trigger pin, it just takes some time and practice.
I did have one customer tell me that he spent nearly 2 hours on it and was about to give up so he called me, I suggested he take his mind off it for a while then come back to it. He called back 2 hours later and said “Man it worked, I took a break, had a couple beers and went back and tried again and it came right out”. I’m no advocate for drinking and playing with guns, but it worked for that customer.
I took Scott’s advice, took a week off, and came back to it with a clear mind and a small rubber mallet. I gave it a little mechanical persuasion, and within 10 minutes of picking up where I’d left off, things were going back together.
Range Impression
The trigger pull is now under 6 lbs. which is a huge improvement. There’s still a long way to go, but it’s an easy trek until just the last little bit of takeup. The reset point is still wayyyyy out there, as you can see in the video below. I think that could be resolved, but we have to take a step back and ask ourselves if it’s really worth it. Twenty bucks is a small price to pay to get a good trigger in an inexpensive gun.
Apex did a really great job with this kit, and if you have the right tools to get the job done, don’t hesitate to contact them and get one on order. If you aren’t sure of your gunsmithing ability or don’t own the necessary tools, give some thought to sending your SD off to Apex, and they’ll do the install for you. It will take about 4-6 weeks and cost you $80 + shipping. Better yet, find a friend who’s comfortable and pay them a 6 pack of beer to install it.
Apex Tactical SD Spring Kit
- Includes: Trigger Return Spring, Striker Block Spring, Striker Spring, and a Slave Pin
- Cost: $19.95
- Installation Time: ~20 minutes if you are Scott Folk. Anywhere from 1 hour to 3 hours depending on that TRS pin.
- Installation Difficulty: With the right tools, fairly easy.
- Installation Cost: If you choose not go the DIY route, $60 for the installation and $20 for test fire + shipping.
Design * * * * *
The Spring kit is very well designed and comes with all the right stuff to get things done.
Functionality * * * * *
Our T&E SD9 performs flawlessly now. I have had zero reliability issues and would feel totally comfortable carrying the SD.
Overall Rating * * * * *
This is a well-put together kit that will make a “cheap” gun feel like a couple thousand bucks.


Nice review. Of course, the wise consumer would purchase a different handgun to begin with if the factory trigger pull isn’t appealing.
For those short on cash for a new 1911 or Sig, TTAG should complete an article on buying used guns. Being a veteran college student living off a government stipend, I could offer some real-world tips .
That makes sense if you have no real budget. Why does a twenty dollar kit make the gun of no value. The advice to find a different gun with a better trigger is silly IMO.
I have many guns I love the trigger from the factory. NONE of them cost 360 bucks. I have an SD40VE now which has a trigger kit and the trigger is very good for a $380 gun(with kit)
Even more so now that a year later you can sometimes score an SD9 at Academy for $289, or $319 if you’re too impatient to wait for sale.
I had an SD9VE. I., too, was going to do the Apex fix. And the guide rod and recoil spring fix. And the trigger bar fix. If I dropped another Benjamin on my three bill SDVE and the moolah make it into a $400 H&K VP7 workalike, I would have gone that route in a heartbeat.
The other route was to buy a new gun in the same revised price range that would be better than the SDVE in ways that went beyond just an easier to pull trigger.
The SD’s trigger was not the only fix my SD needed. The grip was too thin and slippery. A Hogue Tamer or Pachmayr grip might have fixed that for $10 or less. There were other ergonomic problems that popped up as well. But, first, I would move onto fixing the trigger issues.
If i was really in love with the gun except for the trigger, I would have spent the extra Jack to mod it. I still may do it, since I am back in the market for an SD9VE (among other choices).
However, since the initial experience, it has been a love-hate relationship, and because I had no assurances that the trigger fix would make me hate it any less or love it any more, I decided to buy a Sig P250 for $360 instead. The appeal of being able to flip it from a full-sized home defender to a subcompact CCW just by swapping frames and slides was one of the main reasons why I bought it. The different but still long and heavy DAO trigger was another decision point.
However, it opened up another can of trigger worms.
When the SDVE series first came out, it was the Glockalike price leader. Now, the $300 to $360 market is saturated with a wide range of options that include pre-cocked, hammer-fired, and striker-fired polys and steel-framed designs with DA/SA triggers, DA only, SA only, and some odd combinations of both modes.
Trigger pulls also varies greatly, as do break points and reset points, from an initial 8 to 10lbs on the DA side to 6 to 4.5lbs on the SA side. Guns like the Springfield XD-9, Ruger 9E, Canik TP9SA, EAA Witness, SAR BP6, Taurus TP Series, and a lot of Turkish CZ clones, plus the remarkable Walther PPX which is still selling for $279 on CDNN Sports. You can’t buy a better shooting gun for under $400.
Unfortunately, it has NO external safeties.
The whole purpose of putting a long travel, heavy pull trigger on self-defense pistols – especially on the small, thin, light, and under $300 pocket pistols like the KEL-TEC PF-9 & P11 the SCCY CPX-2 (the CPX-1 has a manual safety but the same trigger), the Diamondback DB9, the Ruger LC9, et al., was to avoid accidental discharges because a hard-to-activate DAO trigger took the place of a manual safety. Meaning, it was really hard to have an accidental discharge with it.
Then you had new competitors in the $280 to $320 range like the Taurus 609, 709, 24/7, P111, the Ruger 9E, and the CZ75, CZ P07, and Walther P99 clones mentioned above.
The $299 handgun during the holiday buying season had suddenly become a prolific item. The deals listed on Slick-Guns were mind-boggling:
$218 for a SCCY CPX-2
$223 for a KEL-TEC P11
$235 for a Taurus Millenium G2
$259 for a BAP SAR CZ75 clone
$269 for an EAA Polymer Witness CZ Clone
$299 for the Canik TP9, C100, and Shark
$300 for the TriStar Sig 226 clone
$399 for the PARA-ORDIANCE 1911
$329/$399 for an XD9/XD(M)9
$399 for a Bushmaster ORC (cheapest ever).
Meanwhile, the aftermarket business in addressing the trigger issues, the racking issues, the recoil issues, and other issues we used to have to live with are now having replacement parts made to address them for the guns we want to keep and transform into better performers.
The company leading the charge is Galloway Precision. They went from having fixes for a handful of pocket guns to fixes for high-end handguns as well.
I have finally decided that to get what I want without sinking my life savings into the ideal firearm is to start by buying the basic gun I want and start adding upgrades to it as finances permit. Making it easier to rack is Fix #1. Making it easier to work the trigger is Job #2.
Anyway, I’m returning to Square One.
Since the “SD” stands for “self defense,” shouldn’t the pistol be as suited to that as possible? It seems like a stiff trigger is a bad idea for its intended audience — folks who put the gun in a drawer and forget about it.
I highly recommend Apex Tactical products. I put their FSS and RAM into a M&P Pro and the improvement was great. The trigger is awesome and it compares very strongly to my Wilson CQB. I have sold at least one M&P and Apex FSS to a friend after they fired my M&P w/the Apex FSS and RAM. Iagree Icould not have done it with out the video.
I was able to handle a Smith and Wesson M&P 40 with an Apex Tactical trigger upgrade. It is VERY nice. My only complaint is that I would actually like a slightly stiffer trigger for concealed carry. If the Apex spring kit for the SD is anything like the kit for the M&P, it must be excellent.
The sigma’s and sd’s are what they are. A low price, reliable weapon for self defense. I paid about 300 for my sigma and for that I got a reliable, over a 1000 rounds in 7 months without a jam, gun that fits my hand better than a glock.
As a lifetime user of revolvers I don’t find the trigger that hard to work with. And if I ever have to use it for it’s intended purpose I’ll shed no tears if the cops take it and never return it.
As a self-professed Smith & Wesson weenie and also an Apex weenie (I’ve put Apex kits in two of my S&Ws), all I can say is that this is a marriage made in heaven. If you have a S&W J-frame revolver, install an Apex kit. You’ll love it. If you have an M&P, you probably do not need an Apex kit unless you bought the pistol in Massachusetts and are stuck with the awful MA trigger. Apex hardware turned my compact M&P from a minute-of-barn-door shooter into a precision instrument.
I have the SD9, from S&W, which has now been discontinued. From your photos it looks like it’s pretty much the same gun as the VE series, except mine has a black slide. I haven’t measured my trigger, but yes, there is a lot of travel, there is no crisp break. It doesn’t seem that hard to pull.
The philosophy behind the type of trigger a self-defense gun should have is interesting. I guess S&W’s solution is to make a gun that no one is going to shoot accidentally. You really have to be trying to make these guns fire. On the other hand, if most folks who buy this put it in a drawer and never practice shooting it, how would they ever be expected to hit anything with it with a trigger like that? I like my SD9, but it’s a good thing there are lots of choices out there.
I installed the Apex spring kit in my SD9 at the beginning of the year and it is worth every penny.
I too struggled with the trigger pin, but pushing it in the opposite direction than shown and it installed in a snap.
I installed the Apex spring kit in my SV9, and later found that my gun wouldn’t fire. I took it home and checked every part with the original. The striker spring in the kit was 1/4” shorter than the original. So I reinstalled the original striker spring. The trigger pull was heavy again but, I haven’t fired it yet. The unfired rounds primer had been struck but not hard enough to egnight the rounds.
Man the price just keeps getting higher and higher… For the price of feeding my family of four at Subway, Quiznos, Firehouse, Tubby’s, or any other sub shop… I’m talking about $44.00 including the taxes, $30.00 IF I am lucky and they’re not very hungry.
Five. Five Dollar Foot Long….
Doesn’t include drink or chips. Also the range of $5 foot-longs is limited, even on their “birthday” sale.
You should tell your family to stop eating so much. You know the world’s not gonna end if you don’t eat for a day or two, it’s actually good to give your body a break from digesting trash once in a while. Work on those six packs too man.
More than once your review states that installing the Apex kit is doable if you have the right tools. Your review would be enhanced by listing the tools to which you are referring.
Just bought one brand new or the door for 325. Find this video, get out my debit card, click the link….. only to find this “19.99” kit is 50 bucks. I’ll stick with the trigger not putting a $50 dollar trigger kit in a $300 gun
Just get it off amzon for $25. Maybe less if you can find it on sale.
I just bought the kit for the SD9VE from Apex’s website a couple weeks ago. 19.99 plus shipping. Don’t know what you saw for $50. I had it within 4-5 days. The SD9VE is the first gun I’ve ever owned and I’ve not even had it a year. I did the install myself with no experience just the video on my iphone and the tools mentioned in the video. Took me about 30-40 minutes. Beginner’s luck I guess.
I’m going back to Apex’s site now for the full trigger replacement kit that shortens the travel as well. I think it was about $35 bucks.
I did the same thing Eric. I bought the Apex trigger spring kit (20 bucks) and the trigger replacement (29 bucks) and had them at my door about 6 days later. Bought them at cheaper than dirt. Install was very easy as I followed the Apex video for the spring kit. Replacing the trigger itself, required one more pin that is obviously the one that needs to be removed to take off the trigger bar. Attached the bar to the new trigger assy and attached the spring, boom back together just like the video shows. Dry firing seems perfect for what I was expecting. Can’t wait for live fire. If it differs significantly, I’ll post a reply to this and say so. This is the first time I’ve ever broken down a pistol to this level. I am a former Marines so, I’ve done the AR-15 down to bare bones probably 500 times. Just used my mechanical ability and mechanical experience. It really was no big deal to install, minus the side note below. I would say if you change your own spark plugs, you are definitely capable of this mod.
Side note: On my California SD40 VE, I had to tackle the magazine safety (unsure of nomenclature) bar and spring. It literally fell out when I pulled the back rail off of the frame. It took me about an hour to figure it out including ten minutes of an expletive laiden rant. Calmed down and figured it out. Like I said, I can’t wait.
If anyone has any questions about how I did any part of this mod, feel free to contact me [email protected] I am not a pro but, I’ve done it and I might be able to help someone out.
Happy Shooting
Just bought one brand new or the door for 325. Find this video, get out my debit card, click the link. Only to find this “19.99” kit is 50 bucks. I’ll stick with the trigger not putting a $50 dollar trigger kit in a $300 gun
https://apextactical.com/store/product-info.php?pid57.html
Currently $20.95 (it does say “sale price,” though). Buy it. You won’t be sorry. I put this kit in my SD9 and it makes a world of difference.
You can find them on Amazon for $19.95. I just installed it on my SD40VE…took about 45 minutes with a small hammer and a roll pin punch set (and it was really my first forray into ‘gunsmithing’ aside from standard cleaning). I followed the Apex video step-by-step. The only advice I would give is that the trigger pin may actually come out easier if you do it in the opposite direction from the video. Otherwise, it wasn’t too taxing, and the video makes it pretty simple.
I bought both the trigger and the spring kit directly from ApexTactical for my SD9VE for under $70.00 with S&H. I used a small hammer and a punch set, a fingernail file, and a pen knife. I also fabricated a home-made armorer’s block from a 3/4″ thick piece of scrap wood.
I have a decent average level of mechanical aptitude so I was confident I could do the job, but I was hoping it would be easier than it was. The trigger pin was a major pain and had to be taken out from the left. Putting it back in was even more of a pain, mostly due to the frustration of reinstalling and aligning the slide catch. I hope I never have to, but I think I could do the whole job in a fraction of the the time now.
I was also one of the unfortunate purchasers of this trigger who had to spend a lot of time filing the new trigger, but with some patience and care, it’s doable. I used the pen knife to shave off the roughened plastic you get from filing and this makes for a nice finish. Also, using the pen knife to remove any unevenness in the plastic seam weld behind the trigger probably got me 50% of the way there.
I watched the video(s) a couple times, then had my tablet with the video running during the entire installation process, pausing and rewinding as needed the whole time.
While I certainly agree with the above comments that you are better off spending that $100 up front on a better gun than a gun like the SD9VE that needs $100.00 or more in modifications, but what can I say, live and learn. I say $100 because I had also earlier purchased metal slide guide to replace the plastic stock slide guide, and that cost another $30.00 or so if I remember correctly. But if you already own one of these S&W handguns with a crappy trigger, this is definitely money well spent. This is really the only thing wrong with this gun which otherwise has worked flawlessly for me since the day I bought it. Not a single misfire or malfunction in 500 or more rounds fires through it. We’ll see if this still holds true since the modifications…
I took my time, and as I said, I wasn’t fortunate get by without filing the trigger, so overall I put about 2 hours into the entire project before I was happy with the trigger and the gun working the way I wanted. It was also a great educational experience.
So the bottom line is, if I can do it, anyone can.
i havent seen a sd9 apex kit over 20-25 dollars…u sure that was the right kit? they are on ebay also, just got mine for $22.59 with 3 day shipping
I recently bought a sd9ve 9mm and a .40 cal. . i would like to know if i made a good decision on my purchases . i read about the crappy trigger situation and would like to know more . since i dont have a home computer can i please recieve a call about this matter 909-275-6411 .. all tho i do read my e-mails i would like to talk to a live person if possible .
I ordered this today, other than the hand strain after 3 clips, I find the weapon outstanding for the money.
Hope softening the trigger pull will add a more relaxing session / response 🙂
30 bux with freight, I’ll give it a whirl.
I just installed the Apex spring kit tonight along with a stainless guide rod and a wider take down plate. This video was extremely helpful. Thank you.
anyone know if there is a Canadian distributor for the Apex SD spring and trigger kit?
tapered pins. beware on install. nice trigger.
Excellent review of the Smith & Wesson SD9VE. I purchased and installed the Apex spring kit and also the Apex trigger assembly. Made a big difference in the shootability of this pistol. Then I purchased and installed a stainless steel guide rod and return spring from Stainless Steel Guide Rods and a FireSight fiberoptic sight set from Williams Gun Sight. Huge difference in shootability. While I admit that almost $200.00 is alot to spend on a $300.00 (approximate) pistol, I have to say that this pistol shoots like a custom gun. I’m convinced that the money was well spent. I have run about 2,000 rounds through the barrel and never had a hitch. Happy, Happy, Happy.