
Lets face it, you probably have an AR-15, maybe a couple of them. And if you don’t already have one, you’ve probably thought about getting or building one. If you aren’t aware, there are a few specialized tools you need to build an AR-15 or take one completely apart. The main things you may run into are the barrel nut, castle nut and free float rail components, but you may also need something for compensators or flash suppressors. I’ve used many tools to grapple with these, ranging from specialized tools, to off-the-shelf Craftsmen wrenches. Many off-the-shelf tools are OK for things like the compensator/flash suppressor and the other various pins and screws. But for dealing with things like a castle nut and free float rail installations, you really need specialized tools, and one that will hold up to some use . . .
The tool that I’ve had the best luck with, and have built quite a few rifles with is the DPMS Multi-Tool. You can pick one up on Amazon or at many local retailers for a good price (usually around $33).
Features & Usage
This tool has all the bells and whistles that you may need for building or working on your AR-15s.

The tool includes the basics that you need for installing and disassembling free float handguards. This is the front section of the tool that has two pins sticking out. These pins will hook into standard handguards (used by most companies) and will allow you to properly tighten (or remove) them. It’s worth noting, that if you purchase a rail, and it doesn’t use the standard mounting equipment, often times the manufacturer will include the required wrench. But if you plan on doing handguard upgrades, this is something you should have on hand.
Also built in is a tool for installing and removing barrel nuts (the front of the tool). This is important if you plan to change the barrel of your AR-15. That’s something that’s probably less common for your typical at-home armorer, but it’s there if you need it.
For me, a useful item included in this package is the notch cut out for installing and removing compensators and flash hiders. With the market flooded with different compensators, you may be tempted to remove the standard A2 flash hider on your rifle in favor of something new. If you are, this tool makes easy work of it. But make sure you don’t have a compensator that’s staked to your barrel (a 14.5″ barrel with a staked compensator to make it legal). If you do, you won’t be able to remove yours and trying to do so may damage your barrel in the process.
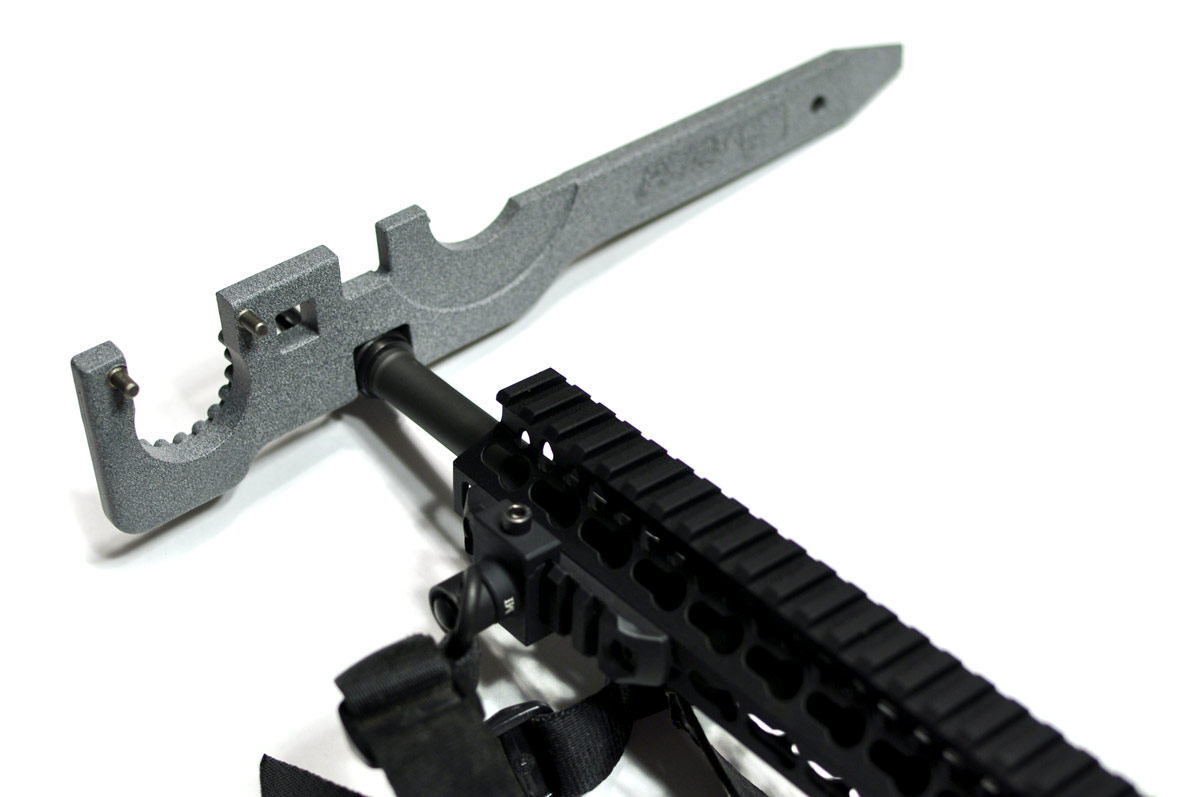
One of the most important features is the castle nut wrench. The castle nut is what secures your stock tube to your lower, something you have to deal with when you’re building up a lower, or want to change various buttstock components (for example, installing a stock that has an integrated tube). The castle nut wrench on the DPMS Multi-Tool stands out mainly because of its strength. If you are trying to remove a tube on a factory rifle and it’s probably staked, you’ll need a well-made tool do the job. The DPMS will handle it with ease.
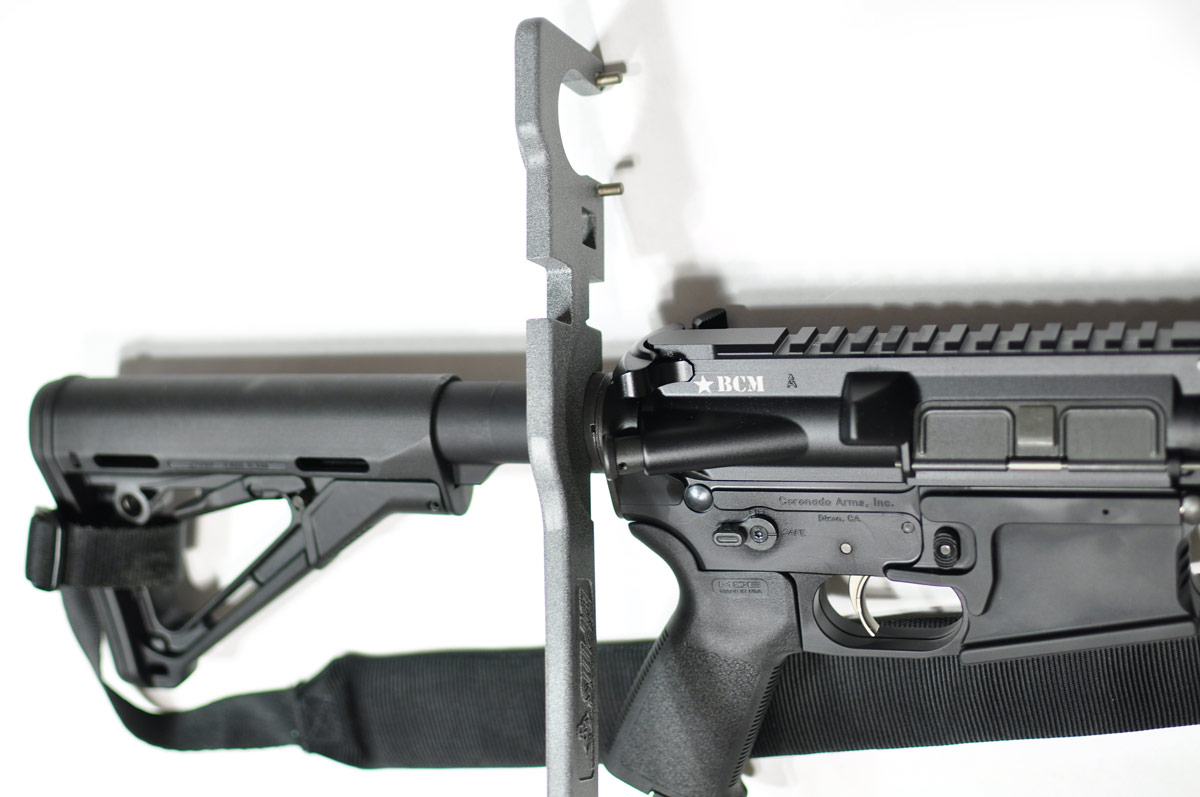
Also included on the tool is a cut-out for installing and removing a standard rifle stock. This is something you’ll need if you are going to upgrade a standard A2 stock. Falling in with the removal of a stock, there is also a large screw driver on the end of the tool that can be used to remove buttstock screws. These are generally large screws, so sometimes standard screw drivers don’t work well for them. This just makes sure that everything is all there in one handy place to take everything apart.
Bringing everything together, there’s also a 1/2″ socket cutout that you can use to connect a standard 1/2″ drive socket wrench. That allows you to use a torque wrench to tighten things to spec, as well as giving you the ability to attach a larger wrench for more torque, if you need it. Oh yeah, and it also has a hole drilled in it so you can hang it on the wall for easy storage.
Construction Quality
The tool is made of 4140 steel and has a powder coat finish. I’ve seen shops and manufacturers that have these tools and have used them to build 100s of rifles; and they still look and work like new. If you break one, you might need to check out what your doing with it, because you might have the wrong tool for the job.
Summary & Final Thoughts
In my book, this is one of the better AR-15 Armorer tools on the market, especially for the price. So if you’re in the market, check it out.
Ratings (out of five stars):
Build Quality * * * * *
The DPMS Multi-Tool is built well and very durable. There are no visible defects on any of the models I’ve run into.
Fit And Finish * * * * *
The coating on the armorers tool is extremely durable and scratch and chemical resistant.
Usability * * * * *
The tool is extremely easy to use and works very well for the tasks it was designed for.
Price * * * * *
The armorers tool is priced competitively; as always it would be nice if it was cheaper, but this tool is definitely worth the money.
Overall * * * * *
This is a great armorers tool. If you are going to be doing any work on AR-15s, this is a must have for the tool bench.


I’m probably the only person in this country with no desire to own an AR15. I’ve got other tacticool rifles that are better suited to me needs.
Don’t have an AR15. Don’t want one.
I own AKs and ARs. I like them both but prefer my AK. Now in training my wife, the AR is easier for her to operate. It is lighter and has less recoil. I will always have both in my safe.
Do you even operate?
Well…this…
Nice! My Tapco seems to do all the same things but includes a bottle opener so I can enjoy premium adult sodas while I admire my work.
Agreed, I like the Tapco better.
Bought mine 2 months ago from Primary Arms in Tx. for $28 and used it for my new AR build. Fantastic tool and use on both AR’s and my son’s.
The little nub for the castle nut sheered off of mine. Maybe that means mine is super tight…
Not being really into AR’s, but…. just how often do you need to tighten, swap, repair, and change things out? Is it for a real reason or just because of some desire to change stuff or “i gotta assemble yet another one”? Should this be in the toolkit for the average rifle user?
I think you might surprised how often it gets used. For the price, it is definitely a “nice to have” and your friends are likely to borrow it from you making you a king among men.
Not to mention that there will be friends too lazy to learn how to work on or build a rifle or just plain don’t have the time, who will be asking you to do it for them.
What often happens is that a person buys an AR. Really enjoys the AR. Starts with small changes, adding sites, different pistol grip, upgrade the trigger.
Then, the person understands that upgrading the trigger is a significant part of assembling a lower receiver. Person sees nice lower receiver at the LGS, buys it. Assembles lower receiver, learns how to install the detente springs and buffer tube, but now there is no upper. Buys upper receiver and barrel, gets proper components, buys AR tool and assembles upper.
Now, the person has built a complete AR. Now it’s time to move on to harder to find calibers. Soon, you have a number of ARs in the gun safe.
An AR is so easy to work with that many people who shoot end up with the tools to make the job easier.
A tool like this makes an AR build a breeze. I personally prefer the Tapco tool because of the 3 prong castle nut feature. The headache thats avoided by buying/using one of these instead of non-specialized tools makes it worth the cost. It pretty much pays for itself after a single use.
Thanks folks. I appreciate the info. Might just need to pick one up.
The hole to hang it on the wall has me sold!
The pin sheared in mine too. I drilled it and installed a hardened pin, problem solved.
don’t have an ar. don’t want one. or a gluck.
but… tools. first get the neighbor kids bike goin’. then give his dad some help with the ‘hey, can you give me a hand with somethin’?’ part of the teardown.
i’ll toss one in the box.
my bottle opener collection is gettin’ dusty since i accepted the ‘open it with anything else in the room’ challenge.
There’s a bunch of other tools one needs to work on AR’s competently. This wrench is just the start.
For many people who work on AR’s, I can tell that they don’t own a set of roll pin punches. They’ve pushing on the roll pins with standard punches without the dimple in the face to keep the punch in place, and it shows when you slip. Get real roll pin punches.
Then you need a block to hold the upper in a vise properly whilst torquing down on the barrel nut. Then you need a block to hold the lower in the vise. You can find these at Brownells or other sources.
Then you need a torque wrench (1/2 drive). You don’t need a “digital” wrench, and I’d never have one in my shop. Just something more to go wrong.
But above all, you need a vise. Get a good vise, no Commie Chinese crap. There are nothing but Wilton vises in my shop, because I value the work I’m working on and I value my hands. Cheap vises lead to accidents when work comes out of the vise. Cheap vises lead to damaged guns and work and hands with skin barked off your knuckles, or worse.
Cheap vises are like cheap anvils: they’re good for a doorstop… and not much else.
Mount the vise on a bench that is sized for you. The top of your vise should come to the bottom of your elbow when your forearm is held parallel to the floor when you’re standing. And yes, if you’re going to work on guns seriously, you need to be standing.
Then you need some soft jaws for the vise. If you have a junkyard nearby, see if you can find some lead sheeting; cut some off and mash it into angles. You then need some leather jaws – get some leather, glue it onto some pieces of plywood cut to fit down into your vise. You’ll be surprised how often you use the soft jaws. If you want the ne plus ultra solution to vise jaws, then get some brass and mill/drill it to be your new vise jaws and pull the hardened steel jaws out of your vise.
As always excellent information. Roll pin punches are a MUST have. Not that it can’t be done with other tools it just can’t be done correctly or as well.
The rest goes without saying re: the proper armorer’s blocks for holding the upper and lower receiver. A good vice makes difficult jobs easy and easy jobs mindless and can be used for many other things aside from gunsmithing.
Or, you could do what I do. Find a professional, experienced, competent gunsmith and let him do his thing.
: )
And get some roll pin holders for starting roll pins as well – makes putting those bad boys in very easy and very safe for the thing you’re putting them into. It keeps the pins nicely aligned when starting them and reduces the number of things to go out of alignment at the last second when that hammer swings. http://www.brownells.com/gunsmith-tools-supplies/general-gunsmith-tools/punches/roll-pin-holders-prod781.aspx is a nice set,
Moving on to hammers since you’re smacking things, get a couple of good ones – I use 4 and 8oz ball peins for almost all of what I do. You do need a BFH for some jobs but when you do, you can walk over the cabinet and get it – my experience is that if something on a gun needs to be “hammered” and a 4oz hammer isn’t doing it, you should look at what’s really happening and see if this really is what you need to remove and ensure nothing is blocking it (unless it’s something that obviously needs a BFH like an action wrench or something like that – not a little pin punch).
Of course that doesn’t apply when you’re trying to take the extractor pin out of a 1911; there you just hammer, cry, and bend those small punches until the pin comes out (got some Brownells replaceable punches a while back to try for this specific job; hope they turn out to be the hot ticket).
Look at medical hemostats also to hold things like roll pins in place while you get them started. The punch you provided a link to I have and broke one of the small ones, Sure it was me ham fisting it but a great idea just seemed like they should have used a higher grade of steel. Hemostats work great on the ejector door rod clip, who knew they could fly like a flea? Speaking of Brownells tools they have a little tool to help install the front take down detent and spring in. They can fly about 30 ft if you release them at just the right angle. The other trick is work in a large ziploc bag, then they can’t fly away.
Yes indeed, Wilton makes some really nice vises
Lots of people squawk like a ruptured duck when they see the price of a new Wilton vise.
I tell them that the satisfaction of a job competently and well done as a result of having a proper vise will pay them back many, many times over the initial cost of a good vise. IMO, Wilton is the last of the vise makers out there making a real machine shop or mechanic’s vise.
Thanks for tip about Wilton vices. Having broken a vice before trying to install some bushings in an upper control arm I can see if I need another to replace the current one they will get my business. Prices were very reasonable for a US made tool. The Tapco tool is also made in the US. Very handy tool, have yet to break it, but give me time, a sailor can break a steel ball bearing in a sandbox given enough time 😉 Also have one of these for light work, padded jaws are handy. Hyskore Portable Armorer’s Vise but not made in the US.
Had to learn the hard way about those Commie Vises! Paid over $300 for one of those nice blue ones and thought I had “THE” vise of all vises! After taking about a half-hour to mount it on my bench, it lasted barely till sundown with one of the arms snapping at the base after applying just medium levels of torque to a piece of steel I was cutting. Now I had a broken vise and 4 holes in my bench that no other vise would line up correctly with. That was a long time ago and I picked up a large Wilton the following week at an estate sale. Built like a tank and darn near 80 lbs too and it dominates the end of the bench! Though it had some age on it, it was built to pass down to subsequent generations and I’ve been offered big bucks for it. Hell of a deal for $50! There are plenty of cheaper vises out there but they are also cheaply made. Definitely cry only once. To me Wilton is the way to go.
with your fore arm held parallel to the floor with your elbow bent ninety degrees and your upper arm at your side while standing.
Correct. The top of the vise should come up to the bottom of your elbow when your arm is held as you specified.
There’s a reason for this, and you don’t realize it until you’re working at a vise all day long. When you can stand comfortably and have your arms positioned comfortably, you can work for hours at a bench and get a lot of manual work done with all manner of tools, but especially files, hacksaws, punches/hammers, polishing tools, etc… and you won’t feel knackered at the end of the day.
When the vise is too low, your lower back gives out on you after a couple of hours. When the vise is too high, you’ll eventually grow tired in your upper arms from holding your lower arms higher than you need to, and when your upper arms give out, you start getting very sloppy in how you handle tools.
A bench that has the working surface at the correct height and a vise at the correct height are a Real Big Deal for me. When someone asks me to work on guns on a bench that is too low, (and most production benches are too low for me, since I’m over 6′ tall), I refuse. I know, even before I pick up a tool, that things are apt to go wrong. Punches slip, files start rounding corners, etc. It is very difficult to convince people to get a bench sized specifically for them, until they finally listen and do it. Then suddenly the quality of their work increases markedly, they’re happier with the results, their backs no longer hurt, etc.
Workspace ergonomics aren’t just about fancy keyboards, expensive office chairs and cubicles with a foot rest in them.
Also if you build it yourself you save about 11% of the total cost, buy a stripped lower for $70, federal tax on it was 7.70 paid by the manufacturer passed along in the price, buy a complete AR all dressed out for $1000 manufacturer passed along that 11% so about $100 went to Uncle Sam’s pocket, vice spending an hour or so putting it together and having the pride to say I built it all from parts. A tool like this, some punches, hammer, small torque wrench, upper and lower blocks and a bench vice, you’re good to go. Well a touch of common sense is helpful too.
ARs are something that you can build yourself and save a lot of money in addition to getting the exact gun you want by not paying for things you don’t want or will replace right away. Being able to say you built it from parts puts you pretty high up there with your shooting buddies.
On the other hand, I built a couple of 10/22s from 80% receivers and while they are cool, they cost a fortune compared to just buying it. Ruger will sell you all the 10/22 parts already pre-assembled into a working gun for around $250, Buying the parts yourself is all an uptick from “stock” – a Timney trigger runs almost as much as gun and with just a few barrel, stock, and other things, you can hit $500+ pretty easy. Not saying you don’t end up with a really nice 10/22, but you ain’t saving money there.
For ARs, building it yourself is a huge money saver in my experience.
Thanks for letting me know about building 10/22, never let cost get in the way of a fun hobby. A semi .22 is about the only thing I don’t have in the safe. Again it’s the pride thing about putting it together. There is a note in there for the wife for after I pass, don’t sell these for what I told you I paid for them, it was a lie otherwise you would be reading this letter much sooner.
At the range it’s fun to watch new shooters have an issue and no clue how the AR functions. Dry as a bone, seen one that had no clue how to pull the upper, scope on backwards, scope rotated 90* clockwise no clue why he was hitting the no blue sky barrier, told him it was on wrong, “GREAT BACK TO THE GUNSMITH!”. I said hold on, opened tool kit, loosen screws, rotated scope 90* counter clockwise, torqued screws to 15 lb/in, pulled the bolt, got the same view looking though barrel and scope, put it back together and his first shot he was on paper……
So far I’ve helped 3 friends assemble their new AR’s, exact parts they wanted without wasting money or having a bunch of “spare” parts laying around. Told them buy as much barrel and trigger as your wallet will allow and feed it good ammo, clean and lube it often, it will last you a lifetime.
And if you want to learn what not to work on, install a trigger group in a HK SL8. AR triggers are God’s gift to the sporting semi-auto world. Or have Hindu goddess helping you with those extra arms/hands.
I’ve had one for 8yrs, nothing new here…
If you don’t have an AR then it’s a given, you don’t need one. You don’t have to tell me that.
For folk who have an AR, it’s better to have this tool or similar because it sucks when you need to use it but you don’t have it.
I don’t care who makes ’em, the “tit” always breaks off in the spanner wrench section for the castle nuts. If you find a tool like this and the “tit” is cast with the rest of the tool, just walk way. How many free float tubes actually use this tool or have enough clearance? About the only “specialized” part is the barrel nut, everything else can be used by easily replaced tools at Lowes.
“About the only “specialized” part is the barrel nut, everything else can be used by easily replaced tools at Lowes.”
——
Maybe so, but we like them so much we use them in our shop.
Lots of user reviews say the castle nut wrench sucks on this.
Wondering if ya’ll will do a review of the magpul wrench? 🙂
Hey there! I could have sworn I’ve been to this website before but after
reading through some of the post I realized it’s new to me.
Anyhow, I’m definitely glad I found it and I’ll be bookmarking and checking back often!
Little late to the conversation but anyways, the Magpull wrench is a good wrench but you have to understand that if you purchase one of these things you’ve been branded. They are good but outrageously priced! I would get one if Santa dropped one down the chimney one cold December night but otherwise I’ve found good AR wrenches at a mere fraction of the price. My old and trusted cost me $14 bucks and has went through no less than 1200 builds and at least double that number in bird cage swap-outs. My only gripe was the sharp edges which I fixed with 100mph tape!
Another item in an armorer’s tool box should be painter’s tape. Never work on someone’s AR without taping up the receiver because you never know when a slip could take place and damage the finish.
Cannot dismiss what Dyspeptic Gunsmith had to say either, especially in regards to standing up while working. Agree 100% with the vise recommendation…..only cry once!