
By Peter C. Schechter
Mmmm, mmmm good! Have you ever had a hankering for some old fashioned 1950s-vintage Colt gunbo for dinner? Me neither, to be honest. When my buddy came to me and asked if there was any way to clean up an old rusty revolver given to him by one of his kids, little did I know that I’d soon be boiling the parts for a couple of hours in a soup pot full of water on the kitchen stove.
Give me a couple of minutes of your time and you’ll understand what this apparent madness is all about.
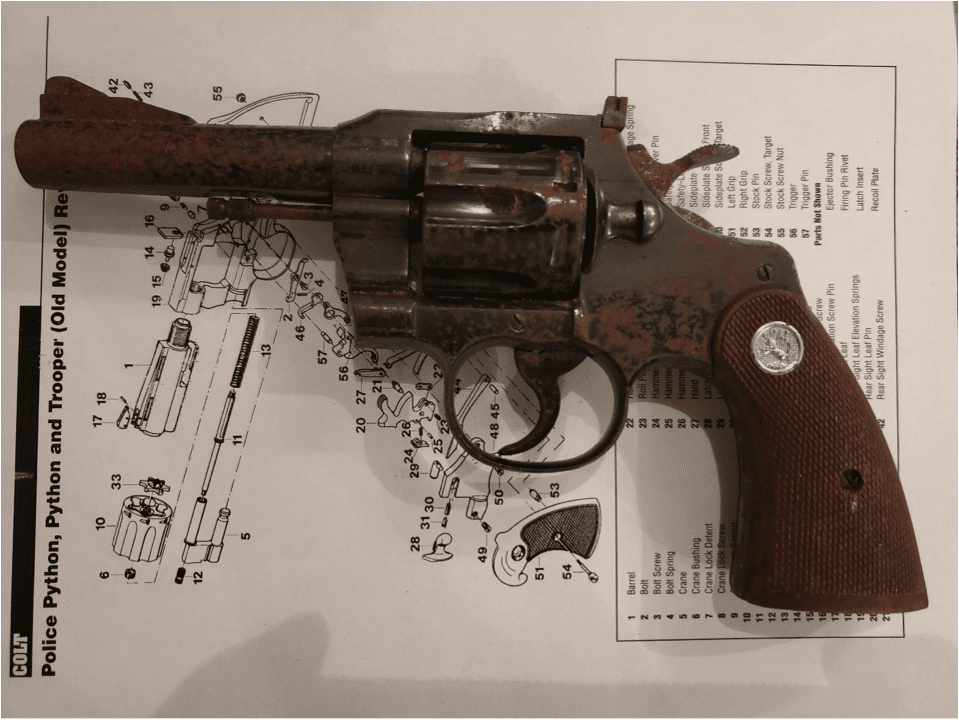
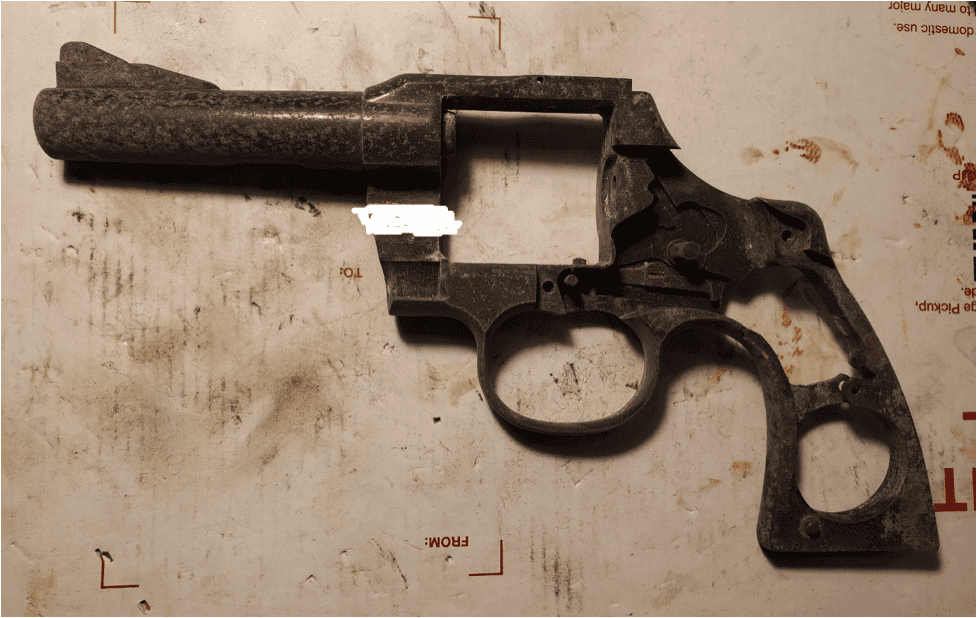
I got a message from Jeff saying that he had a picked up an old Colt revolver, model unknown, but that it was pretty rusty and the markings were hard to read, if readable at all. Here’s what he showed me:
Having never tried to conserve a rusty gun, and it being in pretty terrible shape, I asked if it would be a disaster if I screwed it up in the attempt. Happily, Jeff said “no problem, I don’t care,” and I set about the task of investigating what it was, and what to do with it.
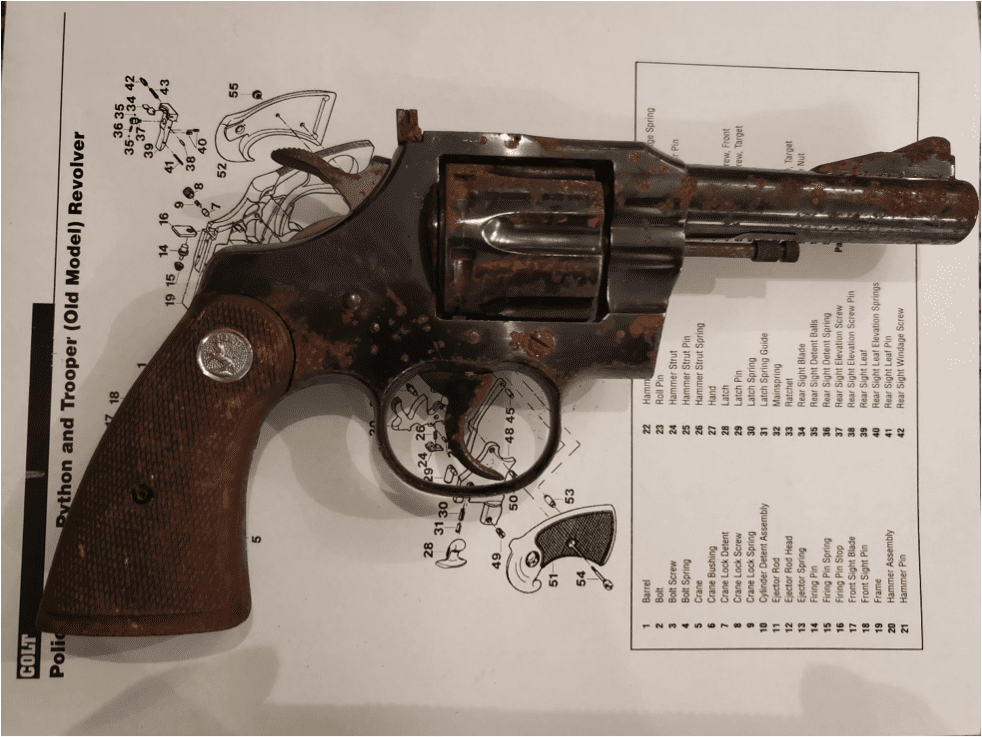
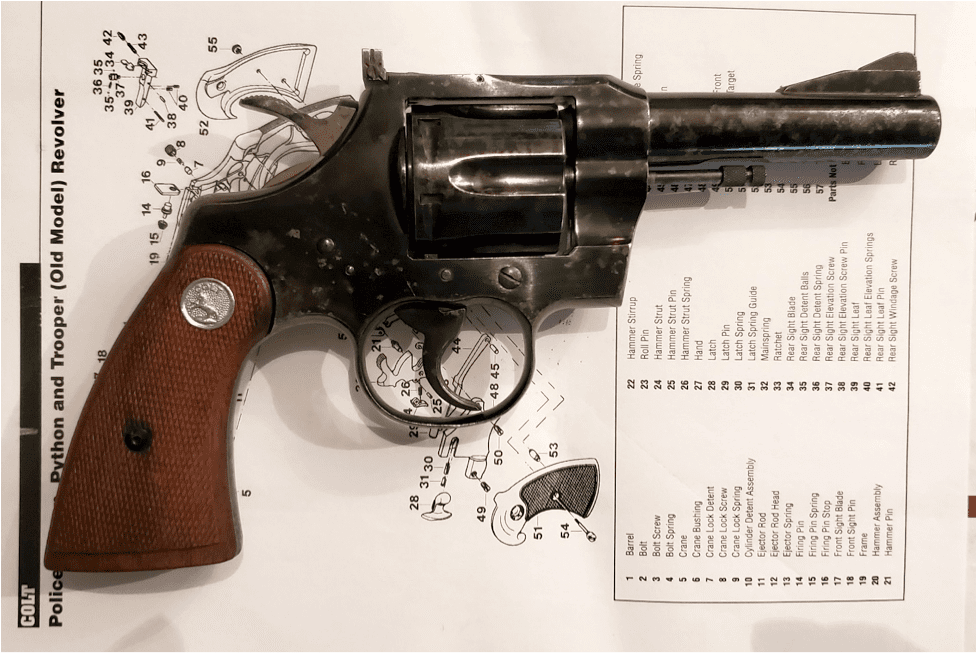
Identifying the gun was more complicated that I had imagined it would be. Everything I know I learned by studying the pages of the exceptionally informative website coltfever.com. The webmaster of that site gets all the credit. Based on a lot of separate bits of information, and the fact that each one corroborated the others, the gun was identified as a Colt Trooper .22LR target model with the 4-inch heavy barrel, made in 1957.
At the time, this revolver was commonly sold to police departments as trainers for officers carrying the Colt Trooper .38SPL service model, which also has 4-inch heavy barrel, or the Colt Model 3-5-7, again basically the same gun but chambered in .357 Magnum.
The first step was to remove as much old grease and gunk as I could with brake cleaner spray, from both the outside and inside of the gun. There was a lot of rust on the exterior surfaces of the gun, and it appeared to my untrained eyes that there was at least some pitting of the metal underneath the rust.
I was disheartened a bit when I removed the grips (which would also be stripped, lightly sanded where necessary, and refinished with two coats of dull Tung Oil, as they were originally finished by Colt), and I saw this:
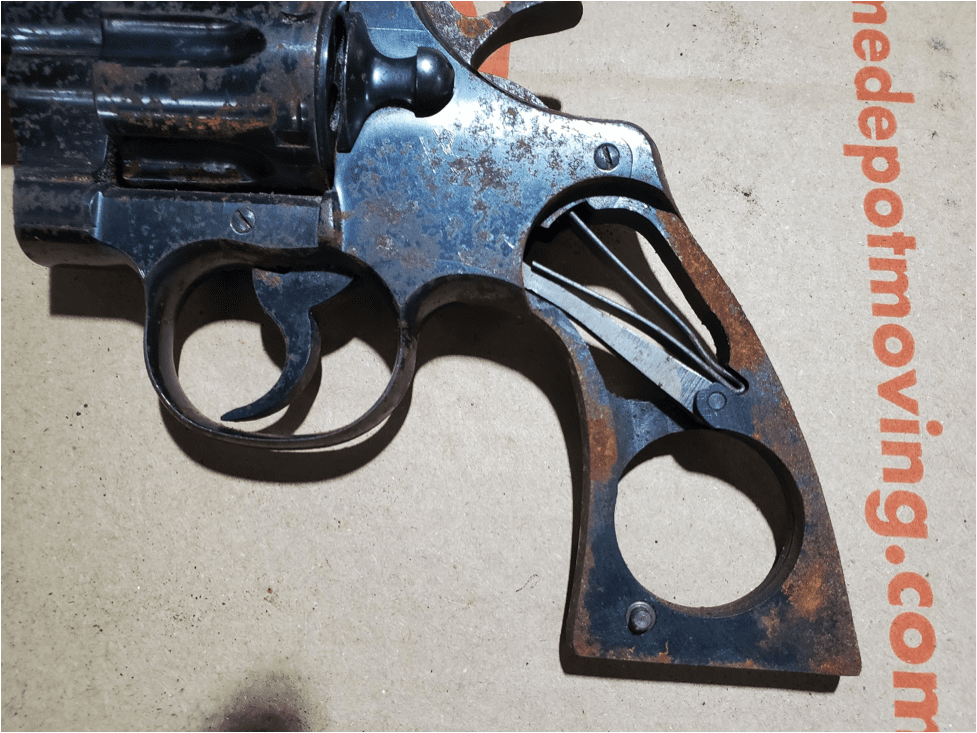
The rust was inside the gun, too. I was not optimistic about what I’d find when the side plate came off. However, luckily for Jeff, there was no rust on any of the metal-to-metal moving surfaces of Colt’s intricate double-action mechanism.
This incredible assembly was used in all Colt double-action revolvers, basically unchanged in any important respect, from its 1908 introduction in the Colt Army Special until its eventual across-the-board replacement by the Mark III action in 1969. I continued to disassemble the old gun, spraying brake cleaner as I went.
Now for the real work. I had read in various forums that one should never heat rust because heating makes it “harder” and more difficult to remove. That, it turns out, is flat-out wrong.
I had also read that one should simply oil up some 0000 steel wool and go at the rust. That method runs the substantial risk of damaging the un-rusty metal adjacent to the rust by scraping hard rust particles along the surface, oil be damned.
If you are like me — that is, if you have a well-equipped shop and you like to do your own work on your own old guns whenever possible — you’ve probably heard of Mark Novak, the man behind Anvil Gunsmithing and the smith who works magic on old guns for the folks at C&Rsenal. He has a fantastically detailed and interesting video (still viewable for the time being on YouTube) about how to “conserve” an old rusty gun.
Conservation is the process of removing and stopping the rot. It is not “restoration,” which is the process of turning something old back into what it was like when it was new, or at least young.
Mark teaches the “rust-boil conversion” method. Simply put, “red” rust is ferrous oxide. It’s hard and it sticks tenaciously to the host metal that has oxidized and formed it. (Gun bluing is also rust, by the way, but is a desirable and beautiful form of oxide.)
The idea of rust-boil conversion is to chemically change the ferrous oxide (FeO) into “black” rust, which is ferroferric oxide (Fe3O4), which occurs naturally as the mineral called magnetite. Why do this? Because ferroferric oxide is brittle, powdery, and easy to rub off with dry superfine 0000 steel wool and a little elbow grease.
In his video, Novak shows a much easier and faster way to mechanically separate the black rust from the gun parts by using a soft “carding wheel” mounted on a long shaft grinder motor, but I don’t have that tool, and don’t know what sort of carding wheel is required.
How does boiling in water for two hours accomplish rust-boil conversion? “Dammit, Jim, I’m a lawyer, not a chemist!” I did not do well in chemistry at any level of my many years of math, science, and engineering education, so don’t ask me how this happens. I just know that it does, but only because Mark Novak said so, and then I did it myself.
Two points to note. First, when working on smaller parts, Novak dips his 0000 steel wool in acetone and lets the acetone evaporate away, in order to remove the residual oil used in the manufacturing process that prevents steel wool from turning into a pile of ferrous oxide, that is, red rust. I skipped that step and have no idea what difference doing it would have made. He probably says to do it for a reason; oh well, my bad.
Second, I’ve read some comments that distilled water should be used for the boiling step. I used tap water. Given the amount of mystery contaminants floating around and sticking to the sides of the soup pot after the first five minutes, I can’t see why distilled water would be necessary. I suppose if you have some very unusual tap water running from your faucet, maybe distilled water might be a better idea. My tap water seemed to work just fine.
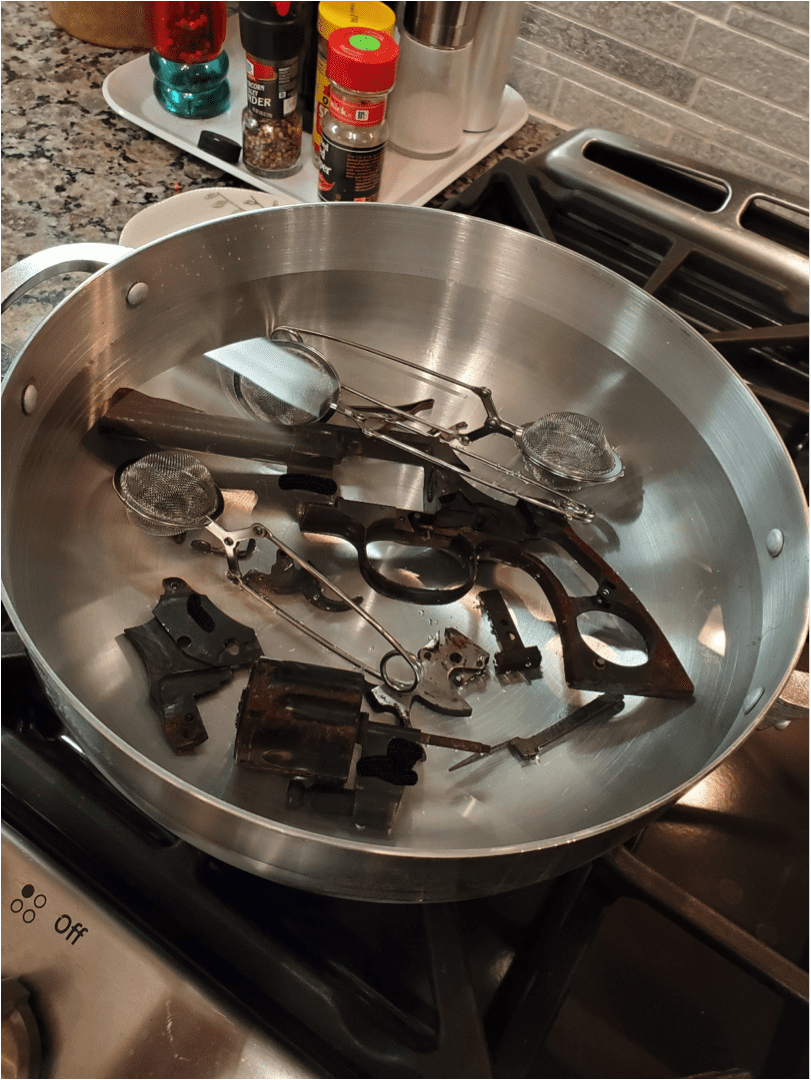
Once the Trooper was as fully disassembled as I could get it (one screw simply refused to come out, multiple PB BLASTER treatments notwithstanding), into the soup pot of kitchen tap water it went:
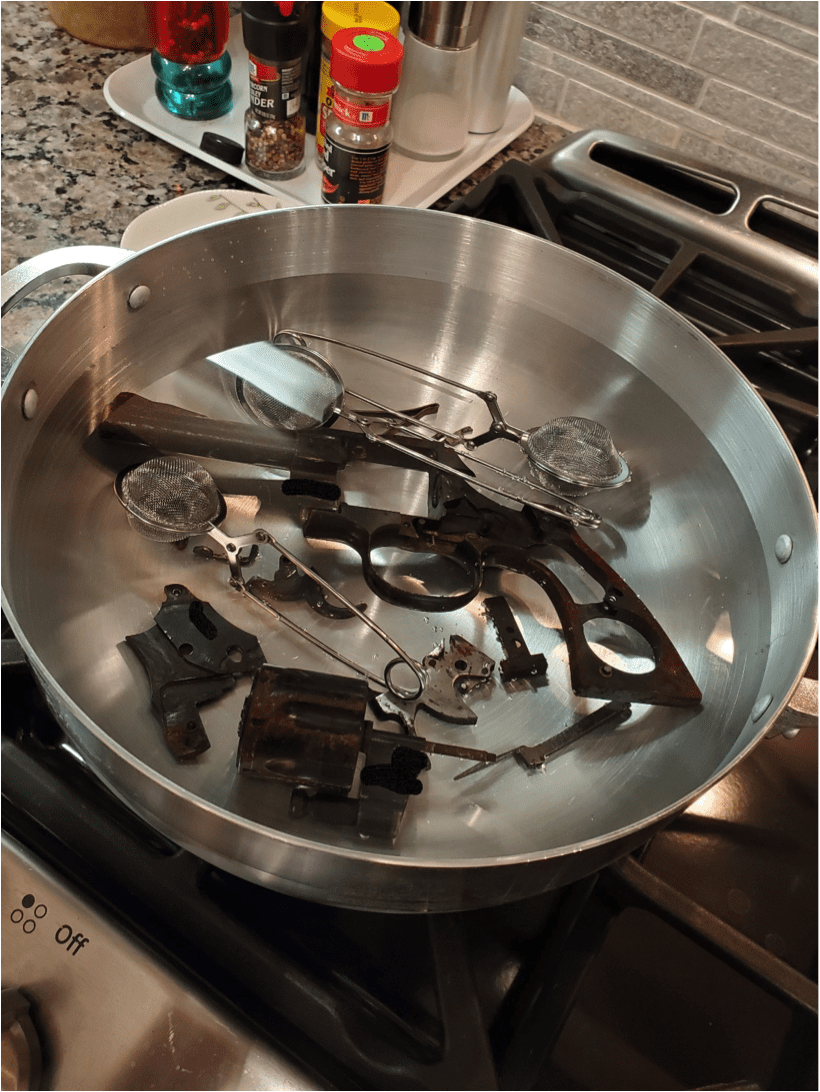
I used tea ball infusers to keep related groups of extremely tiny screws, springs, pins, etc. together because when kept in their groups I could easily figure out which was what, but if mixed up all together, I was afraid I wouldn’t be able to figure it out again, or would at least greatly multiply the odds of making a mistake. And make no mistake – there are some very, VERY tiny parts inside an old Colt revolver. The latch spring guide is practically microscopic.
Every 10 to 15 minutes, I added enough boiling water to the pot to bring the level back to where it had started. If you don’t do this, you’ll be heating metal without any water before you know it.
After two hours of boiling (one hour might work for some light rust, but the rust on the grip portion of the frame definitely needed two hours), the parts were set on a towel to dry by their own heat. There would still be water molecules and even actual wet water in the tiniest nooks and crannies, however. As a result, it was imperative to move on and complete the next two steps of the conservation process without delay.
If you must take any sort of break after the boiling step, it may be necessary to put the cooled parts into a kerosene bath and leave them there until you are ready to proceed, but that will require you to remove the greasy kerosene with brake cleaner again. It is just easier to plan your day accordingly and get it all done.
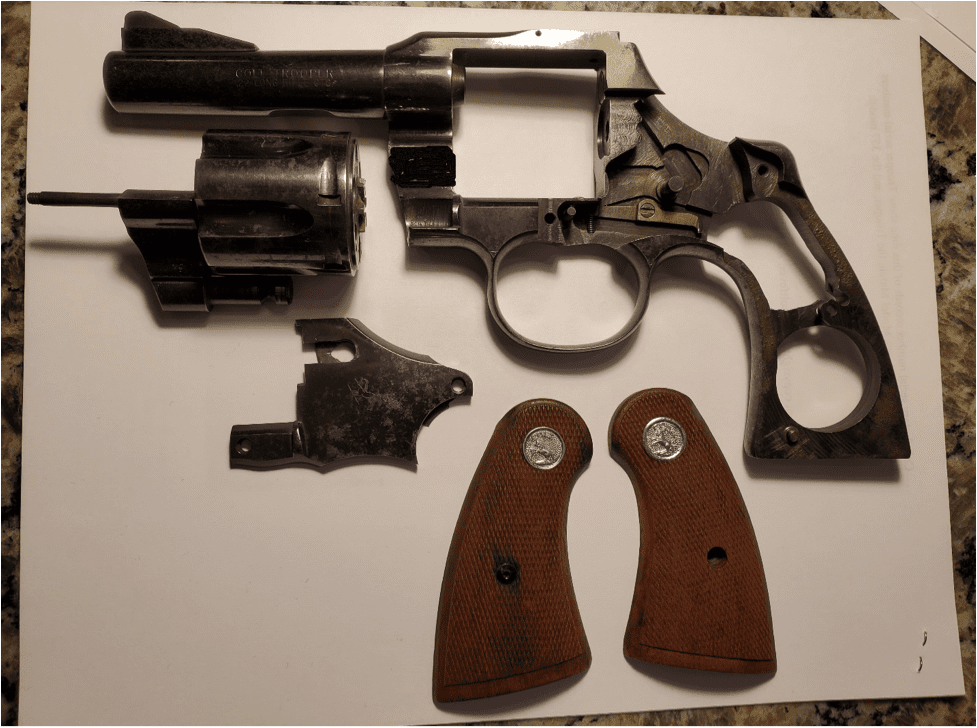
Here’s the frame and barrel assembly after coming out of the gunbo pot:
As you have already seen, I saw no reason whatsoever to undertake the substantial project of removing the barrel from the frame. And here are the major parts when the steel wool scrubbing was done, along with the refinished grips:
Pretty nice, so far, and I was getting a little bit excited about what it was going to look like when it was all put together again.
As soon as the steel wool rubbing was finished, the entire set of metal parts was given yet another bath, this time in kerosene. Kerosene is excellent for pulling out every last molecule of water from every bit of every part, big and small.
As Mark Novak cautions, DO NOT USE GASOLINE for this step; while it would work, and doesn’t stink like kerosene does, the heavier-than-air fumes will creep along the floor to find the nearest source of ignition, and a very unhappy experience will follow. Also, it’s important to get the metal parts into the kerosene bath as soon as possible after steel wool-ing them, or else they will start rusting all over again and the whole process will quickly be rendered pointless.
After several hours bathing in the kerosene, the metal parts were cleaned off with brake cleaner spray again, lightly blown off with compressed air, then rubbed with a silicone-treated gun cloth. The gun was then reassembled with the internal moving parts getting appropriately very lightly lubricated with gun oil in the process.
At last, here she is in all her conserved glory:
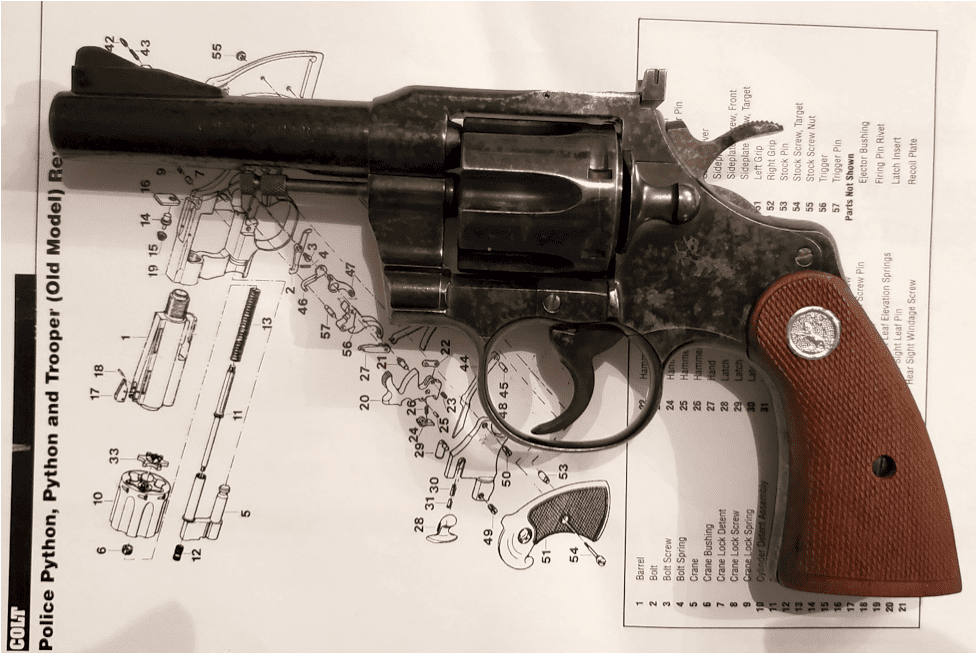
I was very happy to report to Jeff that the trigger on his double-action Colt Trooper .22LR Target Model is as slick and smooth as the day the revolver left Colt’s Hartford Connecticut factory in 1957, an absolute joy to pull. And not a speck of rust anywhere, inside or out.
As there’s nothing more to do for this conservation job, Jeff and his nieces and nephews (and their kids) will all be enjoying plinking tin cans with it at their Labor Day Weekend family gathering.
One final word of caution is needed: DO NOT USE your regular kitchen cookware for this chemistry experiment! Aside from the actually intended chemical reaction, there’s also a whole bunch of additional grease, oil, grime, and who-knows-what-else that will be lifted out of all of the tiny hidden and not-so-hidden spaces in the gun parts. They too will react with each other, and maybe with the iron and the water itself, too.
Here’s what a brand new aluminum stock pot looks like after making a batch of gunbo:

That new brown stuff isn’t coming off – ever. The regular cooks in your kitchen will NOT approve if you’ve done this to the beautiful Calphalon or All-Clad stock pot.
The place will stink like a refinery for a while, too, so you might want to cook this gunbo in the garage (with the garage door open) or even outside, with an outdoor propane burner patio stove or range, so that when the actual edible gumbo is made, you’ll be allowed back into the house to eat some of it.


Stink though it may, still a labor of love.
Still looks better than most of my own cooking.
I was very interested to see this. Who hasn’t seen an old rusty gun and thought “What if?”. I also am really tired of the endless political articles and comments.
I enjoyed both the quality and the content of this particular article. Well written Peter!
I cannot stress not using gasoline enough here. I had a 14yo cousin. We all rode old beater dirt bikes. When the winter was on he decided to take his Honda engine apart for some much needed work. In the garage he was cleaning the motor parts in a turkey basting pan full of gas. The hot water tank was in the garage with a gas pilot light. The explosion ruined the garage and it would have been merciful if he had died in the blast.
He lasted 2 weeks in an intensive care burn unit before he died. His mother aged 20 years in that 2 weeks and she was never the same afterwards.
Do not ever use gas as a solvent or cleaner. Ever.
+1
Sorry to hear about your cousin. A couple of decades ago, I woke up in the middle of the night to the distinct odor of gasoline fumes inside my house. I traced it to the garage, where the previous day’s motorcycle ride resulted in a small nick in the fuel line, causing the entire contents of the tank to drip out onto the concrete floor. The water heater was right there next to the bike – the pilot light easily visible – and I scrambled to open the garage door and roll the bike outside. The fumes may or may not have been thick enough to ignite (though enough to cause a headache), but I learned to respect gasoline a few years earlier when I accidentally poured a few ounces into a small enclosed area near an open flame. Liquid gasoline burns…vapors explode. Bigly.
And that is how FAE bombs work.
As I understand it, the pilot lights on modern gas hot-water heaters are supposed to be “explosion-proof” ( encased in a screen of some type?)
Kinda like how 151-proof rum has a perforated metal disc on the neck of the bottle.
Still, if your A/C air handler was also in the garage, the spark of the motor kicking on could have gone *boom*…
My cousin died 50+ years ago. Those old pilot lights looked like bunsen burners.
athens, ohio road trip. starting a wet campfire in lake vesuvio state park. a little gas from the petcock should speed things up. close the valve, walk the tank at least thirty feet away. when we lit the fire you could clearly see the flame trail walk right up to where my fellow traveler was standing, holding the gs1150 tank. a very tense moment; it stopped at his feet. everyone there still remembers.
It still looks terrible.
Soda blast or Co2 blast it, vibratory polish it, or Naval jelly it. Then refinish it.
And this is only AFTER seeing if the bore I worth the trouble. If not, flat black rattle can.
As I said at the outset, this was conservation, not restoration. I was not, and am not, interested in turning back the clock to make the gun look new. I was interested only in removing and stopping the rot, which this procedure did quite well. The gun is what it is, a beautiful old revolver, and is also what it has become, an abused gun, but that’s not my fault. The barrel and each of the six cylinder bores were stuffed with the most disgusting old grease of some kind — but not a speck of rust anywhere in them. Mirror-bright after the process.
oooo k…. so that’s like removing rust from a vehicle and just leaving it alone after the removal. Not that hard to finish the job. Actually it’s the easiest part lol, half the work is done already.
Actually, it is not so simple to do what would be needed for restoration. The surface is lightly pitted in many places. Fortunately, Colt’s 1950’s bluing was deep enough so that the bluing appears lighter, but not entirely absent, in the pitted areas. No rust bluing or any other bluing is going to un-pit the surface — it will just darken the pits some. Re-polishing means removing MORE metal to get to the lowest level of every pit. I’m not doing that either. Nope, this is as far as this gun will go. Believe me, it is nicer in hand than in the photos — and plenty nice enough to shoot.
I had one of the newer Colt Trooper Mark III .357’s back in the 70’s. It simply did not have as smooth an action as a S&W. My opinion only.
I’m no expert or even a Colt collector but I do know that there’s very little in common between the MK III revolver action and the pre-MK III action. The whole point of the MK III was to eliminate the hand-fitting and intricacies of the the revolver action that had been used for 60 years, and was simply too expensive to mass produce by the mid-late 1960s in a gun that would be competitively priced. Many of the MK III parts were no longer machined or forged but were, instead, made by a “sintering” process. At least that’s what I’ve read on coltfever.com.
Yeah. The newer guns, late 60’s to early 70’s, just were not up to the fit and finish of the older guns. I had a 1903 Colt and a Dick’s special that were both older. Much different guns in terms of visual quality.
Apple cider vinegar? Dump it in a bucket and come back tomorrow.
Be aware that chemicals that go after rust will also remove bluing. If there is no desire to maintain any residual bluing, oxalic acid, still available in some radiator cleaners will remove all oxides on steel.
Of course there are chemical treatments to remove rust. Nearly all are acid-based, and they will remove not only ferrous oxide (red rust) but the bluing as well — which is also an oxide or “rust” if you will, but merely a desirable and beautiful kind. AND it will also etch the steel if you are not careful. I had no interest or desire to refinish, re-blue, etc. the old wheel gun, so acid baths were not even on the list of possible courses of action.
Huh, I had no idea that you could boil a steel part for a couple hours and then remove the rust residue so easily. I will probably be putting this into practice in the next year or two.
Next time use odorless mineral spirits and boil it in a stainless pot. Clean the pot with the 3M red scrubber pads (grit bonded to the plastic wool) I have done a similar cleanup on an ancient Iver Johnson break-action 32 revolver. Rather than steel wool, I used hard plastic spackling tools.
Do you mean to boil in mineral spirits?
Are you saying that plastic tools scraped off the rust residue after boiling without need to go to steel wool?
Thanks
Do it outdoors only…
No. I would NOT recommend boiling Mineral Spirits any more than I would boil kerosene. The liquid and vapors are flammable, and it says so in big warning text on the jug label. Yes, even on “Odorless Mineral Spirits” which is mostly what you’ll find in the stores, is flammable; it just has somewhat lower fumes. Even the new “Klean-Strip Green Odorless Mineral Sprits” which is not labeled as flammable liquid says to store it below 120 F, presummably to limit generation of fumes.
By the way, there’s also mention in this article and comments about using acetone for cleaning. The acetone can label says “EXTREMELY FLAMMABLE.” There have been ladies badly burned who were smoking while cleaning their nails with nail polish remover, which is just acetone by a different name.
As has been said here, don’t use flammable stuff anywhere near a gas water heater. Even newer heaters with a flame arrestor system are no guarantee of preventing an explosion. Only use flammable liquids away from any ignition source. If your water heater is in the garage, obviously open the door and use a window fan when using any flammable liquids. I’m another person who knows someone who badly burned using flammable liquid (lighter fluid) stupidly. Basically could no longer work at his good construction job any more because of the extensive burn scars.
Great story. Beautiful looking firearm.
Used to be that all good guns were rust blued. Think Lugers and double guns. This is kind of the trailer park version of that, not that either are necessarily terrible. Easy and serve a purpose.
I restored a 100+ year old Model 94 lever rifle that way. Used fine soda blasting to gently remove everything down to the bare metal (which was in remarkably good condition), then performed old school rust bluing. Total of seven cycles to reach that deep bluish-black color. Took almost two weeks to properly move through the process, but worth it.
BTW, Dan, little gems like this article are welcome any time.
Got pics of the process?
Write it up and submit it…
Took photos of the entire process, start to finish.
You know, mebbe I *will* write something up. Don’t know if Dan would be interested, but wouldn’t hurt to at least submit it.
Thx for the push, Geoff.
Be careful when restoring Winchester 94’s that are post-64. The receivers don’t blue the same way as the pre-64’s.
Du-lite had/has an article on the post-64 reblueing issue on their web site somewhere.
Loved this. Learned much!.
I have to go back about 45 years now. My “rescue revolver” was my grandfather’s .32 H&R “belly gun.” When I retrieved it from a dresser drawer in my aunt’s basement, it was way more rusted than not. I was a 20-something rank amateur, with no gunsmithing experience. In those days, there was no Google and no articles like this, just the public library. My primitive research led me to needed tools and substances. No blow-up diagrams, no detailed instructions: the test was pass/fail. I first totally disassembled down to the smallest screw. I then immersed everything in naval jelly (marvelous stuff) for a few days. Tedious steel wool therapy next, followed by seat-of-the-pants rebluing. Then lubing, reassembly and final lubing. I bought some non-jacketed ball rounds, crossed my fingers and fired a few cylinders-worth. Not a hitch or a hiccup. Perfect performance all around. A few years later, I depended on this little gun for personal protection while tending bar and closing up in the wee small hours. Just showing it got me out of one dicey situation. Now over a century old, the gun is long-since retired to my safe, but kept in working order. Not that I intend to fire it ever again. But then, Grandpa used to carry it on his sales road trips. And I do have about eight rounds left.
I don’t think those old H&R revolvers get the respect they deserved. They weren’t Colt or S&W but they worked.
I once did a similar restoration using the electrolysis method to remove the rust. A bucket of water, sodium carbonate, and a battery charger. After half a day of treatment, the rust simply sloughed right off without any need for steel wool.
Other projects were best performed via soda blasting. All depends on the surface impurities and the underlying metal.
Another method which is more aggressive, and quicker, is to use phosphoric acid. It will convert rust to something you can get off of steel very quickly.
Phos acid is Parkerizing, isn’t it?
Parkerizing is done with phosphate solutions – either zinc or manganese phosphates.
Zinc phosphate is the lighter grey of the two finishes.
OK, so let’s talk about parkerizing. Parkerizing has two advantages over blueing (any type of blueing)
1. It is exceedingly fast – because it needs less surface finish than blueing (needs less finish – parkerizing needs a coarser finish, like no better than a 240 grit polishing paper – if you want to polish with paper, you could stop at 180-ish paper and then bead-blast the rest of the finish). If you polish the metal to a high level of finish (like a nice rifle, never mind a Python-level of finish), you’ll have a difficult time getting a good parkerized finish because it won’t be deep enough.
The second reason it’s fast is that the process is so easy, anyone can get good results. You’ll need a suitable tank, and enough solution to cover the park(s) you want to parkerized. Then you’ll need You plug the bore of any barrel or polished interior, you de-grease the surfaces to be parkerized, and then you put them into the parkerizing tank. You’ll get a stream of fine, champaign-like bubbles off the metal until the surface of the metal is fully reacted with the solution.
2. Because it has a roughed-up surface when complete, parkerized surfaces take in and hold quite a bit of oil or anti-corrosion fluids. Just oil is good enough. So a good way to keep a parkerized firearm from corroding is to just put some oil on it and wipe it down to remove the excess. You can wipe oil on a blued firearm, but only a very fine film will remain. A parkerized surface will retain a lot more oil that isn’t easily wiped off.
VERY good, BUT….iron oxide finishes MUST be oiled frequently or your steel will rust*.
I know this from my time as a professional mechanic and tool business owner. Impact sockets are traditionally made with an iron oxide (black) finish because:
a) Chrome chips under repeated impacts and can fly into your eyes
b) Tools get oily from your fingers and the auto parts they touch, and they get slippery, but the iron oxide has a bit of a sandpaper-like, nonslip quality.
However, if you don’t keep them re-oiled frequently, they rust. I stored some tools in a storage locker near a saltwater bay, and the salt air rusted them badly. I also had a small flood in a basement while I was away for a few months, and my iron oxide-coated sockets…which were above the water, but in humid air… rusted there as well, even though I was 400 miles from saltwater.
If you are unfortunate to experience this rusting of your impact tools, you can use this excellent TTAG article to remove it, but I’d be disinclined to blue them. They’ll be slippery in the real world of auto repair, and iron oxide -coated tools won’t.
Use a technique to convert the red rust to black rust…which is iron oxide…with electrolysis. There are bazillions of tutorials on the net to choose from.
* For times when you don’t get your iron oxide-coated items oily on a regular basis, I personally like to get two sheets of newspaper or butcher paper, spray them lightly with oil, put the iron oxide-coated items on top of one, then lay the second on top of them. It’s less work and works great for rust prevention, especially for long-term storage.
Noice! This is some very handy information.
I have an old .22 revolver which isn’t worth much but fun to shoot. It had rust in spots and the blue was spotty.
I sanded the rust off smooth and reblued it. Came out really nice and I don’t care if it’s deemed unoriginal or not. It was a good practice for the processes.
The boiling of red rust into black rust is exactly what is going on in “rust blueing” on fine firearms.
There is a hierarchy of blueing techniques in the gun world, and rust blueing is at the top of the hierarchy. Cold blueing is at the bottom, BTW, for those who would ask.
First, understand that the finish in a blueing job is the result of the polishing job, not the blueing. The particular color of the blueing might be the result of the way oxidation of the steel is accomplished, but the luster and shine on the metal is the result of the polishing job.
If you look around on Brownells (and some other sites that serve gunsmiths), you can find rust blueing solutions for nice/fine firearms. These work roughly like this:
– you construct a sweat cabinet, a closed box into which you can put gun parts
– you put a pan with some water into it
– you put a 60W light bulb under the water pan.
OK, now you have your sweat box.
Now, you take your gun to be blued, and you polish it out, then clean all the oils off of it. This requires using something that will strip the oil. Acetone works as a first pass, but a dunk in a hot water tank with some washing soda really helps here. Another product you can get through Brownells is “Dicro-clean 909” which is slightly caustic. Another vendor to seek out if you’re interested in blueing is Caswell Plating.
Come out of the caustic tank, and now you can handle the steel parts only if you’re wearing clean cotton gloves. You’d coat the parts as evenly as possible with the acidic solution, and then hang them in the sweat box for 12 to 24 hours, depending on how aggressive your solution is. A fine layer of red rust forms.
Then you pull the parts out of the sweat box, you boil them (and I prefer distilled water – always – for my boil-out tank; always take away variables that can screw you up when you can) to turn the red rust to black, then you card off the fine ‘fuzz’ rust with 0000 steel wool (which you also have to de-grease/de-oil with acetone and caustic) or a carding wheel.
Re-coat with acidic solution, put back into the sweat box, and leave it there again. Repeat a dozen times, and you will have one of the most durable blueing jobs you’ve ever had.
Rust blueing is time consuming, labor-intensive, and therefore slow. It takes days to really blue a firearm well. But it works well, it is much safer than hot salt blueing, and it is done on some of the guns that have five-figure price tags. It used to be done on Winchester guns before WWII.
But because it slow and labor-intensive, the hot caustic salts method became much more common. A couple men who know what they’re doing can push a literal small truckload of guns through a well-equipped hot salt process setup in a day, and they’ll look OK when they’re done. I’ll insert my standard warning here about hot salt blueing. It is not to be done by amateurs and dilettantes. The hot blueing salts can cause serious burns, and if gotten into the eye(s), can cause loss of sight in literally only seconds.
Thank you for the hundredth time, D.G. You’re almost the only reason for anyone who does have a real job to ever read anything on this website anymore, the good work by some other contributors on some articles notwithstanding.
Yep, this is the way I do my rust bluing, though I “sweat” the part by actually boiling the water in the enclosed cabinet instead of merely using a light bulb. And a proper carding wheel is the only way to go, IMHO.
Polishing takes skill and patience, but after several cycles the color comes out nicely, and once you apply the oil rubdown to lock in the finish, the dark sheen really pops. Again, it takes time and patience, but the satisfaction of a job well done is worth it.
search – GROBET FILE CO. OF AMERICA INC – 4 row carding wheel. Brownells had them in the past. attach to a drill press and you will save much time and effort in removing the coverted rust and do a much better job than with #0000 wool (IMO)