
 Ralph and I are big fans of the 7.62x54R caliber Mosin-Nagant as a budget-priced purveyor of high-velocity lead. If you were lucky enough to find an unissued M44 carbine for a measly sixty-five bucks a few years ago, or if you picked up an arsenal-refinished 91/30 at Big 5 Goods last month, then you already know what we’re talking about.
And you already know the Mosin-Nagant’s Achilles’ Heel: many of them are cursed with heavy, gritty trigger pulls.
First, a quick safety disclaimer: Most trigger work is best left to the professionals, because the trigger and sear on your rifle are the only things preventing it from going boom the instant you close the bolt on a live round. Remington Model 700 owners should think extra long and hard before modifying their rifle’s on-off switches if they want to avoid unintentional discharges.
Fortunately, the simple (many would say ‘crude’) design of the Mosin-Nagant trigger allows the aspiring Bubba Gunsmith to smooth out and lighten the trigger pull without altering the sear engagement or trigger spring stiffness at all.
Step One: safety check
Open the bolt, make sure the gun isn’t loaded, and hold the trigger while you pull the bolt back out of the receiver.
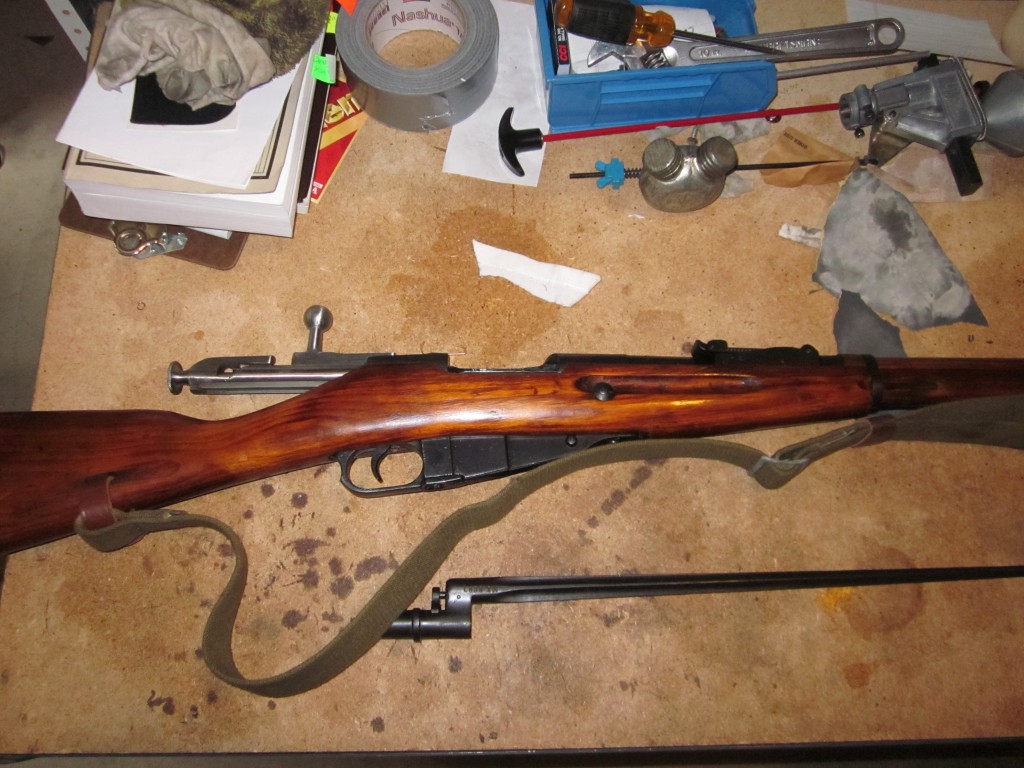
Step Two: remove the stock
Take off the front ‘Dog Collar’ sling and remove the cleaning rod. Then push the front and rear stock retaining bands forward until they’re hanging around the front sight post, and remove the upper handguard. The upper handguard is a slender piece of well-aged stock wood, and it’s the only part of a Mosin-Nagant that anyone could call ‘fragile.’
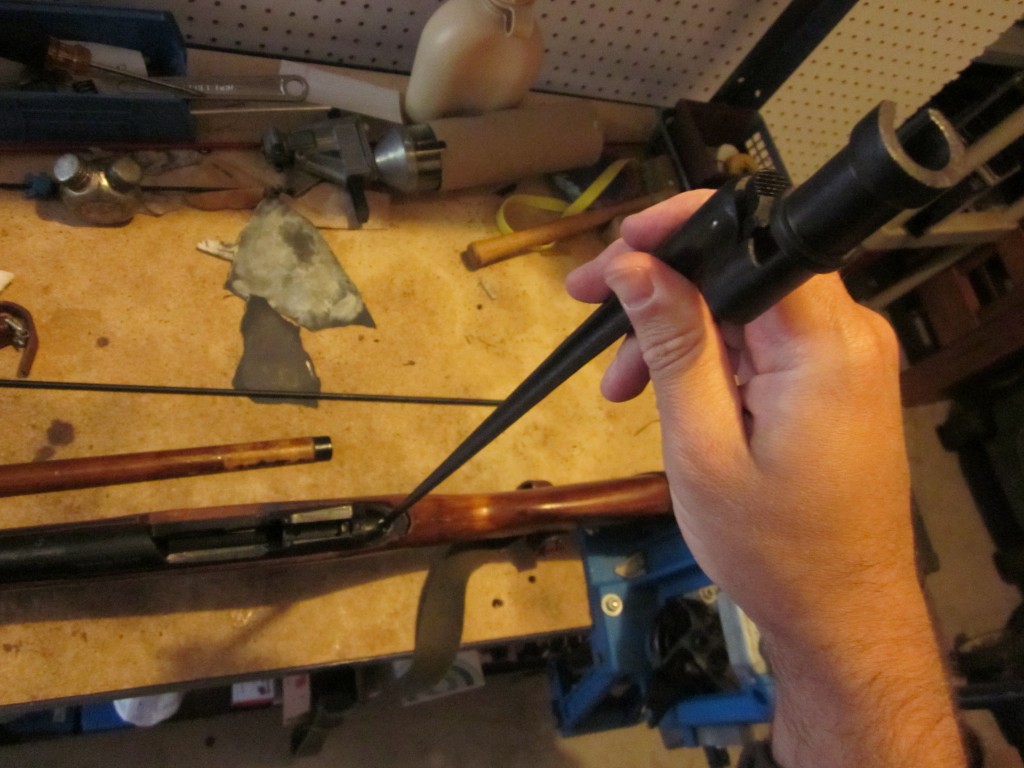 Now remove the two stock screws. If they’re not rusted in place or over-torqued, you can use the handy included spike bayonet as a ‘Soviet Screwdriver,’ but a properly-fitting gunsmith screwdriver will always work better. (When reassembling, remember that the shorter screw goes up front and the longer one goes in back.)
Step Three: remove the sear and trigger
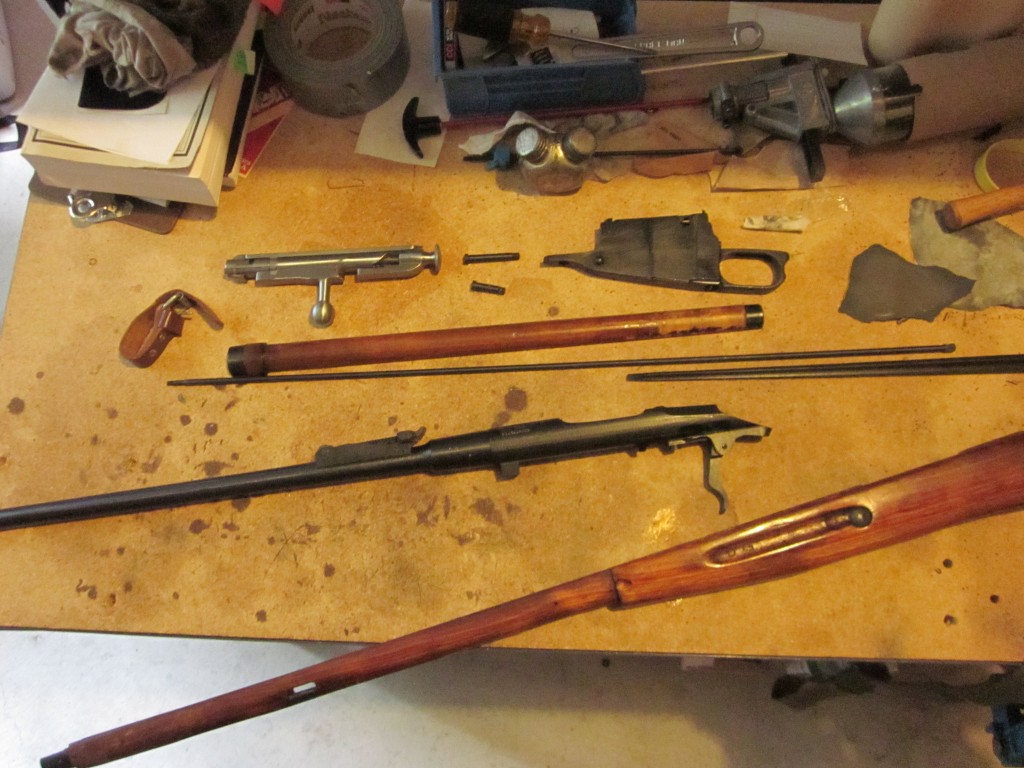
Your workbench should look more or less like this now:
 Set aside the stock and study the trigger/sear assembly at the rear of the receiver. If you’ve never removed the sear screw before, it will probably be extremely tight. If it is, this is a good time to apply a few drops of Liquid Wrench, wait several minutes, and give the sear screw a few thumps with a brass or polymer hammer.
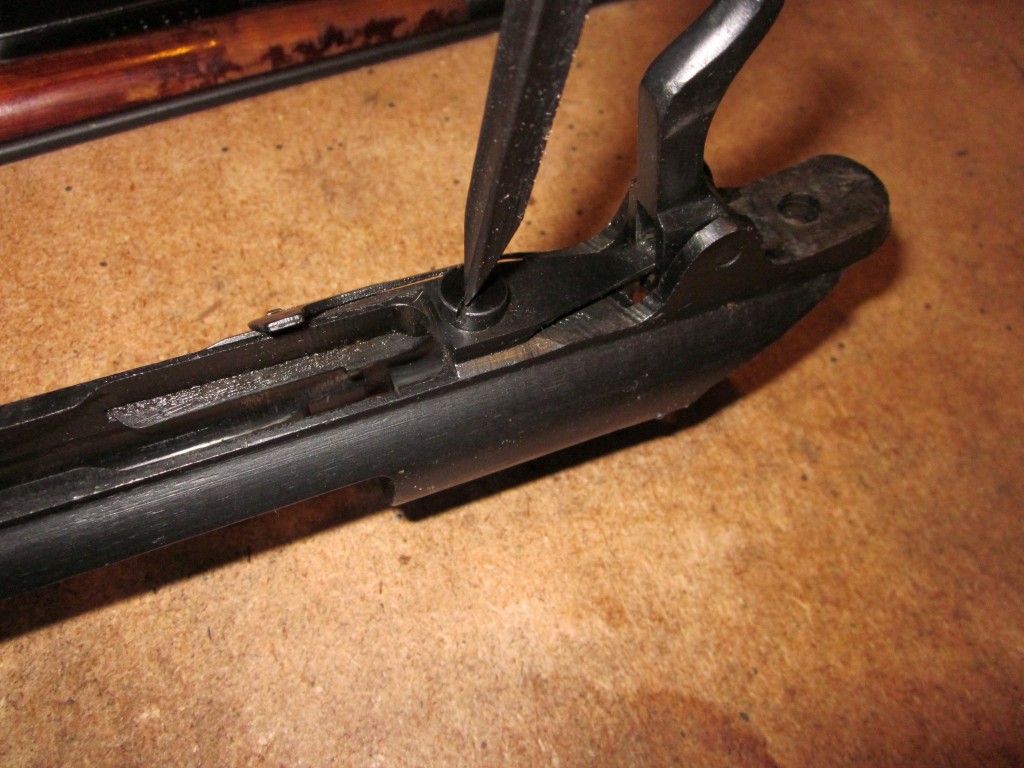 Turn the barreled action on its back, and use a properly-fitting gunsmith’s screwdriver to remove the sear screw. Clean it and degrease it, because it’s going to need a spot of blue Loctite during reassembly.
Now use a punch, pencil, or the corner of your fingernail to push out the trigger pin. They usually have loose tolerances and push out very easily.
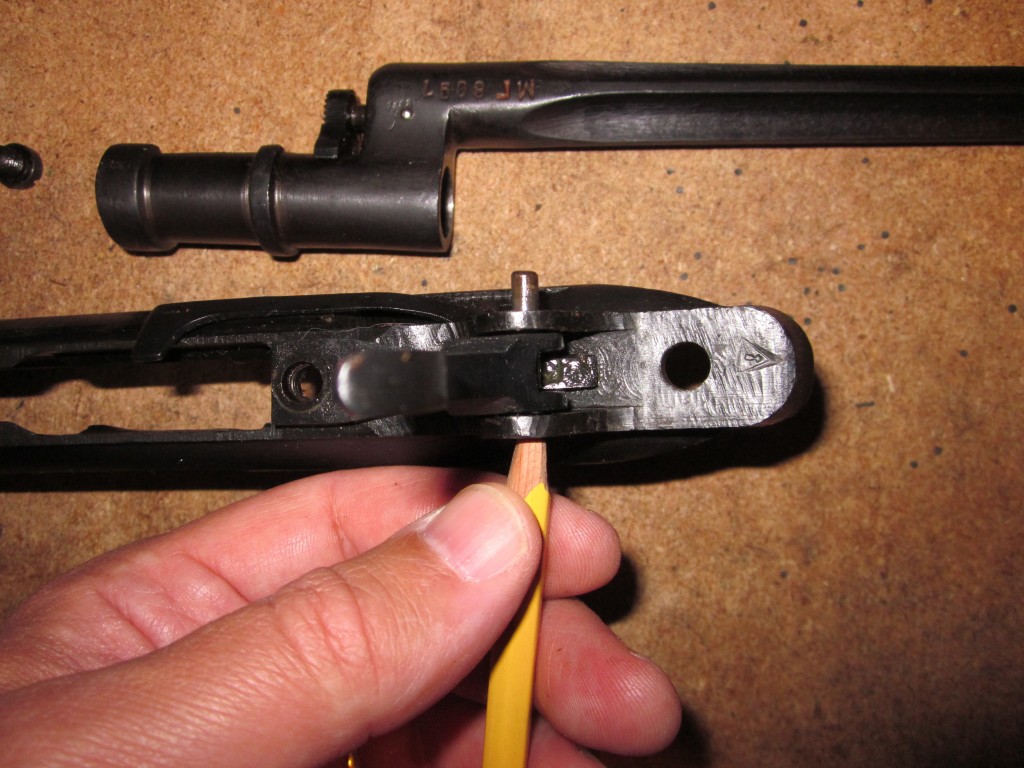
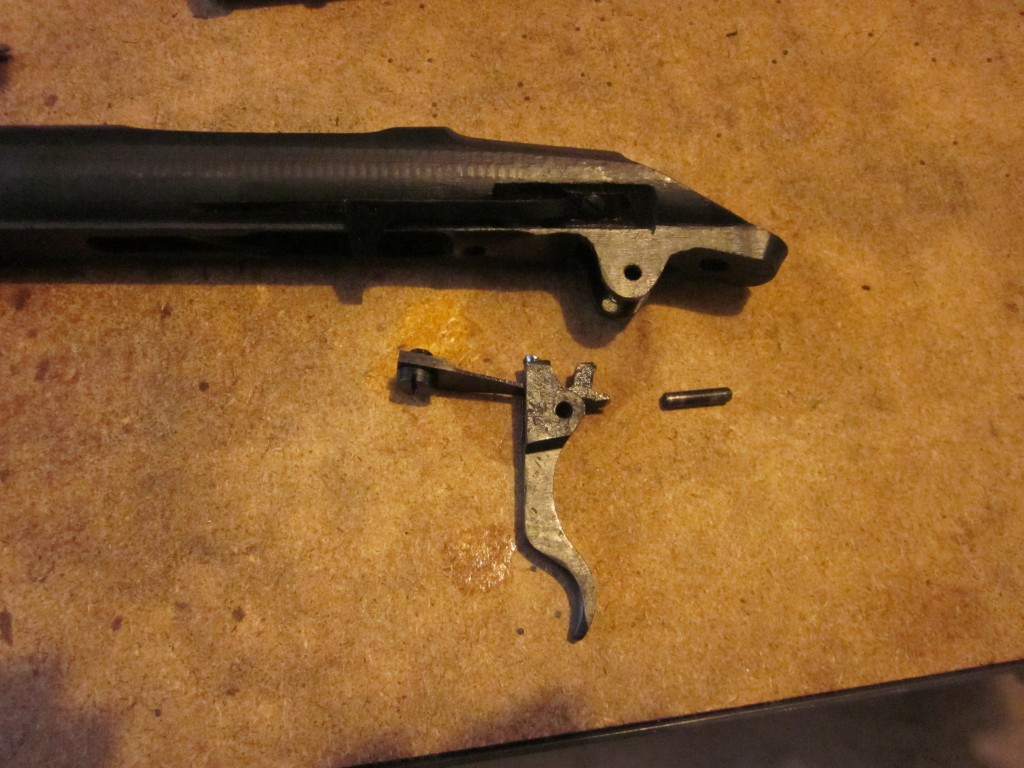
This will allow you to completely remove the sear/spring and the trigger. Once they’re out it will look like this:
Step Four: polish the top and sides of the sear/spring
Notice how the sear/spring passes through the top of the trigger? When you pull the trigger it hinges on the trigger pin and the bottom of the trigger ‘box’ rubs against the top of the sear/spring. This pulls the sear downward and the sear ‘hook’ (the squared-off part at the back of the sear/spring) allows the firing pin to fly forward inside the bolt.
The top and sides of the sear spring (not the sear ‘hook’) are the ONLY sear surfaces you’re going to polish.
Using very fine sandpaper or emery cloth (600 grit or finer), polish the upper surface of the sear spring as shown here:
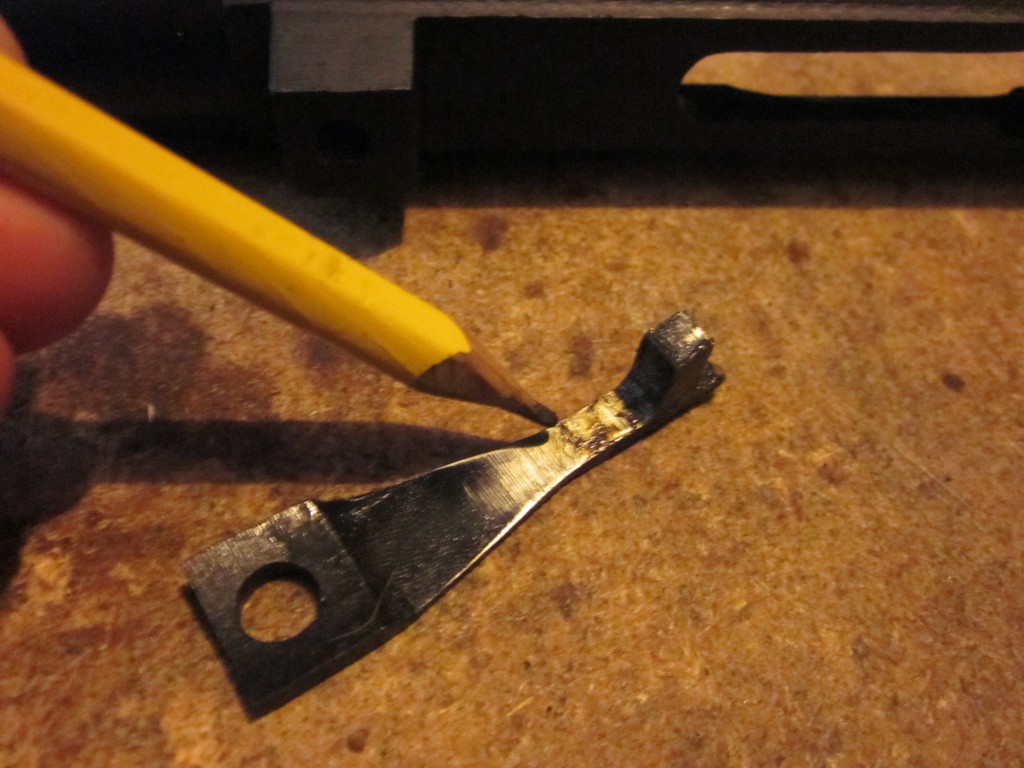 Those sideways machine marks are the main reason that Mosin-Nagants have such gritty trigger pulls. They are the enemy and they must be eliminated, but don’t be tempted to use a grinding wheel or Dremel tool. A single slip with a power tool can grind away too much metal and weaken the spring, or the rapid abrasion can overheat the metal and ruin the temper. Either mistake can leave you with an unsafe weapon, so just use fine sandpaper and your fingers and go slowly until it’s nice and smooth.
You can tell from this picture that I didn’t go for a ‘mirror finish’ on my Mosin’s sear spring, but the rifle now has a very satisfactory trigger pull.
The sides of the sear/spring also rub against the inside of the trigger ‘box’, so polish them too if they’re rough.
Step Five: polish the inside top of the trigger ‘box’
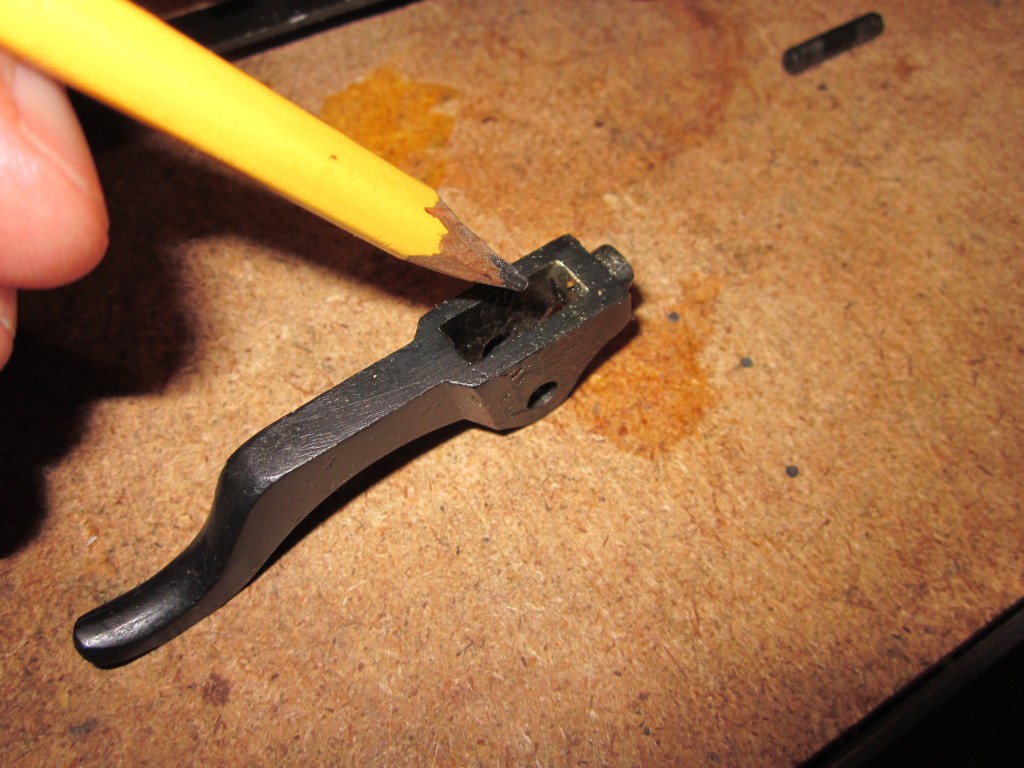 This is where we need to polish your Mosin’s trigger. Mount the trigger in a padded vise and polish this interior surface by pulling a thin strip of fine sandpaper back and forth across it for a few minutes. You can also de-burr the outer sides of the trigger ‘box’ if they’re visibly rough.
Step Six: polish, reassemble, test, repeat
While you polish the sear spring and trigger box, occasionally stop to reassemble the sear and trigger. Don’t tighten the sear screw too hard, just screw it all the way in and slip the action back into the stock. Replace the bolt and dry-fire it a few times to test how smooth the trigger is getting. If it still needs more work, disassemble it and polish it more until it feels acceptable.
Don’t mess with the bolt or the sear hook
Unless you’re a gunsmith, I don’t recommend doing anything to the bolt other than disassembling it and cleaning it thoroughly. (Check YouTube for tutorials on bolt disassembly and reassembly.) Trying to polish or reshape the bolt’s hammer notch won’t help the trigger pull much, and it’s more likely to lead to an unsafe rifle. Same goes for the sear hook.
Reassembly:
Carefully clean the trigger and sear so that no traces of abrasive remain, and then smudge them with some high-temperature grease before fitting them together and replacing the trigger pin. Put a drop of blue Loctite (not the permanent red stuff) on the degreased sear screw and screw it down tight. You don’t want it backing out during firing, because that would lead to unintentional discharges when the sear hook simply falls away from the hammer notch.
Replace the stock, sling and cleaning rod, and let the Loctite cure for a few hours before shooting it. Be extra-cautious when you test-fire it the first time, and stop firing if the trigger pull starts to feel too light; it might mean that your sear screw is backing out. I’ve never had this happen with my own Mosin trigger projects, but it’s a dangerous condition if it happens.
Here’s a recap video:
I don’t pretend to have invented this method myself. I watched a lot of YouTube videos and studied the parts of my two Mosins for hours before I dove into the project, and the results on my two Mosins have been excellent.
It dramatically improved the shootability of my 91/30, an arsenaled 1943 Izhvesk. It came to me with a completely hideous trigger pull, and it now breaks at a hair over 5 pounds, with a long takeup and only a little grittiness. My 1946 M44 came from the factory with a remarkably decent trigger (for a Mosin-Nagant) and this Bubba Gunsmith trigger job made it even better. It now pulls perfectly smoothly and breaks at exactly 4 pounds. Except for the takeup and overtravel, it feels almost like a good (but not great) commercial trigger.
If you’ve got a Mosin with a balky trigger, this no-cost and low-risk trigger job might persuade you to take it shooting more often. And remember, every time someone takes an old mil-surp rifle shooting, an angel gets its wings.


My most recent Mosin-Nagant was purchased last year at the “Black Friday” sale at one of the big box sports stores, and was one of millions with bayonet, cleaning kit, tool kit, sling, oiler and ammo pouches. It was packed in stiff grease, so some cheap Walmart engine degreaser followed up with a slathering of WD-40 left it sparkling clean ( a job done out doors for obvious health and safety reasons).
A sealed ham can of cheap military Russian 7.62-54R (corrosive) purchased online provided the fodder.
Everything works great, and with a healthy coating of some Teflon (SuperLube), the trigger was manageable without any refinishing. My only issue is that the bayonet does not fully lock in place (as if I will ever really need it). No amount of cleaning and lube will allow it to fully lock in place, so some minor grinding of the bayonet socket may be necessary.
Recoil was about the same as my 03-A3, and at 50 and 100 yards with the cheap Russky military ball, I was able to get acceptable groups (keeping all shots in the black).
At a local gun show, someone always has a rack of Century Arms Mosin-Nagants, that come in a box, with all of the accoutrements for between $80 – $110, depending on date, and condition. He always has a few that are $20 off because the came out to the box with a broken stock. These all had the same problem, the toe of the butt stock (made out of 2 pieces of wood!) came apart right at the seam, as if they became unglued.
Maybe at the next gun show I will buy one with a broken stock, as I have seen some inexpensive sporter stocks for the Mosin-Nagant, as well as an inexpensive scope mount, and some other enhancements.
Many of the bayonets don’t fit on the rifles until you lap the inside of the bayonet socket with some medium-grit sandpaper wrapped around a 20-gauge cleaning brush and mounted in a variable-speed drill. They’ll fit just fine after that.
And I saw some shooter’s catalog trying to sell Mosin socket bayonets for $80 each earlier this year; they might have sold a few of them if they threw in the rifle for free!
Ekssssselentttt!!!!
Chris, my man, you didn’t let me down! I performed the same trigger refinement on a 91/30 last year with great success. I also shimmed another trigger with a piece of cut-up aluminum can because the emery cloth treatment didn’t do enough. Neither is ever going to be an Accu-trigger, but at least I know now that when a make a crappy shot it isn’t the trigger’s fault. As you stressed to aspiring Bubbas and Bubbettes, slow and steady is the way to go. We can always take off more; we can’t add back.
I’m finishing up an article on the 91/30 sight and stock fix-me-ups that should be ready next week. Man, I love these old Russian rifles!
I’m a little cautious about recommending the sear shim, because it’s not hard to overdo it and make the sear way too sensitive. On the other hand, that problem is easy to test for and easy to fix.
Thanks a ton….getting to it now
MN 91/30 bayonets often need the gentle “help” of a rubber mallet or a block of wood being hit with a hammer.
As it was intended for the bayonet to be permanently attached it was seen as a good thing tolerances are extremely tight. The rifle is even set up with sights to include the bayonet attached and the change in impact point that this brings. Your rifle is quite normal with the tight bayonet.
Well, lets see. I’ve got 12 Mosin Nagants sitting in my gun safe (8ea 91/30s and 4ea M-44s) … Now all I need to do is find a friend who knows how to polish the triggers on those beasts …. Hmmm… who do I know that possesses the skills necessary for this delicate task?
The proof of the pudding is in the eating, and the proof of the ‘smithing is in the groups. Not to be an internet pedant, but do you have before and after groups to prove that the work was worth the effort?
@TTACer:
Its not only about group size; there are aesthetic, ergonomic and haptic intangibles which can improve a gun without necessarily making it more accurate. I don’t have before-and-after group sizes, but I do have two guns with much better triggers.
Some Mosins might not gain much accuracy from this, if their bores have been corroded or shot out, but they’ll still be more enjoyable to shoot. A Mosin with a good barrel will be more enjoyable *and* slightly more accurate.
If you do a Bubba Gunsmith trigger job and it’s still inaccurate, you’ll probably have an easier time selling it if the trigger feels nice and you’ll probably get a few bucks more for it.
Thanx, informative post. IMO trigger jobs do not improve the accuracy of the rifle, but work wonders for the accuracy of the shooter. So before and after groups would be subjective, to say the least.
I’ve done the shim trick, as well as polishing the trigger surfaces, on one of my Mosins. Safe if you take your time, and check your work before taking to the range. I checked mine (unloaded of course) by banging the buttstock against the floor 100+ times to make sure it wouldn’t spontaneously trigger.
I have been working this week on evaluating Mosin Nagant trigger.
I have taken data on trigger of a matrix of 4 original trigger, 4 sears, and 5 cocking pieces.
That ranges from 3 pounds to 12 pounds on my Wagner force gauge.
I have also measured the effect of adjusting a Huber or Timney trigger or adding washers or layers of tape with those components.
Aside from the Timney, the original parts seem to be the driver, so I am no going to measure the effect of polishing the sear, cocking piece, and trigger.
Instead of polishing with sand paper, you may achieve the same result if not better by using lapping compound on the areas of the trigger assembly that cause friction. Apply, reassemble, and work the trigger a dozen times or so and check progress. This technique will limit the wear only to the problem areas and reduce the risk of over polishing or polishing areas that are not needed.
I have completed my study.
Polishing does no measurable good.
The answer is to bend the sear or buy a Timney.
Polishing is a waste of time.
Huber is a waste of money.
“Polishing does no measurable good” followed quickly by “Polishing is a waste of time.”
The problem here is that you don’t inherently understand the point of polishing, otherwise you’d know that it doesn’t affect trigger weight. The point is to smooth out machining marks so that when you are pulling it’s more even without any grittiness.
If you’re going to spend time making a video, make sure you understand what you’re talking about.
When the trigger force is way too high due to a manufacturing error and the goal is to get it down by a factor of 3, polishing is a waste of time.
I’ve got seven Mosin Nagant’s, both model 38’s and 44’s. I’ve restored six over the years (stock and bluing touchup) but never did any significant shooting. I decided to restore the last one (an M44) and shoot it. I studied the trigger info to see if I could apply any of it to this Mosin. When I checked the backround of the arm I found out that it is a Polish M44. The internal finish is leaps beyond the Russian’s. The trigger components are smooth and polished, no machine marks. The trigger feels smooth. I think that I picked the right one to clean-up and shoot…
The firing pin spring is also very stiff, and is compressed a quite alot. Getting a lighter spring, or cutting the original will also give a lighter trigger pull. Im guessing the original is made to be able to force through anything to get to the primer, or maybe the primers needed alot of force to ignite in 1900s. I have cut mine down so 1/2 inch of it is showing from the bolt before screwing the firing pin back in place. I have fired many hundreds of rounds through it with no miss fires with surplus ammo and new stuff. Just make shur you dont cut to much or bend it while cutting it.
My Mosin shoots well but I notice that when I start to squeeze the trigger, I can see the rear of the bolt carrier drop. Once it goes as far as it can, more pull will actually fire the rifle. If I stick a dime or something under the very end of the bolt carrier to prevent it from dropping, the rifle fires way more smoothly and with a whole lot less pull. I assume this means that the milling or the bolt carrier has way too much clearance. Was thinking of sputtering or adding a little metal to the very end of the receiver and smoothing that down until the bolt carrier fits and has the proper clearance.
Thoughts?
Thx
Mine does the same thing. Let me know if that smooths it out.
Where do I purchase a “trigger pin” I was cleaning my Mosin Nagant and it fell out. I can not find it, do any of you gents have any suggestions?
https://www.buymilsurp.com/trigger-pin-mosin-nagant-rifles-p-6.html
This approach worked really well for me, but with one variation. Rather than sandpaper, I used 000 steel wool. Vastly smoother trigger pull.
+1 on the William Wallace comment. That trigger pin is very, very loose. Almost lost it more than once. Spares now on order.
Very good advice. I used a stereoscope to look inside the trigger box and I could see three sharp ridges right where the sear pin engages. Using a strip of 600 grit paper and gentle rubbing motion, I smoothed the ridges to a gentle curvature. A few drops of machine oil in the box and screwing the seer spring screw down to the stock did the trick. I tried the pull and it is already lighter than before. Doing the “bounce the rifle” trick on the concrete patio did not cause the firing pin to move forward. I guess we will find out how good the job was at the firing range with live Bulgarian surplus ammunition.
Stay tuned and thanks for the good advice.
I tested the trigger sanding job at the range. The pull is definitely ligher than before and the hits were grouped tighter. I still need to learn to keep my left hand steady while aiming, though. Practice, practice, practice.
Next on the modification list: the co-axial trigger spring to remove the trigger slack.
Many thanks to all the contributors for the good advice on the website.
Mine has lighter and smoother pull without the washer. Without the washer the second spring is almost pointless, but I put one in backwards from what he showed (to pull the slack backwards) and it works great. Smooth pull and no slack.
I just received in the mail Colt 22lr (made by Aguila) 500 brick and mosin trigger spring and washer, bent for the curve under sear screw. The spring, washer and install instructions for $2.95! All the slack is gone and trigger feels like 4 to 5 lbs. I found these at United Nations Ammo. I’m pretty sure that’s the name. If it is not I will repost. Check it out.
thanks you all the comments will help me!